Customer & Party


A party is an entity that can enter into business and can be of the type Organization or Person. A party exists separately from any business relationship that it enters in to with another party. Information about a party such as addresses and contacts can be shared with the customer accounts of the party. For example, Vision Distribution could be a party within your trading community.

A customer is an organization or person with whom you have a selling relationship. This selling relationship can result from the purchase of products and services or from the negotiation of terms and conditions that provide the basis for future purchases. For example, a division of Vision Distribution could become one of your customers.

A customer account represents the business relationship that a party can enter in to with another party. The account has information about the terms and conditions of doing business with the party. For example, you could open a commercial account for  purchases to be made by Vision Distribution for its internal use and a reseller account for purchases made by Vision Distribution for sales of your products to end–users .

  • You can create multiple customer accounts for a party to maintain information about categories of business activities. For example, to track invoices for different types of purchases, you can maintain an account for purchasing office supplies and another account for purchasing furniture.
  • You can also maintain multiple customer accounts for a customer that transacts business with more than one line of business in your organization. You maintain separate customer profiles, addresses, and contacts for each customer account.

A customer address is a party site used in the context of a customer account for billing, shipping, or other purposes.
Both Party and customer acount are OU independant where as customer address is OU Specific.

A party site is the location where a particular party is physically located. Every party has only one identifying address, but a party can have multiple party sites.


TCA Bascics
A relationship is defined by the characteristics or terms and conditions of that relationship.
The party model flows through the entire e-business suite. There is just one record to represent both prospect and customer. The entity itself is recorded, such as a person or an organization.
Before the customer terms are established that record represents a prospect and after the customer terms defined it’s a customer.

The party model contains a unique set of information about a person, organization, or relationship. The tables store information such as parties, address, and bank accounts.

You can interact with the party model through the following
1.    Customer forms: Online entry and query of party and customer account information.
2.    Party interface: Batch load of party information

      
Managing Customer


Account Receivables

Oracle Receivables is a full-function accounts receivable system that allows you to manage your customer base, invoice and payment processes effectively.

Oracle Receivables provides four integrated workbenches that you can use to perform most of your day–to–day Accounts Receivable operations. You can use the Receipts Workbench to perform most of your receipt–related tasks and the Transactions workbench to process your invoices, debit memos, credit memos, on–account credits, chargebacks, and adjustments. The Collections Workbench lets you review customer accounts and perform collection activities such as recording customer calls and printing dunning letters. The Bills Receivable Workbench lets you create, update, remit, and manage your bills receivable.

Companies sell their products either for cash (immediate payment in the form of a check, credit card, or notes and coins) or as invoiced sales on credit with specific payment terms. Invoiced sales create a receivable in the balance sheet (General Ledger), which represents the money due to the company. The financial health of a company depends on keeping track of its customers and ensuring prompt collection of the money owed.

1. Receivables produces three legal documents to notify customers of their obligations:
  •       An invoice is usually sent shortly after a sale has been made. It states the obligation and provides details.
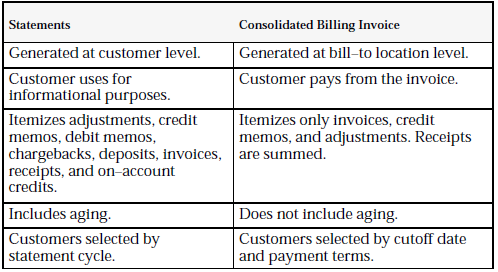
  •       A statement is a summary of the transactions over a period of time. It shows all open transactions. It may also show payments made within the period.
  •       A dunning notice informs the customer of past-due obligations.
Companies can choose not to use both statements and dunning notices. However, because they are legal documents, most companies retain the ability to produce all three document types in a paper format. In the interests of efficiency, however, many now send invoices by EDI, fax, or e-mail, and they may agree with established customers to rely exclusively on electronic documents.

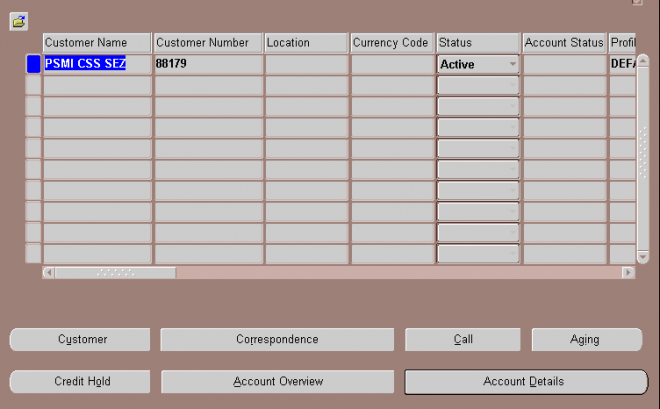
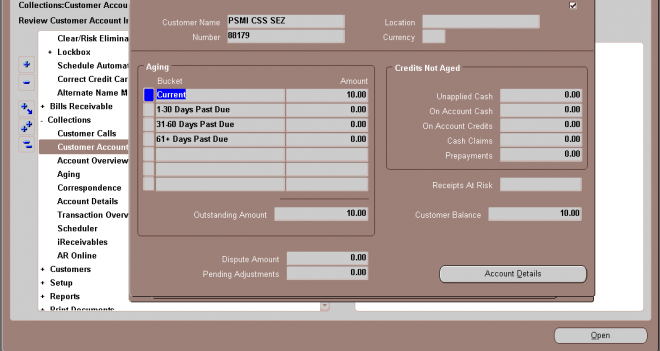
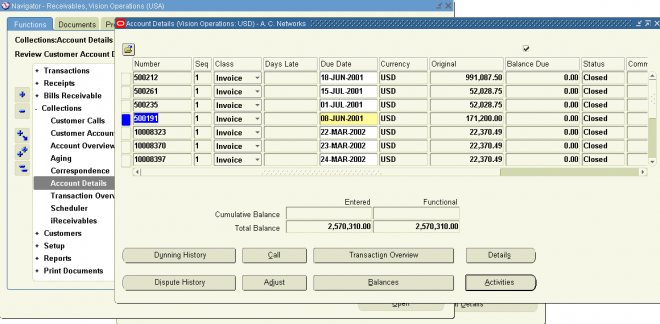
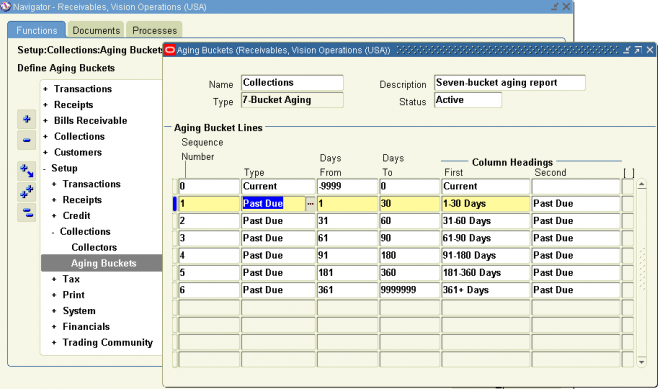
2. The customer can choose to pay the invoice in a variety of ways: by check or bank transfer, direct debit, or bill of exchange. When payment is received from the customer, you apply the cash to the customer account, reducing the amount owed and generating journals in GL. A partial payment will reduce the amount owed, but not to zero. The amount owed by each customer can be seen on the Aging Report and Account Detail screen.
1. Setups
2. Customer

3. Transaction
4. Receipt & Revenue Management
5. Bills Receivable

6. Collection
7. Accounting
8. TAX

9. Report/etc
iReceivables
Using iReceivables customers get immediate secure access to their account details over the Internet. They can print copies of invoices or credit memos, dispute bills they don't agree with, and review their current account balance. Access is available to anyone with a Web browser and the appropriate security details. All transactions accessible via iReceivables are protected by Oracle's standard application security as well as user authentication and the ability to define and limit user access

Permanent and Temporary Accounts

Asset, liability, and most owner/stockholder equity accounts are referred to as "permanent accounts" (or "real accounts"). Permanent accounts are not closed at the end of the accounting year; their balances are automatically carried forward to the next accounting year.

"Temporary accounts" (or "nominal accounts") include all of the revenue accounts, expense accounts, the owner drawing account, and the income summary account. Generally speaking, the balances in temporary accounts increase throughout the accounting year and are "zeroed out" and closed at the end of the accounting year.

Because the balances in the temporary accounts are transferred out of their respective accounts at the end of the accounting year, each temporary account will have a zero balance when the next accounting year begins. This means that the new accounting year starts with no revenue amounts, no expense amounts, and no amount in the drawing account.

By using many revenue accounts and a huge number of expense accounts, a company is certain to have easy access to detailed information on revenues and expenses throughout the year. This allows the management of the company to monitor the performance of all parts of the company. Once the accounting year has ended, the need to know the balances in these temporary accounts has also ended, so the accounts are closed out and reopened for the next accounting year with zero balances.

Cash Account

Because cash is involved in many transactions, it is helpful to memorize the following:

    * Whenever cash is received, debit Cash.
    * Whenever cash is paid out, credit Cash.

With the knowledge of what happens to the Cash account, the journal entry to record the debits and credits is easier. Let's assume that a company receives $500 on June 3, 2008 from a customer who was given 30 days in which to pay. (In May the company recorded the sale and an accounts receivable.) On June 3 the company will debit Cash, because cash was received. The amount of the debit and the credit is $500. Entering this information in the general journal format, we have:

Date               Account Name     Debit     Credit
June 3, 2008            Cash           500   
                               ???                        500
 ???=AR

All that remains to be entered is the name of the account to be credited. Since this was the collection of an account receivable, the credit should be Accounts Receivable. (Because the sale was already recorded in May, you cannot enter Sales again on June 3.)

On June 4 the company paid $300 to a supplier for merchandise the company received in May. (In May the company recorded the purchase and the accounts payable.) On June 4 the company will credit Cash, because cash was paid. The amount of the debit and credit is $300. Entering them in the general journal format, we have:

Date              Account Name     Debit     Credit
June 4, 2008           ???            300   
                              Cash                      300

???=AP

All that remains to be entered is the name of the account to be debited. Since this was the payment on an account payable, the debit should be Accounts Payable. (Because the purchase was already recorded in May, you cannot enter Purchases or Inventory again on June 4.)

To help you become comfortable with the debits and credits in accounting, memorize the following tip:
Whenever cash is received, the Cash account is debited (and another account is credited).
Whenever cash is paid out, the Cash account is credited (and another account is debited).

Expenses and Losses


Expenses and Losses are Usually Debited


Expenses normally have their account balances on the debit side (left side). A debit increases the balance in an expense account; a credit decreases the balance. Since expenses are usually increasing, think "debit" when expenses are incurred. (We credit expenses only to reduce them, adjust them, or to close the expense accounts.) Examples of expense accounts include Salaries Expense, Wages Expense, Rent Expense, Supplies Expense, and Interest Expense.

To illustrate an expense let's assume that on June 1 your company paid $800 to the landlord for the June rent. The debits and credits are shown in the following journal entry:

    Account Name                 Debit                Credit
    Rent Expense                  800   
                        Cash                                    800

Since cash was paid out, the asset account Cash is credited and another account needs to be debited. Because the rent payment will be used up in the current period (the month of June) it is considered to be an expense, and Rent Expense is debited. If the payment was made on June 1 for a future month (for example, July) the debit would go to the asset account Prepaid Rent.

As a second example of an expense, let's assume that your hourly paid employees work the last week in the year but will not be paid until the first week of the next year. At the end of the year, the company makes an entry to record the amount the employees earned but have not been paid. Assuming the employees earned $1,900 during the last week of the year, the entry in general journal form is:

            Account Name                                  Debit                 Credit   
       Wages Expense                                      1,900   
                          Wages Payable                                           1,900


As noted above, expenses are almost always debited, so we debit Wages Expense, increasing its account balance. Since your company did not yet pay its employees, the Cash account is not credited, instead, the credit is recorded in the liability account Wages Payable. A credit to a liability account increases its credit balance.

Revenues and Gains


Revenues and Gains Are Usually Credited


Revenues and gains are recorded in accounts such as Sales, Service Revenues, Interest Revenues (or Interest Income), and Gain on Sale of Assets. These accounts normally have credit balances that are increased with a credit entry.

The exceptions to this rule are the accounts Sales Returns, Sales Allowances, and Sales Discounts--these accounts have debit balances because they are reductions to sales. Accounts with balances that are the opposite of the normal balance are called contra accounts; hence contra revenue accounts will have debit balances.

Let's illustrate revenue accounts by assuming your company performed a service and was immediately paid the full amount of $50 for the service. The debits and credits are presented in the following general journal format:

          Account Name               Debit                Credit
    Cash                                    50   
             Service Revenues                                  50


Whenever cash is received, the asset account Cash is debited and another account will need to be credited. Since the service was performed at the same time as the cash was received, the revenue account Service Revenues is credited, thus increasing its account balance.

Let's illustrate how revenues are recorded when a company performs a service on credit (i.e., the company allows the client to pay for the service at a later date, such as 30 days from the date of the invoice). At the time the service is performed the revenues are considered to have been earned and they are recorded in the revenue account Service Revenues with a credit. The other account involved, however, cannot be the asset Cash since cash was not received. The account to be debited is the asset account Accounts Receivable. Assuming the amount of the service performed is $400, the entry in general journal form is:

               Account Name                           Debit                       Credit
    Accounts Receivable                   400   
                        Service Revenues                                   400


Accounts Receivable is an asset account and is increased with a debit; Service Revenues is increased with a credit.

Setup Steps : VII - X

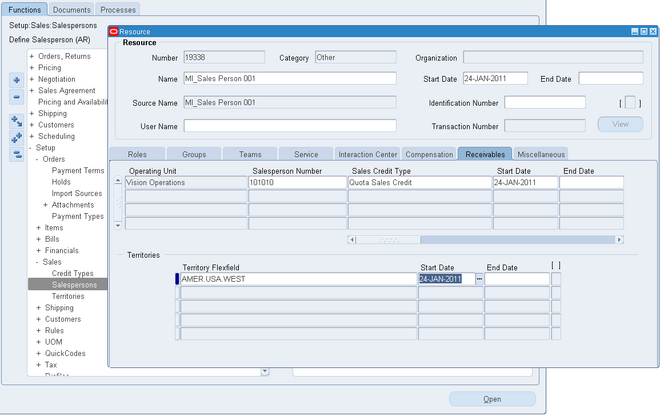
Step 7: Salespersons
Define information on your sales representatives.
This step is optional.

Step 8:Tax

Define tax features, such as codes, rates, exceptions, and exemptions.
This step is required.

Step 9: Quick Codes

Define QuickCodes that provide custom values for many lists of values throughout Order Management.
This step is required if you plan on creating user defined Quickcodes for utilization. QuickCode types that you can define include:
■ Credit Cards
■ Freight Terms
■ Hold Types
■ Note Usage Formats
■ Release Reasons
■ Cancellation Codes
■ Sales Channels
■ Shipment Priorities
Navigation: OM ->Set up ->QuickCodes ->OM

You can create as many quickcodes as you need. You can also inactivate QuickCodes.

Step 10: Workflow
Define order and line processing flows to meet different order and line type requirements.
This step is required.

What Is An Account?

To keep a company's financial data organized, accountants developed a system that sorts transactions into records called accounts. When a company's accounting system is set up, the accounts most likely to be affected by the company's transactions are identified and listed out. This list is referred to as the company's chart of accounts. Depending on the size of a company and the complexity of its business operations, the chart of accounts may list as few as thirty accounts or as many as thousands. A company has the flexibility of tailoring its chart of accounts to best meet its needs.

Within the chart of accounts the balance sheet accounts are listed first, followed by the income statement accounts. In other words, the accounts are organized in the chart of accounts as follows:

    * Assets
    * Liabilities
    * Owner's (Stockholders') Equity
    * Revenues or Income
    * Expenses
    * Gains
    * Losses

chart of accounts

A chart of accounts is a listing of the names of the accounts that a company has identified and made available for recording transactions in its general ledger. A company has the flexibility to tailor its chart of accounts to best suit its needs, including adding accounts as needed.

Within the chart of accounts you will find that the accounts are typically listed in the following order:
    Balance sheet accounts    
    * Assets
    * Liabilities
    * Owner's (Stockholders') Equity

    Income statement accounts    
    * Operating Revenues
    * Operating Expenses
    * Non-operating Revenues and Gains
    * Non-operating Expenses and Losses

Within the categories of operating revenues and operating expenses, accounts might be further organized by business function (such as producing, selling, administrative, financing) and/or by company divisions, product lines, etc.

A company's organization chart can serve as the outline for its accounting chart of accounts. For example, if a company divides its business into ten departments (production, marketing, human resources, etc.), each department will likely be accountable for its own expenses (salaries, supplies, phone, etc.). Each department will have its own phone expense account, its own salaries expense, etc.

A chart of accounts will likely be as large and as complex as the company itself. An international corporation with several divisions may need thousands of accounts, whereas a small local retailer may need as few as one hundred accounts.

Each account in the chart of accounts is typically assigned a name and a unique number by which it can be identified. (Software for some small businesses may not require account numbers.) Account numbers are often five or more digits in length with each digit representing a division of the company, the department, the type of account, etc.

As you will see, the first digit might signify if the account is an asset, liability, etc. For example, if the first digit is a "1" it is an asset. If the first digit is a "5" it is an operating expense.

A gap between account numbers allows for adding accounts in the future. The following is a partial listing of a sample chart of accounts.

Property, Plant, and Equipment (account numbers 17000 - 18999)
    17000   Land
    17100   Buildings
    17300   Equipment
    17800   Vehicles
    18100   Accumulated Depreciation - Buildings
    18300   Accumulated Depreciation - Equipment
    18800   Accumulated Depreciation - Vehicles

Current Liabilities (account numbers 20000 - 24999)
    20100   Notes Payable - Credit Line #1
    20200   Notes Payable - Credit Line #2
    21000   Accounts Payable
    22100   Wages Payable
    23100   Interest Payable
    24500   Unearned Revenues

Double Entry Accounting

Because every business transaction affects at least two accounts, our accounting system is known as a double entry system. (You can refer to the company's chart of accounts to select the proper accounts. Accounts may be added to the chart of accounts when an appropriate account cannot be found.)

For example, when a company borrows $1,000 from a bank, the transaction will affect the company's Cash account and the company's Notes Payable account. When the company repays the bank loan, the Cash account and the Notes Payable account are also involved.

If a company buys supplies for cash, its Supplies account and its Cash account will be affected. If the company buys supplies on credit, the accounts involved are Supplies and Accounts Payable.

If a company pays the rent for the current month, Rent Expense and Cash are the two accounts involved. If a company provides a service and gives the client 30 days in which to pay, the company's Service Revenues account and Accounts Receivable are affected.

Although the system is referred to as double entry, a transaction may involve more than two accounts. An example of a transaction that involves three accounts is a company's loan payment to its bank of $300. This transaction will involve the following accounts: Cash, Notes Payable, and Interest Expense.

Journal Entries


Another way to visualize business transactions is to write a general journal entry. Each general journal entry lists the date, the account title(s) to be debited and the corresponding amount(s) followed by the account title(s) to be credited and the corresponding amount(s). The accounts to be credited are indented. Let's illustrate the general journal entries for the two transactions that were shown in the T-accounts above.


Date                Account Name     Debit          Credit
June 1, 2008        Cash             5,000   
                  Notes Payable              5,000


Date                  Account Name       Debit     Credit
June 2, 2008         Notes Payable       2,000   
                         Cash                 2,000

Setup Steps : XI - Document Sequences

Step 11: Document Sequences (Order Numbering)

Define Document Sequences for automatic or manual numbering of orders. This step is required.
Order Management uses AOL Document Sequence functionality for order numbering. You can define document sequences that automatically generate numbers for your orders and returns as you enter them. You can define a single document sequence to assign unique consecutive numbers to all your orders and returns, or you can define multiple document sequences that are assigned to different order types. In the latter case, an order or return is uniquely identified by its type and its number, since orders and returns of different types may share numbers.

Order and return numbers cannot contain alphabetic characters.

Following 4 steps need to be completed to enable document sequence
1.  Set the profile option Sequential Numbering to Always Used at the Order Management Application level

2.  Define document sequence
OM: Setup -> Documents -> Define


Many countries have legal and audit requirements for order numbers to be contiguous. You can set up a document sequences as gapless through the Define Documents Sequences window. In addition, Order Management prevents deletion of orders that have been numbered using the gapless numbering sequence. The application uses locks to ensure gapless numbering. If you are using gapless sequences, please save your changes frequently to minimize lock contention issues.

Order Management enables you to enter the order numbers for certain types of orders. You can define a document sequence as manual and assign it to a desired order type. This order type can be used on orders that you want to manually enter order numbers. When an order number is specified for such an order, Order Management validates that it is unique for a given order type.

Steps for creating document sequence
1. Enter a name for the document sequence.
2. Specify Oracle Order Management as the Application.
3. You can define the sequence to be Automatic, Gapless or Manual.
■ Automatic sequences: The system will automatically increment document numbers. Automatic sequences do not guarantee contiguous numbering.
■ Gapless sequences: The system guarantees that the numbers returned are contiguous.
■ Manual: User must specify a unique document number.
For all types of numbering, the Order Management system validates that the number specified by you is unique for a given order type.
4. Enter a starting number

3.  Define document categories
You can create a document category for shipping documents such as a bill of lading (BOL) and assign it to a location or all locations. You can create more than one document category for a document, for example, if you want each carrier to have its own Bill of Lading number series, you can set up a unique document category to accommodate this requirement.

You must define a category for each bill of lading and packing slip you wish to create. You can create a bill of lading category for each ship method/carrier or define a single bill of lading category for all. When you use a different bill of lading sequence for each carrier, you can easily identify the carrier by looking at the bill of lading number.
Whenever we create a new transaction type, a new document category gets created automatically


4.  Assign document sequences
After defining document sequences and categories, assign document sequences to document categories. Assigning sequences is application and category specific.
You cannot change a document category definition. If you find incorrect information, create a new category with the correct information, re-assign document sequences to the new category, and disable the old category. Either leave alone the existing Category or Disable it cautiously since it may affect other documents using the setting. For that reason disabling cannot be undone.


Document Sequences

Step 11: Document Sequences (Order Numbering)

Define Document Sequences for automatic or manual numbering of orders. This step is required.
Order Management uses AOL Document Sequence functionality for order numbering. You can define document sequences that automatically generate numbers for your orders and returns as you enter them. You can define a single document sequence to assign unique consecutive numbers to all your orders and returns, or you can define multiple document sequences that are assigned to different order types. In the latter case, an order or return is uniquely identified by its type and its number, since orders and returns of different types may share numbers.

Order and return numbers cannot contain alphabetic characters.

Following 4 steps need to be completed to enable document sequence
1.  Set the profile option Sequential Numbering to Always Used at the Order Management Application level

2.  Define document sequence
OM: Setup -> Documents -> Define


Many countries have legal and audit requirements for order numbers to be contiguous. You can set up a document sequences as gapless through the Define Documents Sequences window. In addition, Order Management prevents deletion of orders that have been numbered using the gapless numbering sequence. The application uses locks to ensure gapless numbering. If you are using gapless sequences, please save your changes frequently to minimize lock contention issues.

Order Management enables you to enter the order numbers for certain types of orders. You can define a document sequence as manual and assign it to a desired order type. This order type can be used on orders that you want to manually enter order numbers. When an order number is specified for such an order, Order Management validates that it is unique for a given order type.

Steps for creating document sequence
1. Enter a name for the document sequence.
2. Specify Oracle Order Management as the Application.
3. You can define the sequence to be Automatic, Gapless or Manual.
■ Automatic sequences: The system will automatically increment document numbers. Automatic sequences do not guarantee contiguous numbering.
■ Gapless sequences: The system guarantees that the numbers returned are contiguous.
■ Manual: User must specify a unique document number.
For all types of numbering, the Order Management system validates that the number specified by you is unique for a given order type.
4. Enter a starting number

3.  Define document categories
You can create a document category for shipping documents such as a bill of lading (BOL) and assign it to a location or all locations. You can create more than one document category for a document, for example, if you want each carrier to have its own Bill of Lading number series, you can set up a unique document category to accommodate this requirement.

You must define a category for each bill of lading and packing slip you wish to create. You can create a bill of lading category for each ship method/carrier or define a single bill of lading category for all. When you use a different bill of lading sequence for each carrier, you can easily identify the carrier by looking at the bill of lading number.
Whenever we create a new transaction type, a new document category gets created automatically


4.  Assign document sequences
After defining document sequences and categories, assign document sequences to document categories. Assigning sequences is application and category specific.
You cannot change a document category definition. If you find incorrect information, create a new category with the correct information, re-assign document sequences to the new category, and disable the old category. Either leave alone the existing Category or Disable it cautiously since it may affect other documents using the setting. For that reason disabling cannot be undone.


Setup Step: 22 - Transaction Types

Transaction Types are used to associate workflows for various phases of sales document (sales orders or sales agreements) processing. You can also associate various values like transaction phases, layout templates, approvers to a transaction type and these will be defaulted on the sales order or sales agreement


Transaction(Order/Line) Types


Transaction Types provide default information on orders and establish process controls.
Transaction type is the generic term that refers to both Order Transaction Types and Line Transaction Types in Order Management. This is not to be confused with the Receivables Transaction Type, which is a completely different object.

The transaction type code may have values of Order or Line and determines whether the transaction type is an order transaction type or a line transaction type. In this document order type is used synonymously with order transaction type and line type is used synonymously with line transaction type. A document sequence is a range of numbers that can be used for an order type and is defined by a numbering method (automatic, manual or gapless) and the beginning order number.

A document category is a specific type of document such as a sales order or a purchase order. These are used in many Oracle applications for key entities. In Order Management when you create an order transaction type the system automatically creates a document category with the same name. This is used to assign the numbering sequence to the order type.

Some of the features of Transaction Types/Workflow are:
■ Each line in an order has its own workflow so each line may follow a different flow. This allows you to have both order and return lines on the same order.
■ You can create new workflow activities from custom PL/SQL code. This makes it very easy to extend OM.
■ A workflow process can have subprocesses.
■ A workflow process can have an unlimited number of activities.
■ There is no limit to the number of custom workflow activities that can be defined in Order Management.
■ You can view the status of the workflow on an order or order line in either tabular or graphical format. In graphical format you can see not only the activities that the workflow has completed but also the activities that still require completion.


Line Transaction Types

The Define Transaction Types window is used to define both order and line types.
Define your line types first. You should define line types for both order lines and return lines. To access the window from the order management navigation menu choose
Setup -> Transaction Types -> Define.
Except the operating unit and transaction type name the other mandatory fields in the header are Order category, Transaction type and effective dates. And we should also specify the sales document type(agreement type: SO/Blanket Agreement)

1. Enter a name for the line type in the Transaction Type field. Note that this name must be unique; you cannot create an order type and a line type with the same name.

2. Sales Documnet Type : Sales Order / Sales Agreement

3. Order Category : Order / Return /Mixed
Enter either Order or Return for the Order Category depending on whetheryour new line type is for sales lines or return lines. For Line transaction type choose wither order/return.
The value Mixed is selected for order type which can contains both sales order and return lines.

4. Transaction Type Code : Order/Line
Enter LINE for the Transaction Type Code.

Many of the other fields on this window as well as the assign line flows button are not applicable to line types so
when you enter the transaction type code they will become inaccessible
On the Shipping tab the autoschedule flag is inaccessible because it only applies to order types. The inspection required flag determines whether inspection is required when return lines are received. There are five Scheduling level choices to control the way scheduling works at the time of order entry for lines of this type: ATP Only, Allow all scheduling actions, No reservations, Inactive Demand with Reservations and Inactive Demand without Reservations. The remainder of the fields can be used for defaulting.

Two values on the Schedule Level LOV on the Shipping tab support different requirements for reservations: Inactive Demand with Reservations and Inactive Demand without Reservations. These levels can be set on the transaction types,
which would mean that the line will not be scheduled and will not be seen as demand in APS. When this level is set, Schedule Ship Date entered by the user will be accepted and no scheduling is done. If scheduling is done as an action or through WF, Request Date will be copied to the Schedule Ship Date if it is already not there.

Shipping Source Type: External/Internal. Its used to default the values but can be changed in sales order. The shipping source type External is used for drop ship orders.

The Finance tab fields contain information which affects the interfaces with the financial applications. The Invoicing Rule and Accounting Rule fields are used as defaulting sources for the sales order, and this information on the sales order is
passed to Autoinvoicing. For the fields Invoice Source, Non-Delivery Invoice Source, and Receivables Transaction Type these values are required for interfacing to Receivables but they are not on the sales order header or line. When the invoice
interface activity in the workflow is executed the system will look for a value in the following order: line transaction type, order transaction type, profile option.
If no value is found the invoice interface activity will fail. The Cost of Goods Sold
Account
can be used by the Account Generator function of the inventory interface when a line is ship confirmed.

Order Transaction Types

Here the transaction type could would be order.
If you want to use the order type as a defaulting source for Price List on the order you may enter a Price List on the Main tab. The Enforce List Price flag will determine whether a user can apply a manual discount to the order at the time of order entry. The Credit Check rules for ordering and shipping determine whether credit check will occur for this order type. If the fields are blank, no credit checking will occur for orders of this type.

On the Shipping tab the autoschedule flag determines whether scheduling will try to autoschedule the lines on orders of this type. The inspection required flag is not accessible (it only applies to lines). The rest of the fields can be used for defaulting.

The Finance tab fields are used for information which affects the interfaces with the financial applications. The Currency and Currency Conversion Type can be used as defaulting sources for the order header. The Invoicing Rule and Accounting Rule
fields are used as defaulting sources for the sales order line, and this information on the sales order is passed to Autoinvoicing.For the fields Invoice Source, Non-Delivery Invoice Source, and Receivables Transaction Type these values are required for interfacing to Receivables but they are not on the sales order header or line. When the invoice interface activity in the workflow is executed the system will look for a value in the following order: line transaction type, order transaction type, profile option. If no value is found the invoice interface activity will fail. The Cost of Goods Sold Account is used by the inventory interface when a line is ship confirmed.


Transaction Types

Transaction Types are used to associate workflows for various phases of sales document (sales orders or sales agreements) processing. You can also associate various values like transaction phases, layout templates, approvers to a transaction type and these will be defaulted on the sales order or sales agreement


Transaction(Order/Line) Types


Transaction Types provide default information on orders and establish process controls.
Transaction type is the generic term that refers to both Order Transaction Types and Line Transaction Types in Order Management. This is not to be confused with the Receivables Transaction Type, which is a completely different object.

The transaction type code may have values of Order or Line and determines whether the transaction type is an order transaction type or a line transaction type. In this document order type is used synonymously with order transaction type and line type is used synonymously with line transaction type. A document sequence is a range of numbers that can be used for an order type and is defined by a numbering method (automatic, manual or gapless) and the beginning order number.

A document category is a specific type of document such as a sales order or a purchase order. These are used in many Oracle applications for key entities. In Order Management when you create an order transaction type the system automatically creates a document category with the same name. This is used to assign the numbering sequence to the order type.

Some of the features of Transaction Types/Workflow are:
■ Each line in an order has its own workflow so each line may follow a different flow. This allows you to have both order and return lines on the same order.
■ You can create new workflow activities from custom PL/SQL code. This makes it very easy to extend OM.
■ A workflow process can have subprocesses.
■ A workflow process can have an unlimited number of activities.
■ There is no limit to the number of custom workflow activities that can be defined in Order Management.
■ You can view the status of the workflow on an order or order line in either tabular or graphical format. In graphical format you can see not only the activities that the workflow has completed but also the activities that still require completion.


Line Transaction Types

The Define Transaction Types window is used to define both order and line types.
Define your line types first. You should define line types for both order lines and return lines. To access the window from the order management navigation menu choose
Setup -> Transaction Types -> Define.
Except the operating unit and transaction type name the other mandatory fields in the header are Order category, Transaction type and effective dates. And we should also specify the sales document type(agreement type: SO/Blanket Agreement)

1. Enter a name for the line type in the Transaction Type field. Note that this name must be unique; you cannot create an order type and a line type with the same name.

2. Sales Documnet Type : Sales Order / Sales Agreement

3. Order Category : Order / Return /Mixed
Enter either Order or Return for the Order Category depending on whetheryour new line type is for sales lines or return lines. For Line transaction type choose wither order/return.
The value Mixed is selected for order type which can contains both sales order and return lines.

4. Transaction Type Code : Order/Line
Enter LINE for the Transaction Type Code.

Many of the other fields on this window as well as the assign line flows button are not applicable to line types so
when you enter the transaction type code they will become inaccessible
On the Shipping tab the autoschedule flag is inaccessible because it only applies to order types. The inspection required flag determines whether inspection is required when return lines are received. There are five Scheduling level choices to control the way scheduling works at the time of order entry for lines of this type: ATP Only, Allow all scheduling actions, No reservations, Inactive Demand with Reservations and Inactive Demand without Reservations. The remainder of the fields can be used for defaulting.

Two values on the Schedule Level LOV on the Shipping tab support different requirements for reservations: Inactive Demand with Reservations and Inactive Demand without Reservations. These levels can be set on the transaction types,
which would mean that the line will not be scheduled and will not be seen as demand in APS. When this level is set, Schedule Ship Date entered by the user will be accepted and no scheduling is done. If scheduling is done as an action or through WF, Request Date will be copied to the Schedule Ship Date if it is already not there.

Shipping Source Type: External/Internal. Its used to default the values but can be changed in sales order. The shipping source type External is used for drop ship orders.

The Finance tab fields contain information which affects the interfaces with the financial applications. The Invoicing Rule and Accounting Rule fields are used as defaulting sources for the sales order, and this information on the sales order is
passed to Autoinvoicing. For the fields Invoice Source, Non-Delivery Invoice Source, and Receivables Transaction Type these values are required for interfacing to Receivables but they are not on the sales order header or line. When the invoice
interface activity in the workflow is executed the system will look for a value in the following order: line transaction type, order transaction type, profile option.
If no value is found the invoice interface activity will fail. The Cost of Goods Sold
Account
can be used by the Account Generator function of the inventory interface when a line is ship confirmed.

Order Transaction Types

Here the transaction type could would be order.
If you want to use the order type as a defaulting source for Price List on the order you may enter a Price List on the Main tab. The Enforce List Price flag will determine whether a user can apply a manual discount to the order at the time of order entry. The Credit Check rules for ordering and shipping determine whether credit check will occur for this order type. If the fields are blank, no credit checking will occur for orders of this type.

On the Shipping tab the autoschedule flag determines whether scheduling will try to autoschedule the lines on orders of this type. The inspection required flag is not accessible (it only applies to lines). The rest of the fields can be used for defaulting.

The Finance tab fields are used for information which affects the interfaces with the financial applications. The Currency and Currency Conversion Type can be used as defaulting sources for the order header. The Invoicing Rule and Accounting Rule
fields are used as defaulting sources for the sales order line, and this information on the sales order is passed to Autoinvoicing.For the fields Invoice Source, Non-Delivery Invoice Source, and Receivables Transaction Type these values are required for interfacing to Receivables but they are not on the sales order header or line. When the invoice interface activity in the workflow is executed the system will look for a value in the following order: line transaction type, order transaction type, profile option. If no value is found the invoice interface activity will fail. The Cost of Goods Sold Account is used by the inventory interface when a line is ship confirmed.


Defining Account Aliases

An account alias is an easily recognized name or label representing a general ledger account number. You can view, report, and reserve against an account alias. During a transaction, you can use the account alias instead of an account number to refer to the account.


Entering Parties and Customer Accounts

 
To minimize the possibility of creating duplicate party or customer accounts, search parties or customer accounts before entering new accounts. In organizations with more than one person entering or maintaining customer account information, duplicate parties or customer accounts might be created.

1. The default procedure, enforced by the Find/Enter Customers window requires that a search, as described in the next section, must be completed before you can create a new customer account. You can set up your application to directly enter a new customer account by setting the Bypass Find/Enter Window profile option to Yes. Bypassing a search of existing parties or customer accounts before entering a new party or customer account is not recommended because
duplicate parties or customer accounts could be more frequently entered.
 
At the bottom of the Find/Enter Customers window, you can select an Exact or a Fuzzy search type. The default search type is Exact. You can perform a fuzzy search if you enter at least one of these search criteria:
  • Name for an Organization customer account type
  • First name and last name for a Person customer type
  • Address
  • Postal code
  • First name and last name in the Contact region
2. If any customer exists then the below window 'll be shown
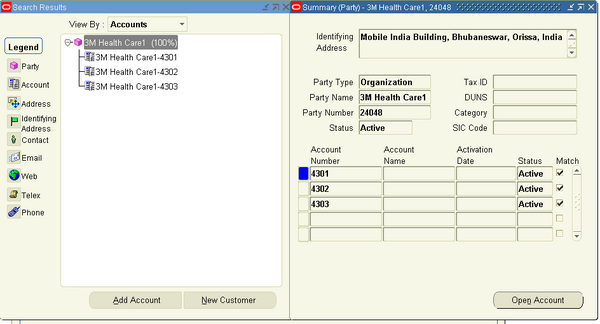
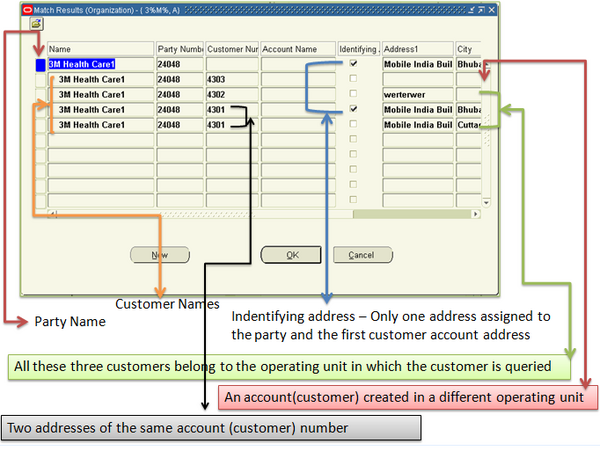
Notice the party number and customer number. There exists two customer numbers under party number number 100917 and customer number 32170890 has two different addresses and so is shown twice in the window.

Note the following in the Match Results window:
  • The title bar of the Match Results window displays the Customer Type used for the search and the search criteria.
  • If a party has multiple customer accounts, the party name displays (indented to the right) in the Name column next to each customer account.
  • If the Identifying Address Flag check box is checked, then other party sites could exist for this party.

3. Create a new customer and party
If no possible matches are found, click the New button to create both a new party and a new customer account at the same time. When you enter information about your customer both a new party and a new customer account are created. You do not have to separately create a new party and a new customer account.
Enter the new Party  name, customer number and account name. Once the record is saved a new party number is automatically created.
 Click the Cancel button to return to the Find/Enter Customers wind.


4. Create a new customer against an existing party
To create a new customer account for an existing party, highlight the row for that party, then click the OK button.
New customer entery form opens with the existing organization number(party number). You can change the party name and customer number and enter a new account name.

Save the record after entering all the details.


2.1 Entering Parties and Customer Accounts

 
To minimize the possibility of creating duplicate party or customer accounts, search parties or customer accounts before entering new accounts. In organizations with more than one person entering or maintaining customer account information, duplicate parties or customer accounts might be created.

1. The default procedure, enforced by the Find/Enter Customers window requires that a search, as described in the next section, must be completed before you can create a new customer account. You can set up your application to directly enter a new customer account by setting the Bypass Find/Enter Window profile option to Yes. Bypassing a search of existing parties or customer accounts before entering a new party or customer account is not recommended because
duplicate parties or customer accounts could be more frequently entered.
 
At the bottom of the Find/Enter Customers window, you can select an Exact or a Fuzzy search type. The default search type is Exact. You can perform a fuzzy search if you enter at least one of these search criteria:
  • Name for an Organization customer account type
  • First name and last name for a Person customer type
  • Address
  • Postal code
  • First name and last name in the Contact region
2. If any customer exists then the below window 'll be shown
1. Notice the party number and customer number. There exists two customer numbers under party number number 100917 and customer number 32170890 has two different addresses in the same OU and so is shown twice in the window.
2. The customer number can be same in two OUs (Similar to suppliers).

Note the following in the Match Results window:
  • The title bar of the Match Results window displays the Customer Type used for the search and the search criteria.
  • If a party has multiple customer accounts, the party name displays (indented to the right) in the Name column next to each customer account.
  • If the Identifying Address Flag check box is checked, then other party sites could exist for this party.

3. Create a new customer and party
If no possible matches are found, click the New button to create both a new party and a new customer account at the same time. When you enter information about your customer both a new party and a new customer account are created. You do not have to separately create a new party and a new customer account.
Enter the new Party  name, customer number and account name. Once the record is saved a new party number is automatically created.
 Click the Cancel button to return to the Find/Enter Customers wind.


4. Create a new customer against an existing party
To create a new customer account for an existing party, highlight the row for that party, then click the OK button.
New customer entery form opens with the existing organization number(party number). You can change the party name and customer number and enter a new account name.

Save the record after entering all the details.


Transaction Type

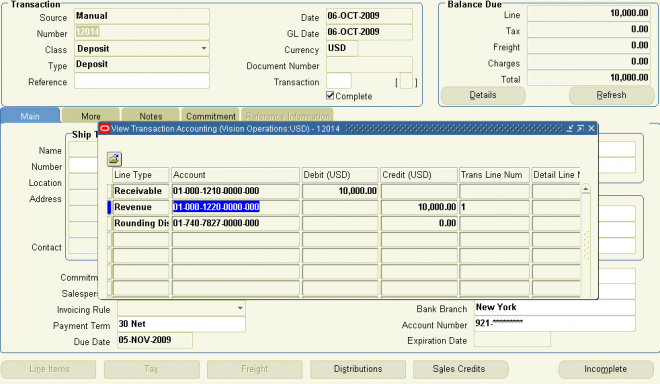
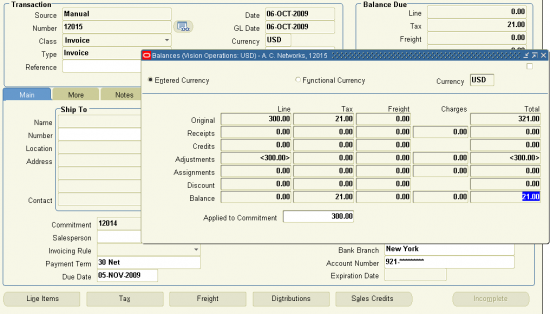
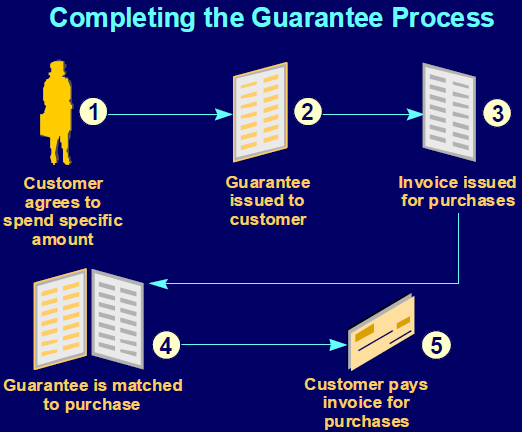
Use transaction types to define the accounting for the invoices, debit memos, credit memos, commitments(Guarnatee, Deposit),   chargebacks, on–account credits,  and bills receivable you create in Receivables.
Transaction types also determine whether your transaction entries update your customers’ balances and whether Receivables posts these transactions to your general ledger.

1. If AutoAccounting depends on transaction type, Receivables uses the general ledger accounts that you enter here, along with your AutoAccounting rules, to determine the default revenue, receivable, freight, tax, unearned revenue, unbilled receivable, finance charges, and AutoInvoice clearing accounts for transactions you create using this type.

2. For bills receivable, the accounts that you enter here determine the bills receivable, unpaid bills receivable, remitted bills receivable, and factored bills receivable accounts for a bill receivable.

3. You can associate transaction types with your invoice sources in the Transaction Sources window to speed data entry in the Transactions and Credit Transactions windows. Active transaction types appear as list of values choices in the Transactions, Reverse Receipts, Credit Transactions, and Transaction Sources windows, and for bills receivable in the Bills Receivable and Receipt Classes windows.

4. You should define your transaction types in the following order:

  • credit memo transaction types
  • invoice, debit memo, and chargeback transaction types
  • bills receivable transaction types
  • commitment transaction types - Guarantee, Deposit

5. To be able to void a debit memo, credit memo, on–account credit or invoice, define a Void transaction type with ’Open Receivables’ and ’Post to GL’ set to No. Then, as long as there is no activity against the transaction and it has not been posted to your general ledger, you can make it invalid by simply changing the transaction type to ’Void’.

Define a transaction type
Navigate to the Transaction Types window.
1. Enter a Name and Description for this transaction type.

2. Enter a Class for this transaction type. Choose from the following classes: Invoice, Chargeback, Credit Memo, Debit Memo, Deposit, or Guarantee. If you choose Deposit or Guarantee, Receivables sets Open Receivable and Post to GL to Yes, Allow Freight, Tax Calculation, and Allow Overapplication to No, Creation Sign to ’Positive Sign,’ and Natural Application Only to Yes

3. Enter the payment Terms to use for transactions with this transaction type.

4. If this transaction type’s class is not Deposit or Guarantee, indicate whether you want transactions with this type to update your customer balances by checking or unchecking the Open Receivable box. If Open Receivable is set to Yes, Receivables updates your customer balances each time you create a complete debit memo, credit memo, chargeback, or on–account credit with this transaction type. Receivables also includes these transactions in the standard aging and collection processes. If you are defining a ’void’ transaction type, set Open Receivable to No.

Suggestion: You can use the Open Receivable option to implement an approval cycle for any temporary or preliminary debit memos, credit memos, on–account credits, chargebacks, and invoices that you may use in your business. For particularly sensitive debit memos, credit memos, on–account credits, chargebacks, and invoices that you may want to review, you can define a transaction type called Preliminary with Open Receivable set to No. This transaction type does not update your customer balances. When you review and approve the item, you can then change the transaction type to Final (a transaction type that you define with Open Receivable set to Yes) which will update your customer’s balances.

5. To be able to post transactions with this type to your general ledger, check the Post To GL box. The default is the value you specified for the Open Receivables option. This box must be checked if the class is Deposit or Guarantee.
If you are defining a ’void’ transaction type, do not check this box.

6. Choose a Transaction Status of Open, Closed, Pending, or Void. Use these statuses to implement your own invoice approval system. Enter ’Void’ to void debit memos, on–account credits or invoices to which you assign this transaction type.
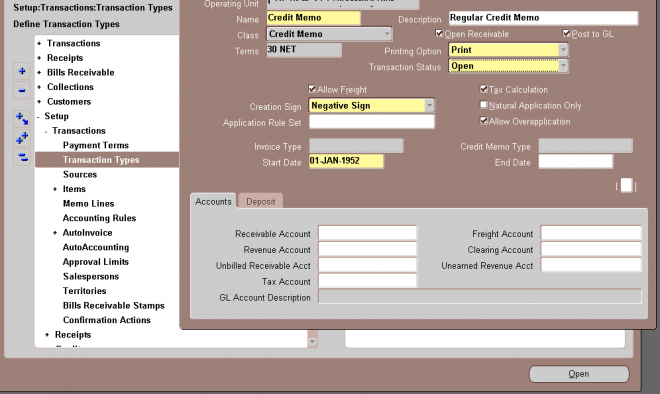
1. To allow freight to be entered for transactions with this transaction type, check the Allow Freight box.

2. To let Receivables calculate tax for transactions with this transaction type, check the Tax Calculation box. If you do not check this box, the Tax Code field in the Lines window will not be required and Receivables will not perform tax calculations or create tax accounting entries for transactions with this transaction type (this is also true for transactions in Oracle Order Management and Oracle Sales and Marketing).

3. Choose a Creation Sign. The default is Positive Sign for transaction types with a class of either Guarantee or Deposit. If you are using the Cash Basis accounting method, your transaction’s creation sign must be either Positive Sign, Negative Sign, or Any Sign. You cannot update this field after you enter transactions with this type.

4. If this transaction type’s class is not Deposit or Guarantee and you want to restrict the direction in which items with this transaction type can be updated by applications entered against them, check the Natural Application Only box. If you check this box, Receivables sets Allow Overapplication to No. You cannot update this option after you save this transaction type.

5. If this transaction type’s class is not Deposit or Guarantee, and you did not check the Natural Application Only box, choose whether to Allow Overapplication against items with this transaction type by checking or unchecking this box. If you check this box,  Receivables sets Natural Application to No and you cannot update it after you save this transaction  ype. If you use the Cash Basis accounting method, the default value is No and you cannot change it.

6.  Enter an Application Rule Set for this transaction type or select one from the list of values (optional). An Application Rule Set determines the default payment steps when you use the Applications window or AutoLockbox to apply receipts to transactions using this type. If you do not enter a rule set, Receivables uses the rule set in the System Options window as the default.

Account
1. Enter the Receivable Account for transactions with this transaction type. Receivables uses this information, along with your AutoAccounting definition, to determine the receivable accounts for transactions with these types. Receivables creates a receivables transaction record using this account so you can transfer to your general ledger and create a journal entry if Post To GL is Yes for this transaction type.

2. Enter a Revenue Account for transactions with this transaction type. Receivables skips this field if Allow Freight is set to No. Receivables uses this information, along with your AutoAccounting definition, to determine the revenue account for transactions with this transaction type.

3. If this transaction type’s class is Invoice or Credit Memo, enter an Unbilled Receivable Account. When you use the Bill In Arrears invoicing rule, Receivables uses this information, along with your AutoAccounting definition, to determine the Unbilled Receivable account for transactions with this transaction type.

4. If this transaction type’s class is Invoice or Credit Memo, enter an Unearned Revenue Account. Receivables uses this information, along with your AutoAccounting definition, to determine the unearned revenue account for transactions with this transaction type. Receivables only uses this account when your transaction’s invoicing rule is Bill In Advance.

5. Enter a Freight Account for transactions with this transaction type. Receivables uses this information, along with your AutoAccounting definition, to determine the freight account for transactions with this transaction type. Receivables skips this field if this transaction type’s class is Deposit or Guarantee or if Allow Freight is set to No.

6. If this transaction type’s class is Invoice, Credit Memo, or Debit Memo, enter a Tax Account. Receivables uses this information along with your AutoAccounting definition to determine the tax account for transactions with this transaction type.

7. If this transaction type’s class is Invoice or Debit Memo, enter a Clearing Account for transactions with this transaction type.Receivables uses this account to hold any difference between the revenue amount specified for the Revenue account and the selling price times the quantity for imported invoice lines. Receivables only uses the clearing account if you have enabled this feature for transaction sources that you use for your imported transactions.
 

Transactions

Transactions, such as invoices, credit memos, receipts and adjustments, are entered against a customer account. Over time the customer's account evolves as new invoices are raised, credits and receipts are applied and adjustments are made. Paid invoices and their corresponding receipts are of no long-term interest in Receivables and disappear from the Aging Reports. However, each transaction will be posted to General Ledger and will have contributed to the receivables, revenue, tax, and cash balances.

Use the Transaction window to enter your invoices, debit memos, credit memos, and commitments. You can also query and update your transactions in this window and review your transactions and chargebacks in the Transactions Summary window. For a list of fields you can update.

When you enter an invoice, Receivables uses your AutoAccounting rules to determine your default general ledger accounts. You can enter transactions one at a time or in a group called a batch.
Your system administrator determines whether you can delete a transaction.

Note: You can view the detail accounting lines for existing transactions in the form of a balanced accounting entry (i.e. debits equal credits) by choosing View Accounting from the Tools menu. You can also choose to view the detail accounting as t–accounts.


Chargebacks and adjustments @
http://www.oracleug.com/user-guide/account-receivables/chargebacks-and-adjustments

Invoices

Each invoice lists what the customer has received and explains how the total invoice amount, which may include tax and freight charges, has been calculated.

Invoices are entered in Oracle Receivables through the Transactions window or the Transactions Summary window, or they are imported through the AutoInvoice open interface. You must provide the customer number and bill-to address, the receivables account and freight account, and revenue and tax accounts for each invoice line. An invoice increases the customer's account balance by the invoice amount. Here are the accounting entries that would be created for a sample invoice amount of $125:


An invoice often has multiple revenue account lines. For example, an invoice from a hardware reseller for a PC server and installation shows two separate lines on the invoice. The PC sale and the installation service are posted to different revenue accounts

Manually enter an invoice or a debit memo: 
Navigate to the Transactions window.

1.1. Enter the transaction batch Source for this transaction. The default is the source you entered at the batch level. If there is no batch information, you must enter a source. The transaction batch source specifies automatic or manual batch and invoice numbering and the standard transaction type.

1.2. If your batch source does not specify Automatic Invoice Numbering, enter a transaction Number. Otherwise, Receivables assigns a number when you save. If you are adding transactions to a batch,the transaction number must be unique within this batch.
Attention: Once you save a transaction, you cannot update the transaction number.

1.3. Choose a transaction Type with a class of Invoice or Debit Memo.
Transaction types determine whether a transaction updates your open receivables, can be posted to your general ledger, if Receivables calculates tax, the transaction’s creation sign, and whether transactions with this type use natural application only or will allow overapplication. The transaction type also provides the default transaction class, payment term, and printing options for each transaction.

You can set up AutoAccounting to use transaction types when determining your general ledger accounts. If AutoAccounting depends on transaction type and you change this value, Receivables displays a pop–up window asking you if you want to recalculate all of your general ledger accounts. If you choose Yes, Receivables reruns AutoAccounting and makes the appropriate changes to your accounts (unless the transaction is a chargeback).

1.4. Enter the Date and Currency of this transaction. The default date is either the batch date or, if there is no batch information, the current date. The default currency is either the currency entered at the batch level or your functional currency, but you can change it to any currency that is defined in Receivables. If the currency is different from your functional currency, and you have not defined daily conversion rates, enter exchange rate information.
Note: You can optionally account for rounding differences that can occur when you create foreign currency transactions by enabling: Header Level Rounding.

1.5 If the transaction batch source you entered has Post to GL set to Yes, enter the GL Date for this transaction. The default GL Date is the current date. However, if the current date is not in an open period, the default is the last date of the most recent open period. The GL Date you enter must be in an Open or Future period.

1.5 If you are using manual sequence numbering, open the More tabbed region, then enter a unique Document Number. Otherwise, Receivables assigns a document number when you save.

2.1 Enter the customer Bill–to Name and Location for this transaction.

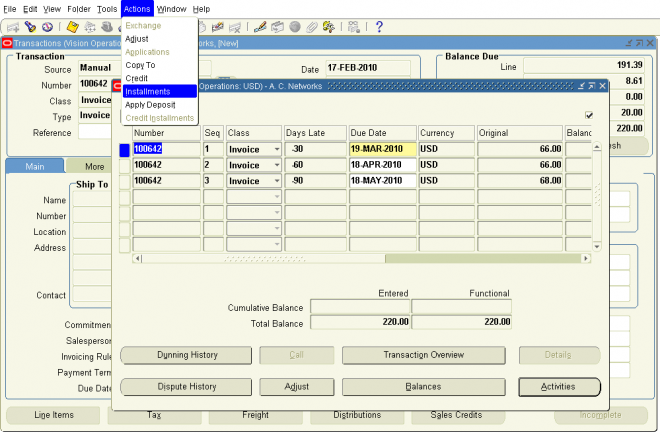
3.1 Enter the payment Terms for this transaction. Receivables calculates the Due Date based on the payment terms and date of this transaction. If you enter a split payment term, the due date is the date that the first payment is due.
Receivables uses the following hierarchy to determine the default payment terms, stopping when one is found:

  • customer bill–to site level
  • customer address level
  • customer level
  • Transaction Type

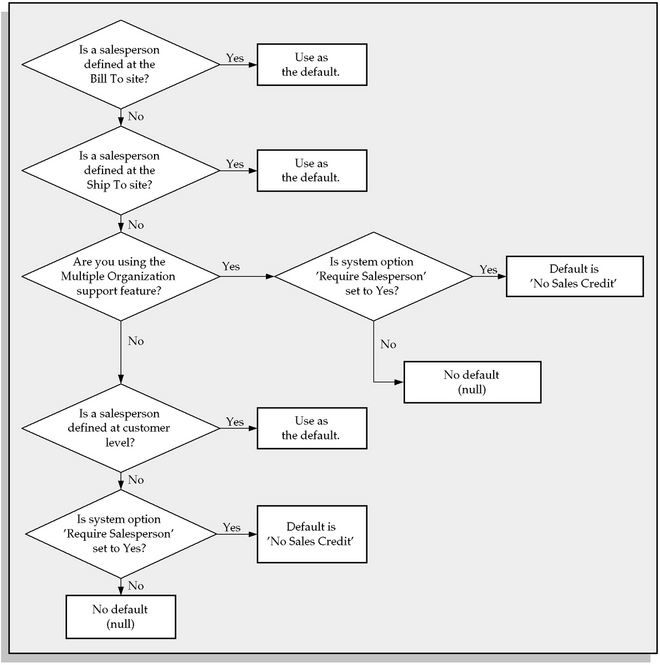
3.2 Enter a Salesperson (optional). If the system option Require Salespersons is Yes and you did not assign a salesperson to this customer at the customer or site level, you must enter a salesperson.

3.3 Select the invoicing rule

4.1 To enter the goods or services to bill to this customer, choose Line Items, then enter the Item, Quantity, and Unit Price for each item.
Receivables automatically calculates the total Amount for each line.

4.2 To enter Freight information for this transaction, choose Freight.

4.3 To review or update tax information for this line, choose Tax.
Receivables displays a default Tax Code (or tax group) if you defined one at one of the following levels: item, customer, customer site (and system level, if your tax method is ’VAT’). You can override this value if the profile option Tax: Allow Override of Tax Code is set to Yes.
Note: If you override a tax code, Receivables preserves the override across all updates to the invoice. Similarly, changing
the ship–to address or the line item could change the default tax code.

Transaction Window Fields

Remit–to Address: The remit–to address for this transaction. The remit–to address is the address to which customers send payments. The default is the remit–to address assigned to the country, state, and postal code for this customer address, but you can change it.


Sold To Customer: The customer to whom you sold the goods and services. This customer could be different from your ship–to or bill–to customer. The default is the bill–to customer for this transaction, but you can change it.

Paying Customer Region
Use the fields in this region to indicate that this transaction will be paid by automatic receipt.

Account Number: The bank account number. If the profile option AR: Mask Bank Account Numbers is set to Yes, some bank account numbers appear as asterisks (*).

Paying Customer: The customer associated with the customer bank account assigned to your invoice. This could be different from the billing customer if, for example, you wanted a primary customer to pay for related invoices.

Payment Method: The payment method assigned to this transaction.
You can choose any payment method defined for this customer or a primary customer to which it is related, as long as the invoice date is within the payment method active date range and the payment method has bank accounts in the currency of the invoice or at least one of its bank accounts has the Receipts Multi–Currency flag set to Yes. Enter a payment method to automatically receive payment for this invoice with a direct debit or bill of exchange. Receivables uses the following hierarchy to default a value for this field: 

  • the primary Payment Method of the parent site
  • the primary Payment Method of the primary customer
  • the primary Payment Method of the bill–to site
  • the primary Payment Method of the bill–to customer

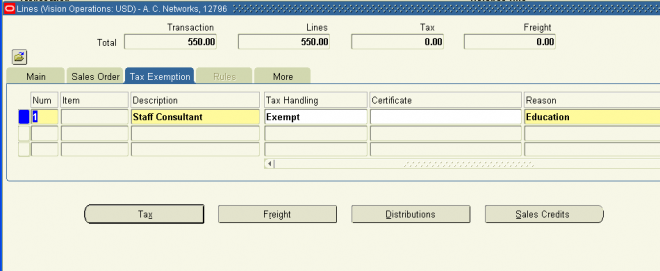
Tax Exemptions Region

Certificate: If you enter ’Exempt’ in the Tax Handling field, enter a tax exemption Certificate Number. Use the list of values to select an existing tax exemption certificate number.

Reason: If you enter ’Exempt’ in the Tax Handling field, enter a Reason for creating this exemption, or select from the list of values. You can define additional exemption reasons in the Receivables Lookups window.

Tax Handling:
You can enter a value for this field only if the profile option Tax: Allow Override of Customer Exemptions is Yes and the transaction is not a chargeback. Use the default value of ’Standard’ if you want tax to be calculated as per the normal procedures set up in Receivables.  Enter ’Exempt’ if your system option Use Customer Exemptions is set to Yes and you want to force tax exemption on the invoice lines. Enter ’Require’ to force tax calculation on the invoice
lines. If you update this field, there will be no affect on existing invoice lines; only new invoice lines will get the new value as a default.

Invoice Date:
Receivables prints the invoice date on your invoice.
Receivables calculates the due date from the invoice date and payment terms you assign to this invoice. The default value is the batch date if you entered a batch, or the current date if you did not enter batch information.
If you change the invoice date, Receivables automatically recalculates the due date and the associated tax.

Finance Charges: Use this field to indicate whether finance charges are calculated against this invoice, debit memo, or chargeback. If you leave this field blank or choose ’If Appropriate’, Receivables calculates finance charges according to your customer’s credit profile. If you choose No, Receivables does not calculate finance charges on this transaction,
regardless of the customer’s credit profile.

Default Tax: You can enter a value for this field only if the profile option Tax: Allow Override of Customer Exemptions is Yes and the transaction is not a chargeback. Use the default value of ’Standard’ if you want tax to be calculated as per the normal procedures set up in Receivables. Enter ’Exempt’ to force tax exemption on the invoice lines, and your system option Use Customer Exemptions is set to Yes. Enter ’Require’ to force tax calculation on the invoice lines. If you update this field, there will be no affect on existing invoice lines; only new invoice lines will get the new value as a default.

Dispute Amount: The current amount of this invoice, debit memo, or chargeback that is in dispute. Receivables sums up the dispute amounts for each installment of your payment schedule and displays the total in this field. You can either increase or decrease the dispute amount. If you enter 0 (zero), the debit item is no longer in dispute. If your debit
item does not have split terms, then you can enter a dispute amount that is between zero and the balance due for this item.
You can also place a debit item in dispute in the Customer Calls window, and review your in dispute debit items in the Disputed Invoice Report. For debit items with split terms, you can enter the dispute amount for each installment in the Installments window or you can set it to either the balance due or zero in this field.

Original Transaction: When you query a chargeback in the Transactions window, this field shows the transaction for which the chargeback was created.

Agreement: If entering an invoice, this is the order agreement this invoice is against. You can only enter this field if you have defined an agreement with the selected customer or customers related to the selected customer. You can associate an agreement with your customer in the Sales Orders window in Oracle Order Management.
If you are entering a commitment, this is the agreement to associate with this commitment. You can only use agreements defined in Oracle Order Management.

Cross Reference: The transaction to relate to this invoice. This field is optional. You can choose any transactions that are assigned to your bill–to customer or a selected customer. If you enter a cross reference transaction number and then change your bill–to customer, Receivables will erase the value in this field.

Status: (Transactions window) The status of this transaction. This is a user maintainable field and you can define values for it in the Receivables Lookups window. Possible values include Open, Pending, Closed, or Void. This field is not used by Receivables, therefore it is not updated automatically when an invoice is paid off, closed, etc. You have to manually update this field.

Warehouse (More Tab)
If you entered an inventory item, enter a Warehouse Name to indicate the ship–from location for this item (optional). If
AutoAccounting is based on Standard Lines, you can use the inventory item and warehouse name to create accounting flexfield information. For example, you use multiple inventory organizations and set up AutoAccounting to create the Revenue account based on standard lines. AutoAccounting uses the item and warehouse that you enter here to create the Product segment of your Revenue account.

 Consolidated Bill Number The consolidated billing invoice number on which this transaction appeared. You can view all transactions that appeared on a specific consolidated billing invoice by entering a consolidated bill number and performing a query on this field. This field appears only if the profile option AR: Show Billing Number is setto Yes.

Reviewing Accounting Information


Receivables uses AutoAccounting to create the revenue accounts for your invoice after you enter your invoice lines. You can review or update the revenue account assignments for your invoice in the Accounting window.

If you are reviewing an invoice that uses rules, you must run the Revenue Recognition Program before you can view accounting information in this window. You can change the Accounting Flexfield for each account, but you cannot create or delete lines in the Accounting window. If you change a row that has already been posted, Receivables does not alter the posted  entry; instead, it makes the adjustments through additional entries.Accounting Rule: The accounting rule for this invoice line.

Accounting rules: are used to recognize revenue over multiple general ledger periods. If you entered an invoicing rule at the invoice header–level, you must enter a value in this field. If you did not enter an invoicing rule, Receivables skips this field. If you have selected a standard memo line or an item with an accounting rule for this invoice line, Receivables defaults this field to that accounting rule.
Amount: The specific amount of the invoice line to assign to this revenue account.
GL Date: The date that this account will post to your general ledger.
The default is the general ledger date you entered for this invoice. You cannot change this date. If you are using invoicing rules, Receivables does not display the general ledger date until you run the Revenue Recognition Program.
Percent (%): The percentage of this invoice line to assign to this revenue account.Entering Freight Information

Recognizing Revenue

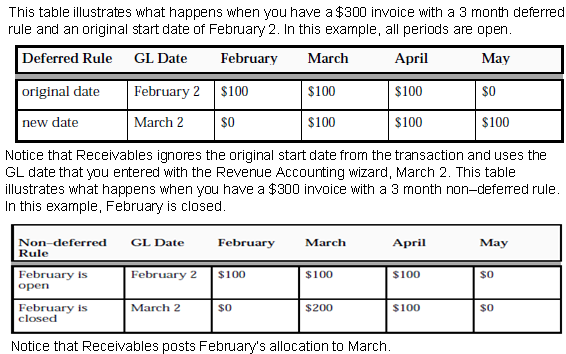
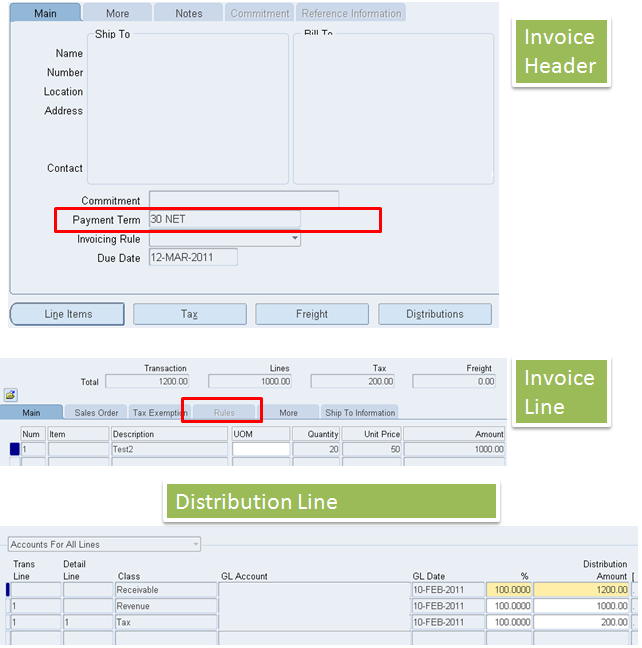
Please read the basic concepts of payment terms, Invocing with rules and accounting rules @
http://www.oracleug.com/node/9

1. Creating an Invoice for Revenue Recognition

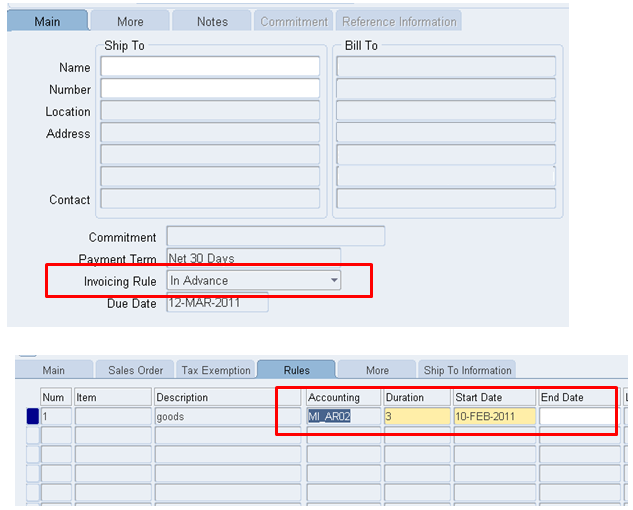
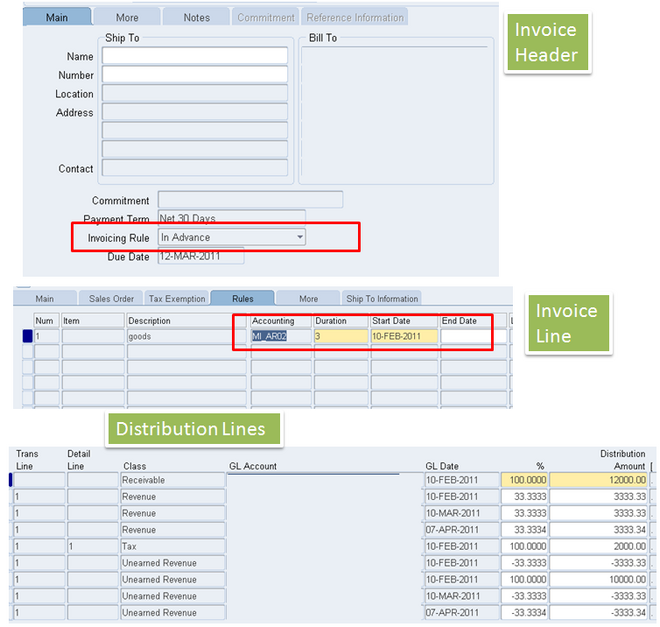
To make an invoice eligible for revenue reorganization, set the invoicing rule and accounting rule while creating the invoice The Invoicing rule provided tells Revenue Recognition how you want it to create the distributions for the Receivable account.

You set the accounting rule in the lines of the invoice, where you also provide duration & rule start date information to make the system create the distributions for the Revenue account.
After you finish creating and completing an invoice, records are created in RA_CUST_TRX_LINE_GL_DIST_ALL that provide a template or model for the Revenue Recognition engine to use.

After the invoice is completed, you will need to run Revenue Recognition so it can create the necessary distributions. There are many different  ways to run Revenue Recognition:

2. Run Revenue Recognition
Run the Revenue Recognition program to generate the revenue distribution records for your invoices and credit memos that use Invoicing and Accounting Rules. You assign accounting rules to recognize revenue over several accounting periods. The Revenue Recognition program will create distribution records for the invoices and credit memos that you create in Receivables and import using AutoInvoice.

2.1 Standalone process in batch mode.
This standalone method provides users the ability to run Revenue Recognition at any given time.

Responsibility: Receivables Manager
Navigation: Control > Accounting > Revenue Recognition

The Revenue Recognition Master Program is capable of running the process using multiple workers. This feature is useful when processing large volumes of data. Invoices pending Revenue Recognition are stored in a queue: AR_REV_REC_Q. Records from this queue are removed once they have been processed by the Master program.

The Revenue Recognition program uses the accounting distribution sets  that you specify in the Transactions window or import into Receivables using AutoInvoice to determine the accounts of your newly created revenue distribution records.

There are two Revenue Recognition programs: Revenue Recognition and Revenue Recognition Master. The Revenue Recognition Master program is for parallel processing only and takes advantage of the Oracle scalability feature to reduce processing time by running on multiple processors, or workers. The Revenue Recognition Master program determines the maximum number of parallel processors needed for your transaction volume and uniformly distributes the processing over these workers. You can set a maximum number of processors for the Revenue Recognition Master program to use at runtime. This scheduling capability allows you to take advantage of off–peak processing time. You choose the Revenue Recognition program that you want to use at runtime.

When you submit the program, Revenue Recognition selects all transactions that have invoicing and accounting rules and that have not yet been processed since you last submitted the program. The program creates the revenue distribution records for all accounting periods specified by the accounting rule on each transaction line. If a deferred accounting rule exists, then Revenue Recognition will create the distribution records for an unearned revenue account.

Revenue Recognition also creates the receivable, tax, freight, and AutoInvoice clearing account assignments which correspond to the GL date of each invoice included in your submission.

If you later decide that the GL distributions need to be reclassified, you can change the individual distribution on the transaction. Receivables will automatically create the reverse accounting entries. If the GL date for a transaction is in a period that has a status of either Closed or Close Pending, Revenue Recognition changes the revenue GL date to the first subsequent period that has a status of Open, Future, or Not Open. If the GL date for a transaction is in a period that has a status of Open, Future, or Not Open, Revenue Recognition creates the revenue in the accounting period specified by the accounting rule.

2.2 Online in Transactions form

Available only in Release 12, in the Transactions form, you can invoke the creation of accounting for a specific invoice.

Responsibility: Receivables Manager
Navigation: Transactions > Transactions

After completing an invoice, or after querying a completed invoice, access from the Toolbar: Menu > Create Accounting.

2.3 Implicitly via the transfer to General Ledger

Since Revenue Recognition creates the GL distributions necessary for posting, the process that transfers to the General Ledger will invoke Revenue Recognition to ensure that all necessary distributions exist before attempting to post. This process has changed between Release 11.5 and 12.

In Release 11.5:
Responsibility: Receivables Manager
Navigation: Interfaces > General Ledger

In Release 11.5, when running the General Ledger Transfer process

  • You can not disable the call to Revenue Recognition
  • The Revenue Recognition execution report is always submitted in Detailed mode


2.4 Submit Accounting
In Release 12.0:
Responsibility: Receivables Manager
Navigation: Control > Requests > Run

Run the request for: Submit Accounting, and provide the parameters requested

Submit accounting is different from Create Accounting,. Create accounting never calls Revenue Recognition. If you use this process, there is a likelihood that you will not post everything from Receivables if there are invoices still pending to be processed by Revenue Recognition.

You are advised to use Submit Accounting which was created specifically for Oracle Receivables. This process calls: Revenue Recognition prior to calling Create Accounting. This ensures the necessary GL distributions are created by Revenue Recognition.


In Release 12.0, when running Submit Accounting

  • You cannot disable the call to Revenue Recognition
  • The Revenue Recognition execution report is always submitted in Summary mode

Entering Commitments

Receivables lets you create two types of commitments:
Deposits: Create a deposit to record a customer’s prepayment for goods or services that you will provide in the future.
Guarantees: Create a guarantee to record a contractual agreement with your customer to conduct business over a
specified period of time.

Remaining Balances
Deposit Deposit balances refer to the amount due remaining on the deposit. Receipts and credits reduce the deposit balance.
Commitment Commitment balances refer to the contractual amount that has not yet been invoiced. Invoices against commitments reduce the commitment balance.
Invoice Invoice balances refer to the amount due remaining on the invoice. Deposits, receipts, and credits reduce the invoice balance


Creating customer Commitments

Use the Transaction window to enter or update your customer commitments. Receivables lets you update certain information depending on the commitment status. You define a commitment and then specify the debit and credit accounts. When your customers invoice or credit against their commitments, Receivables automatically adjusts the commitment balance and generates reversing accounting entries.

You can assign sales revenue and non–revenue credit as a percentage of the commitment total. If you do assign sales revenue credit, Receivables ensures that you assign 100% of your commitment total. To assign additional or bonus credit for certain sales, use non–revenue sales credits.
Note: Commitments do not include tax or freight charges.


Enter the payment Terms if this commitment is a deposit.
Receivables calculates the Due Date based on the payment terms and date of this deposit. The default is the payment term assigned to the transaction type you entered for this deposit. Receivables uses the following hierarchy to determine the default payment terms, stopping when one is found:
  •  customer Bill–to site level
  •  customer address level
  •  customer level
  •  Transaction Type
You cannot enter payment terms if the commitment is a guarantee

Completing Transactions

Before you can complete a transaction in Receivables, you must ensure that all required information for that transaction type has been entered.


After you enter all required information, you can change a transaction’s status to Complete in the Transaction or the Transactions Summary window. When you complete an invoice, Receivables creates payment schedules based on the payment terms and invoice date you specified and includes the invoice in the standard aging and collection process if
the transaction type has Open Receivables set to Yes.
Attention: If you change the transaction type of a completed invoice to a type in which Open Receivable is set to No,
Receivables no longer includes this invoice in the standard aging and collection process.

If you update a completed invoice by changing values on which AutoAccounting depends (for example, salesperson), and
AutoAccounting fails, Receivables displays a warning message and changes the status of the invoice to Incomplete. This is also true if you modify values that Receivables uses to calculate tax (for example, ship–to address).

Use the Complete button in the Transactions or Transaction Summary window to complete transactions. Use the  omplete check box when the form is in Query mode to indicate the status of transactions you want to view.

More on Transactions

Copying Invoices
The Copy Transactions window lets you automatically create invoices for goods or services that you regularly provide to your customers. For example, you need to bill your customers for services or products provided once a month for two years, but do not want to manually create a new invoice every month. By creating invoice copies, you can quickly create a group of invoices that share the same characteristics.

All of the dates for the copied invoices (for example, invoice date, GL date, and due dates) are determined using the copy rule that you specify.
When you copy invoices, Receivables does not derive the exchange rates and tax rates from the copied invoice date. Instead, it derives the exchange rate and tax rate from the date of your first copied invoice. Consequently, if you are copying invoices in a foreign currency, or have tax rates that change over time, you may need to manually update the
exchange rate and tax rate. 

You can use the Transactions window to update the tax rates for your copied invoices.
Attention: If the invoice you are copying has lines that use inclusive tax codes and a tax rate has changed, the line amounts for your copied invoice(s) will also be different from the original transaction. This is because the line amount for a line assigned to a tax inclusive tax code includes tax. If the tax rate for any of the original invoice’s lines has changed, the line, tax, revenue, and sales credit amounts for the copied invoice(s) will be different from the original transaction.
Receivables uses the invoice amount from your model invoice on your copied invoices. Therefore, even if the model invoice has been credited, adjusted, or paid, the amount for all copied invoices is equal to the original invoice amount.

You can copy invoices as often as you want and create copies from any existing invoice, even if it is closed.
You create, review, and update copied invoices in the Transaction window.

Voiding Transactions
Receivables lets you make a debit memo, credit memo, on–account credit, invoice, or chargeback invalid by updating the transaction type.
You can only void a transaction if both of the following are true:

  • it does not have any activity against it
  • it has not been posted to your general ledger

Maintaining Transactions
You can review and update invoice, debit memo, deposit, guarantee, credit memo, on–account credit memo, and chargeback information for transactions you enter manually or import into Receivables using AutoInvoice.
If the Allow Change to Printed Transactions system option is Yes, you can update most transaction information, even if it has been printed.
However, once there is activity against it, Receivables does not let you update most transaction attributes. Activity includes actions such as payments, credit memos, adjustments, and including the transaction on a consolidated billing invoice.


You can update debit item information such as the due date, PO number, salesperson, and remit–to address. You can also place a debit item in dispute by specifying a dispute amount, exclude a debit item from finance charges, or update the bill–to information. Receivables also lets you enter or update the exchange rate of your debit item if your debit item does not have any activity against it.
You can also record other information by adding notes about your debit items in the Notes tabbed region of the Transaction window.

Printing Transactions
The Print Invoices window lets you generate invoices, debit memos, commitments, chargebacks, credit memos, and adjustments to send to your customers. You can preview the transactions that will print by selecting the Invoice Print Preview program.
Note: You can also use Consolidated Billing to create a single document that summarizes all of a customer’s activity for a
specific period. The system option Allow Change to Printed Transactions determines whether you can update a transaction after it has been printed. However, you cannot update a transaction if it has activity against it, regardless of how you set this option. Examples of activity include payments, credit memos, adjustments, and including the transaction on
a consolidated billing invoice.

The Print Date field in the Transactions window shows you the last time a transaction was printed.

Crediting Transactions

Receivables lets you fully or partially credit your invoices while it automatically creates all the accounting reversal entries for you. You can use the Credit Transactions window or AutoInvoice to create your credit memos. The accounting is always the same whether the credit memo is imported through AutoInvoice or entered manually using the Credit Transactions window.

Use the Credit Transactions window to enter, update, and review credit memos against specific invoices, debit memos, or commitments. You create credit memos to reduce the balance due for a transaction. When you credit a transaction, Receivables creates the appropriate accounting entries and reverses any sales credit assigned to your salespeople.

1. Receivables lets you credit an entire invoice or specific invoice lines. You can also credit freight for an entire invoice or only for specific invoice lines. You can delete an incomplete credit memo if the system option Allow Invoice Deletion is set to Yes.

2. A transaction must be complete before you can create a credit memo against it.

3. If you are crediting a transaction that uses invoicing and accounting rules, choose one of the following Rules Methods:
Last In First Out (LIFO): Choose this option to back out revenue starting with the last general ledger period and reverse all prior periods until it has used up the credit memo.
Prorate: Choose this option to credit an equal percentage to all account assignments for this invoice.
Unit: Choose this option to reverse the revenue for the number of units you specify from an original line of the invoice.

4. If you are crediting a transaction that has multiple installments, choose one of the following Split Term Methods:
First in First Out (FIFO): This method credits the first installment first.
Last In First Out (LIFO): This method credits the last installment first.
Prorate: This method credits the installments of the credited transaction and prorates them based on the amount remaining for each installment.

Crediting Transaction Lines
In addition to crediting either part or the entire balance due of a transaction, Receivables lets you credit individual transaction lines. For example, if a transaction has several line items, you can partially or fully credit the amount due for each line or only a single line item.
 
 
Reviewing Accounting Information
Receivables lets you enter or review the account assignments for a credit memo or tax line in the Accounting window. Receivables uses AutoAccounting to create the default values for the revenue and tax accounts of your credit memo lines.
If this transaction is a credit memo against a specific invoice or commitment, and the profile option AR: Use Invoice Accounting For Credit Memo is set to Yes, Receivables does not use AutoAccounting to create the default values for these accounts. Instead, reversal entries are created using the accounts of the invoice or commitment that you are crediting.

Unapplying Cash when Crediting a Transaction
Receivables lets you unapply cash that was previously applied to a transaction and create a credit memo for that amount. For example, your customer returns a product for which they have already paid in full. You need to unapply the cash for that transaction, then create a credit memo for the full amount.
To unapply cash and create a credit memo:
1. Navigate to the Receipts window.
2. Query the receipt to unapply, then choose Applications.
3. Uncheck the Apply check box next to the transaction.
4. Save your work.
5. Navigate to the Credit Transactions window.
6. Query the transaction from step 3.
7. Create a credit memo for the full amount.

Receipts

A receipt is a written acknowledgement that a specified article or sum of money has been received as an exchange for goods or services. The receipt acts as the title to the property obtained in the exchange.

In oracle receipts are processed in three steps: Creation(approval)/Confirmation, Remittance and Clearance.

Manual Receipts

  • Manual receipts are entered in receipt workbench and can be entered individually or in a batch.
  • The customer balance is updated when the receipt is saved.
  • Manual receipts can be cash or miscellaneous receipts.

QuickCash Receipts

  • You can enter receipts manually or using AutoLockbox. QuickCash receipts must be entered in a batch.
  • The customer balance is updated when the batch is posted.
  • You can simplify the receipt application process using AutoCash rule sets.

Automatic receipts

  • Automatic receipts can be a bill of exchange (BOE), direct debit, or credit card receipt and Automatic receipts must be entered in a batch.
  • Automatic receipts are created, approved, and formatted. The customer balance is updated during the approval process.
  • Automatic receipts require customer authorization and customer bank information, and they can require customer confirmation.

Receipt Type

You can enter two types of receipts in Receivables:

  1. Cash receipts: Payment (such as cash or a check) that you receive from your customers for goods or services.
  2. Miscellaneous receipts: Revenue earned from investments, interest, refunds, and stock sales.
  • You can apply receipts to invoices, debit memos, deposits, guarantees, on–account credits, and chargebacks.
  • You can partially or fully apply a receipt to a single debit item or to several debit items.
  • You can enter receipts and apply them to transactions in either Open or Future accounting periods.
  • If you do not specify a customer for a receipt, the receipt is unidentified. In this case, the receipt amount appears in the Unidentified field in the Receipts window (Application Summary tabbed region). You cannot apply an unidentified receipt.

Receipt Status
A receipt can have one of the following statuses:
Approved: This receipt has been approved for automatic receipt creation. This status is only valid for automatic receipts.
Confirmed: For manually entered receipts, this status indicates the receipt belongs to a receipt class that requires remittance. For automatic receipts, this status indicates the receipt has been confirmed.
Remitted: This receipt has been remitted. This status is valid for both automatic and manually entered receipts.
Cleared: The payment of this receipt was transferred to your bank account and the bank statement has been reconciled within Receivables. This status is valid for both automatic and manually entered receipts.
Reversed: This receipt has been reversed. You can reverse a receipt when your customer stops payment on a receipt, if a receipt comes from an account with non–sufficient funds or if you want to re–enter and reapply it in Receivables. You can reverse cash receipts and miscellaneous receipts.

1.1 Receipts Batches
1.2 Cross Currency Receipts
1.3 More on Receipts (Standard Reversal and Debit memo reversal)


2.1 Applying Receipts
2.2 Chargebacks and Adjustments
2.3 Bills of Exchange

Demo : Customer Receipts - Bank Deposits - Remittances

Applying Receipts

Use the Applications window to apply your receipts or on–account credits.

  • You can apply all or part of a receipt or on–account credit to a single debit item or to several debit items. For example, your customer may send a single check to pay all of one invoice and part of another invoice. Or, a customer may have an on–account credit he will expect you to use with his receipt to close an open debit item.
  • You cannot apply an unidentified receipt; you must specify the customer who remitted the receipt before you can apply it to a transaction.
  • You can apply a receipt to an unrelated customer’s debit items if the system option Allow Payment of Unrelated Invoices is set to Yes.
  • You can apply receipts to any type of transaction except guarantees and standard credit memos.
  • You can also combine on–account credits with a customer’s receipts to increase the amount you can apply to debit items, leave partial receipt amounts unapplied, or place an amount on–account. If you leave partial receipt amounts unapplied, you can write off the remaining receipt balances.
  • You can apply receipts in the same foreign currency as your transactions. Enter foreign currency exchange rate information using predefined exchange rates, or enter your own rate. When you post a foreign currency receipt application to the general ledger, Receivables records a realized gain or loss amount.
  • If you have set up Receivables to use cross currency receipts, you can apply a receipt in one currency to one or more transactions in different currencies.
  • Receivables uses the transaction type of the debit item to which you are applying the receipt to validate the application amount. If the transaction type does not allow overapplication, you cannot enter an amount that would reverse the sign of the debit item. If the transaction type specifies Natural Application only, you must enter an amount that brings the balance due closer to zero.
  • Receivables uses the Application Rule Set assigned to this debit item’s transaction type to determine how to reduce the open line, tax, freight, and finance charge amounts. If there is no application rule set assigned to this item’s transaction type, Receivables uses the application rule set in the System Options window.
Account entries
1. If the receipt does not require remittance and clearance then the account entries would be
2. Account entries for receipt with remittanc and clearnce are
Confirmed Receipt Dr.
                                  Unidentified Cr.
Unidentified Dr.
                                  Unapplied Cr.

Unapplied Dr.
                                   Receivables Cr
Remitted /Cash Clearing Dr.
                                           Confirmed Receipt Cr.
Cash Account Dr.
                                           Remitted /Cash Clearing

Cross Currency Receipts

When your customer remits payment for an invoice, debit memo, or chargeback, the receipt is usually in the same currency as the transaction. However, there may be times when your customer remits payment in a currency that is different than the currency of the open debit item. For these occasions, Receivables lets you create cross currency receipt applications to let you fully or partially process the payment.

For example, you create Invoice 101 in Canadian dollars (CAD) but your customer sends a receipt in Deutsche marks (DEM) as payment. Using the remittance information provided by your customer, you can either fully or partially apply this receipt to Invoice 101. Receivables automatically calculates the open balance on the invoice (if any) and the foreign exchange gain or loss (FXGL) for this application. You can apply receipts to transactions using any currency defined in Oracle General Ledger.

Because of fluctuating exchange rates between currencies, cross currency applications must be evaluated to determine their effect within Receivables and the corresponding accounting entries created in your general ledger. With each cross currency application, you can incur either a foreign exchange gain or loss (FXGL). 
 
When you apply a receipt to a transaction that is in a different currency, Receivables first determines the transaction and the receipt amounts in your functional currency. Receivables then compares these amounts to determine the foreign exchange gain or loss for this application. If the result is positive, you will incur a foreign currency exchange gain for this application; if the result is negative, you will incur a foreign exchange loss.

Note: As with same currency receipt applications, Receivables accounts for your FXGL using the Realized Gains and Realized Losses accounts that you defined in the System Options window.
 

Viewing Discounts on a Cross Currency Receipt Application
When you apply a receipt to multiple transactions that are in different currencies, Receivables does not display the total discount amount in the Receipts window (Application Summary tabbed region). This is because Receivables always calculates discounts in the currency of the transaction. Since there are multiple transactions with multiple currencies involved in this type of application, the total discount cannot be expressed in a single currency. Therefore, you can only view the discount for each application separately in the Applications window.
To do this, perform the following:

  • query the receipt in the Receipts window
  • choose the Applications button
  • scroll to display the Discounts field (if this field does not appear in the window, choose Show Field, then Discounts from the Folder menu)

Accounting Entries in Multiple Currencies
When you enter a receipt or a transaction that is not in your functional currency, Receivables requires that you enter the applicable exchange rate in the Exchange Rates pop up window. This lets Receivables  account for amounts in both your functional currency and the currency of the transaction.

Customer Remittance Information
When applying cross currency receipts, your customer needs to provide you with the following remittance information:

  • to which invoice(s) this receipt should be applied
  • if the receipt is a partial payment, how much of each invoice is to be settled (this is the ’Amount Applied’ field in the Applications window)
  • how much of the receipt should be allocated to this transaction (this is the ’Allocated Receipt Amount’ field in the Applications window)

Note: Alternatively, your customer can provide the exchange rate used to convert the transaction currency to the receipt
currency (this could be a previously agreed upon rate). If your customer provides this exchange rate, Receivables automatically calculates the Allocated Receipt Amount. For information on how the cross currency rate field and the Allocated Receipt Amount are mutually exclusive.

Receivables Application Rule Sets

Application Rule Sets determine the steps Receivables uses to apply partial payments to your customer’s open debit items and how discounts affect the open balance for each type of associated charges.
Transactions usually consist of line items, tax, freight, and finance charges, or a combination of these. Depending on your business needs, you can reduce each associated charge proportionately, close the outstanding tax amount first, or apply a payment to the line and tax amounts and use any remaining portion to reduce the freight and finance charges.

Application Rule Sets let you specify how Receivables reduces the balance of your open debit items when you:

  • Apply a receipt to an invoice or debit memo
  • Run Post QuickCash

You can assign a rule set to each of your transaction types and enter a default rule set in the System Options window. Receivables uses the following hierarchy to determine which application rule set to use, stopping when one is found:

  1. Transaction Type
  2. System Options
    Note: Receivables Application Rule Sets always apply payments and discounts to the gross line amount (the net line amount plus any associated tax amount). For more
    information, see: Tax Inclusive in the Oracle Receivables Tax Manual.
Predefined Application Rule Sets
Receivables provides the following predefined Application Rule Sets.
You can view these rule sets and create your own rule sets in the Application Rule Sets window.
 
Line First – Tax After
This rule set first applies the payment to the open line amount, and then applies the remaining amount to the associated tax. If the payment is greater than the sum of the line and tax, Receivables attempts to close each open item by applying the remaining amount in the following order, stopping when the payment has been fully applied:
1. Freight
2. Finance charges
Any remaining receipt amount is applied using the Overapplication Rule. This is the default application rule set in the System Options window.
 
Line First – Tax Prorate
This rule set applies a proportionate amount of the payment to the open line and tax amount for each line. If the payment is greater than the sum of the open line and tax amounts, Receivables attempts to close each open item by applying the remaining amount in the following order, stopping when the payment has been fully applied:
1. Freight
2. Finance charges
Any remaining receipt amount is applied using the Overapplication Rule.

Prorate All
This rule set applies a proportionate amount of the payment to each open amount associated with a debit item (for example, any line, tax, freight, and finance charge amounts for this item).
Receivables uses the following formula to determine the applied amount:
Any remaining receipt amount is applied using the Overapplication Rule.

Overapplication Rule
Each application rule set includes an Overapplication Rule by default.
This rule applies any remaining receipt amount after the balance due for all charges has been reduced to zero. If the transaction type for the debit item has the Allow Overapplication check box set to Yes, Receivables applies the remaining amount to the lines, making the  balance due negative. If the item’s transaction type has Allow Overapplication set to No, you can either place the remaining amount on–account or leave it ’Unapplied’.
When using AutoLockbox, Receivables uses your AutoCash Rule Set to determine how to apply the remaining amount.

Transactions with Mixed Sign Balances
An additional consideration is the situation in which you apply a payment to a transaction that has mixed sign balances. ’Mixed sign balances’ indicates that not all of the charges that make up a transaction have the same sign (positive or negative). In this case, the procedure Receivables uses to apply a payment is different than when applying to transaction amounts that are all positive or all negative (i.e. ”same sign” balance).

When you apply a payment to a transaction that has mixed sign balances, Receivables applies the payment only to those amounts that have the same sign as the payment. For example, if the payment is for a positive amount (i.e. not a credit memo), Receivables only reduces the charges that have a positive balance; any negative balances are not affected.
As with transactions having a same sign balance, Receivables will apply any remaining amounts according to the  verapplication rule assigned to your Application Rule Set.
 
Notes:
AutoCash rule sets decide which rules are applied to select the transactions to be applied for the receipt. Once that is done Application rule set decides how the open balances of the customer are applied i.e the sequence in which the line amount/tax/fright are deducted from open balance.

Example : You create a receipt of $1000 for a customer which has 4 different invoices open. AutoCash rule ‘ll decide the sequences of the invoice in which the payment ‘ll be applied i.e INV1, INV3, INV4 and INV2.
Now when INV1 is selected, the application rule set‘ll decide which amount (Line, Tax or Freight) ‘ll be applied first and next.

Chargebacks and Adjustments

Receivables lets you create adjustments and chargebacks against transactions to which you are applying a receipt. You can create multiple chargebacks and adjustments against each transaction, for positive or negative amounts.

  • Receivables lets you enter a chargeback against a credit memo or an on–account credit if they have a positive balance.
  • Receivables uses the transaction type of the transaction you are adjusting to validate the adjustment or chargeback amount. If the transaction type does not allow overapplication, you cannot enter an amount that would reverse the sign of the balance of the debit item.
  • Chargebacks and adjustments do not follow the natural application rules; this lets you adjust transactions in either direction, regardless of the Natural Application flag.
  • If the profile option AR: Cash – Allow Actions is set to No, the Chargebacks and Adjustments buttons are not available in the Applications window.

Creating a Chargeback
Use chargebacks to create a new debit item for your customer when closing an existing debit item. For example, your customer sends payment of $75 for a $100 invoice. You can apply the receipt to the invoice, then create a chargeback for the balance due.
  • Receivables requires that you automatically number your chargebacks.
  • You can change the base number for your chargeback numbering sequences by updating the Last Invoice Number field for this chargeback batch source in the Transaction Sources window. 
  • Charge backs can be viewed in transacrtion window but needs to be created while applying receipts to transactions. the following error message 'll be shown if you try to create a chargeback in transaction form.

To create a chargeback:
1. Navigate to the Receipts window. Query or enter the receipt. Choose Applications.Select or enter the Transaction to which you want to apply this receipt and click on Chargebacks button.
2. Enter the transaction Type and the Amount of this chargeback. The default chargeback amount is the remaining amount of the transaction. Receivables displays the new remaining amount in the Balance Due field. You can enter an amount greater than the balance due only if the Allow Overapplication option for this transaction type is Yes.
3. If document numbering is enabled and the document sequence associated with this receipt is Manual, enter a Document Number for this chargeback. If the sequence type is Automatic, Receivables assigns a document number when you save.
4. Enter the Account for this chargeback. The transaction type provides the default account, but you can change it.
5. Enter the Due Date for this chargeback. The default due date is the value of the Chargeback Due Date parameter in the System
Options window. For example: Current Date, Deposit Date, Open Invoice Due Date, or Receipt Date.
6. Open the More tabbed region, then enter a Reason for creating this chargeback and any Comments (optional). Chargeback reasons can
include Refund, Billing Error, or Write Off. You can define additional chargeback reasons in the Receivables Lookups window.


After completing chargeback we can verify the intial invoicve against which the chargeback is done and it should reflect the transaction in Adjustments header.

 
After the chargeback is created we can query it in transaction form.
Accounting entries  for chargeback is same as that of invoice i.e Receivable Dr.
                                                                                                                            Revenue Cr.

Creating an Adjustment

Create adjustments to increase or decrease the balance due for an invoice, debit memo, chargeback, or commitment. For example, you apply a receipt to an invoice, but there is still an open balance of two dollars. You can create an adjustment to write off the remaining amount and close the debit item.
Note: If you create an adjustment during a receipt application (for example, to write off a small remaining amount) and then unapply the application later, Receivables reverses the adjustment and assigns it a status of ’Adjustment Reversal.’
 

More on Receipts

Entering Miscellaneous Receipts

Non–invoice related transactions such as investment and interest income are known as miscellaneous receipts in  Receivables. Use the Receipts or Receipts Summary window to enter your miscellaneous receipts.
You can enter miscellaneous receipts in any currency defined in the system if you have at least one remittance bank account with the Receipts Multi–Currency flag set to Yes. If no such bank account exists, you can only enter receipts in the same currency in which bank accounts exist. Receivables uses distribution sets that you define to account for miscellaneous receipts.


Reversing Receipts
Receivables lets you reverse a receipt when your customer stops payment on a receipt or if a receipt comes from an account with non–sufficient funds. You can also reverse a receipt if you want to re–enter and reapply it in Receivables. You can reverse both standard, invoice–related receipts and non–invoice related (miscellaneous) receipts. You can reverse an Automatic Receipt only if its status is Approved.
After you reverse a receipt, you cannot update any of the receipt’s attributes.

Receivables lets you create two types of reversals:
Standard Reversal: When you create this type of reversal, Receivables automatically creates reversal journal entries for your general ledger and reopens all of the debit and credit items that were closed with the original receipt. You can create a standard reversal for a transaction related to a chargeback if there is no activity against the chargeback and the chargeback has not been posted to the general ledger. If the chargeback has been posted to the general ledger, you must create a debit memo reversal (see below).
If you create a standard reversal for a receipt that you have applied, Receivables reverses any adjustments or chargebacks that you created, as long as you have not posted these adjustments to your general ledger.

Debit Memo Reversal: When you create this type of reversal, Receivables does not update any of the receipt activity associated with the original receipt. The new debit memo reversal is actually a new receivable that replaces the item closed by the original receipt. Receivables requires that you create a debit memo reversal if:
– you are reversing a receipt that you previously applied to a chargeback and this chargeback has had any activity against it (for example, another receipt, credit memo, or adjustment), or
– the chargeback or adjustment was posted to your general ledger When you create a debit memo for a receipt reversal, Receivables creates a line on your debit memo that displays the original receipt number associated with the debit memo. In addition, when you save your reversal, Receivables assigns a unique transaction number to your new debit memo.

Reapplying Receipts
You can reapply receipts that you previously applied in error before or after posting these items to your general ledger. When you reapply a receipt, you first ’unapply’ the original receipt applications; this reopens each transaction that was previously closed by the receipt.
  • You can reapply both automatic and manually entered receipts.
  • However, you cannot unapply a receipt that has adjustments associated with it unless you first readjust the transaction to its original amount.
  • In addition, you cannot unapply a transaction if there is a chargeback against it and the chargeback has any activities against it (for example, another receipt or credit memo).

Receipts Batches

Use the Receipt Batches window to create receipt batches or to query existing batches. Batching receipts lets you:

  • View the difference between your control and actual batch counts and amounts as you process your receipts. These differences can alert you to data entry errors, missing or lost receipts, or duplicate entries.
  • Group related receipts together to share default attributes such as receipt class, payment method, and automatic numbering.
  • Manage the time–consuming task of data entry. For example, you have many receipts to enter and want to divide the work among several people. You can create one batch and have each person entering receipts add them to the same batch.
  • You can add duplicate receipts to a batch. Duplicate receipts are receipts that have the same number, amount, and customer information.
  • You can post a receipt batch to your general ledger regardless of its status.
  • You can delete a receipt batch only if it does not contain any receipts.
  • Receivables lets you add receipts denominated in different currencies to a batch. However, the total in the Receipt Batches window reflects amounts entered in all currencies, not the batch currency. For example, if there are two receipts in a batch, one for 400 USD and one for 200 EUR, the total amount for this batch is 600, regardless of the batch currency.
Batch Statuses
A batch has a status that indicates whether it is complete. Receivables automatically updates the status of a receipt batch when you add new
or apply existing receipts in the batch. A batch can have one of the following statuses:
New: This is a new batch that does not yet contain any receipts.
Out of Balance: The actual count and amount of receipts in this batch do not equal the control count and amount.
Open: The actual count and amount equal your control count and amount. However, you have not applied, identified, or placed on–account one or more receipts.
Closed: The actual count and amount match the control count and amount. All of the receipts in this batch have been either applied or placed on–account.

Bills of Exchange

A bill of exchange (BOE) is an agreement between two parties in which one party promises to pay the other a specific amount for goods or services at a future date. The date on which payment is due is known as the maturity date. In Receivables, bills of exchange are similar to receipts: you can enter them either manually or automatically and apply, reverse, confirm, clear, and risk–eliminate them.

 
1. Use the Automatic Receipts program to automatically create bills of exchange and apply them to specific transactions. Use the Receipts window to manually enter bills of exchange and then apply them to one or more open debit items in the Applications window.

2. You determine the required processing steps and numbering information for your bills of exchange by defining a bill of exchange receipt class. As with automatic receipts, bills of exchange generated by the Automatic Receipts program require confirmation only if you check the Require Confirmation check box when you define the receipt class in the Receipt Classes window.

3. The remittance method determines the accounting entries Receivables generates for your bills of exchange, regardless of the creation method.

To help you track and manage bills of exchange, Receivables enables you to:
  • clearly distinguish receipts from bills of exchange in Receivables windows
  • view the total amount of risk created by bills of exchange and regular receipts
  • view all bills of exchange or receipts at risk using variable selection criteria, such as customer name, maturity date, and remittance bank information
  • view the total amount of receipts and bills of exchange at risk for a specific customer or for all customers

Revenue Management


In accrual based accounting method when you create an invoice system creates the accounting entries for
receivable and revenue accounts (i.e Receivable Dr. to Revenue Cr.)
But for some business or legal requirements you might intend to defer the accounting processes till certain activities are performed like confirmation from the customer that the goods have been received at the correct shipping location.

Companies that build bridges or aircraft take years to deliver the product to the customer. In this case, the company cannot just recognize the revenue in the period in which they have sold the product/service as this would result in an incorrect reporting of the PL statement. As per the business requirement the company can recognize different revenue amounts in different accounting periods.
 

Using event-based revenue management, Receivables can automatically evaluate your invoices to determine whether to immediately recognize revenue, or temporarily defer revenue to an unearned revenue account. Revenue is subsequently recognized depending on certain events, such as customer acceptance or receipt of payment. Receivables makes these automatic revenue recognition or deferral decisions based on your organization's established revenue policy, and the existence of any revenue contingencies on the invoice line.

Revenue contingencies are terms and conditions in a sales contract
or order that prevent revenue from being immediately recognized, based on strict revenue recognition requirements mandated by US GAAP and International Accounting Standards. Typical contingencies that can delay revenue recognition are fiscal funding clauses (for government contracts), cancellation clauses, customer acceptance clauses, customer creditworthiness, nonstandard payment terms, and nonstandard refund policies.

Collections

Collections helps you to review and better service your customer accounts using the Oracle Receivables collections workbench.
You can use this workbench to review internal collections policies, which customer accounts have outstanding balances, and discover developing business trends. This chapter also tells you how to create dunning letters, calculate finance charges, and print statements using Oracle Receivables.

Customer Accounts

Receivables lets you view customer account information in a variety of ways. You can view the total amount overdue for a customer or customers in the Account Summary window. You can view all transactions that are past due for a specific customer in the Account Details window.

The Customer Accounts window displays a customer’s credit limit and available credit if you set Display Currency to Yes in the Find Customer Accounts window. Receivables displays a customer’s current account balances in your functional currency using the most recent exchange rate.

Suggestion: To automatically display receipts at risk and include them when calculating a customer’s past due balance,
set the profile option AR: Include Receipts at Risk in Customer Balance to Yes. If this profile option is set to No, you can include receipts at risk by choosing Include Receipts at Risk in Customer Balance from the Tools menu and then re–executing your query.


Account Status: A user defined code to indicate a customer’s current account status. You can define additional account status values in the Receivables Lookups window.

Average Days Late: The average number of days late for receipts by customer and currency. Receivables calculates this value using the following formula:
Average Days Late = Sum (Days Late) / Total Number of Receipts

DSO: Days Sales Outstanding. Receivables calculates this amount using the following formula:
DSO = (Total Outstanding Receivables / Total Sales Amount for Prior DSO Days) * DSO Days
You specify a default value for your days sales outstanding calculation (DSO Days) in the System Options window.

Past Due Transactions: The number of past due transactions for this customer.

Receipts At Risk: The amount of receipts for this customer that have not yet cleared the bank and factored receipts that have not been risk eliminated.

Risk Code: A user defined code to indicate this customer’s credit risk. You can define additional risk code values in the Receivables Lookups window.


Viewing Account Balances by Aging Bucket


Receivables lets you view your customer’s outstanding account balances by aging bucket. Aging buckets are time periods in which you age and can review your debit items. For example, you can define an aging bucket that includes all debit items that are 1 to 30 days past due. You can define your own aging buckets or customize the aging buckets that Receivables provides.

When you view your customer balances by aging bucket, Receivables calculates and displays the total outstanding amount and the credits not aged for unapplied cash, on–account cash, and on–account credits. You can modify your display by specifying an aging bucket or by choosing to age or summarize open credits.
Receivables selects a transaction for aging if its GL date is prior to or the same as the current date. Once selected for aging, Receivables uses the following formula to determine the number of days past due for each transaction:
(Current Date) – (Due Date) = Days Past Due
Receivables then groups each transaction into an aging bucket based upon the number of days it is past due. For example, your customer has four invoices, Invoice 101 to 104, all of which are due within 30 days. For each invoice, this table shows the invoice number, the amount due, the important invoice dates, and the number of days past due:

If you choose to view this customer’s past due transactions using the ’Standard’ aging bucket, Receivables groups these invoices by the least number of days past due first, as illustrated in the table.

Note: This is a simplified example. Activities such as receipt applications, adjustments, and credit memos will affect the open
amount if the activity GL Date is prior to or the same as the current date. You can view open items as of a specific date by running one of the Receivables Aging reports.

Aging Window Field Reference
Dispute Amount: The total amount of this customer’s open balance that is currently in dispute.

On–Account Cash: The total amount of on–account cash for this customer. If you chose to ’Summarize’ Open Credits in the Find Aging window, Receivables displays your on–account cash amount here.

On–Account Credits: The total amount of open on–account credits and credit memos for this customer. On–account credits and credit memos are open until you apply the entire amount to invoices, debit memos, or chargebacks. If you chose to ’Summarize’ Open Credits in the Find Aging window, Receivables displays your on–account credit amount
here.

Outstanding Amount: The receivables balance due, adjusted for all credit items, for this customer. Receivables calculates the adjusted balance for your customer as the outstanding balance minus unapplied cash, on–account cash, and on–account credits. If you chose to ’Age’ Open Credits in the Find Aging window, the Adjusted Balance is the same as the Outstanding Balance because Receivables automatically includes your credits in the bucket amounts.

Pending Adjustments: The amount of adjustments that are currently pending approval.

Receipts At Risk: The amount of this customer’s receipts that have not yet cleared the bank and factored receipts that have not been risk eliminated. You must check the Include Receipts At Risk box in the Find Aging window to view this amount.

Unapplied Cash: The total amount of unapplied cash for this customer. If you chose to ’Summarize’ Open Credits in the Find Aging window, Receivables displays your unapplied cash amount here.

Account Overview

Receivables lets you view the total number and amount of transactions entered, accrued finance charges, and discounts for a customer during a specific period of time. For example, if you specify March 1992, Receivables displays the total number and amount of transactions, on time and late payments, and discounts earned during that period.

Suggestion: To automatically display receipts at risk and include them when calculating a customer’s past due balance,
set the profile option AR: Include Receipts at Risk in Customer Balance to Yes. If this profile option is set to No, you can include receipts at risk by choosing Include Receipts at Risk in Customer Balance from the Tools menu and then re–executing your query.


Account Details


Receivables lets you view detailed or summary information about your invoices, credit memos, debit memos, and commitments that have outstanding balances.
Use the Account Details window to view the status, due date, number of days late, dispute amount, and the balance due for a specific transaction. You can open this window from the Navigator or by choosing Account Details from the Customer Accounts or Aging window. When you select the Account Details button from the Aging window, the Account Details window may show transactions that are not included in the total displayed on the Aging window. The Aging window displays items based on GL Date, while the Account Details window does not. You can view more detailed information about a transaction by choosing the Details button.

If the transaction you are viewing uses the Staged Dunning method, you can also modify its dunning level in this window. You may want to do this, for example, if your customer has remitted payment for a past due item, and you want to reduce the severity of the next dunning letter they will receive. You can update a past due debit item’s dunning level at any time. To display the dunning level for a debit item, choose Show Field from the Folder menu, then choose Current Dunning Level. To modify this item’s dunning level, enter a new dunning level. You can change a dunning level to 0 (zero) or any positive number.
Note: The Account Details window does not display receipts, credit memos, on–account credits, adjustments, and debit items that have a transaction type with Open Receivables set to No.

Transactions assigned to a transaction type with Open Receivables set to No do not update your customer balances
and therefore are not included in the standard aging and collection process.

To view the total amount due by transaction type and time period for a specific customer, choose the Account Overview button. For example, you can view the total number and amount of invoices entered for Customer ABC from August to December, 1998. You can open the Account Overview window from the Navigator or by choosing Account Overview from the Customer Accounts window.

To view information for a specific transaction, such as customer bill–to and ship–to addresses, payment terms, due date, status and invoice lines, choose the Transaction Overview button.

To view the dunning history for a specific transaction, choose the Dunning History button. You can update the due date for a transaction in this window if the profile option AR: Update Due Date is set to Yes.

Account Details Field Reference
This section provides a brief description of some of the fields in the Account Details window.
Balance Due: The balance of the transaction. If this item is an invoice, debit memo, deposit, guarantee, or chargeback, the remaining amount is the amount due. If this item is a receipt or on–account credit, the remaining amount is the amount not yet applied to debit items.
Class: The transaction class of an the transaction or receipt. Classes include invoices, receipts, credit memos, chargebacks, guarantees, deposits, and debit memos.
Dispute Amount: The amount of the transaction that is in dispute or has pending adjustments against it.

Viewing Transaction Balances


Receivables lets you view complete information for a specific transaction in the Balances window. The Balances window displays the original transaction amount, the total amount of receipts, credit memos, adjustments, and finance charges applied to this transaction and any discounts taken.

The Balances window also indicates at what level a receipt, credit, or discount was applied to this transaction and the type of adjustments that were created. For example, you may have created two types of adjustments for a single transaction; one of type ’Charges’ and another of type ’Freight’. Similarly, more than one credit memo may have been applied; one at the Line level and one at the Tax level.

Receivables displays the total amount of each action affecting this transaction in the ’Total’ column and displays how the line, tax, freight, and finance charges balances were affected in the ’Balance’ row. By default, the Balances window displays transaction balances in the currency in which they were entered, but you can view amounts in your functional currency (if different from the entered currency) by checking the Functional Currency box. If the transaction you are viewing is a guarantee or a deposit, Receivables displays the current balance in the Commitment Balance field.


Customer Calls

When a customer’s account or payment for a specific transaction is past due, you can contact the customer by phone and use the Customer Calls window to record the results of your conversation. By speaking with a customer you may learn that they were incorrectly billed, never received the goods or services that were ordered, or have already sent payment for the invoice in question. By entering details about your conversation, you create a record of the contact and can recommend any further collection action.


You can also use the Customer Calls window to place amounts in dispute and review previous calls made to your customers. You can define additional call actions and customer responses in the Receivables Lookups window. You can enter new actions or topics for an existing call, but you can only update the following information:
  • Call Status in the Customer Calls window
  • Follow up Complete check box in the Customer Calls window (Response tabbed region) and the Call Topics window
  • Complete check box in the Actions window
Note: If there are two Transaction Number fields, the profile option AR: Show Billing Number is set to Yes. This profile
option determines whether you can enter both a consolidated billing invoice number and a transaction number. If two fields
appear next to Transaction Number, enter a consolidated billing invoice number in the first field; enter a transaction number in the second field.

Call Actions
Enter call actions during a customer call to indicate any recommended follow–up steps for a collection item. Receivables provides the following call actions:
Alert: Notify management that this item is still outstanding.

Call: Contact the customer for more information.

Collection Action: This transaction requires further collection action.

Collection Follow Up: This invoice, debit memo, or chargeback requires further follow up action.

Credit Memo: Credit memo this transaction or line item. You can generate the Call Action report for this action and have your credit memo department enter the credit memos.

Exclude from Dunning: This option removes your customer from dunning. Your customer remains off the dunning list until you re–include the customer for dunning by updating their customer profile in the Customer Profile Classes window.

Note:
If you attempt to exclude from dunning a customer site that does not have a profile class but another of this customer’s sites does have a profile class, Receivables displays the following message:
”No site level profile exists. Do you want to update the customer profile?” If you choose Yes, Receivables changes
the profile class at the customer level and the customer will be excluded from dunning. If you choose No, Receivables does not update the profile class. In this case, you can define a profile class for this site in the Customers window, which will exclude the site from future dunning submissions.

Partial Dispute: Your customer disagrees with an open invoice, debit memo, or chargeback. For example, if your customer disagrees with an open debit item line amount, you can place that line in dispute for further research. You can create new dispute actions and update or delete existing dispute actions. To update an existing dispute amount for a debit item, query up the record and update the Amount field. To mark an amount as no longer in dispute, query your customer’s action,
then either update the Amount to zero, or delete the record. Choose this option if you want this invoice to appear in the Disputed Invoice report.

Recording Call Actions

Use the Call Actions window to recommend follow–up activity after recording a customer call. You can place items in dispute, mark an item for further collection action, or update or delete existing disputes.

You can define additional call actions in the Receivables Lookups window.

Follow up actions that you enter against a customer or specific transaction appear in the Schedular window for your collectors toreview.
Note: You can only create new rows in the Call Actions window; you cannot modify existing data.


Completing a Call Action
You can indicate that a specific call action has been executed by marking it ’Complete’ in the Call Actions window. Completing call actions lets you track items that require additional customer contact and record your progress.
1. Navigate to the Customer Calls window.
2. Query the call.
3. Choose Actions.
4. Check the Complete box next to the call action.
5. Save your work.

Topics : Placing an Item In Dispute

If your customer disagrees about the outstanding balance for an item, you can mark that item or a specific amount due as ’in dispute.’ Amounts that are in dispute appear in collections reports. Receivables does not prevent you from applying payments to disputed transactions.
You can choose whether to calculate finance charges on disputed items when printing your statements.
You can place items in dispute from the Customer Calls window, the Installments window, or by using iReceivables.


To place an item in dispute:
1. Navigate to the Customer Calls window.
2. Query or enter the customer call.
3. Choose Topics.
4. Select the transaction, then choose Actions.
5. Enter a dispute Action, then enter the Amount in dispute.
6. Save your work.

Viewing Items in Dispute
Receivables lets you view disputed items in the Dispute window. The Dispute window displays the date an item was placed in dispute, the amount in dispute, and the person who placed the item in dispute. You can also review items in dispute by creating the Disputed Invoice Repor

Credit Holds

When a customer is consistently late in making payments, has exceeded their credit limit, or is identified as a bad risk, you can prevent additional credit purchases by placing their account on credit hold. When a customer account is on credit hold, you can still create new sales orders for that customer in Oracle Order Management. However, all new orders will have a status of ’on hold’ and you will not be able to book or ship them until the hold on the customer account is removed.

A credit hold does not prevent you from creating new transactions for a customer in Receivables.
Note: You can place a credit hold at either the customer account or site level.

To place a customer account on credit hold:

1. Navigate to the Customer Accounts window.
2. Query the customer account.
3. Choose Credit Hold, then choose OK to acknowledge the message.

Customer Correspondence

Regular correspondence is an effective way to create and maintain good relationships with your customers. Receivables provides three ways to correspond with your customers: printing account statements, printing dunning letters, and making customer calls.
Receivables lets you view all previous customer correspondence in the Correspondence window. You can view all previous contact with your customers, including dunning letters, customer calls, and account statements in this window.

Prerequisites

  • Assign profile classes to customers.
  • Define dunning letters.
  • Create dunning letter sets.

Scheduler - Reviewing Collector Actions

When you contact a customer to discuss an overdue account or payment for a specific transaction, you enter a specific call action in the Call Actions window. Call actions indicate whether an issue has been resolved or requires further follow–up activity. You can view items that require further collection activity in the Scheduler window.

The Scheduler window lists the follow–up date, the recommended collection action, and the customer to contact. You can also view the Follow Up Action and Notes information that you entered in the Call Actions and Call Topics windows. To display a particular field, choose Show Field from the Folder menu, then select the field to display.


Bills Receivable

A bill receivable is a document that your customer formally agrees to pay at some future date (the maturity date). The bill receivable document effectively replaces, for the related amount, the open debt exchanged for the bill. Bills receivable are often remitted for collection and used to secure short term funding.

Oracle Receivables provides a comprehensive solution to managing the entire life cycle of bills receivable: creation, acceptance, remittance, updates, history, and closing.

Creating Bills Receivable
Oracle Receivables treats a bill receivable as a separate transaction. You can create bills receivable individually through the Bills Receivable window, directly exchange a completed invoice for a bill receivable in the Transactions workbench, or create bills receivable in batch using the Bills Receivable Transaction Batches window or the Bills Receivable Batch Creation concurrent program. You can create signed, unsigned, and customer–issued (promissory note) bills receivable.

Remitting Bills Receivable
You can remit bills receivable to a bank or factoring company using the Remittances window. Choose to factor remittances with or without recourse. Optionally print bills receivable as supporting documentation for the bank or for your own records. Run the Bills Receivable Maturity and Risk program and report to apply receipts and eliminate risk on remitted bills factored with recourse. You can further automate the creation of a remittance batch by using the inbound API.

Managing Bills Receivable
Use the Bills Receivable Portfolio Management window as an analysis tool and to record changes to a bills receivable transaction. You can:

  • Record customer acceptance of a bill receivable
  • Endorse a bill
  • Manage risk associated with factored bills
  • Mark a bill as unpaid or protested
  • Cancel a bill
  • Recall a bill from a remittance batch
  • Exchange one bill for another
  • Place or remove a bill on hold
  • View bill details, including the current status
  • View the life cycle of events for each bill
  • Utilize folder functionality to meet your analysis needs
You can also review bills receivable transactions using the Collection and Receipt workbench features. To further automate the update of items not paid by a customer, you can choose to utilize the Unpaid Bills Receivable API.

Notes:
Bills receivable is same like the debtor the only and the minor difference between is while selling the goods on the credit we open the debtor account and when the debtor give bills in regards of the payment of the credit goods purchased we open the bills receivable accounts and if the bill is not matured on the due-date or dishonoured we again transfer the bills receivable in the debtors account.

Bills Receivable Creation

1. There are four methods in Oracle Receivables for exchanging transactions for bills receivable:

  • Manually, using the Bills Receivable window and the Assignments window.
  • Directly, by exchanging a transaction in the Transactions window for a bill receivable.
  • Automatically, by creating a bills receivable batch using the Bills Receivable Transaction Batches window.
  • Automatically, by submitting the Bills Receivable Batch Creation concurrent program in the Submit Request window.
2. When you create a bill receivable manually, you can assign and group transactions that have the same currency and exchange rate as the bill according to your own requirements.
When you create bills receivable automatically, you must assign transactions a bills receivable creation payment method. Receivables collects and groups transactions into bills receivable based on selection criteria, currency, exchange rate, paying customer bank account, and the rules defined on the bills receivable creation payment method. (Transaction types are assigned to bills receivable receipt class.)

3. The bills receivable transaction type assigned to the bill receivable determines if the bill is issued by the drawee (promissory note), requires drawee acceptance (signed bill), or does not require drawee acceptance (unsigned bill). The transaction type also determines the printing options for the bill.

Note: While a transaction is assigned to a bill receivable that is pending drawee acceptance, you cannot perform any activity on the transaction, such as applying receipts, credit memos, or adjustments.

4. Bills Receivable Accounting
After you exchange a transaction for a bill receivable, the transaction is reduced by the exchanged amount. Accounting for the bill receivable occurs:
  • when the bill receivable is accepted by the drawee, or
  • when a bill receivable that does not require acceptance is completed.
The initial accounting for a bill receivable is a debit to Bills Receivable and a credit to Accounts Receivable for each transaction exchanged. Receivables derives the Bills Receivable account segments from AutoAccounting and inherits the Accounts Receivable account segments from each transaction exchanged.

Manually Creating a Bill Receivable

Use the Bills Receivable window to manually create a bill receivable and assign transactions to the bill. You can also query and update existing bills receivable in this window.

You can designate a maximum amount for the bill. If you do, then the total amount of the transactions assigned to the bill must equal the designated maximum amount in order to complete the bill. If you do not designate a maximum amount, Receivables calculates the amount of the bill as the sum of assigned amounts when you complete the bill.

The values for the Signed and Issued by Drawee boxes are derived from the bills receivable transaction and are displayed for reference only. Receivables updates the Acceptance Date and Acceptance GL Date when a bill that requires acceptance is accepted, and updates the Remittance Date and Remittance Batch when the bill is remitted.
After you enter general information to create the bill, you can:

  • Enter drawee and remittance bank information.
  • Assign transactions to the bill.
  • Complete the bill.
  • Accept a bill.
Pre-requisities
  • Define AutoAccounting.
  • Define bills receivable transaction types.
  • Define transaction batch source(s).
  • Define customer drawees and drawee sites..
  • Define document sequences (optional).
  • Create a customer with drawee site.


Manually Assigning Transactions to a Bill Receivable

Use the Assignments window to manually assign transactions to a bill receivable, remove transactions from a bill receivable, and review assigned transactions. You can assign and unassign transactions to a bill until the bill is completed or, for bills that require acceptance, until the bill is accepted.

You can manually assign any class of transaction to a bill except guarantees. You can also assign a bill that has a status of Unpaid to a new bill receivable.
By default, you can only assign transactions that belong to the drawee and its related customers. If you set the Receivables system option Allow Payment of Unrelated Transactions to Yes, you can assign transactions of unrelated customers.
You can assign full or partial transaction amounts to a bill. The unassigned portion of a transaction remains an open item. If you designated a maximum amount for the bill, you can only assign transactions up to the designated maximum amount. You cannot complete a bill receivable with a designated maximum amount until the bill is fully assigned.

Note: Bills receivable assignments follow the natural application rule, even though the individual transactions assigned to the bill may allow for overapplication. You can only assign transactions that have the same currency as the bill receivable. Transactions assigned to the bill must share the same functional exchange rate. The bill inherits the exchange rate from the
transactions assigned to it when you complete the bill. If you want to assign transactions with a different currency, you must uncheck any transactions already assigned to the bill and enter the new currency in the Currency field.

Setting Up

Payment terms @
http://www.oracleug.com/user-guide/order-management/payment-terms
Accounting Rules & Invoicing Rule @
http://www.oracleug.com/user-guide/order-management/setup-steps-vi-payment-terms-accounting-rules
 

AutoAccounting

Define AutoAccounting to specify how you want Receivables to determine the general ledger accounts for transactions that you enter manually or import using AutoInvoice. Receivables creates default accounts for revenue, receivable, freight, tax, unearned revenue, unbilled receivable, finance charges, bills receivables accounts, and AutoInvoice clearing (suspense) accounts using this information.

When you enter transactions in Receivables, you can override the default general ledger accounts that AutoAccounting creates. You can control the value that AutoAccounting assigns to each segment of your Accounting Flexfield, such as Company, Division, or Account. You must define AutoAccounting before you can enter transactions in Receivables. Suggestion: If you use the multiple organization support feature, you can set up AutoAccounting to derive the Product segment of your Revenue account based on inventory items. To do this, define the Product segment of your Revenue account to use Standard Lines and specify a Warehouse ID when entering transactions.

  1. AutoInvoice Clearing: The clearing account for your imported transactions. Receivables uses the clearing account to hold any difference between the specified revenue amount and the selling price times the quantity for imported invoice lines. Receivables only uses the clearing account if you have enabled this feature for the invoice batch source of your imported transactions.
  2. Receivable: The receivable account for your transaction.
  3. Revenue: The revenue and finance charges account for your transaction.
  4. Freight: The freight account for your transaction.
  5. Tax: The tax account for your transaction.
  6. Unbilled Receivable: The unbilled receivable account for your transaction. Receivables uses this account when you use the Bill In Arrears invoicing rule. If your accounting rule recognizes revenue before your invoicing rule bills it, Receivables uses this account.
  7. Unearned Revenue: The unearned revenue account for your transaction. Receivables uses this account when you use the Bill In Advance invoicing rule. If your accounting rule recognizes revenue after your invoicing rule bills it, Receivables uses this account.
  8. Bills Receivable: The bills receivable account for your transaction. Receivables uses this account when you exchange  transactions for bills receivable.
  9. Factored Bills Receivable: The factored bills receivable account for your bills receivable transactions.
  10. Remitted Bills Receivable: The remitted bills receivable account for your bills receivable transactions.
  11. Unpaid Bills Receivable: The unpaid bills receivable account for your bills receivable transactions.
For each segment, enter either the table name or constant value that you want Receivables to use to get information. When you enter an account Type, Receivables displays all of the segment names in your Accounting Flexfield Structure. Segments include such information as Company, Product, Department, Account, and Sub–Account. Receivables lets you use different table names for different accounts. Choose one of the following table names:
  1. Bill To Site: Use the bill–to site of the transaction to determine this segment of your revenue, freight, receivable, AutoInvoice clearing, tax, unbilled receivable, and unearned revenue account.
  2. Drawee Site: Use the drawee site table to determine this segment of your bills receivable, factored bills receivable, remitted bills receivable, and unpaid bills receivable account.
  3. Remittance Banks: Use the remittance banks table to determine this segment of your factored bills receivable and remitted bills receivable account.
  4. Salesreps: Use the salesperson’s table to determine this segment of your revenue, freight, receivable, AutoInvoice clearing, tax, unbilled receivable, and unearned revenue account. If you choose this option for your AutoInvoice clearing, tax, or unearned revenue accounts, Receivables uses the revenue account associated with this salesperson. If you choose this option for your unbilled receivable account, Receivables uses the Standard Lines: Use the standard memo line or inventory item on the transaction to determine this segment of your revenue, AutoInvoice clearing, freight, tax, unbilled receivable, and unearned revenue account. If you choose this option for your AutoInvoice clearing, freight, tax, unbilled receivable or unearned revenue accounts, Receivables uses the revenue account associated to this standard memo line item or inventory item. If the transaction has a line type of ”LINE” with an inventory item of freight (”FRT”), AutoAccounting uses the accounting rules for the freight type account rather than the revenue type account.
  5. Taxes: Enter this option to use tax codes when determining your tax account.
  6. Transaction Types: Use the transaction types table to determine this segment of your revenue, freight, receivable, AutoInvoice clearing, tax, unbilled receivable, and unearned revenue account, and of your bills receivable, factored bills receivable, remitted bills receivable, and unpaid bills receivable account. If the transaction has a line type of ”LINE” with an inventory item of freight (”FRT”), AutoAccounting uses the accounting rules for the freight type account rather than the revenue type account.


Transaction Batch Sources

Batch sources control the standard transaction type assigned to a transaction and determine whether Receivables automatically numbers your transactions and transaction batches. Reference Field default value for a transaction is also specified in a transaction batch source.

For imported transactions we need to specify AutoInvoice, Customer Information, Accounting Information, Other Information and Sales Credit.

Active transaction batch sources appear as list of values choices in the Transactions, Transactions Summary, and Credit Transactions windows, and for bills receivable in the Bills Receivable and Bills Receivable Transaction Batches windows.
You can define two types of transaction batch sources:

  •  Manual: Use manual batch sources with transactions that you enter manually in the Transactions and Transactions Summary windows, and for bills receivable transactions.
  •  Imported: Use imported batch sources to import transactions into Receivables using AutoInvoice.
You can make a batch source inactive by unchecking the Active check box and then saving your work. Receivables does not display inactive transaction batch sources as list of values choices or let you assign them to your transactions.

Suggestion: If you have installed multiple organization support (multi–org), define an imported batch source with the
same name in each organization (these sources can have the same or different settings). This enables you to import order
lines that belong to different organizations in Oracle Order Management into Receivables.

Bills receivable batch sources: After you define batch sources for bills receivable, enter a batch source in the profile option AR: Bills Receivable Batch Source.
To define a transaction batch source:
Navigate to the Transaction Sources window.
1. Enter a unique Name and a Description for this transaction source.

2. Enter a Type of ’Manual’ or ’Imported.’ For bills receivable batch sources, enter ’Manual.’

3. If this is a Manual source and you want to automatically number new batches you create using this source, or if this is a Manual source for bills receivable and you want to generate bills receivable automatically, check the Automatic Batch Numbering box and enter a Last Number. For example, to start numbering your batches with 1000, enter 999 in the Last Number field. If you are defining an Imported transaction batch source, Receivables automatically numbers the batch with the batch source name – request ID.

4. To automatically number new transactions you create using this source, check the Automatic Transaction Numbering box and enter a Last Number. You can use automatic transaction numbering with both Imported and Manual sources.
Note: For bills receivable transaction batch sources, you must use the Automatic Transaction Numbering box and Last Number field to number bills receivable generated automatically. If you are using a bills receivable creation payment method that has Inherit Transaction Number set to Yes, the bill receivable number inherits the transaction number when there is a one–to–one relationship between the exchanged transaction, but uses Automatic Transaction Numbering when more than one transaction is assigned to a bill.
Note: Receivables automatically updates the Last Number fields, so you can review this batch source later and see the last transaction number that was generated (note that this number is only an approximation due to caching).

5. To use the same value for both the document number and the transaction number for transactions assigned to this source, check the Copy Document Number to Transaction Number box (optional).
Suggestion: If your application uses Gapless document sequences, check this box if you require gapless transaction numbers. Checking this box ensures that transaction numbers are generated sequentially and there are no ”missing” numbers.

6. Enter the Standard Transaction Type for this batch source. When you choose a batch source during transaction entry, this is the
default transaction type. You can define new transaction types in the Transaction Types window.

7. To number your credit memos created against invoices and commitments with this source differently than the invoices or commitments they are crediting, enter a Credit Memo Batch Source. Before you can assign a credit memo batch source, you must first define your credit memo batch sources using this window. If you do not specify a credit memo batch source, Receivables enters the invoice or commitment batch source here.

Standard Memo Lines


Standard memo lines are lines that you assign to a transaction when the item is not an inventory item (for example, ’Consulting Services’). You can assign memo lines to debit memos, on–account credits, debit memo reversals, chargebacks, commitments, and invoices. Receivables displays your standard memo lines as list of values choices during credit memo entry in the Credit Transactions window and during invoice entry in the Lines window. When you create chargebacks and debit
memo reversals, you can either use the standard line that Receivables provides or enter your own. You can create an unlimited number of standard memo lines.

If AutoAccounting depends on standard line items, Receivables uses the revenue account that you enter here along with your AutoAccounting setup to determine the default revenue, freight, AutoInvoice Clearing, Tax, Unbilled Receivable, Unearned Revenue, and Receivable accounts for invoices with this line item.

Warning: When you enter a standard memo line in the Lines window, place the cursor in the Description field and then use
the list of values to select a memo line. If AutoAccounting is based on Standard Lines and you type or copy the memo line
information, Receivables will not generate the proper accounting entries for this line when you save.
Receivables lets you enter tax code, unit list price, and unit of measure information for each standard memo line. You can also specify a standard invoicing and accounting rule for each standard memo line.

Auto Invoice

AutoInvoice is a powerful, flexible tool you can use to import and validate transaction data from other financial systems and create invoices, debit memos, credit memos, and on–account credits in Oracle Receivables. You use a custom feeder program to transfers transaction data from an external system into the AutoInvoice interface tables. AutoInvoice then selects data from the interface tables and creates transaction in Receivables. Receivables rejects transactions with invalid information to ensure the integrity of your data. You can run AutoInvoice together with Customer Interface or
separately.


Oracle Receivables can create invoices from the following Oracle applications:  Oracle Order Management, Oracle Projects,  Oracle Service, Oracle Property Manager.
Oracle Receivables can create invoices from the following non-Oracle applications:  Legacy system (for transaction history),  Non-Oracle billing applications, Non-Oracle order entry applications.

What occurs during auto-invoice
 
  1. Populates the RA_Interface_Lines, RA_Interface_distribution and RA_Interface_salescredit tables.
  2. Lines are grouped and ordered by the grouping rule and line ordering line.Grouping rules are mandatory and determine how transaction lines are grouped into transactions. Optionally, you can use line-ordering rules to determine the order in which lines are displayed on a transaction.
  3. Tax, freight, commitments and credit memos are linked to transaction line by transaction line, transaction reference and transaction link-to descriptive flex fields.To uniquely identify imported transactions and link the tax, freight, commitments and credit memos, define the Transaction flexfields
  4. GL date is determined.
  5. GL accounting code combinations are assigned using auto accounting rule.
  6. TAX is determined.
  7. All transactions are batched.
  8. Validated lines are used to create the transaction.

Grouping Related Transactions

Grouping and ordering rules must include required attributes and may include optional attributes.
Required attribute examples
– Bill-To Address
– Currency
– GL Date
– Primary salesperson
Optional attribute examples
– Accounting rule
– Sales Order
– Tax Code

line ordering rules
  •  AutoInvoice uses line ordering rules to order and number the lines grouped into transactions. For example, you might want to use line ordering rules to ensure that the highest invoice line amounts are listed first.
  •  If an ordering rule is not defined, lines will appear on transactions in random order.
  •  You can specify a line ordering rule for each grouping rule.
Seting up autoinvoice
Define the following:
  • Transaction flexfields
  • Transaction Batch Source
  • AutoInvoice system options
  • AutoInvoice Line Ordering rules
  • AutoInvoice Grouping rules

AutoInvoice Interface Tables

Oracle Receivables uses three interface tables for AutoInvoice:

  1. RA_INTERFACE_LINES
  2. RA_INTERFACE_DISTRIBUTIONS
  3. RA_INTERFACE_SALESCREDITS
AutoInvoice transfers transaction data from the above three interface tables into the following Receivables tables:
  • RA_BATCHES_ALL
  • RA_CUSTOMER_TRX _ALL
  • RA_CUSTOMER_TRX_LINES _ALL
  • RA_CUST_TRX_LINE_GL_DIST_ALL
  • RA_CUST_TRX_LINE_SALESREPS_ALL
  • AR_PAYMENT_SCHEDULES_ALL
  • AR_RECEIVABLE_APPLICATIONS_ALL
  • AR_ADJUSTMENTS_ALL
RA_INTERFACE_LINES
  • This table contains information relating to all transactions to be processed by AutoInvoice. Transactions include invoices, debit memos, credit memos, and on-account credits.
  • Each record contains line, tax, freight, or finance charges information.
  • The Line_Type field identifies the type of information contained in the record.
  • A record can be a parent record: Line, Header Freight, or Charges; or a child record: Tax or linelevel Freight.
  • A child record is linked to the parent record using the Link-To Transaction flexfield.

RA_INTERFACE_DISTRIBUTIONS
  • This table contains accounting distributions to be used by the transactions defined in RA_INTERFACE_LINES.
  • Accounts defined in this table override any accounts created using AutoAccounting.
  • You can choose to pass some or all account information to AutoInvoice. Any accounts that are not passed will be derived using AutoAccounting.
  • Records in this table are linked to records in the RA_INTERFACE_LINES table using the Transaction flexfield.
  • Not required if AutoAccounting determines GL distributions.

RA_INTERFACE_SALESCREDITS
  • This table contains all sales credit information for the transactions in the RA_INTERFACE_LINES table.
  • The two tables are linked using the Transaction flexfield.
  • Not required if not tracking sales credit.
Transaction flexfields
  • Transaction flexfields are descriptive flexfields that AutoInvoice uses to uniquely identify transaction lines.
  • Because they are unique for each transaction line, they can also be used to reference and link to other lines.
  • Receivables lets you determine how you want to build your transaction flexfield structure and what information you want to capture.
  • Define a flexfield for each import source. Specify which one to use during import.
Types of transaction flexfields
  1. Invoice Header (optional): Specifies invoice header information
  2. Line (required): Uniquely identifies invoice lines
  3. Link-To (optional): Link tax and freight to invoice lines
  4. Reference (optional): Links credit memos to transactions

Grouping Rules

Grouping rules specify attributes that must be identical for lines to appear on the same transaction. Define grouping rules that AutoInvoice will use to group revenue and credit transactions into invoices, debit memos, and credit memos.


1. Grouping rules include mandatory attributes which are always included in all grouping rules, and optional attributes which may be included in a grouping rule. Optional attributes may be added to the mandatory attributes to create new grouping rules. To be included in a group a transaction must always match on all of the mandatory attributes as well as on all of the optional attributes included in a grouping rule. All attributes of the Transaction Flexfield are optional within a grouping rule, and you can assign these attributes as optional grouping characteristics in the Grouping Rules window.
Required attribute examples Bill-To Address, Currency, GL Date & Primary salesperson
Optional attribute examples Accounting rule, Sales Order, Tax Code
Note: The Grouping Rules window only displays the optional attributes included in a grouping rule. This window does not
display any mandatory grouping attributes. The mandatory attributes are the same for all grouping rules. Use the Ordering
and Grouping Rules Listing report to view all of the mandatory and optional attributes assigned to your grouping rules.

2. In the diagram below, the grouping rule specifies that to appear on the same invoice items must match on all of the mandatory attributes, for example currency (CURRENCY_CODE) and bill–to address (ORIG_SYSTEM_BILL_ADDRESS_ID) and must also match on the optional attribute of order type (SALES_ORDER_SOURCE). For example, in the diagram, assume that all mandatory attributes match other than currency and bill–to address. Items A and B share the same currency and order type, so they appear on the same invoice (Invoice 1).
Item C has the same currency as A and B, but it has a different order type, so it appears on its own invoice (Invoice 2). Items D and E share the same currency and Order Type, so they appear on the same invoice (Invoice 3).

3. AutoInvoice uses the following hierarchy to determine which grouping rule to use for a transaction line:
1) The grouping rule specified in the Transaction Sources window for the batch source of the transaction line
2) The grouping rule specified in the Customer Profile Classes window for the bill–to site use of the transaction line
3) The grouping rule specified in the Customer Profile Classes window for the bill–to customer of the transaction line
4) If you do not specify a rule in either the Transaction Sources or Customer Profile Classes window, AutoInvoice uses the default grouping rule specified in the System Options window.

4. Receivables provides the DEFAULT grouping rule which contains all of the mandatory attributes. If you upgrade from a previous version of Receivables, the DEFAULT grouping rule initially becomes your default grouping rule. If you use the DEFAULT rule to create transactions, Receivables does not require that you define any additional grouping rules. You can add optional attributes to the DEFAULT grouping rule to create new grouping rules. You cannot delete any mandatory attributes from a grouping rule.

Attention: If you are doing a fresh install of Receivables, you must enter a default grouping rule in the System Options window. You can enter the grouping rule that Receivables provides or one that you create. Receivables lets you assign an invoice line ordering rule to each of your grouping rules. AutoInvoice uses the invoice line ordering rule to order your transaction lines when grouping revenue and credit transactions into invoices, debit memos, and credit memos.

5. If you have transactions that fail validation, Receivables looks at the value you entered in the Invalid Line field for your transaction batch source to determine the grouping of your transactions. (This field is located in the Transaction Sources window, AutoInvoice Processing Options tabbed region.) If you entered ’Reject Invoice’, AutoInvoice rejects all of the transactions that make up one invoice if any of the transactions are invalid. For example, if your grouping rule specifies that three transactions should be created as one invoice and one of the transactions has an error, AutoInvoice rejects all three transactions and does not create an invoice.

However, if you entered ’Create Invoice’, AutoInvoice rejects the one invalid transaction and creates an invoice from the two remaining valid transactions.

6. Transaction Number Validation
Receivables validates that transaction and document numbers are unique within a batch after grouping has completed. In certain cases, AutoInvoice will create multiple invoices in the same group with the same transaction or document number. Once grouping is completed, AutoInvoice checks for duplicate transaction and document numbers and reports any lines that fail validation.

For example, two lines are imported with the same transaction number, but they have different currency codes. These lines will be split into two separate invoices during grouping due to the different currency codes. Once grouping has completed, both of the invoices will fail validation due to identical transaction numbers.

Enter a new Customer information

Following are the screenshots of the steps showing how to create a new customer.

Take the Order Management/AR responsibility and go to customers -> standard
Enter the name, customer number and account name


Click on Open and enter one address for the customer and save the record


Query the customer number in customer form.

2.2 Enter a new Customer information

Following are the screenshots of the steps showing how to create a new customer.

Take the Order Management/AR responsibility and go to customers -> standard
Enter the name, customer number and account name


Click on Open and enter one address for the customer and save the record


Query the customer number in customer form.

Prerequisites - Customers

1. Customer Numbering
       Check the box: Automatic Customer Numbering in System Options.

2. Collectors
Receivables lets you define collectors and assign them to a profile class or to a customer’s credit profile class. When you assign a collector to a profile class, that collector becomes the collector for all customers assigned that profile class. You can modify collector assignments for your customers in the Customers window and for your profile classes in the Customer Profile Classes window.
Read More @
http://www.oracleug.com/user-guide/order-management/collectors

3. Profile Class
        Use Customer Profiles to group customers with similar credit worthiness, business volume, and payment cycles. For each profile class you can define information such as credit limits, payment terms, statement cycles, invoicing, and discount information. You can also define amount limits for finance charges, dunning, and statements for each currency in which you do business.
Read more @
http://www.oracleug.com/user-guide/account-receivables/1-profile-classes

AutoInvoice Line Ordering Rules

Define invoice line ordering rules for transaction lines that you import into Receivables using AutoInvoice. AutoInvoice uses these rules to order transaction lines when grouping the transactions it creates into invoices, debit memos, and credit memos. You can assign a line ordering rule to each grouping rule.

You also assign transaction attributes to your line ordering rules. AutoInvoice uses these attributes to order invoice lines. You can assign a priority to these attributes for each of your invoice line ordering rules. You can also specify an ascending or descending order for each transaction attribute assigned to a rule. Active invoice line ordering rules appear as list of values choices in the Grouping Rules window.
Suggestion: If you are importing transactions from Oracle Order Management, create an invoice line ordering rule with
the attribute SALES_ORDER_LINE to list the items on the invoice in the same order as they appear on the sales order.

Approval Limits

Use the Approval Limits window to define approval limits for adjustments created in Receivables, requests for credit memos initiated from iReceivables, and write–offs for receipts. Receivables uses approval limits that have a document type of Adjustment when you create an adjustment in the Adjustments, Submit AutoAdjustments, and Approve Adjustments windows.


When you enter an adjustment that is outside your approval limit range, Receivables assigns the adjustment a status of Pending until someone with the appropriate approval limits either approves or rejects it.

The Credit Memo Request Approval Workflow uses approval limits that have a document type of Credit Memo when forwarding credit memo requests from iReceivables. The workflow sends a notification to an approver if the request is within the approval limit range for the currency and reason code specified.

When you write off an unapplied receipt amount, Receivables uses approval limits that have a document type of Receipt Write–off. You cannot write off a receipt amount that is outside your approval limit range. You can only write off positive amounts.

You define Adjustment approval limits by currency and dollar amount. You define Credit Memo approval limits by reason type, currency, and dollar amount. You define Receipt Write–off approval limits by currency and dollar amount. The approval limits for write–offs are separate from, but cannot exceed, the system level write–off maximum amount that you define in the System Options window. You must specify both lower and upper approval limits for each approver.

Receipt Sources

Define receipt batch sources to provide default values for the receipt class, payment method, and remittance bank account fields for receipts you add to a receipt batch. You can accept these default values or enter new ones. Receipt batch sources can use either automatic or manual batch numbering.

Receipt source type can either be Manual or Automatic.

You can specify a default receipt batch source when defining the profile option AR: Receipt Batch Source. If you specify a default receipt batch source, Receivables displays this source in the Receipt Batches window when you create your receipt batches.

When you select a receipt batch source to enter receipts, Receivables automatically uses the Cash, Receipt Confirmation, Remittance, Factoring, Short Term Debt, Bank Charges, Unapplied Receipts, Unidentified Receipts, On–Account Receipts, Earned and Unearned Discounts, and Bills Receivable account information you assigned to the payment method for this batch source. The payment method accounts for the receipt entries and applications you make using this
receipt batch source.

Receivables will issue a warning if you enter a receipt source that includes a payment method that has activities allocated to more than one company. Allocating activities to more than one company will cause some reconciliation reports to distribute data of previously entered transactions across multiple companies. Therefore, information regarding a particular receipt may be distributed across multiple company reports. For example, the Applied and Earned Discount amounts in the Applied Receipt Register would be shown across multiple company reports if you allocated them to different companies.

Receivables provides the automatic receipt source ’Automatic Receipts.’ You cannot update this predefined receipt source except for the Last Number field. All of the receipt batch sources you define are created with a Receipt Source Type of Manual.

Prerequisites
  • Define receipt classes
  • Define payment methods
  • Define banks

Receipt Classes & Payment Methods

Define receipt classes to determine the required processing steps for receipts to which you assign payment methods with this class. These steps include creation/confirmation, remittance, and reconciliation. For example, you must create and remit a direct debit, but you must create, confirm, and remit a bills receivable remittance. You can specify any combination of these processing steps with one exception: if you confirm and reconcile, then you must also remit. If you enter No for all three of these steps, Receivables automatically creates receipts assigned to this receipt class with a status of Cleared.

Receivables uses the payment method you assign to a receipt class to determine how to account for receipts you create using this receipt class.For each receipt class, you can specify a creation method, remittance method, and whether to require bank clearance for receipts that you assign to this class. If you are defining a receipt class for bills receivable creation payment methods, then Require Confirmation, Remittance Method, and Clearance Method are disabled.

Receivables lets your customers pay their invoices via credit cards and electronic funds transfer (both non-Automatic Clearing House direct debit and ACH bank account transfers).
To accept payment via credit cards or non-ACH direct debit, use your existing Receivables setup, or optionally define a new receipt class and payment method to be used with these transactions.
To accept payment via ACH bank account transfer, define a new receipt class and payment method to be used with these transactions. 

Creation Method
If you choose Automatic, you can create receipts with this receipt class using the Automatic Receipt program. If you choose Manual, receipts using this receipt class must either be entered manually in the Receipts or QuickCash window, or imported into Receivables using AutoLockbox.If you choose Bills Receivable or Bills Receivable Remittance, Receivables enables the Bills Receivable or Bill Receivable Remittance tab.

Remittance Method
If you checked the Require Confirmation box, choose a Remittance Method. The remittance method determines the accounts that Receivables uses for automatic receipts that you create using payment methods to which you assign this receipt class. Choose one of the following methods:
  • Standard: Use the remittance account for automatic receipts or for standard bills receivable assigned to a payment method with this receipt class.
  • Factoring: Use the factoring account for automatic receipts or for factored bills receivable assigned to a payment method with this receipt class.
  • Standard and Factoring: Choose this method if you want Receivables to select receipts assigned to this receipt class for remittance regardless of the batch remittance method. In this case, you can specify either of these remittance methods when creating your remittance batches.
  • No Remittance: Choose this method if you do not require receipts assigned to this receipt class to be remitted.
Note: If the Require Confirmation box is not checked and you choose a Remittance Method of No Remittance, automatic
receipts that you create using this payment method and receipt class will be created as ’Confirmed.’

Clearance Methods
To require receipts created using a payment method assigned to this receipt class to be reconciled before posting them to your cash account in the general ledger, choose one of the following Clearance Methods:
  • Directly: Choose this method if you do not expect the receipts to be remitted to the bank and subsequently cleared. These receipts will be assumed to be cleared at the time of receipt entry and will require no further processing. Choosing this method is the same as setting Require Bank Clearance to No in previous releases of Receivables.
  • By Automatic Clearing: Choose this method to clear receipts using the Automatic Clearing program. (Receipts using this method can also be cleared in Oracle Cash Management.)
  • By Matching: Choose this method if you want to clear your receipts manually in Oracle Cash Management.

Payment Methods

Receivables uses payment methods to account for your receipt entries and applications. Payment methods also determine a customer’s remittance bank information. For bills receivable, you need to define two types of payment methods: creation payment methods, which determine how Receivables automatically creates bills receivable from transactions, and remittance payment methods, which designate the remittance banks and accounting for bills receivable remittances.

You can assign multiple remittance banks to each payment method, but only one bank account can be the primary account for each currency. For each remittance bank branch account assigned to a payment method, you must define all of your receipt accounts. You can then assign your payment methods to your receipt sources to use with your AutoLockbox and manually entered receipts.

The receipt class you assign to each of your payment methods determines the processing steps that Receivables requires for receipts that you create using this payment method. These steps include whether to require confirmation, remittance, and bank clearance for receipts that you create with a specific receipt class.

Receivables requires that you specify a payment method when you create your automatic receipts through the Receipt Batches window.You also assign payment methods to invoices when you manually enter them in the Transactions window.
You can assign all payment methods to transactions in the Transactions window, with the exception of bills receivable remittance payment methods. You enter bills receivable remittance payment methods in the Remittances window.
Only automatic payment methods can be associated with invoices. If you remit receipts in several currencies for a single payment method, you must enter at least one remittance bank per currency. At least one of these remittance banks must be primary.
Note: You define payment methods in the Receipt Classes window.

Number of Receipts Rules
When defining payment methods for a receipt class with an Automatic creation method, you can choose from the following receipts rules:
One Per Customer: Create one payment for each customer.
One per customer and Due Date: Create one payment for each customer and due date. This option creates several payments for a customer if a customer’s invoices have several due dates.
One per Site: Create one payment for each site.
One per Invoice: Create one payment for each invoice.
One per Site and Due Date: Create one payment for each customer site and due date.

Assigning Remittance Banks

Assign remittance banks to your payment methods to facilitate data entry and specify the General Ledger accounts Receivables will use when you enter or apply receipts. A remittance bank can be assigned to a payment method only if its institution type is 'Bank.'
You can assign multiple bank accounts to a payment method, but you can only have one primary account for each currency defined for that payment method

To assign a remittance bank to a payment method:
1. Enter general Remittance Bank information, such as Bank, Branch, Account Name, and range of Effective Dates. You can only select active banks and bank branches.

2. If the creation method of the receipt class is Automatic, enter a Minimum Receipt Amount. This is the minimum amount in this currency that must be specified when you create automatic receipts with this payment method.
Note: You can also define a minimum receipt amount at the customer profile level. Receivables uses the larger of the two minimum receipt amounts when creating automatic receipts.

3. If the remittance method for this receipt class is either Factoring or Standard and Factoring, specify the number of Risk Elimination Days for receipts created with this receipt class (optional). When you factor receipts, Receivables creates a short term debt to account for your risk in case of customer default. When you run the Automatic Clearing program to clear or risk eliminate these receipts, the debt is cleared y days after each receipt's maturity date, where y is the number of risk elimination days that you enter here.

4. If the remittance method is not No Remittance, enter the number of Clearing Days for receipts created with this receipt class (optional). Remitted receipts are cleared x days after their maturity date, where x is the number of clearing days that you enter here. Factored receipts are cleared immediately on the remittance date.

5. To be able to override this bank during the remittance process, check the Override Bank box.

6. If you do not want this to be the primary remittance bank account in this currency for this payment method, uncheck the Primary check box. You can only assign one primary remittance account per currency to your payment method. Receivables ensures that at least one remittance account per currency is primary.

7. In the GL Accounts tabbed region, enter GL Account information for this remittance bank.
7.1 In the Unearned Discounts and Earned Discounts fields, select an unearned discount activity type and an earned discount activity type from the lists of values.
7.2 If using Oracle Trade Management, then in the Claim Investigations field, select a claim investigation activity type.
7.3 If the creation method of the associated receipt class is Automatic, open the Formatting Programs tabbed region, then enter formatting program information.

Banks

Use the Banks window to enter bank information for bank branches with which you do business. Some Oracle Financial Applications, including Receivables and Payables, share bank definitions, although not every application uses all available bank information. Each bank branch can have multiple bank accounts, and each bank account you define can be associated with Payables payment documents and/or Receivables payment methods.


If you use Receivables, use the Banks window to define your internal banks, which you use for receipts, and external banks, which are your customers’ banks with which you do business. If you use Receivables only, you do not need to define Payables payment documents. If you use Payables, use the Banks window to define your internal bank accounts from which you disburse payments. For each internal bank account, you can define payment documents for checks, electronic payments (EFT and EDI), wire transfers, and other payment methods.

You can also enter supplier bank information for your suppliers to which you send electronic payments. If you use Payables only, you do not need to define clearing houses. If you are using Oracle Cash Management, you need to define a Bank Errors Account, a Bank Charges Account, and a Cash Clearing Account for each bank account you plan on reconciling by using Cash Management. If you use Payables, you can override these accounts for each payment document you define.

Define clearing houses to record banks that process electronic versions of your receipt information which you send to them. These clearing institutions then create copies of your customer receipt information which they forward to each of your remittance banks.

Defining Bank Accounts

Defining Internal Bank Accounts
You define internal bank accounts to define bank accounts for which you are the account holder. Receivables uses internal bank accounts to receive payments from customers. Payables uses internal bank accounts to disburse funds to suppliers.

Prerequisite

  • You have installed Receivables.
  • Define custom payment formats for Payables payment documents if you are defining a disbursement bank account. (Optional).


Defining Customer Bank Accounts
If you use Receivables, you can enter bank account information for your customers. Receivables uses this information when you receive electronic payments from your customers.
To define a customer bank account:
1. In the Banks window query an existing Bank.
2. Choose the Bank Accounts button. Enter the Bank Account Name and Bank Account Number. Optionally enter an Account Type and Description.
If you want to use Bank Account validation, enter Check Digits.
3. Select Customer Account Use.
4. Optionally enter contact information in the Account Contact region.
5. Save your work.

Defining Supplier Bank Accounts
If you use Payables, you can enter bank information for bank accounts for which your supplier is the account holder. You then assign these accounts to the supplier and its sites. Payables uses this bank information when you create electronic payments for your suppliers.
You can either define the supplier first and then when you define the bank account you can associate it with the supplier in the Supplier Assignments region (as described below). Or you can define the bank account first and then assign it to the supplier when you enter the supplier in the Suppliers window.

Prerequisite
Define the suppliers and supplier sites that use the bank account to receive electronic payments.

Defining Multiple Currency Bank Accounts
A multiple currency bank account is an account that accepts payments in more than one currency.
If you define a multiple currency bank account for payments, the currency of the bank account must be the same as your functional currency.

You can enable multi currency receipts in receivables tab and multi currency payments in payable tab.
 

Application Rule Sets

Use the Application Rules Sets window to review existing and define new application rule sets. Application rule sets specify the default payment steps for your receipt applications and how discounts affect the open balance for each type of associated charges. By defining your own application rule set, you can determine how Receivables reduces the balance due for a transaction’s line, tax, freight, and finance charges.
Receivables provides the following application rules:

  •  Line First – Tax After: Apply to the open line item amount first. Apply any remaining amount in the following order: tax, freight, and then finance charges.
  • Line First – Tax Prorate: Apply a proportionate amount to the open line item amount and the open tax amount for each line. Apply any remaining amount to freight and then to finance charges.
  • Prorate All: Apply a proportionate amount to the line, tax, freight, and finance charges.

To define an application rule set:
Navigate to the Application Rule Sets window and Enter a Name and Description for this rule set.

1.
Enter the Sequence number for this application rule. Receivables applies payments in this sequence, beginning with the lowest sequence number.
Note: You cannot enter a sequence number for the Overapplication rule. By default, this rule is last in the
sequence for each application rule set.

2. Enter an application Rule. Each rule will correspond to a line type (for example, lines, freight, or charges), so you should give your rule a descriptive name. Each rule set must have at least one application rule.
Attention: Receivables automatically assigns the Overapplication rule to each application rule set. You cannot delete this rule. The Overapplication rule applies any remaining amount after the balance due for each item has been reduced to zero. If the transaction type of the debit item allows overapplication, this rule prorates the remaining amount between each line and its associated tax amount, making these amounts negative. If the transaction type does not allow overapplication, you can either place the remaining amount on–account or leave it ’Unapplied’.

3. Enter Rule Details for this application rule. This section indicates the type of charges and the tax handling for this rule. Choose a Type of Line, Freight, or Charges. You need to enter at least one type for your rule set.

4. If you chose a Type of ’Line’, choose a Tax Treatment. Choose one of the following:
  1. Prorate: Choose this option to proportionately reduce the net amount of the line and associated tax amounts.
  2. Before: Choose this option to first reduce the open tax amount, then apply any remaining amount to the line.
  3. After: Choose this option to reduce the open line amount, then apply any remaining amount to the associated tax.
Note: The default Tax Treatment for your Freight and Charges types is None. This option ignores tax, since you cannot tax freight and charges in Receivables. You cannot choose None for your Line type.

5. To automatically adjust this line type to account for any rounding corrections within this rule set, check the Rounding Correction box.
When an amount is prorated among several line types, Receivables must use one of the line types to account for the rounding adjustment. Each application rule set must have one and only one rounding correction line type.
Suggestion: Assign the Rounding Correction to the line type that is usually the largest portion of your invoices. By doing
this, the rounding correction will have the least effect on the overall remaining and applied amounts for this line type.

6. Repeat the previous steps for each rule you want to add to this rule set. Save your work.

7. When you are satisfied with this rule set definition, check the Freeze box. Receivables verifies that your application rule set is defined properly and that it does not violate any basic application guidelines. If this rule set fails validation, Receivables displays an error message. In this case, modify your rule set definition, then check the Freeze box again to revalidate it.
Attention: A rule set must be ’frozen’ before you can assign it to a transaction type or use it as your default rule it in the
System Options window. Additionally, after you freeze an application rule set, you cannot update or delete it.

Distribution Sets

Define distribution sets to account for your non–invoice related receipts. These receipts can include refunds, revenue from the sale of stock, as well as interest and investment income. Receipts that are not related to an invoice are known as miscellaneous receipts in Receivables.


Distribution sets are predefined groups of general ledger accounting codes that determine the credit accounts for positive miscellaneous receipt amounts and the debit accounts for negative receipt amounts. Distribution sets also let you speed your receivables accounting by reducing time spent on data entry. You can also use distribution sets to apply percentages of other receipts to different accounts. You can create an unlimited number of distribution set lines for each distribution set. The total distribution lines must equal 100% before you can save your distribution set.

Receivables displays active distribution sets as list of values choices in the Transactions and Receivables Activities windows.
You can make a distribution set inactive by unchecking the Active check box, and then saving your work.

Receivables Activities

Define receivables activities to default accounting information for your miscellaneous cash, discounts, finance charges, adjustments, bills receivable, and receipt write–offs. Activities that you define appear as list of values choices in various Receivables windows. You can define as many activities as you need.

The Tax Code Source you specify determines whether Receivables calculates and accounts for tax on adjustments, discounts, finance charges, and miscellaneous receipts assigned to this activity. If you specify a Tax Code Source of Invoice, then Receivables uses the tax accounting information defined for the invoice tax code(s) to automatically account for the tax. If the Receivables Activity type is Miscellaneous Cash, then you can allocate tax to the Asset or Liability tax accounts that you define for this Receivables Activity.

Receivables uses finance charge activity accounting information when you assess finance charges in your statements and dunning letters. Query the Chargeback Adjustment activity that Receivables provides and specify GL accounts for this activity before creating chargebacks in Receivables. You can make an activity inactive by unchecking the Active check box and then saving your work.

Attention: Once you define an activity, you cannot change its type. However, you can update an existing activity’s GL
account, even if you have already assigned this activity to a transaction.
Activity Types
An activity's type determines whether it uses a distribution set or GL account and in which window your activity appears in the list of values. You can choose from the following types:

Adjustment: You use activities of this type in the Adjustments window. You must create at least one activity of this type.
Note: In the Adjustments window, you cannot select the Adjustment Reversal, Chargeback Adjustment, Chargeback Reversal, and Commitment Adjustment activities to manually adjust transactions. These four activities are reserved for internal use only, and should not be end dated.

When you reverse a receipt, if an adjustment or chargeback exists, Receivables automatically generates off-setting adjustments using the Adjustment Reversal and Chargeback Reversal activities. When your customers invoice against their commitments, Receivables automatically adjusts the commitment balance and generates an off-setting adjustment against the invoice using the Commitment Adjustment activity.

Bank Error: You use activities of this type in the Receipts window when entering miscellaneous receipts. You can use this type of activity to help reconcile bank statements using Oracle Cash Management.

Claim Investigation: You use activities of this type in the Receipts Applications and QuickCash windows when placing receipt overpayments, short payments, and invalid Lockbox transactions into claim investigation. The receivable activity that you use determines the accounting for these claim investigation applications. For use only with Oracle Trade Management.

Credit Card Chargeback: Use activities of this type in the Receipts Applications window when recording credit card chargebacks. This activity includes information about the General Ledger clearing account used to clear the chargebacks. Receivables credits the clearing account when you apply a credit card chargeback, and then debits the account after generating the negative miscellaneous receipt. If you later determine the chargeback is invalid, then Receivables debits the clearing account when you unapply the credit card chargeback, and then credits the account after reversing the negative miscellaneous receipt. Only one activity can be active at a time.

Credit Card Refund: You use activities of this type in the Receipts Applications window when processing refunds to customer credit card accounts. This activity includes information about the General Ledger clearing account used to clear credit card refunds. You must create at least one activity of this type to process credit card refunds.

Earned Discount: You use activities of this type in the Adjustments and the Remittance Banks windows. Use this type of activity to adjust a transaction if payment is received within the discount period (determined by the transaction's payment terms).

Endorsements: The endorsement account is an offsetting account that records the endorsement of a bill receivable. This is typically defined with an Oracle Payables clearing account.

Late Charges: You use activities of this type in the System Options window when you define a late charge policy. You must define a late charge activity if you record late charges as adjustments against overdue transactions. If you assess penalties in addition to late charges, then define a separate activity for penalties.

Miscellaneous Cash: You use activities of this type in the Receipts window when entering miscellaneous receipts. You must create at least one activity of this type.

Payment Netting: You use activities of this type in the Applications window and in the QuickCash Multiple Application window when applying a receipt against other open receipts.

The GL Account Source field defaults to Activity GL Account and you must enter a GL account in the Activity GL Account field. The GL account that you specify will be the clearing account used when offsetting one receipt against another receipt. The Tax Rate Code Source field defaults to None.
You can define multiple receivables activities of this type, but only one Payment Netting activity can be active at any given time.

Prepayments: Receivables uses activities of this type in the Applications window when creating prepayment receipts. When the Prepayment activity type is selected, the GL Account Source field defaults to Activity GL Account and you must enter a GL account in the Activity GL Account field. The GL account that you specify will be the default account for prepayment receipts that use this receivables activity. The Tax Rate Code Source field defaults to None. You can define multiple receivables activities of this type, but only one prepayment activity can be active at any given time.

Receipt Write-off: You use activities of this type in the Receipts Applications and the Create Receipt Write-off windows. The receivable activity that you use determines which GL account is credited when you write off an unapplied amount or an underpayment on a receipt.

Refund: Use activities of this type in the Applications window to process automated non-credit card refunds. This activity includes information about the General Ledger clearing account used to clear refunds. Create at least one activity of this type. Only one activity can be active at a time.

Short Term Debt: You use activities of this type in the GL Account tabbed region of the Remittance Banks window. The short-term debt account records advances made to creditors by the bank when bills receivable are factored with recourse. Receivables assigns short-term debt receivables activities to bills receivable remittance receipt methods.

Unearned Discount: You use activities of this type in the Adjustments and the Remittance Banks windows. Use this type of activity to adjust a transaction if payment is received after the discount period (determined by the transaction's payment terms).

GL Account Source
Indicate how Receivables should derive the accounts for the expense or revenue generated by this activity by specifying a GL Account Source. Choose one of the following:

Activity GL Account: Allocate the expense or revenue to the general ledger account that you  specify for this Receivables Activity . If the activity type is Bank Error, Claim Investigation, Endorsement, Late Charges, Prepayment, Receipt Write-off, or Short Term Debt, you can only choose this GL account source.

Distribution Set: Allocate the expense or revenue to the distribution set that you specify for this Receivables Activity. A distribution set is a predefined group of general ledger accounting codes that determine the accounts for miscellaneous receipts and payments. You can choose this option only if the activity type is Miscellaneous Cash.

Revenue on Invoice: Allocate the expense or revenue net of any tax to the revenue account(s) specified on the invoice. If Tax Rate Code Source is set to None, allocate the gross amount to these accounts. You can only choose this option if the activity type is Adjustment, Earned Discount, or Unearned Discount.
      If the revenue on the specified invoice is unearned, then Receivables calls the Revenue Adjustment API, which uses AutoAccounting to derive the anticipated revenue accounting distribution accounts and amounts. The accounting engine then uses this information to allocate the adjustment or discount amount to these derived revenue account(s).

Tax Rate Code on Invoice: Allocate the net portion using the Expense/Revenue accounts specified by the tax rate code on the invoice. If Tax Rate Code Source is set to None, allocate the gross amount to these accounts. You can only choose this option if the activity type is Adjustment, Earned Discount, or Unearned Discount.
In the event of an adjustment to an invoice with zero amount revenue distributions, the adjustment activity's GL Account Source must not be set to Revenue on Invoice or Tax Rate Code on Invoice.

Tax Rate Code Source
Specify a Tax Rate Code Source to indicate where Receivables derives the tax rate code for this activity. Choose one of the following:
None: Allocates the entire tax amount according to the GL Account Source you specified. Choose this option if you do not want to separately account for tax.

Activity: Allocate the tax amount to the Asset or Liability tax accounts specified by the Receivables Activity.

Invoice: Distribute the tax amount to the tax accounts specified by the tax rate code on the invoice. You cannot choose this option if the activity Type is Miscellaneous Cash or Late Charges.

In the event of a tax adjustment to an invoice with zero amount tax distributions, the adjustment activity's Tax Rate Code Source must not be set to Invoice.

If the Tax Rate Code Source is Activity or Invoice, Receivables displays the Recoverable and Non-Recoverable options. Indicate whether tax for this activity can be taken as a deduction. If the tax is deductible, choose the Tax Recoverable option; otherwise, choose Non-Recoverable.

If your Tax Rate Code Source is Invoice, Recoverable is the default but you can change it. If your Tax Rate Code Source is Activity or None, Non-Recoverable is the default and you cannot change it.

Note: If your activity type is Miscellaneous Cash or Bank Error, the Recoverable and Non-Recoverable options do not appear.

Activity GL Account
Enter an Activity GL Account, or select from the list of values.
  • If the activity type is Credit Card Refund or Refund, enter a clearing account.
  • If the activity type is Miscellaneous Cash and the GL Account Source is Distribution Set, then skip to the next step. You cannot enter both an Activity GL Account and a Distribution Set.
  • If your activity type is Miscellaneous Cash, enter a Distribution Set, or select from the list of values. You use distribution sets to automatically distribute miscellaneous cash across various accounts.
Suggestion: Specify a distribution set for your Miscellaneous Cash activities to properly distinguish them from your invoice-related activities.

Distribution sets
If the activity type is Miscellaneous Cash and you specified a Tax Rate Code Source of Activity, then select Asset and Liability tax rate codes.
  • If the selected operating unit has multiple legal entities, then select tax rate codes for each legal entity.
  • The Asset tax rate code is your collected tax account (tax received); use this tax rate code to account for tax on miscellaneous receipts.
  • The Liability tax rate code is your deductible account (tax paid); use this tax rate code to account for tax on miscellaneous payments.
Usage of Receivable activities

AutoCash Rule Sets

The Post QuickCash program uses AutoCash rules to determine how to automatically apply your receipts. Receivables uses your customer’s open balance along with the AutoCash rules to determine how to apply receipts and whether you allow partial payments to be applied to your customer’s items. If Receivables is not able to apply or fully apply a receipt, you can specify whether the remaining amount is left as Unapplied or On–Account.

Receivables provides five AutoCash rules you can use to create your AutoCash rule sets. When you define your AutoCash rule sets, you specify which rules to use and the sequence of these rules. To determine which AutoCash Rule Set to use when applying receipts, Receivables uses the following hierarchy, stopping when one is found:
1. Customer site
2. Customer profile class
3. System Options window


Receivables provides a default AutoCash Rule Set when you assign a customer to a credit profile, but you can modify individual AutoCash Rule Set assignments at both the customer and customer site levels. If you do not assign an AutoCash Rule Set to a customer’s credit profile, and you enter a receipt for this customer, Receivables uses the AutoCash Rule Set that you entered in the System Options window along with the number of Discount Grace Days you specified in this customer’s credit profile to apply the receipt. If you assign an AutoCash Rule Set to a customer, but none of the AutoCash Rules apply, Receivables places the remaining amount Unapplied or  On–Account, depending on how you set the Remaining Remittance Amount option for the rule set.

If you have set up your system to use bank charges and a tolerance limit, Post QuickCash will also consider these amounts if the current AutoCash rule fails (this is true for all rules except ’Apply to the Oldest Invoice First’). If it finds a match, Post QuickCash applies the receipt; otherwise, it looks at the next rule in the sequence. For more information, You can disable an existing AutoCash Rule Set by changing its status to Inactive and then saving your work.

 
1. Enter the type of Discount you want to automatically give to your customer for this AutoCash Rule Set. Choose one of the following Discount options:
Earned Only: Your customer can take earned discounts according to the receipt terms of sale. You negotiate earned discount percentages when you define specific receipt terms. You can enter this option if Allow Unearned Discounts is set to Yes in the System Options window. In this case, Receivables only allows earned discounts for this AutoCash Rule Set.
Earned and Unearned: Your customer can take both earned and unearned discounts. An unearned discount is one taken after the discount period passes. You cannot choose this option if the system option Unearned Discounts is set to No.
None: Your customer cannot take discounts (this is the default). 

2.  If this rule set will include the Apply to the Oldest Invoice First rule, choose how you want to apply any Remaining Remittance Amount. Receivables uses this value to determine how to enter the remaining amount of the receipt if none of the AutoCash Rules within this rule set apply. Choose ’Unapplied’ to mark remaining receipt amounts as Unapplied. Choose ’On–Account’ to place remaining receipt amounts On–Account.

3. To automatically apply partial receipts when using the Apply to the Oldest Invoice First rule, check the Apply Partial Receipts check box. A partial receipt is one in which the receipt minus the applicable discount does not close the debit item to which this receipt is applied.

The applicable discount that Receivables uses for this rule depends upon the value you entered in the Discounts field for this
AutoCash Rule Set. If you exclude finance charges (by setting Finance Charges to No) and the amount of your receipt is equal to the amount of the debit item to which you are applying this receipt minus the finance charges, Receivables defines this receipt as a partial receipt. In this case, Receivables does not close the debit item because the finance charges for this debit item are still outstanding.

If Apply Partial Receipts is set to No, this AutoCash Rule Set will not apply partial receipts and will either mark the remaining
receipt amount ’Unapplied’ or place it on–account, depending on the value you entered in the Remaining Remittance Amount field.

Auto Cash Rules
Apply to the Oldest Invoice First: This rule matches receipts to debit and credit items starting with the oldest item first. This rule uses the transaction due date when determining which transaction to apply to first. This rule uses the values you specified for this AutoCash Rule Set's open balance calculation to determine your customer's oldest outstanding debit item.

Post QuickCash uses the next rule in the set if any of the following are true:
  • all of your debit and credit items are closed
  • the entire receipt amount is applied
  • it encounters a partial receipt application and Allow Partial Receipts is set to No for this AutoCash Rule Set
  • the next oldest debit item includes late charges and Finance Charges is set to No for this AutoCash Rule Set
This rule marks any remaining receipt amount 'Unapplied' or places it on-account, depending on the value you entered in the Remaining Remittance Amount field for this AutoCash Rule set (see step 8).

Clear the Account: Post QuickCash uses this rule only if your customer's account balance exactly matches the amount of the receipt. If the receipt amount does not exactly match this customer's account balance, Post QuickCash uses the next rule in the set. This rule calculates your customer's account balance by using the values you specified for this AutoCash Rule Set's open balance calculation and the number of Discount Grace Days in this customer's profile class. This rule also includes all of this customer's debit and credit items when calculating their account balance. This rule ignores the value of the Apply Partial Receipts option.
This AutoCash Rule uses the following equation to calculate the open balance for each debit item:
Open Balance = Original Balance + Late Charges - Discount
Receivables then adds the balance for each debit item to determine the customer's total account balance. The 'Clear the Account' rule uses this equation for each invoice, chargeback, debit memo, credit memo, and application of an Unapplied or On-Account receipt to a debit item.

Note: The discount amount for each item depends upon the payment terms of the item and the value of the Discounts field for this AutoCash Rule Set. The number of Discount Grace Days in this customer's credit profile, along with the payment terms assigned to their outstanding invoices, determine the actual due dates of each debit item.

Clear Past Due Invoices: This rule is similar to the 'Clear the Account' rule because it applies the receipt to your customer's debit and credit items only if the total of these items exactly matches the amount of this receipt. However, this rule only applies the receipt to items that are currently past due. A debit item is considered past due if its due date is earlier than the receipt deposit date. This rule considers credit items (i.e. any pre-existing, unapplied receipt or credit memo) to be past due if the deposit date of the receipt is either the same as or later than the deposit date of this pre-existing receipt or credit memo. In this case, this rule uses a pre-existing receipt or credit memo before the current receipt for your AutoCash receipt applications.

If this AutoCash Rule Set's open balance calculation does not include late charges or disputed items, and this customer has past due items that are in dispute or items with balances that include late charges, this rule will not close these items. This rule ignores the value of the Apply Partial Receipts option.

Clear Past Due Invoices Grouped by Payment Term: This rule is similar to the 'Clear Past Due Invoices' rule, but it first groups past due invoices by their payment term, and then uses the oldest transaction due date within the group as the group due date. When using this rule, Receivables can only apply the receipt if the receipt amount exactly matches the sum of your customer's credit memos and past due invoices.

A debit item is considered past due if the invoice due date is earlier than the deposit date of the receipt you are applying. For credit memos, Receivables uses the credit memo date to determine whether to include these amounts in the customer's account balance. For example, if you are applying a receipt with a receipt date of 10-JAN-93, credit memos that have a transaction date (credit memo date) on or earlier than 10-JAN-93 will be included. Credit memos do not have payment terms, so they are included in each group.

Match Payment with Invoice:
This rule applies the receipt to a single invoice, debit memo, or chargeback that has a remaining amount due exactly equal to the receipt amount. This rule uses the values that you enter for this AutoCash Rule Set's open balance calculation to determine the remaining amount due of this customer's debit items. For example, if Finance Charges is No for this rule set and the amount of this receipt is equal to the amount due for a debit item minus its late charges, this rule applies the receipt to that debit item. If this rule cannot find a debit item that matches the receipt amount, Post QuickCash looks at the next rule in the set. This rule ignores the value of the Apply Partial Receipts option.

Notes:
AutoCash rule sets decide which rules are applied to select the transactions to be applied for the receipt. Once that is done Application rule set decides how the open balances of the customer are applied i.e the sequence in which the line amount/tax/fright are deducted from open balance.

Example : You create a receipt of $1000 for a customer which has 4 different invoices open. AutoCash rule ‘ll decide the sequences of the invoice in which the payment ‘ll be applied i.e INV1, INV3, INV4 and INV2.
Now when INV1 is selected, the application rule set‘ll decide which amount (Line, Tax or Freight) ‘ll be applied first and next.

Collectors

Receivables lets you define collectors and assign them to a profile class or to a customer’s credit profile class. When you assign a collector to a profile class, that collector becomes the collector for all customers assigned that profile class. You can modify collector assignments for your customers in the Customers window and for your profile classes in the Customer Profile Classes window.

You can also print collector names and telephone numbers on dunning letters you send to your customers for past due items. Receivables displays active collectors and their descriptions as list of values choices in the Customers, Customer Profile Classes, and Customer Calls windows. Receivables does not display inactive collectors in the list ofvalues for these windows.

You can make an existing collector inactive by unchecking the Active check box and then saving your work. If the collector you want to make inactive is associated with an active customer, Receivables displays a warning message.


To define a collector:
1. Navigate to the Collectors window.
2. Enter a Name and Description for this collector. For example, enter the collector’s first name in the Name field and full name in the Description field.
3. Enter a Correspondence Name and Telephone Number for this collector (optional). This information appears on your dunning letters if you enter it when formatting your dunning letters.
4. If you use the Credit Memo Request Approval workflow, enter the collector’s employee name or select it from the list of values.
Receivables uses this information to ensure that the collector is also an employee and therefore can receive workflow notifications.
5. Save your work.

Aging Buckets

Aging buckets are time periods you can use to review and report on your open receivables. For example, the 4–Bucket Aging bucket that Receivables provides consists of four periods: –999 to 0 days past due, 1 to 30 days past due, 31–61 days past due, and 61–91 days past due.When you create your Collections reports or view your customer accounts, you can specify an aging bucket and ’as of date’, and Receivables will group the transactions and their amounts in the appropriate days past due period.

You can define an unlimited number of aging buckets and lines (time periods) within an aging bucket. However, all Receivables aging reports include a maximum of the first seven time periods for an aging bucket. If you want to report on additional time periods, you must create custom aging reports. You can also customize the aging buckets that Receivables provides.

Aging buckets that you define here appear as list of values choices in the Aging, Print Statements, and the Print Collection Reports windows. You can make an aging bucket inactive by changing its status to ’Inactive’ and then saving your work.


AutoInvoice Processing Options


1. Specify how you want AutoInvoice to handle imported transactions that have Invalid Tax Rates. An invalid tax rate is one in which the imported transaction’s tax rate does not match its tax code.
Correct’ if you want AutoInvoice to automatically update the tax rate that you supplied to the one that you defined previously for the tax code.
Enter ’Reject’ if you want AutoInvoice to reject the transaction.

2. Specify how you want AutoInvoice to handle imported transactions with Invalid Lines by entering either ’Reject Invoice’ or ’Create Invoice.’

3. Specify how you want AutoInvoice to handle imported transactions that have lines in the Interface Lines table that are in a closed period.
To have AutoInvoice automatically adjust the GL dates to the first GL date of the next open or future enterable period, enter ’Adjust’ in the GL Date in a Closed Period field. Enter ’Reject’ to reject these transactions.

4. Enter a Grouping Rule to use for a transaction line (optional). If you do not enter a grouping rule, AutoInvoice uses the following hierarchy to determine which rule to use:
  • The grouping rule specified in the Transaction Sources window for the batch source of the transaction line.
  • The grouping rule specified in the Customer Profile Classes window for the bill–to customer and bill–to site of the transaction line.
  • The grouping rule specified in the Customer Profile Classes window for the bill–to customer of the transaction line.
  • The default grouping rule specified in the System Options window.
5. Check the Create Clearing box if you want AutoInvoice to require that the revenue amount for each transaction line is equal to the selling price times the quantity specified for that line. Use this option to distribute revenue on an transaction in an amount that is not equal to the transaction line amount.
If you check this box, AutoInvoice puts any difference between the revenue amount and the selling price times the quantity for a transaction into the AutoInvoice Clearing account that you have defined. Otherwise, AutoInvoice requires that the revenue amount be equal to the selling price times the quantity for all of the transactions it is processing. Define your clearing account in the Automatic Accounting window.

6. Indicate whether sales credits can be entered for transactions using this source by checking or unchecking the Allow Sales Credit box. This option and the Require Salesreps option in the System Options window determine whether sales credits are optional or required.

Other Transaction Source tab details

Completing the Deposit Process


1.
Customer agrees to pay deposit of 100
When the deposit is initially entered, the following accounting entry is created:
Dr. Receivables (Deposit) 100
                                Cr. Unearned revenue 100

2.
Goods of 40 is sold to customer and thus an invoice of 40 is created and applied to deposit of 100.
These accounting entries are created:
Dr. Receivables (Invoice) 40
                               Cr. Revenue 40
Dr. Unearned Revenue 40
                               Cr. Receivables (Invoice) 40
Net effect is:
Dr. Receivables (Deposit) 100
                               Cr. Unearned Revenue 60
                               Cr. Revenue 40

3.
Customer sends Payment of 100 against the deposit
This accounting entry is created:
Dr. Cash 100
                               Cr. Receivables (Deposit) 100
Net effect is:
Dr. Cash 100
                               Cr. Unearned Revenue 60
                               Cr. Revenue 40


Completing the Guarantee Process

1. Customer commits to guarantee
When the guarantee is initially entered, the following accounting entry is created:
Unbilled Receivables 100 Dr.
                            Unearned Revenue 100 Cr.


2. Invoice of 40 applied to guarantee
These accounting entries are created:
Receivables (Invoice) 40 Dr.
                            Revenue 40 Cr.

Unearned Revenue 40 Dr.
                            Unbilled Receivables 40 Cr.
Net effect is:
Unbilled Receivables 60 Dr.
                           Unearned Revenue 60 Cr.

Receivables (Invoice) 40 Dr.
                           Revenue 40 Cr.

3. Payment of 40 received for invoice
These accounting entries are created:
Cash 40 Dr.
              Receivables (Invoice) 40 Cr.


Net effect is:
Cash 40 Dr.
               Revenue 40 Cr.

Unbilled Receivables 60 Dr.
              Unearned Revenue 60 Cr. 

Demo : Invoice Corrections

Practice - Invoice Corrections

Overview

In this practice you will learn how to perform invoice corrections.

    * Update unit price

    * Adjust freight

    * Write-off an invoice

    * Enter a debit memo

Assumptions

    * You must have access to an Oracle Application Vision database or comparable training or test instance at your site on which to complete this practice.

    * The URL s for accessing the HTML login page and apps login page.

    * Seeded vision data.

Tasks

1.    Update unit price:

The unit price was incorrectly entered.

Solution:

   1. Login as Operations with Welcome as the password.
   2. Choose Receivables, Vision Operations (USA) as the responsibility.
   3. (N) Transactions > Transactions
   4. You enter a query to retrieve previously created transaction.
   5. Choose the Incomplete button to incomplete the transaction.
   6. Click on the Line Items button.
   7. Replace the unit price with any number.
   8. Save your work.
   9. Close the Lines window to return to the Transactions window.
  10. Choose the Complete button to complete your invoice.

Tasks

2.    Adjust freight:

    * Correct the freight amount incorrectly entered.

Solution:

   1. Login as Operations with Welcome as the password.
   2. Choose Receivables, Vision Operations (USA) as the responsibility.
   3. (N) Transactions > Transactions Summary.
   4. You enter a query to retrieve previously created transaction.
   5. Choose the Adjust button.  You will see the “Installments” window executed, then the Adjustments window will display.
   6. Choose Freight Error as the Activity Name.
   7. Choose Freight as the type.
   8. Create an adjustment to reflect the freight increase of  $25;  notice the balance due for freight increases.
   9. Select the Comments tab.
  10. Choose CHARGES as the reason.
  11.  Enter ‘correct freight charge’ as the comments for making this adjustment.
  12. Save your work. 
  13. Write down the Adjustment Number _____________.

Tasks

3.  Write-off a portion of the invoice:

A customer has been over-charged.

Solution:

   1. Login as Operations with Welcome as the password.
   2. Choose Receivables, Vision Operations (USA) as the responsibility.
   3.  (N) Transactions > Transactions Summary.
   4. You enter a query to retrieve previously created transaction.
   5. Choose the Adjust button.  You will see the “Installments” window executed, then the Adjustments window will display.
   6. Choose Write-Off as the Activity Name.
   7. Choose Line as the type.
   8. Create an adjustment amount of –500 to reflect a decrease;  notice the balance due for invoice decreases.
   9. Select the Comments tab to enter a comment for making this adjustment.
  10. Choose REFUND as the reason.
  11. Enter ‘overcharge customer’ as the comments for making this adjustment.
  12. Save your work. 
  13. Write down the Adjustment Number _____________.

Tasks

4.  Create a debit memo:

    * You have not billed the customer for freight charges.

Solution:

   1. Login as Operations with Welcome as the password.
   2. Choose Receivables, Vision Operations (USA) as the responsibility.
   3. (N) Transactions > Transactions.
   4. Choose Manual as the source.  Since this source has been defined as a manually entered transaction with automatically generated, sequential transaction numbering (the system will assign a number upon committing/saving).
   5. Choose Debit Memo as the class.
   6. Choose Debit Memo as the type.
   7. Choose American Telephone and Telegraph as the customer.
   8. New York (OPS) is defaulted as the location.
   9. Smith, Lisa is defaulted as the contact.
  10. Douglas, Ms. Lisa is defaulted as the salesperson.
  11. Save your work.
  12. Choose the Freight button
  13. Choose United Parcel Services as the Carrier.
  14. Enter today as the Ship Date.
  15. Choose Destination as FOB.
  16. Enter 400 as the amount.
  17. Save your work.
  18. Close the Freight window to return to the Transactions window.
  19. Choose the Complete button to complete your invoice.
  20. Write down the invoice number  _____________________.

Entering and Changing Credit Memos

In this practice you will learn how to create credit memos.

    * Enter a credit memo with percentage

    * Enter a credit memo for a specific line

    * Enter an on-account credit invoice

Assumptions

    * You must have access to an Oracle Application Vision database or comparable training or test instance at your site on which to complete this practice.

    * The URL s for accessing the HTML login page and apps login page.

    * Seeded vision data.

Tasks

1.    Enter a credit memo with percentage:

It has been determined that the invoice entered should have included a 5% discount up front; that will be rebilled at a later date.  You will create a credit memo for the discrepancy.

Solution:

   1. Login as Operations with Welcome as the password.
   2. Choose Receivables, Vision Operations (USA) as the responsibility.
   3. (N) Transactions > Credit Transactions
   4. You enter a query to retrieve previously created transactions.
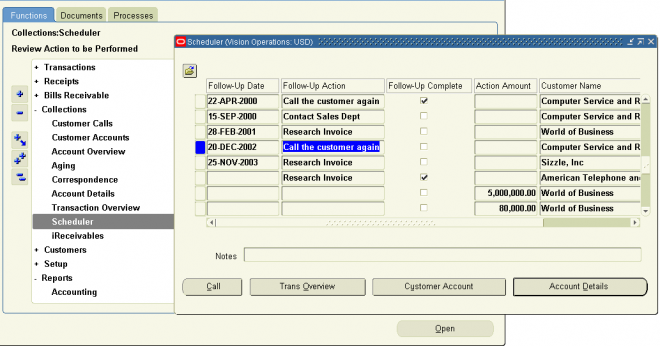
   5. Leave the “Batch” field set at  “None” since we are not batching credit transactions.
   6. The Source is Manual and the system will auto-generate the credit memo number.
   7. Choose Credit and Rebill as the reason.
   8. Enter Credit Memo as the type.
   9. In the Line field of the Credit Memo region, enter 5 which implies a credit of 5 % for all lines.
  10. Save your work.
  11. Choose the Credit Lines button to review how the system pre-rated the credit amount..
  12. Close the Lines window to return to the Credit Transactions window.
  13. Choose the Complete button to complete your invoice.
  14. Write down the credit memo number _____________________________

Tasks

2.    Enter a credit memo for a specific line:

    * Correct a specific invoice line error.

Solution:

   1. Login as Operations with Welcome as the password.
   2. Choose Receivables, Vision Operations (USA) as the responsibility.
   3. (N) Transactions > Credit Transactions
   4. You enter a query to retrieve previously created transactions.
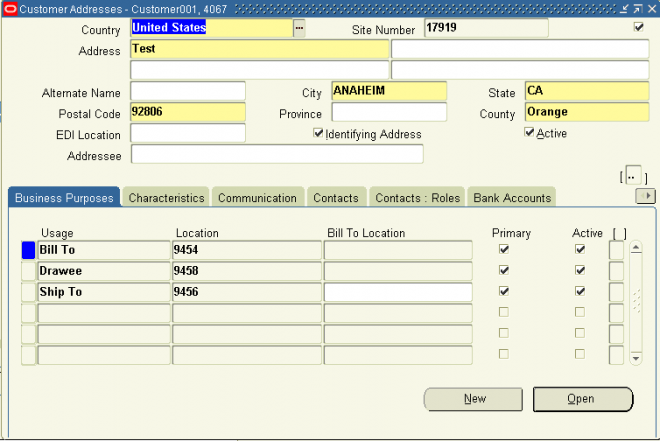
   5. Leave the “Batch” field set at  “None” since we are not batching credit transactions.
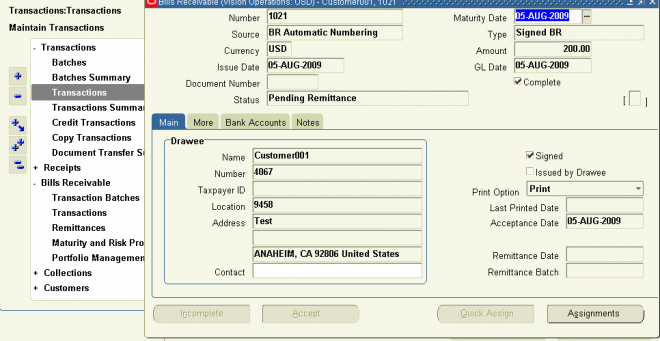
   6. The Source is Manual and the system will auto-generate the credit memo number.
   7. Choose Credit Memo as the type.
   8. Choose Damaged Goods as the reason.
   9. Save your work.
  10. Choose the Credit Lines button.
  11. Use List of Values to choose the value of the Num field.
  12. Enter –5 as the quantity.
  13. Enter 50 as the unit price.
  14. Save your work.  Notice Balance Due on the invoice.
  15. Close the Lines window to return to the Credit Transactions window.
  16. Choose the Complete button to complete your invoice.
  17. Write down the credit memo number _______________________

Tasks

3.  Enter an on-account credit invoice:

A customer has been over-charged.

Apply the on-account credit memo against the standard invoice.

Solution:

   1. Login as Operations with Welcome as the password.
   2. Choose Receivables, Vision Operations (USA) as the responsibility.
   3. (N) Transactions > Transactions
   4. Choose Manual as the source.  Since this source has been defined as a manually entered transaction with automatically generated, sequential transaction numbering (the system will assign a number upon committing/saving).
   5. Choose Credit Memo as the class.
   6. Choose On-Account Credit as the type.
   7. Choose American Telephone and Telegraph as the customer.
   8. New York (OPS) is defaulted as the location.
   9. Smith, Lisa is defaulted as the contact.
  10. Douglas, Ms. Lisa is defaulted as the salesperson.
  11. Save your work.
  12. Click on the Line Items button.
  13. Enter Miscellaneous in the Description field.
  14. Enter 1 as the Quantity.
  15. Enter -400 as the unit price.
  16. Choose Location as the tax code.
  17. Save your work.
  18. Close the Lines window to return to the Transactions window.
  19. Choose the Complete button to complete your invoice.
  20. Write down the invoice number  _____________________.
  21. (N) Transactions > Transactions Summary
  22. You enter a query to retrieve previously created on-account credit transactions.
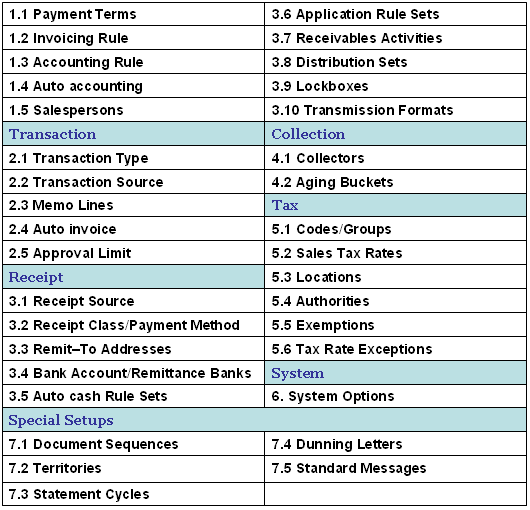
  23. Choose the Applications button.
  24. In the Apply To field, chose a transaction to apply the on-account credit against, optionally you can choose not to apply the complete amount by changing the Amount Applied field.
  25. Save your work.

Demo : Customer Receipts - Bank Deposits - Remittances


In this practice you will learn how to create remittances.

    * Enter a remittance batch

Assumptions

    * You must have access to an Oracle Application Vision database or comparable training or test instance at your site on which to complete this practice.

    * The URL s for accessing the HTML login page and apps login page.

    * Seeded vision data.

Tasks

1.    Enter a remittance:

You have received customer payments and ready to make a deposit to the bank.

Solution:

   1. Login as Operations with Welcome as the password.
   2. Choose Receivables, Vision Operations (USA) as the responsibility.
   3. (N) Receipts > Remittances
   4. Select Batch Type of Remittance.
   5. System will default in the current date
   6. Select Standard as the remittance method. 
   7. Select the Receipt Class and Payment Method for customer related receipts.
   8. Leave Media Reference Blank.
   9. Select Bank of America as the bank.
  10. Select New York as the branch.
  11. Select 10271-17621-619 as the account number.  
  12. Enter any number in the deposit number.  This represents the deposit slip number.
  13. Save your work.
  14. Choose the Manual Create button.
  15. With Cursor in the Payment Method field of the receipts region, run a query for your receipt numbers.
  16. Enter an ‘x’ in the Select checkboxes to the left of your receipt numbers to select them to be included in this deposit or remittance to the bank.
  17. Select Format to approve and format your batch.
  18. The system will display a decision box asking if you would like to continue with the Approval and Format step, choose Yes.
  19. The system will automatically save your changes.
  20. Choose OK to acknowledge the save to the database.


Address Tab

  • Select a Ship To Location and Ship To Contact.
These fields provide default ship to information for all lines on the order. If the system profile option OM: Customer Relationships is set to:
Yes, you can choose a ship to location based only on the customer listed on the order or a related customer.
No, you can choose the Ship To location of the Sold To customer only,
All, customer relationships are ignored and you can choose a ship to location from any customer.
  • Select a Bill To Location and Bill To Contact.
These fields provide bill to information for all lines in the order. If the system profile option OM: Customer Relationships is set to:
Yes, you can choose a bill to location based only on the customer on the order or a related customer.
No, you can choose the Bill to location of the sold to customer only.
All, customer relationships are ignored and you can choose a bill to location from any customer. You can choose any contact associated with the bill to address.
  • Select a Deliver-To Location and Deliver-To Contact. If you have a deliver-to field in the order header, you must be able to populate the line deliver to field from the header field. This is done by setting up a defaulting rule for the line deliver to field so that it defaults the value of the header deliver to field.
End Customer selection does not look at the Customer Relationship setting. Any customer location or contact can be selected for End Customer


Pricing Tab

Below lists all additional data items available for the seeded (default) Sales Order Line Items Pricing Tab folder.
• Accounting Rule
• Calculate Price Flag description
• Commitment
• Commitment Applied
• Customer Net Price
• Customer Payment Terms
• Invoicing Rule
• Tax Code
• Tax Date
• Tax Exemption Number
• Tax Exemption reason
• Tax Handling
• Unit List percent
• Unit percent base price
• Unit Selling Percent
• Commitment Applied
• Subinventory
• Split By
• Shipped to Customer
Note: The fields Customer Net Price and Customer Payment Terms are seeded as Hidden in the Pricing tab of the Lines region in the Sales Orders window.

Calculate Price Flag

The Pricing tab enables you to specify whether the new order or order line is copied at the original pricing or is repriced. To reprice, you can specify the pricing date.
  • If you choose to reprice the order or order line, manual discounts and charges are removed and automatic discounts and charges are recalculated.
  • If you choose to retain original pricing, all discounts and charges are retained and the Calculate Price Flag is set to Freeze Price for order lines and Partial Price for return lines.
  • Additionally, you can choose to set the Calculate Price Flag to Partial Price by selecting the corresponding radial button on the Pricing Options Tab.
Note: You cannot copy an order which contains a solution based model for which one or more of the components have been cancelled. This is currently not supported, and you may receive the following error: Item &ITEM is selected more than once in this Configuration.
Attention: When the destination order type while copying an order is RMA, Order Management will set the Calculate Price Flag to P for the copied order lines even if the you specify At Original Price within the Pricing Options tab copy window.
 
Pricing a Copied Order
The pricing tab lets you specify whether the new order/line is to be copied at the original pricing re-priced or partially repriced. If it is to be re-priced, you can specify a pricing date.

When you choose to retain original pricing, all discounts/charges will be retained and the calculate_price_flag will be set to ‘N.’ When you choose to re-price, manual discounts/charges will be lost and automatic discounts/charges will be re-evaluated. When price partial is used the price of the line remains the same but freight charges may be obtained with a pricing call. When you are copying only the order header then you can only choose the original selling price.

Shipping Tab

 
Below lists all additional data items available for the seeded (default) Sales Order Line Items Shipping Tab folder.
• Actual Arrival Date
• Actual Shipment Date
• Auto Selected quantity
• Bill To
• Bill To Address1..5
• Bill To Contact
• Bill To Location
• Deliver To
• Deliver To Address1..5
• Deliver To Contact
• Deliver To Customer
• Deliver To Customer Number
• Deliver To Location
• Delivery Lead Time
• Demand Class
• DEP Plan required Flag
• Earliest Acceptable Date
• Explosion Date
• FOB
• Freight Carrier
• Latest Acceptable Date
• Model Group Number
• Over-Shipped resolved flag
• Over-Ship Tolerance
• Promise Date
• Qty Fulfilled
• Request Date
• Rounding Factor
• Schedule Date
• Ship Complete
• Ship From Location
• Ship Model Complete flag
• Ship To
• Ship To Address1..5
• Ship To Contact
• Ship To Location
• Shipment Priority
• Shipment Quantity
• Shipment UOM
• Subinventory
• Undership Tolerance

Quote

A quote encompasses many stages before becoming a sales order or sales agreement. These stages can include a draft, customer negotiations, internal and external business approvals. Versioning can capture changes and the transaction seamlessly converts to a
sales order or can be archived as a lost or expired quote. Quoting draws all relevant information from the Order Management schema for use by the customer service representatives (CSR), enabling a seamless flow from a quote status through a sales order.

Why Should Business use Quote?
  • The creation and management of quote as a negotiation tool and transitioning the quote to a sales order, thus acting as a single point of entry into Order Management.
  • Preparation of quote for assisted selling of products and services to customers and business partners.
  • Processing the quote with or without approvals.
  • Quick entry of order lines with minimum data entry as the information captured on the quote gets carried forward into the sales order.
Using Quotes you can:
  • Create, modify, and select quotes
  • Configure complex products
  • Manually adjust quote prices
  • Perform real time global availability checks
  • Up Sell, Cross Sell
  • Calculate taxes
  • Assign sales credits
  • Convert quotes to sales orders
  • Support E-Business requirements
  • Reduce administration expenses and increase a sales person's productivity
Workflows
  • Both Quotes and Sales Agreements(SAs) use the same seeded Negotiation workflows.
  • After Customer Acceptance, Quotes transition to a sales order and Sales Agreements become Active.
  • SAs do not capture an Offer Expiration date and therefore do not leverage this functionality in the Negotiation flow.
Unsupported Features
The functionality supported with Quotes is similar to the level of support for Sales Orders. There are a few Sales Order features that are not available during the negotiation phase of a transaction including:
  • Holds
  • Scheduling
  • Copy a return from a quote.
  • Independent line flows
  • Cancellations – progress to LOST Status
  • Ship and Arrival Sets
  • Commitments
  • Quotes for returns or Internal Sales Orders
  • Sales Agreements - Can specify sales agreement reference on a quote but released quantity and released amount on a sales agreement are updated only when a quote is converted to an order

Entering Information at the Supplier Site Level

Except for Receiving, Classification, General, and Sites categories, all categories of information that are entered at the supplier level can also be entered at the supplier site level. The information that you enter at the supplier level cascades down to all supplier sites. Note that Accounting information is entered only at the supplier site level.
 
Enter Basic Supplier Site Information
1. Enter the supplier site names. To distinguish between a supplier’s sites, the site names should be unique (for example, city name or branch name). The site name is for your reference when you select a supplier site from a list of values during transaction entry and will not appear on documents that you send to the supplier.
2. Enter the supplier site address.

General Supplier Site Information

1. Select the appropriate Site Uses check boxes to indicate which specific business functions are performed at each site.
- A Pay Site is a supplier site to which you send payment for an invoice. You cannot enter an invoice for a supplier site that is not defined as a Pay Site.
- A Purchasing Site is a supplier site from which you create a purchase order for goods and services. A site can be both a Pay Site and a Purchasing Site.
- An RFQ Only Site is a supplier site from which you enter a request for quotations. This should be selected only if you do not allow entering purchase orders for a supplier site.
2. Enter any additional supplier site information in the appropriate field.

Contact Information
In the Contact Region, enter contact information specific to that site. This information is for your reference only and is not used by the system.

Accounting Region
(N) Suppliers—>Entry (B) Open
Entering Supplier Site Information in the Accounting Region
1. In the Distribution Set field, select the default distribution set for all invoices entered for the supplier site.
2. In the Liability field, select the default liability account number.
Oracle Payables displays the description for the account number.
3. In the Prepayment field, enter the default prepayment account number for recording any prepayment to the supplier site.
Oracle Payables displays the account description.
 

Tax Basics, Code and Group

The word tax has two meanings: first, the financial duty or levy contributed to the entity (be it a government or any other organization) a person or group of persons (say, a business) is part of. The second definition is "a very heavy burden" and can essentially summarize the first definition.

While there are opposing views on imposing tax, the general idea is that taxes are used to fund projects that can benefit society as a whole, or at least the majority of it. Businesses are taxed by the state because they use government-owned infrastructures and services. Individuals are taxed as part of their social contract, i.e., their rights and responsibilities as citizens of the state. Tax is what John F. Kennedy called "the annual price of citizenship."

India has a well developed Tax structure with a three‐tier federal structure, comprising of the Union Government, the State  Governments, and the urban/rural local bodies. The power to levy taxes and duties is distributed among the three tiers of governments, in accordance with the provisions of the Indian Constitution

The main taxes/duties that the Union Government is empowered to levy are Income Tax (except tax on agricultural income, which the State Governments can levy), Customs duties, Central Excise and Sales Tax(CST)(VAT is used in place of sales tax), and Service Tax.

The principal taxes levied by the State Governments are Sales Tax (tax on intra‐State sale of goods), Stamp Duty (duty on transfer of property), State Excise (duty on manufacture of alcohol), Land Revenue, Duty on Entertainment and Tax on profession and callings.

Local bodies are empowered to levy tax on properties, Octroi, Tax on Markets, and tax/user charges for utilities like water supply, drainage, etc.

Types of taxes
1. DIRECT TAXES
1.1 Income tax : An income tax is tax levied on financial income of person co-operation or  other legal entity.
1.2 Wealth tax
1.3 Property tax   etc.

2. INDIRECT TAXES
2.1 Custom duty : Custom Duty Is A Tax Which A State Collects On Goods Imported Or Exported Out Of The Boundaries Of The Country In India, Custom Duties Are Levied On The Goods And At The Rates Specified In The Schedules To The Custom Tariff Act, 1975.

Customs is an authority or agency in a country responsible for collecting and safeguarding customs duties and for controlling the flow of goods including animals, personal effects and hazardous items in and out of a country. Depending on local legislation and regulations, the import or export of some goods may be restricted or forbidden, and the customs agency enforces these rules.The customs LEBA may be different from the immigration authority, which monitors persons who leave or enter the country, checking for appropriate documentation, apprehending people wanted by international arrest warrants, and impeding the entry of others deemed dangerous to the country.

A customs duty is a tariff or tax on the import of or export of goods.

2.2 Excise duty : Excise duty  is an indirect tax levied and collected on goods manufactures in india.
             An excise is an indirect tax, meaning that the producer or seller who pays the tax to the government is expected to try to recover the tax by raising the price paid by the buyer (that is, to shift or pass on the tax). Excises are typically imposed in addition to another indirect tax such as a sales tax or VAT. In common terminology (but not necessarily in law) an excise is distinguished from a sales tax or VAT in three ways: (i) an excise typically applies to a narrower range of products; (ii) an excise is typically heavier, accounting for higher fractions (sometimes half or more) of the retail prices of the targeted products; and (iii) an excise is typically specific (so much per unit of measure; e.g. so many cents per gallon), whereas a sales tax or VAT is ad valorem, i.e. proportional to value (a percentage of the price in the case of a sales tax, or of value added in the case of a VAT).

Typical examples of excise duties are taxes on gasoline and other fuels, and taxes on tobacco and alcohol (sometimes referred to as sin taxes).

2.3 Sales tax/Vat: Sales tax is a tax on the supply of goods  and certain services ,it is charged  at the time of sale and then deposited in the Government treasury.
               Vat Paid By Dealers On Their Purchases Is Usually Available For Set-off Against The Vat Collected On Sales.
Under The Vat, The Tax Rates Have Been Simplified:

  • 4% For Items Consisting Mainly Of Raw Materials Used In The Manufacturing Process
  • 12.5% For All Goods Unless They Are Listed Under The Other Rates.
  • Foodgrains Including Pulses, Milk, Vegetables Books are Not Subject To Vat.
WHAT  TYPES OF BUSINESS ARE  NOT LIABLE FOR SALES TAX?            
  • Agricultural  Products
  • Most Of Pharmaceutical Products
  • Educational & Scientific Materials
  • Equipment For Fighting AIDS & CANCER
3. Service Tax: Service tax is an indirect tax levied under the Finance Act, 1994, as amended from time to time, on specified services. At present, there are approximately 96 categories (including 15 new services introduced by Budget 2006) of net services taxable under the service tax.

Key FFs in AR

Sales Tax Location - Can have more than 1 structure
Territory Flexfield - one structure CUSTOMER_TERRITORY_FLEXFIELD

System Options

Define system options to customize your Receivables environment. During Receivables setup, you specify your accounting method, set of books, tax method and accounts, customer and invoice parameters, and how the AutoInvoice and Automatic Receipts programs will run. If you are planning to use the Bills Receivable Workbench, then you need to perform the necessary implementation steps and enable Bills Receivable.

Prerequisites
❑ Define your set of books.
❑ Define your AutoCash Rule sets.
❑ Define Grouping Rules.
❑ Define Key Flexfield Segments - Location, Territory.

 
Accounting System Options
Use the Accounting tabbed region to specify an accounting method and set of books and define your accounting flexfields. You can also choose whether to use automatic journal import, enable header level rounding, and specify how many days should be included in each posting cycle.

1. Enter the Accounting Method to use for your set of books. Enter ’Accrual’ if you want your billing system to record revenue from invoices, debit memos, and chargebacks. When you use this method, Receivables debits your cash account and credits your receivables account upon payment of a debit item.
Enter ’Cash Basis’ to recognize revenue at the time you receive payment for an invoice, debit memo, or chargeback. Receivables debits cash and credits revenue when using the Cash Basis method.
Attention: Once you enter and save this information, you cannot update your Accounting Method.

2. If your accounting method is Accrual, enter your Realized Gains and Realized Losses Accounts. Receivables posts changes in your functional currency to your Realized Gains or Losses account in your general ledger if there are differences in exchange rate gains or losses.
For example, if the exchange rate for a foreign currency invoice is 1.7 and the exchange rate of your payment for this invoice is 2.0, Receivables posts the difference as a gain to your Realized Gains account. Receivables provides descriptions of each segment, verifies that all flexfield segments are active, and ensures that you enter a valid combination.

3. Enter the Tax Account to use as the default value in the Tax Codes and Rates window.

4. If your accounting method is Cash Basis, enter your Unallocated Revenue Account. Receivables uses this account when you apply a cash receipt with a balance other than zero to an invoice with a zero balance.

5. Enter a Cross Currency Rounding Account. Receivables uses this account to record any rounding error amounts created during a cross currency receipt application for currencies that have a fixed rate relationship. You need to define a rounding error account if you create cross currency receipts.

6. Define a Header Rounding Account and enable Header Level Rounding (optional). Receivables uses this account to record any rounding differences that occur when converting foreign currency transactions to your functional currency.
Warning: After you enable Header Level Rounding and save your work, you cannot disable the feature.

7. To import the batches of transaction records that you post into your general ledger, check the Automatic Journal Import box. The value you enter becomes the default value for the Run GL Journal Import field in the Run General Ledger Interface window.

8. Enter the number of Days per Posting Cycle. This lets you process the transactions you are posting in smaller groups to ensure that you do not run out of rollback space during posting. For example, if your accounting period is 30 days and you set this value to 30, the posting program uses only one cycle. If your accounting period is 30 days and you set this value to 17, the posting program uses two cycles. We recommend that you set this field to a value that is less than the number of days in your accounting period.

Tax System Options

Use the Tax tabbed region to define how Receivables calculates taxes.
You specify your tax method, the Location Flexfield Structure to use to determine your taxes for different customer locations, and whether to compound taxes for your customers. You can also choose to recognize tax exception rates for customers, customer sites, specific locations, and products, and whether exemptions that you define for specific products or customers should take precedence.


1. Open the Tax tabbed region, then enter your Tax Method. Choose either ’Sales Tax’ or ’Value Added Tax’. Receivables uses this tax method, along with the value you entered for the Calculate Tax field assigned to your transaction type, to determine whether to calculate tax for your transactions.
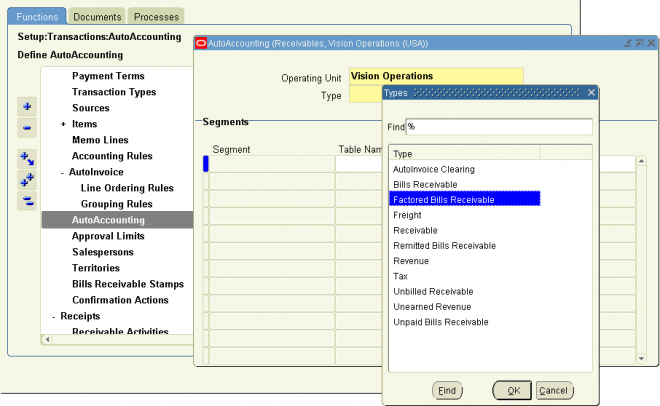
2. Enter your sales tax Location Flexfield Structure. You can use this to validate customer addresses as well as calculate sales tax based on your customer’s shipping address. Alternatively, you could perform address validation using flexible address formats

3. Enter the Postal Code Range that you want to be the default value when entering sales tax rate assignments in the Tax Locations and Rates window.

4. If you are not using a flexible address format for validation, enter the type of Address Validation to use. This option is only valid for addresses in your home country. Enter one of the following:

Error: Receivables displays an error message when you enter an invalid address format. If the location combination does not exist for the customer’s Ship–To address, Receivables displays an error message and prevents you from saving the record. In this case, you must manually add the location in the Tax Locations and Rates window before you can save the address.

Suggestion: If you choose Error, Receivables displays a list of values to help you select specific components when entering a
new address. For example, if you enter ’New’ in the City field and then press Tab or Return, Receivables displays all cities
prefixed with ’New’ such as New York, New Brunswick and New Bedford. (Receivables derives this information from
locations that you previously entered or imported.)

Warning: Receivables displays a warning message if a tax rate or location is not defined for this address. However, you can save the record. Receivables creates locations that were not defined but does not create the corresponding rates for these new locations.

No Validation: Receivables does not validate the address. This validation level lets you save an address without displaying an error or warning message, even if all of the locations do not exist. If these locations do not exist, then Receivables creates them for you but does not create the corresponding rates for these new locations.

5. To compound taxes in Receivables, check the Compound Taxes box.
Compound taxes are taxes that are based on other taxes. If you check this box, Receivables lets you assign precedence numbers to your tax lines when entering invoices.

6. Enter the Invoice Printing method to use. This is the method Receivables will use when printing tax amounts on your invoices. The value you enter here becomes the default for your customer profile classes. Choose one of the following methods:
European Tax Format: Print tax information in the following format: Tax rates printed as the last column of invoice lines, freight items printed last, and the taxable amount with the summarized tax codes printed at the end of the invoice.
Itemize By Line: Itemize tax information for each invoice line. Receivables displays this information after each invoice line.
Itemize and Summarize: Display both itemized and recap tax information.
Summarize by Tax Code: Display all tax information under the heading ’Tax Summary by Tax Code.’ If you have two tax lines with the same tax code, rate, exemption, and precedence number, Receivables will group them together.
Summarize By Tax Name: Display all tax information under the heading ’Tax Summary by Tax Name.’ If you have two tax lines with the same tax name, rate, exemption, and precedence number, Receivables will group them together.
Total Tax Only: Display only the total tax amount at the bottom of the document.
If you charge your customer’s tax and want to print a registration number on their invoices, enter a Tax Registration Number.

7. Enter the Tax Vendor Views to use to calculate tax, or select one from the list of values. Receivables provides a Tax Vendor Extension to integrate external tax calculation programs with Oracle Applications. If implemented, the Tax Extension returns a tax rate or amount from the vendor program whenever you manually enter, import, or copy transactions in Receivables. Enter Oracle if you are not implementing a tax vendor extension and want to calculate tax using the tax engine

8. Check the Inclusive Tax Used box if you use inclusive tax codes (optional). This option determines at what point Receivables updates the total line amount in the Lines window when you add, update, or delete a tax line. If this option is Yes, Receivable does not update the ’Lines’ total until you save your work; otherwise, Receivables enters a null value when you make the change, then updates the total when you save your work.

TAX Defaults & Rules
1. Define your Tax Code Defaults and hierarchy by checking the appropriate boxes and entering a sequence number for each. This hierarchy determines the order in which Receivables derives a default tax rate when you manually enter transactions or import them using AutoInvoice.
For example, if Tax From Customer Site is Yes and you specify that it is number 1 in the hierarchy, Receivable will first check if a tax rate is defined to the customer site for this transaction. If no tax rate exists at this site, Receivables looks at the next location in the sequence, and so on.
Customer Site: Use the tax rate defined at the customer address level.
Customer: Use the tax rate defined at the customer level.
Product: Use the tax rate defined at the item level.
Revenue Account: Use the tax code assigned to the natural account segment of your Revenue account.
System Options: Use the tax code that you entered in the System Options window.

2. If your Tax Method is VAT, enter a default Tax Code (optional).

3. Define your Exception Rates by checking the appropriate boxes:
Use Customer Exemptions: Check this box to include customer exemptions when calculating tax for your transactions. Use the Tax Exemptions window to exempt customers and items from specific tax. If you do not check this box, you cannot set the Default Tax and the Tax fields in the Transaction window to ’Exempt’.
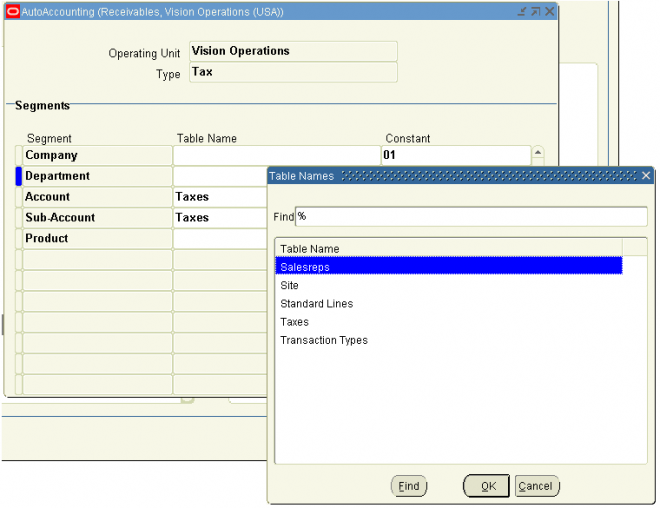
Use Item Exemptions: Check this box to include item exemptions when calculating tax for your transactions. Use the Tax Exemptions window to exempt customers and items from specific tax.
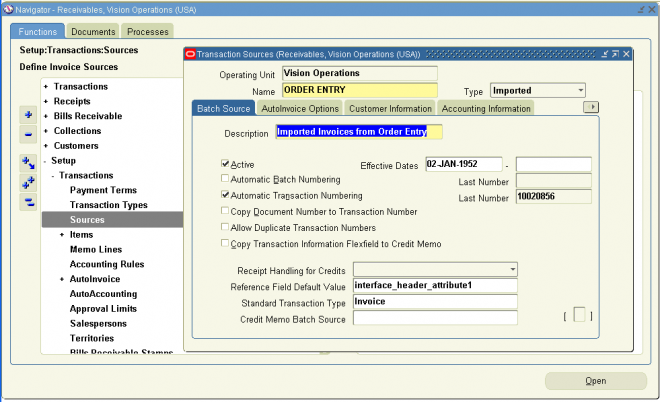
Use Item Tax Rate Exceptions: Check this box to use the tax rate you defined for specific products based on the customer’s Ship–To address. Use the Item Tax Rate Exceptions window to enter tax rates for specific items based on Ship–To address.

Transactions and Customers

Receivables lets you define several options for your invoices and use of the AutoInvoice program. You can choose whether to allow updates to printed invoices and whether you can apply payments to an unrelated customer’s transactions. Receivables lets you define the segments to use for Accounting Flex Tuning, System Items Tuning, and Territory Tuning during AutoInvoice.
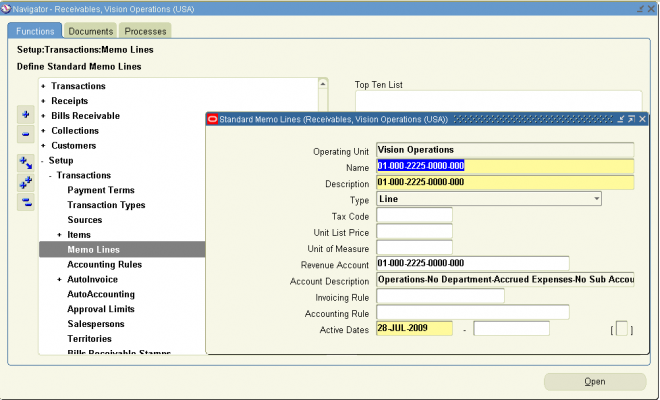
You can also specify whether to purge the interface tables that you use for AutoInvoice, the maximum number of bytes to use, whether SQL Trace is active for this program, and the grouping rule to use for the revenue and credit transactions you create through AutoInvoice. You can also specify whether to allow reciprocal relationships between customers.


1.1 To allow updates to transactions that have been printed, check the Allow Change to Printed Transactions box. This option also determines whether you can update a customer’s address when printed, posted, or applied transactions are assigned to that address.
Attention: You cannot update a transaction if it has activity against it, regardless of how you set this option. Examples of activity include payments, credit memos, adjustments, and including the transaction on a consolidated billing invoice.

1.2
To allow transactions to be deleted from Receivables after they have been saved, check the Allow Transaction Deletion box. If you set this option to Yes, you can still specify at the responsibility level which users can delete transactions by using function security.
Setting this option to No prevents all Receivables users from deleting transactions; this is a requirement for installations that are legally required to number transactions sequentially with no missing transaction numbers.

1.3 To allow receipt applications to debit items of unrelated customers, or to allow bills receivable assignments to transactions of unrelated customers, check the Allow Payment of Unrelated Transactions box.
If you check this box, Receivables lets you select debit items for unrelated customers and apply your receipts to them in the
Applications window, and lets you select transactions of unrelated customers and assign them to bills receivable in the Assignments window or the Bills Receivable Transaction Batches window.

2.1 Enter the Accounting, System Items, and Territory Flexfield segments that are most often selected by AutoInvoice. Receivables uses this information to increase AutoInvoice performance.

2.2 To activate SQL trace for AutoInvoice, check the SQL Trace box.

2.3 Enter the Maximum Memory (in bytes) to allocate to AutoInvoice for validation. For best results, enter a value that is the maximum number of records that you import (rounded to an even number) multiplied by 1024. For example, if you use AutoInvoice to import no more than 100 records at a time, enter a value of 102400.

2.4 To automatically purge the AutoInvoice Interface tables after running AutoInvoice, check the Purge Interface Tables box. If you check this box, Receivables deletes the records that have successfully transferred into permanent Receivables tables. Do not check this box if you want to submit the AutoInvoice Purge program manually after running AutoInvoice.

2.5 Enter a Log File Message Level. This number (from 0 to 3) indicates the amount of detail you want AutoInvoice to display in the
AutoInvoice log file. The higher the number, the greater the detail.

3.1 To automatically assign a unique number to every new customer, check the Automatic Customer Numbering box. Do not check this box if you want to manually assign customer numbers. Your Oracle Applications system administrator or developer can specify the initial number to be used for Automatic Customer Numbering.
❑ Switch to the Application Developer responsibility.
❑ In the Navigator window select Application, then Database, and finally Sequence.
❑ In the Name field of the Sequences window, query for HZ_ACCOUNT_NUM_S.
❑ In the Start Value field of the Sequences window, enter the intitial number to be used for Automatic Customer Numbering

3.2 To automatically assign numbers to your customer’s business purposes, check the Automatic Site Numbering box.
Suggestion: If you do not check the Automatic Site Numbering box, you can provide descriptive location names for your business purposes. For example, your customer has several addresses, but they want all invoices to be sent to their office in Chicago. For the Bill–To business purpose, enter a location name of ’Chicago–Bill To Site Only.’ This will help you identify the correct address to enter when creating invoices.

3.3 To automatically create a reciprocal relationship between two customers when you are defining customer relationships, check the Create Reciprocal Customer box. A reciprocal relationship is one in which related customers can apply payments to each others invoices.

3.4 Enter the default Grouping Rule Name you want AutoInvoice to use. AutoInvoice uses grouping rules to group revenue and credit transactions into invoices, debit memos, and credit memos.

Miscellaneous System Options

Use the Miscellaneous tabbed region to specify your split amount and the number of days to use for your Days Sales Outstanding (DSO)
Calculation in the Collection Effectiveness Indicators Report. You can also choose whether you require a billing location, salespersons, and remit to addresses with your receipts, define the system level maximum write–off amount for receipts, specify a chargeback due date, define your Automatic Receipts submission parameters, choose a default Application Rule Set, and set the Sales Credit Percent Limit.


Split Amount
Discount basis
Application rule set
AutoCash Rule Set
Days in DSO (Days Sales Outstanding) Calculation
Sales Credit Percent Limit
Write-off Limits per Receipt

Accrue Interest
Allow Unearned Discounts
Dicsuount of parial Payment
Bills Receivable enabled
Require Sales person

Bank account payment method
Credit card payment method

Miscellaneous invoice


Enter a miscellaneous invoice:

  • Enter the invoice header
  • Enter an invoice line with free-format description

Solution:

  1. Login as Operations with Welcome as the password.
  2. Choose Receivables, Vision Operations (USA) as the responsibility.
  3. (N) Transactions > Transactions
  4. Choose Manual as the source.  Since this source has been defined as a manually entered transaction with automatically generated, sequential transaction numbering (the system will assign a number upon committing/saving).
  5. Choose Invoice as the class.
  6. Choose Invoice as the type.  Your implementation team may have created a transaction type of Miscellaneous Invoice to segregate miscellaneous invoices from standard invoices.
  7. Choose American Telephone and Telegraph as the customer.
  8. New York (OPS) is defaulted as the location.
  9. Smith, Lisa is defaulted as the contact.
  10. Douglas, Ms. Lisa is defaulted as the salesperson
  11. Save your work.
  12. Click on the Line Items button.
  13. Enter Scrap Material Sale in the Description field.
  14. Enter 1 as the Quantity.
  15. Enter $800 as the price.
  16. Choose Location as the tax code.
  17. Save your work.
  18. Close the Lines window to return to the Transactions window.
  19. Choose the Complete button to complete your invoice.
  20. Write down the invoice number 


Entering a Manual receipt

Manual receipts are entered in receipt workbench.
Manual receipts can be entered individually or in a batch.
Manual receipts can be cash or miscellaneous receipts.
The customer balance is updated when the receipt is saved.

Navigate to the Receipts or Receipts Summary window.


1. You can enter transactions in any currency defined in Oracle Receivables if you have at least one remittance bank account with a Receipts Multi–Currency flag set to Yes. If no such bank account  exists, you are limited to entering only those currencies in which bank accounts exist. (The currency of a multiple currency bank account must be the same as your functional currency.)
If the currency for this receipt is different from your functional currency and you have not defined daily conversion rates, enter exchange rate information.

2. Enter a payment method. Receivables uses the payment method to determine the accounting and remittance bank accounts for this receipt. You can only select payment methods that have remittance bank accounts that are in the same currency as the receipt.

3. To help identify the customer for this receipt, enter a transaction number (optional). Receivables displays the customer associated with this transaction. If multiple customers have transactions with the number you entered, Receivables displays a window from which you can select a customer. If you enter a number here, Receivables displays the customer number in the Applications window when you apply this receipt.

If you did not enter a transaction number and the receipt is not unidentified, enter customer information for this receipt, including customer name or number and bill–to location. When you enter the customer, Receivables enters this customer’s primary bill–to location, if one exists (you can change this value). If the system option Require Billing Location for Receipts is set to Yes, you must enter a bill–to location.

4. Receivables derives the default remittance bank account from the payment method you entered. You can accept this value or enter any bank account assigned to the payment method if the bank account is in the same currency as that of the receipt or the Multi–Currency flag for the remittance bank is set to Yes. Only bank accounts that are in your functional currency can accept multiple currency deposits.

QuickCash Receipts

Create a batch of QuickCash receipts when you need to enter and apply receipts quickly. The QuickCash window requires only minimal information for each receipt and application. QuickCash also provides an extra level of control for entering high volume receipts because it does not immediately affect your customer’s account balance.

When you enter receipts and applications in a QuickCash batch or import them using AutoLockbox, Receivables stores the data in an interim table. You can then use the QuickCash window to review receipts and ensure that application information is correct. After reviewing a QuickCash batch for accuracy, run Post QuickCash to update your customer’s account balances.

QuickCash lets you apply your receipts to one or many transactions, use AutoCash rules, place receipts on–account, or enter them as unidentified or unapplied. If you enable the profile option AR: Enable Cross Currency, you can also apply receipts to transactions in different currencies. After you run Post QuickCash, Receivables treats QuickCash receipts like any other receipts; you can reverse and reapply them and apply any unapplied, unidentified, or on–account amounts.

You must batch QuickCash receipts. Receivables does not update the status, applied, on account, unapplied, and unidentified fields for your QuickCash batch until you save your work.

Application Types:
Auto Cash Rule: Apply receipts to this customer’s transactions using AutoCash Rule Set defined for this customer’s profile class. If this customer’s profile class does not have an AutoCash rule Set assigned to it, Receivables uses the AutoCash Rule Set defined in the System Options window.
Single: Apply this receipt to a single installment. If you choose this option, you must also enter the transaction number to which you want to apply this receipt.
Multiple: Apply this receipt to multiple transactions or to multiple installments. You specify the transactions and installments to which you want to apply this receipt in the Applications window.
On–Account: Apply this receipt to a customer’s account, but not to a specific transaction.
Unapplied: Mark this amount as Unapplied if this receipt is not applied to any transactions.
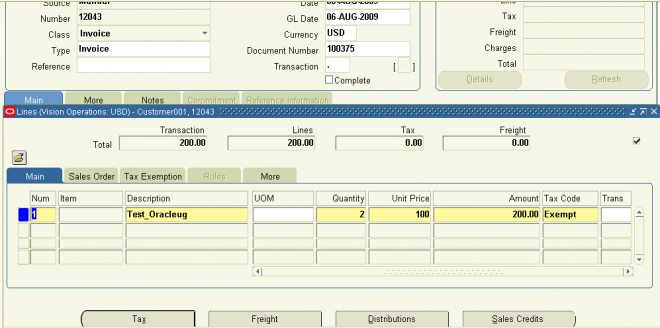
Unidentified: Mark this amount as Unidentified if this receipt is not associated with a customer.

To apply a QuickCash receipt to several transactions:
1. Navigate to the Receipt Batches window.
2. Query or enter the QuickCash batch.
3. Choose Receipts.
4. If this is a new batch, enter receipt information and choose an Application Type of Multiple. If the receipt currency is different
than the batch currency, specify exchange rate information.
5. Choose the Multiple button.
6. Enter a transaction or select one from the list of values.

Post QuickCash

When you enter receipts in the QuickCash window or import them using AutoLockbox, Receivables stores them in interim tables. You can then use the QuickCash window to review each receipt and use the Applications window to ensure that the application information is correct. After you approve the receipts and their applications, run Post QuickCash to update your customer’s account balances.
You can choose which QuickCash or Lockbox batches to review. For example, you may want to review only the receipts entered by your data entry clerks or the data files sent by your bank. The following diagram summarizes how Post QuickCash transfers receipts and applications from interim tables into Receivables.

 
Closed Transactions
If you enter a receipt and fully apply it to an open invoice, Post QuickCash will process the receipt as well as the application.
However, if you apply a receipt to an invoice that is closed by another application, Post QuickCash will only process the receipt. In this case, the receipt will be marked ’Unapplied’. You need to use the Applications window to manually apply these receipts.

AutoCash Rule Sets
Post QuickCash uses the AutoCash Rule Set assigned to the customer site or profile class to determine how to apply receipts. If an AutoCash Rule Set has not been assigned to the customer’s site, Post QuickCash uses the rule set in the customer’s profile class; if the customer’s profile class does not have an AutoCash Rule Set, Post QuickCash uses the rule set in the System Options window.

If you use AutoCash rules to apply your receipt and all of the rules in your AutoCash Rule Set fail, Post QuickCash will apply the receipt using the Remaining Amount Rule Set that you specify for this customer’s profile class. If you did not specify a Remaining Amount Rule Set for this customer’s profile class, Receivables marks the remaining amount Unapplied.

Bank Charges
If you set the system option AR: Create Bank Charges to Yes, Receivables will also consider bank charges and a tolerance limit when
applying receipts.

Receipts Without a Bill–to Location
If the system option ’Require Billing Location For Receipt’ is set to Yes, Post QuickCash will not process receipts that do not have a bill–to location. Both the QuickCash window and AutoLockbox validate that receipts have a billing location if this option is set to Yes. However, the system option may change after the receipts have been entered but before Post QuickCash has been run, so Post QuickCash revalidates.

Application Rule Sets
Post QuickCash uses the Application Rule Set assigned to the debit item’s transaction type to determine how to apply payments and how discounts affect the open balance for each type of associated charges. If no rule set is assigned to this item’s transaction type, Post quickCash uses the rule set defined in the System Options window.

Cross Currency Receipts
If the profile option AR: Enable Cross Currency is set to Yes, you can use Post QuickCash to apply a receipt when the receipt and transaction currencies are different.
 

Automatic Receipts

Instead of manually entering receipts, you can use the Receivables automatic receipts feature to automatically generate receipts for customers with whom you have predefined agreements. These agreements let you collect payments on time by transferring funds from the customer’s bank account to yours on the receipt maturity date. You can also manage your cash flow by deciding when, where, and how much you should remit to your bank.

Automatic receipts also lets you manage your customer risk and reconcile bank statements. You can decide how you wish to process the receipts from creation to remittance and risk elimination.

The Automatic Receipts feature satisfies the many variations of bank remittance processing, such as Bills of Exchange, Direct Debits, Letras Aceptadas (Spain), Tratte Accettate (Italy), Lettre de Change Releve, and Credit Prelevement Automatique (France).
Once created, automatic receipts can be reapplied in the same way as manual receipts. You can reverse an automatic receipt only if its status is Approved.
Note: You cannot create cross currency receipt applications using Automatic Receipts.

Creating automatic receipts involves three steps:

  •  Create: Select the invoices to include in your automatic receipts.
  •  Approve: Update, delete, and approve the receipts that you have selected.
  •  Format: Format your automatic receipts onto paper to send to your customer for confirmation or notification before remitting them to your bank on either paper or magnetic media. This step is optional, as it depends upon the type of automatic receipt you create.
  •  
You can perform these steps at the same time or separately.The following diagram provides an overview of the Automatic
Receipts and Remittance processes.

Auto lockbox

what is LockBox

  • Process where customers mail payments to a post office box near your remittance bank and the bank deposits the payments in your account at regular intervals
  • Bank provides you with computer files detailing about the receipts and their application
  • Receivables uses AutoLockbox to import details about receipts directly into the system
Benifits of Auto LockBox
  • Eliminates manual data entry
  • Streamlines the application of receipts to outstanding transactions
  • Effectively manages cash flow by reducing turnover for converting checks into cash
Use of Auto LockBox
  • Apply receipts to outstanding invoices
  • Import historical receipt data
  • Autolockbox reports, such as the Post Quikcash Execution Report, are a good tool to reconcile autolockbox
Prerequisites for Auto LockBox
  • Set up agreements with banks
  • Define lockboxes in Oracle Receivables
  • Define AutoLockbox transmission formats
  • Define receipt classes and payment methods
  • Test AutoLockbox transmission with bank


Transaction Flexfields

Transaction flexfields are descriptive flexfields that AutoInvoice uses to identify transactions and transaction lines. Receivables lets you determine how you want to build your transaction flexfield structure and what information you want to capture.
There are four types of transaction flexfields:
  1. Line Transaction Flexfield
  2. Reference Transaction Flexfield
  3. Link–To Transaction Flexfield
  4. Invoice Transaction Flexfield
You must define the Line Transaction Flexfield if you use AutoInvoice. You can use the Line Transaction Flexfield to reference and link to other lines because the Line Transaction Flexfield is unique for each transaction line. AutoInvoice always uses the Line Transaction Flexfield structure for both the Link–to and Reference information when importing invoices.

You must explicitly define the Link–to, Reference, and Invoice Transaction Flexfield structures only if this information is to be displayed on a custom window. Receivables gives you the option of displaying Invoice Transaction Flexfield information in the reference column of invoice lists of values. Use the System Profile Option AR: Transaction Flexfield QuickPick Attribute to select the Invoice Transaction Flexfield segment that you want to display. For example, if you want to be able to  reference the order number for imported invoices when using an invoice list of values, you must assign the transaction flexfield segment that holds the order number to the AR: Transaction Flexfield QuickPick Attribute profile option. The order number will now display in the reference column of invoice lists of values.

Line Transaction Flexfield
Use columns INTERFACE_LINE_ATTRIBUTE1–15 and INTERFACE_LINE_CONTEXT to define the Line Transaction Flexfield.
Line Transaction Flexfields are unique for each record in the interface table and therefore can be used as record identifiers.

Reference Transaction Flexfield
Reference Transaction Flexfields have the same structure as the Line Transaction Flexfields.
Reference Transaction Flexfields are used to apply a credit memo to an invoice or associate an invoice to a specific commitment. For example, to refer a credit memo to a specific invoice, use the REFERENCE_LINE_ATTRIBUTE1–15 and
REFERENCE_LINE_CONTEXT columns of the credit memo to enter the Line Transaction Flexfield of the invoice. To refer an invoice to a specific commitment, use the REFERENCE_LINE_ATTRIBUTE1–15 and REFERENCE_LINE_CONTEXT columns of the invoice to enter the Line Transaction Flexfield of the commitment.

Link–To Transaction Flexfield
Link–To Transaction Flexfields also have the same structure as the Line Transaction Flexfield.
Use Link–To Transaction Flexfields to link transaction lines together in the interface table. For example, you might want to import tax and freight charges that are associated with specific transaction lines. If you want to associate a specific tax line with a specific transaction line, use the LINK_TO_LINE_ATTRIBUTE1–15 and LINK_TO_LINE_CONTEXT columns of the tax line to enter the Line Transaction Flexfield of the invoice.

Invoice Transaction Flexfields
Create a new flexfield with a similar structure as the Line Transaction Flexfield, but only include header level segments. For example, if the Line Transaction Flexfield structure has four segments and the last two segments contain line level information, define your Invoice Transaction Flexfield using the first two segments only. Segments included in the Invoice Transaction Flexfield should be included in the AutoInvoice grouping rules.

Transaction Flexfields: An example
This example illustrates how records described in the Line Transaction Flexfield are linked in the interface table using the Link–To or the Reference Transaction Flexfield columns.

Consider an invoice against a commitment with four records: two Line records, one header Freight record, and one Tax record. The transaction type for records of an invoice is INV.
The table below shows how the four invoice records are represented in the interface table. There are two segments enabled for the Line Transaction Flexfield OM (Order Management) context. The

Creating On–Account Credits

On–account credits are credits you assign to your customer’s account that are not related to a specific invoice. For example, if your customer remits payment of $100 for a $90 invoice, you can create an on–account credit for ten dollars. You can then apply this on–account credit to another transaction.

  • You can specify the debit item to credit in the Transactions window or create an on–account credit by not specifying one. You can apply and reapply on–account credits to invoices, debit items, and chargebacks.
  • You can also place amounts on–account when manually applying receipts in the Applications window. For this the auto-cash rules set (it defaults from customer bill-to, customer and system options) should have remaining remittance as on-account instaed of unapplied.
To place an amount on account, enter ’On Account’ in the Transaction Number field. The default amount is the unapplied
amount of the receipt, but you can change it. Receivables marks any portion of this receipt that you do not apply or place on–account as ’Unapplied’.

Applying On–Account Credits
Receivables lets you apply on–account credits to your customer’s open debit items. For example, your customer has $200 on–account. You can apply the on–account credit to one or more open debit items to either reduce or close the on–account credit and your customer’s outstanding balance.
In the above transaction, an on account credit (CM#500611) of amount - 80,220 is applied against the invoice 500591

To apply an on–account credit to a transaction
1. Navigate to the Transactions Summary window.Query the on–account credit to apply & Choose Applications.

2. Select the transaction to which you want to apply this on–account credit from the list of values. Receivables enters the Amount Applied and updates the Unapplied Amount of the on–account  credit and the Balance Due for this transaction.

The default Amount Applied is the balance due for this transaction, unless the balance due is greater than the amount of this on–account credit. In this case, the default Amount Applied is the unapplied amount of the on–account credit. You can accept this amount or enter a different amount (for example, if you want to apply this on–account credit to more than one transaction).

Note: Receivables uses the transaction type of the debit item to which you are applying credit to validate the application amount. If the transaction type forces natural application only, you must enter an application amount which brings the debit item’s balance closer to zero. If the transaction type does not
allow overapplication, you cannot enter an amount that would reverse the sign of the balance of the debit item.

3. To apply this on–account credit to another transaction, repeat step 2.

4. When you are satisfied with the application of this on–account credit, save your work. Receivables updates your customer’s account balances.

Credit Memo Request Workflow

The Credit Memo Request Workflow process is a predefined workflow process that routes a credit memo request for approval using an organization’s internal management hierarchy or approval limits defined in Oracle Receivables. If the request is approved, a credit memo is automatically created in Receivables. Otherwise, the process notifies the requestor with an explanation of why it was not approved.

You initiate the Credit Memo Request workflow from iReceivables. iReceivables is a web–based, self–service application that enables registered users to access their Receivables account information using a standard web browser. When an iReceivables user chooses the Dispute a Bill function, Receivables places the specified amount in dispute and initiates the Credit Memo Request process to route the request for approval.

To obtain approvals for a request, the Credit Memo Request process contacts the appropriate personnel via email or by posting notifications in the Workflow Notification Viewer window. If the disputed amount is greater than the approver’s predefined limit, the process forwards the request to the next approver in the hierarchy. The process uses limits that you define in the Receivables Approval Limits window for each person within the hierarchy.

If the request receives the required approval, Receivables creates a new credit memo. If the request is rejected, the process notifies the requestor and removes the amount from dispute. You can use the predefined approval process that Receivables provides or customize the process to meet your business needs.

About Adjustments

Receivables lets you make either positive or negative adjustments to your invoices, debit memos, chargebacks, on–account credits, deposits, and guarantees.

Adjustment Approval
You can approve adjustments that are within your approval limits and give pending statuses to adjustments that are outside your approval limits. You can automatically write off debit items that meet your selection criteria.

A pending adjustment must be approved before it affects the remaining balance of a transaction. You control adjustment approvals by creating individual approval limits. You define adjustment approval limits in the Approval Limits window by specifying a minimum and maximum approval amount for each user and currency.

You can overapply an adjustment if the transaction type of the item you are adjusting has Allow Overapplication set to Yes.
Use the Adjustments or the Approve Adjustments window to review and approve your pending adjustments.

Adjustment Status
An adjustment has a status that indicates whether it is complete. Receivables provides the following adjustment statuses:

Approved: This adjustment has been approved. Receivables updates the debit or credit item amount and status to reflect the adjustment.
Pending Approval: The adjustment amount is outside the approval limits of the user who entered the adjustment. Adjustments with this status can only be approved by a user with the appropriate user approval limits.
Rejected: You have rejected this adjustment. Adjustments with this status do not update the balance of the credit or debit item.
Research Required: This adjustment is on hold because you are either researching the debit or credit item, or are requesting additional information about the adjustment.

You can define other adjustment statuses by updating the Receivables lookup ’Approval Type.

Validation
When you create an adjustment, Receivables verifies that it is within your adjustment approval limits before approving the adjustment. If you enter an adjustment that is within your assigned approval limit for the currency of that item, Receivables updates your customer’s balance to reflect the adjustment. If you enter an adjustment that is outside your approval limits, Receivables creates a pending adjustment with a status of Pending Approval.

If the transaction type does not allow over–application, you cannot enter an amount that would reverse the sign of the balance of the debit item. If you specify Invoice Adjustments as your type of adjustment, Receivables requires that your adjustment amount be the exact amount to close the item you are adjusting, and enters this amount in the Amount field.

Adjustment Activities
You use receivables activities to default accounting information for your miscellaneous receipt, finance charge, and adjustment transactions. You can define as many receivables activities as you need. Define adjustment activities in the Receivables Activities window.
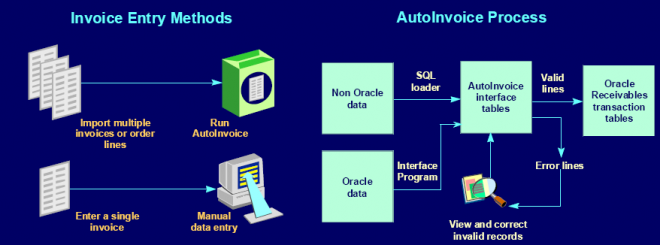
Adjustment Types
You can create an adjustment at the invoice header level or adjust only specific elements of an invoice, debit memo, credit memo, or chargeback. For example, you can adjust individual invoice lines, or the tax, freight, and finance charges associated with a transaction. To do this, specify an adjustment type of Line, Tax, Freight, Charges, or Invoice when creating your adjustment.

Adjustment Numbering
Receivables automatically generates and assigns a unique adjustment number when you create adjustments.

Entering Manual Adjustments

Use the Adjustments window to create your adjustments. When you assign an activity to your adjustment, Receivables automatically uses the accounts assigned to that activity for the adjustment. A transaction must have a status of Complete before you can adjust it.

1. Navigate to the Transactions Summary window.Query the transaction to adjust and then Select the transaction, then choose Adjust.
If this transaction has multiple installments, select the installment to adjust, then choose Adjust.

2. Enter the adjustment. Enter an Activity Name .

3. Choose the Type of adjustment you are creating. Valid adjustment types include Invoice, Line, Charges, Freight, and Tax.

4. Enter the Amount of this adjustment. If you specify ’Invoice’ as your adjustment type, Receivables requires that the amount of your adjustment be at least enough to close the item you are adjusting,
and displays this value in the Amount field. If the amount of this adjustment is outside your approval limits, Receivables sets the status of the adjustment to Pending Approval when you save (unapproved adjustments do not update the balance due for an item).
Attention: You can enter an amount greater than the balance due only if the transaction type’s Allow Overapplication option is set to Yes.

5. Enter the GL Date for this adjustment (optional). The default is the later of either the transaction GL date or the current date. However, if this date is not in an open period, the default GL Date is the last
date of the most recent open period. The GL date must be later than be in an open or future–enterable period.

6. Enter the Adjustment Date (optional). The default is the current date, but you can change it.

7. Open the Account IDs tabbed region, then enter the GL Account for this adjustment (optional). The activity name provides the default GL account, but you can change it.

8. If you are using manual document numbering, enter a unique Document Number for this adjustment. If you are using automatic document numbering, Receivables assigns a document number when you save.

9. If you entered an adjustment type of Line in step 6, enter the line number you are adjusting optional). Receivables does not update the remaining amount due for the line when you specify a line adjustment; instead, Receivables updates the balance due for the transaction by the amount that you entered for the line adjustment.

10. Open the Comments tabbed region, then enter a Reason for creating this adjustment (optional). Receivables prints your reasons on the Adjustment Register.

11. Update the Status of this adjustment (optional). If this adjustment is within your user approval limits, you can choose any status. If you are reviewing a previously approved adjustment, Receivables skips this field.

12. Save your work. Receivables generates a unique number for this adjustment.

Approving Adjustments

When you create an adjustment that is outside of your approval limits, Receivables creates a pending adjustment with a status of Pending Approval. Pending adjustments must be approved before Receivables will update the balance of the transaction.
Note: An adjustment that is pending approval does not reserve the transaction from updates by other types of activity, such as cash or credit memo applications.
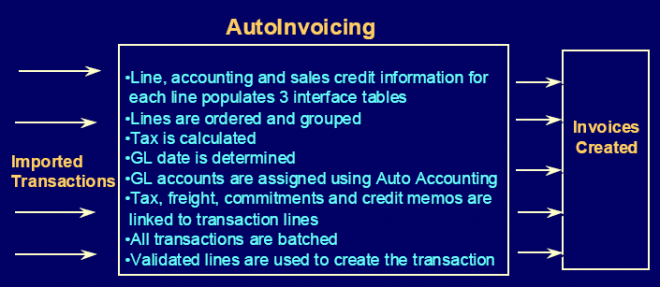
You can approve a pending adjustment only if the adjustment amount is within your approval limits. However, you can review adjustment histories, record your comments, and create all other actions (such as assign a status of More Research or Rejected), even if the adjustment is outside your approval limits.You can approve an adjustment that has been selected and approved for automatic receipt generation only if the user profile option AR: Invoices with Unconfirmed Receipts is set to Adjustment or Adjustment and Credit.

When you approve an adjustment that is within your approval limits, Receivables automatically updates the balance of the transaction.

To approve a pending adjustment

1. Navigate to the Approve Adjustments window.

2. To limit your display to only certain adjustments, enter selection criteria. For example, enter a Creator, Adjustment Number, Currency, range of Amounts, or adjustment Status. Open the More tabbed region to enter selection criteria for a specific transaction, customer, or adjustment. Leave a field blank if you do not want to limit your query to adjustments matching that criteria.
You can control how Receivables displays your adjustments by choosing the Order By Amount or Status option.

3. Choose Find.
Note: You can view the detail accounting lines for an adjustment in the form of a balanced accounting entry (i.e.,
debits equal credits) by choosing View Accounting from the Tools menu. You can also choose to view the detail accounting
as t–accounts.

4. To approve an adjustment, enter a Status of Approved.
To review information about this adjustment, including the date this adjustment was created, who created this adjustment, and any related comments, choose Action History.

Creating Automatic Adjustments

Run AutoAdjustment to automatically adjust the remaining balances of all open invoices, debit memos, credit memos, and chargebacks. You can adjust specific transactions by entering selection criteria such as remaining amount, due date, transaction type, customer name, or customer number.

When you run AutoAdjustment, Receivables automatically creates your pending or approved adjustments based on your approval limits, and prints preview and audit reports for your AutoAdjustment processes. If you enter a Remaining Amount range that exceeds your adjustment approval limits, Receivables displays a warning message and your approval limits when you submit. If you choose to continue, Receivables creates adjustments with a status of Pending Approval. If the Remaining Amount range you specify is within your adjustment approval limits, Receivables automatically approves your adjustment.

Invoices with Rules

New chapter @
http://www.oracleug.com/user-guide/account-receivables/revenue-management

Invoicing and accounting rules let you create invoices that span several accounting periods. Accounting rules determine the accounting period or periods in which the revenue distributions for an invoice line are recorded. Invoicing rules determine the accounting period in which the receivable amount is recorded.

Read the basics @
http://www.oracleug.com/user-guide/order-management/setup-steps-vi-payment-terms-accounting-rules


Deferred Accounting Rules
When you use deferred accounting rules, the Revenue Recognition program creates a single distribution per line that posts to an unearned revenue GL account. You can use deferred accounting rules only for invoices that are assigned the Bill in Advance invoicing rule. If the invoicing rule on a transaction is Bill in Arrears, the Revenue Recognition program ignores the deferred flag. You can later earn the revenue using the Revenue Accounting feature.

If you use a deferred accounting rule with a single accounting period, Receivables recognizes the revenue in the period that you specify with the Revenue Accounting wizard. If you use a deferred accounting rule with multiple accounting periods,
Revenue Accounting creates the revenue recognition schedule based on the rule, and the start date is determined by the GL start date that you entered using the Revenue Accounting wizard.

If you use a non–deferred accounting rule with multiple accounting periods, Revenue Accounting uses the schedule created by the Revenue Recognition program. If an accounting period is closed, Revenue Accounting posts that portion of revenue into the subsequent open accounting period.

The tables below illustrate the difference between deferred and non–deferred rules.

Importing Data From Your Feeder System

Your on–site MIS personnel or Oracle consultant must first write a custom feeder program that transfers transaction data from your original system into Receivables AutoInvoice Interface tables. Your feeder program must convert data from your original system into a standard data format that AutoInvoice can read. AutoInvoice can then convert your imported data into Receivables invoices, credit memos, on–account credits, and debit memos.

Writing a Feeder Program
The type of environment from which you want to transfer your data determines the type of feeder program you need to write. For example, you can use SQL*Loader, SQL*Report, PL/SQL, or Pro*C to write a feeder program to transfer transaction data from a non–Oracle system.

Or, you can write a conversion program to transfer historical data from your previous accounting system. Selecting an Import Utility SQL*Loader and SQL*Report are powerful and easy–to–use tools that should be able to accommodate all of your import needs. However, depending on the complexity of your import program, you may also want to use Oracle’s Pro* language products such as Pro*C, Pro*Cobol, and Pro*Fortran to write the program.

AutoInvoice Validation

AutoInvoice validates your data for compatibility with Receivables. It ensures that the columns in Receivables’ Interface tables reference the appropriate values and columns in Receivables.

Existence
For some columns, AutoInvoice ensures that the values are already defined in Receivables. However, AutoInvoice does not validate against any effectivity date or status.

Batch Sources
You do not have to pass values for all of the fields that are referenced in the Transaction Sources window. If you want AutoInvoice to ignore any of these values for a specific batch source, you can set the field to ’None’ in the Transaction Sources window. You use transaction batch sources that have a type of ’Imported’ when importing transactions into Receivables.

Uniqueness
AutoInvoice ensures that the invoice number you supply is unique within a given batch source and the document number you supply is unique within the associated sequence type. AutoInvoice also ensures that the Transaction Flexfield you supply is unique.

Precision
Precision is the number of digits to the right of the decimal point that are used in regular currency transactions. AutoInvoice ensures that the amount and the accounted amount you supply have the correct precision for a given currency.
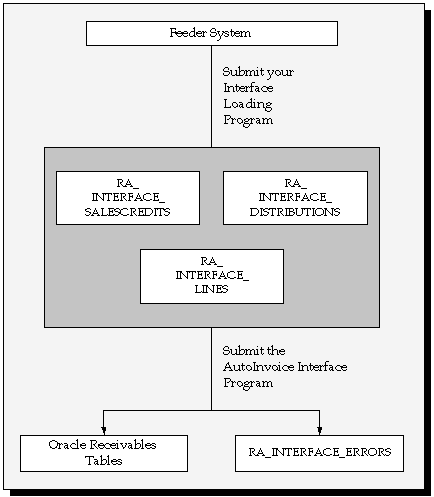
Cross Validation
AutoInvoice ensures that certain column values agree with each other. These values can be within an interface table or multiple interface tables.

For example, if you specify in your batch source that you do not want to use accounting rules, AutoInvoice ignores any values you supply for invoicing rule, accounting rule, and accounting rule duration. However, if you do import transactions that use accounting rules, AutoInvoice requires that these transactions also include an invoicing rule.

Validation for Lines With Rules
Besides validating dates, AutoInvoice also validates and rejects lines if:

  • The accounting rule has overlapping periods
  • All of the accounting periods do not exist for the duration of your accounting rule
Create Transactions with Invalid or Incorrect Data
You can specify whether AutoInvoice will reject or partially create transactions that have an invalid line, invalid tax rate, or a GL date in a closed period. For example, you import an invoice with three invoice lines and one of the lines is invalid. If the value of the Invalid Line option for this batch source is set to ’Create Invoice,’ AutoInvoice will create the invoice with only the two valid lines. You can then use the Transaction window to add the line that was rejected. If Invalid Line is
set to ’Reject Invoice,’ AutoInvoice will not import this transaction or any of its lines into the interface tables. Transactions that fail validation appear in the AutoInvoice Validation report.

The values you enter in the AutoInvoice Processing Options tabbed region of the Transaction Sources window determine how AutoInvoice will process transactions with invalid data.

Accounting Entries


Example of Invoice without rules

1. Create an Invoice that does not use an Invoicing Rule

2. Create a line w/o any accounting Rules.
Note that the Rules tab is disabled because we did not specify an Invoicing Rule in the Main section of the form.

3. Save and Complete the Invoice

Clicking on the Distributions button will show you the current state of the distributions for the invoice. The distributions are made against Receivables, Rounding and Revenue.

Since this invoice has no rules, upon completion of the invoice, the complete set of GL distributions are already created. In 11i , This invoice is ready to post to the General Ledger. Revenue Recognition will not pick up this invoice for processing because it has no rules.

In R12 you need to run create accounting to generate the account entire but the system won’t run the revenue recognition implicitly as the invoice is not eligible for that.

Example of Invoice with rules


1. Create an Invoice with an Invoicing Rule.

2. Create a line with an accounting rule

3. Save and Complete the Invoice

Clicking on the Distributions button will show you the current state of the distributions for the invoice. The presence of Unearned Revenue distributions indicates this invoice uses the Invoicing rule = Advanced Invoice. (If the Invoicing Rule = Arrears Invoice, we would see Unbilled Revenue instead).

Since this invoice has no rules, upon completion of the invoice, the complete set of GL distributions are already created. In 11i , This invoice is ready to post to the General Ledger. Revenue Recognition will not pick up this invoice for processing because it has no rules.

Accounting Entries


a
1. When an invoice is created with out using invoice rule(if invoicing rule is not entered at the invoice header then accounting rule cant be seleceted at line level). The accounting entries are generated after completing the transaction.

2. When invoicing rule is used the accouting entries are created by the revenue recognization program.

Remit–To Addresses

Define remit–to addresses to let your customers know where to send payment for their invoices. Receivables uses the addresses that you define in the Remit To Addresses window to provide default remit–to information when you enter transactions.
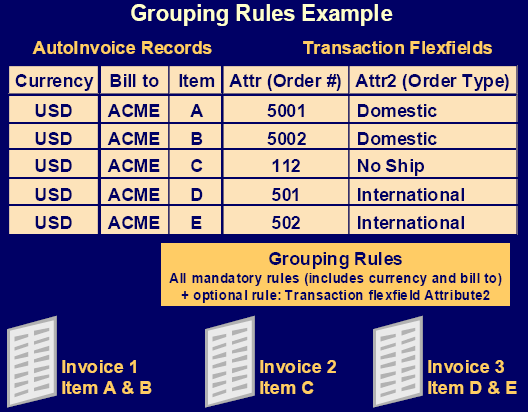
If you use AutoInvoice but have not defined a remit–to address for a location, AutoInvoice will reject all invoices for which it could not determine a remit–to address. However, if you do not wish to set up a remit–to address for each location, you can set up one remit–to address with a default assignment. Receivables will then use this address for all locations or for any locations for which you do not have specific location assignments. This ensures that AutoInvoice will not reject invoices because it could not determine a remit–to address.

If you check the Print Remit–To Address box in the System Options window, Receivables prints the remit–to address that you define here on your dunning letters and statements. The system profile option AR: Dunning Letter Remit–To Address Label
Size lets you specify the length and width of your remit to address on your dunning letters.

Defining a Default Remit To Address

Define default remit–to addresses to ensure that:
  • Receivables is able to provide a default remit to address when you enter transactions
  • AutoInvoice will not reject invoices because it is not able to determine a remit–to address
You can only have one default remit–to address for each country and state combination. For example, you can have one default remit–to address for United States/California, one for United States/Nevada, and so on.

Enter ’Default value’ in the Country field, or select this from the list of values.

How does the GL date get derived

For invoices without Rules:
AutoInvoice first uses the GL date in the interface table (RA_INTERFACE_LINES_ALL), if one exists.

If one does not exist then it is derived as follows:

If the Derive Date box is checked for your batch source (Menu: Setup>Transactions>Sources, query your batch source, alternate region Accounting), AutoInvoice first uses the ship date in the interface table. If the ship date does not exist, AutoInvoice uses the sales order date. If the sales order date does not exist, AutoInvoice uses the date entered in the Submit Request window when AutoInvoice was run.


If the Derive Date box is not checked for your batch source, AutoInvoice uses the date entered in the Submit Request window when AutoInvoice was run.

For Invoices with Rules:
AutoInvoice first uses the GL date in the interface table  (RA_INTERFACE_LINES_ALL), if one exists.
  • If the Invoicing Rule is 'Bill In Advance', AutoInvoice uses the Rule Start Date for the GL date. 
  • If the Invoicing Rule is 'Bill in Arrears' and the invoice line has an accounting rule of type 'Accounting, Fixed Duration' and a period of 'Specific Date', AutoInvoice computes an end date using the earliest  accounting rule date. 
  • For all other Accounting rules, AutoInvoice computes an ending date for each invoice line, and then takes the earliest date of these lines and uses it as the GL date of the invoice. 
If your invoice does not use a fixed rule accounting duration and the rule start date is not provided in the interface table, GL date is derived as follows:

If the Derive Date box is checked in batch source options, AutoInvoice first uses the ship date. If the ship date does not exist, AutoInvoice uses the sales order date. If the sales order date does not exist, AutoInvoice uses the date entered in the Submit Request window.

If the Derive Date box is not checked, AutoInvoice uses the date entered in the Submit Request window.

Freight and TAX

Entering Freight Information
You can assign freight charges to an invoice or to each invoice line. When you assign freight to an invoice, Receivables includes the freight amount in the total amount of the invoice. To assign freight to each invoice line, choose Freight from the Lines window after entering your invoice lines.

You cannot enter or update freight information if the invoice’s transaction type has Allow Freight set to No or if the line type is either Tax or Charges.

By default, Receivables does not calculate tax on freight charges. However, you can calculate sales tax on freight by using inventory items to define freight services and entering these items as ordinary invoice lines.

Carrier: The company you use to send product shipments to your customers.
FOB (free on board): The point or location where the ownership title of goods is transferred from the seller to the buyer. Receivables uses the Ship–to FOB and then the Bill–to FOB as the default value when you enter transactions.
Shipping Reference: Any related freight information you want to provide. Receivables does not validate this field.

Entering Tax Information

Receivables lets you enter and review tax information for your transaction lines in the Tax window. If the profile option Tax: Allow Manual Tax Lines is No, you can only review the tax lines Receivables automatically creates; you cannot manually enter or delete tax lines in this case. Additionally, you cannot assign a tax code that must use inclusive tax to a manually entered tax line. If Allow Override is set to Yes for an inclusive tax code, you can assign it to a manually entered tax line, but you cannot use it as an inclusive tax code.

For each invoice line, you can assign multiple tax codes and calculate compound taxes. Receivables automatically recalculates your compounded tax amounts whenever you save your changes or move to another tax line.
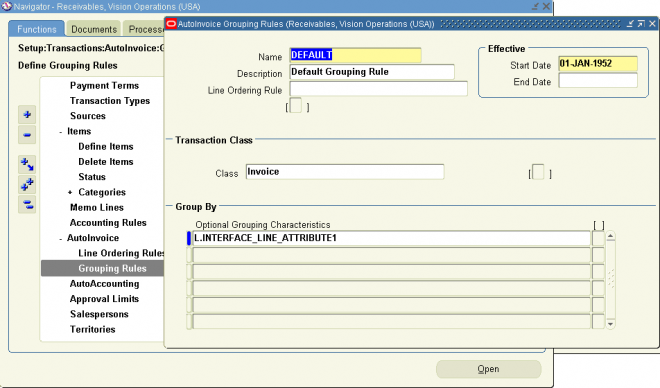
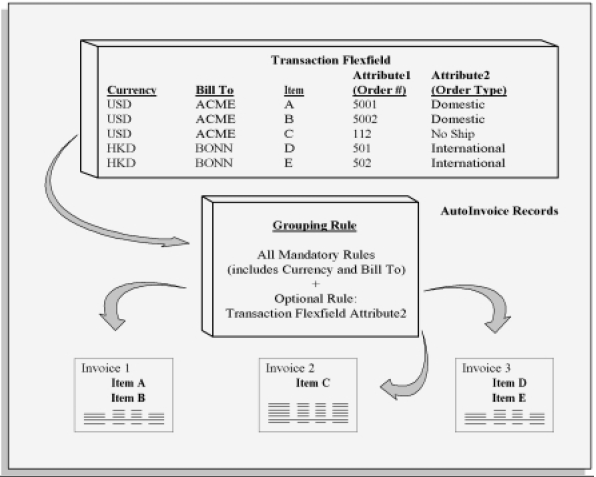
You cannot review tax information for a line if the standard line type is either ’Freight’ or ’Charges’ or if the transaction is a chargeback.

Tax Locations and Rates


Use the Tax Locations and Rates window to enter and update your locations and their associated tax rates. For each location you can define multiple tax rates and postal code ranges, as long as the date and postal code range do not overlap. Receivables uses these locations and tax rates to create authorities and sales tax rates for tax calculations.

Receivables also uses locations to validate your customers’ addresses.

Use this window to assign tax accounts to the components of your segment that has a tax account qualifier assigned to it. You assign a tax account qualifier to any one segment of your location flexfield structure using the Key Flexfield Segments window.
You can also implement country–specific validation of foreign customer address information using the Flexible Address Formats feature.

If you do not want to manually enter or maintain location and tax rates, you can use the Sales Tax Rate Interface program to load this information from an outside tax service

Tax Groups

Use the Tax Groups window to group multiple, conditional taxes. Tax groups let countries with multiple taxes automatically calculate each applicable tax within Receivables and Oracle Order Management. For example, Canada has two types of taxes: Goods and Services Tax (GST) and Provincial Sales Tax (PST). GST is a federal sales tax that is applied for all shipments, and has one standard tax rate. PST is applied at the provincial level and has a different tax rate for each province. Similarly, India has multiple taxes, both government and state sales tax applies, and the state tax rate is controlled by the ship–to address.
When you implement VAT and Canadian Tax, you should assign tax codes or tax groups at the Customer and/or Item Levels.


Compound Tax
Tax groups support compounded tax rates within the group.
Compound tax enables you to calculate multiple taxes for a transaction.
 
To compound tax, specify an order of precedence for each tax code in the group. Once set up, Receivables automatically calculates the compounding of multiple taxes within the group when you assign it to a transaction.
Tax groups can also contain multiple independent branches of compounded tax. Within each compounding branch, Receivables adds tax to the original amount, so each subsequent tax line within the branch calculates tax on the new taxable amount. Receivables then adds the tax for each compounding branch to determine the total tax amount.

Attention: A compounding branch within a Tax Group can contain either inclusive or exclusive tax codes, but not both.
Additionally, only one compounding branch in a Tax Group can have inclusive tax codes.

Note: Tax groups consisting of tax inclusive tax codes cannot contain some tax codes with a Taxable Basis of After Discount
and some with a Taxable Basis of Before Discount.

Inclusive Tax
Inclusive tax codes include the tax for a transaction line in the line amount, rather than displaying these amounts separately. Certain restrictions apply when using inclusive tax codes in compounding branches of a Tax Group.
Note: If you override a tax code, Receivables preserves the override across all updates to the invoice. Similarly, changing
the ship–to address or the line item could change the default tax code.

Defining Tax Accounting for Tax Codes and Locations


Use the Tax Accounting window to enter additional accounting information about your tax codes and tax locations. You can specify expense, revenue, and non–recoverable accounts for your adjustment, finance charge, and earned and unearned discount activities. You can also use the Tax Accounting window to set up deferred tax, an accounting method in which tax is due when payment is applied to an invoice, rather than when the invoice is created.

If you use tax codes, use the Tax Accounting window to assign tax accounts to your tax codes. If you use location–based tax, use the Tax Accounting window to assign tax accounts to your tax locations. To record tax on adjustments, discounts, and finance charges, specify an expense or revenue account and a non–recoverable account. The non–recoverable account records decreases in the total amount of tax that you collect for activities that the government does not consider a
legitimate tax deduction.
Suggestion: You can define regular or deferred tax accounting for existing tax codes. To do this, select the tax code to modify, then disable it by entering the current date in the To field.  Create a new record, then choose Duplicate Record Above from the Edit menu. Enter a new effective date range then define additional tax accounting for this tax code.

To use deferred tax accounting, use the Tax Accounting window to specify an Interim Tax Account. When you create an invoice, Receivables accounts for the liability in the Interim Tax Account. When you apply a payment to the invoice, Receivables automatically transfers the tax liability to the Tax Account.
Attention: If you are upgrading from a previous release of Oracle Receivables, you cannot update the tax accounting for
transactions that have a status of ’complete.’ Once a transaction is complete, Receivables creates all corresponding accounting entries and does not let you enter a different tax code or modify the existing accounting information.

Reviewing Sales Tax Rates

Use the Review Sales Tax Rates window to review your existing sales tax rates. Receivables creates these sales tax rates when you enter customer addresses in the Customers window. You can view the locations and associated rates for your customer addresses in the Tax Locations and Rates window. If you have a situation where locations are defined without rates and these locations are included in existing authorities, Receivables also creates sales tax rates when you assign rates to these locations.

If you update rates belonging to locations that are already included in an authority, Receivables automatically updates all of the sales tax rates that are associated to this authority. You can review the changes in this window.
The number of sales tax rates created for each authority depends upon the postal code and date ranges that you assigned to each location included in your authority.

The following example demonstrates the criteria that Receivables uses to create sales tax records for your customer addresses. In the table below, you have the following locations and rate assignments defined in Receivables where CA is the state of California, San Mateo is a county within California, and Foster City and Belmont are cities within San Mateo county:
 
Receivables only calculates sales tax rates for authorities that exist within your home country. For example, if you set up your sales tax system to handle business in the United States but you enter addresses in a foreign country, Receivables does not create locations, authorities, or sales tax records.

Tax Authorities

Tax Authorities represent a unique combination of locations and are created manually through the Tax Authorities window or automatically when you enter customer addresses. Receivables uses authorities to expedite sales tax calculations.

When you enter a customer address, Receivables first checks if this authority already exists for the appropriate date range. If it exists, Receivables uses the combined sales tax rate associated with this authority to calculate any tax amounts. If the authority does not exist, Receivables first checks if the locations and associated rates exist. If they exist, Receivables creates the authority and all of the sales tax rates. If the locations do not exist, Receivables creates the authority and the locations in the Tax Locations and Rates window.

You can also implement country specific validation of foreign customer address information using Flexible Address Formats.
You can disable an existing tax authority either by unchecking the Enabled check box or entering an ending effective date, and then saving your work.

Tax Exemptions

Define tax exemptions to fully or partially exempt a customer, item, or range of items from specific tax codes. You can create exemptions against customers or items for either locations or specific tax codes.

To use customer exemptions, set the Use Customer Exemptions system option to ’Yes.’ To use product exemptions, set the Use Product Exemptions system option to ’Yes.’ To exempt customers or products from tax codes with a type of ’VAT’ or ’Sales,’ set the appropriate Use Tax Code system option to ’Yes.’

To exempt a customer from all taxes, use the Customers window to assign this customer to a tax code with a zero tax rate. To exempt an item from all taxes, use the Items window to assign this item to a tax code with a zero tax rate.

You can only define a tax rate exemption for items that can be entered on an invoice and have a status of ’Active.’ In addition, if you create more than one exemption for the same customer, item, tax code, reason, or certificate number, the date ranges of these exemptions cannot overlap.

You can also use the Tax Exemptions window to update the status of your exemptions. If you need to add an exemption number to an Unapproved exemption created in the Transaction window, you must change the status of this exemption to ’Expired’ and recreate the exemption with the number.

Entering Invoices with Installments

You can let your customers make invoice payments in multiple installments by using a split payment term. When you assign a split payment term to an invoice, Receivables automatically creates the payment schedules based on the invoice date and the payment terms that you define. For example, your split payment term might specify that 40 percent of the invoice is due in 30 days after the invoice date with the remainder due in 60 days.

You define your split payment term in the Payment Terms window. You can enter due dates for each installment and specify discounts to assign  to each line of your payment terms. You can also apply the tax and freight for the invoice to the first installment or prorate tax and freight over all of the installments.

Receivables lets you review invoice installments if the status of the invoice is Complete. You can review invoice installments in the Installments window. You can update the transaction due date in the Installments window if the profile option AR: Update Due Date is set to Yes.

To enter an invoice with split payment terms:

1. Navigate to the Transactions window.
2. Enter general information for this invoice.
3. Enter a split payment term in the Payment Term field, or select a payment term from the list of values.
4. Save your work. If you are ready to complete this invoice.

Consolidated Billing

Use the Consolidated Billing Invoice program to print a single, monthly bill that includes all of a customer’s transactions for the period. This lets you send one consolidated bill to a customer, instead of a separate invoice for each transaction.
Attention: You cannot use the Consolidated Billing feature with the Imported Billing Number feature. Use the Imported
Billing Number when you want to group invoices other than on a monthly basis.

When you create a consolidated billing invoice, Receivables includes all invoices, credit memos, adjustments, receipts, and cross–site applications that are assigned to a customer bill–to site and have not been included on a previous consolidated billing invoice.
Attention: If a transaction has been included on a consolidated billing invoice, you cannot update it, regardless of
how you set the system option Allow Change to Printed Transactions. This is because Receivables considers inclusion
on a consolidated billing invoice to be an activity and you cannot update a transaction once it has activity against it.
(Other examples of activity include payments, credit memos, and adjustments.)

Statements and consolidated billing invoices are similar, but they have different purposes. The table below lists the differences between a statement and a consolidated billing invoice.

 
A consolidated billing invoice includes:
  • All transactions that were created before the cutoff date that you specify and have not yet been included on a consolidated billing invoice
Note: When creating a consolidated billing invoice, you can specify a cutoff date and currency combination only once for a given customer.
  • A beginning balance
  • An itemized list of new charges (invoices, credit memos, and adjustments) in either summary or detail format
  • Separate reporting of consumption tax
  • The total amount of any payments received since the previous consolidated billing invoice
  • The total balance due for this customer or bill–to site
Attention: The Consolidated Billing Invoice program does not select transactions from related customers.

Bank Transaction Codes

If you want to load electronic bank statements or use Cash Management's AutoReconciliation feature, you must define, for each bank account, the transaction codes that your bank uses to identify different types of transactions on its statements. You should define a bank transaction code for each code that you expect to receive from your bank.

You can enter effective date range fields, Start Date and End Date, so that you can make a bank transaction code inactive. You can also delete codes that have not been used, in case you make a mistake in creating one.

To define a bank transaction code:

1. Navigate to the Bank Transaction Codes window.

2. Select the bank, whose codes you are defining, from the Find Bank window. Alternatively, you can query the bank Account Number. The system displays the Bank Transaction Codes window, which includes Bank Account and Bank information, as well as a region for entering transaction codes.

3. For each transaction code you are defining, select a transaction Type from the poplist. The transaction type determines how Cash Management will match and account for transactions with that code.
Bank statement lines are coded to identify the type of transaction the line represents. Since each bank might use a different set of transaction codes, you need to map each code a particular bank uses to one of the following Cash Management transaction types.
You can select from the following list of values:
Payment: Payments such as generated or recorded checks, payment batches, wire transfers, electronic funds transfers, or payroll checks.
Receipt: Receipts such as received checks, remittance batches, direct debits, and bills of exchange.
Miscellaneous payment: Payments not associated with supplier invoices, such as petty cash transactions directly posted to cost accounts, or bank charges.
Miscellaneous receipt: Receipts not associated with customer invoices, such as petty cash transactions directly posted to revenue accounts, such as interest received.
Stopped: Stopped payments previously entered, generated, or cleared, such as callback of check. A stopped transaction type matches only to Voided or Stopped payments in Payables or Oracle Payroll.
Rejected: Receipts rejected for reasons other than non-sufficient funds, such as an invalid bank account. A rejected transaction type matches only to reversed receipts in Receivables.
NSF (Non-Sufficient Funds): Receipts rejected by the bank because the accounts on which they were drawn had non-sufficient funds. You can reverse these receipts by creating a standard reversal. Cash Management reopens the invoices you closed with the original receipt. When you match bank statement lines with transactions, an NSF transaction type only matches to reversed receipts in Receivables.

4. Enter the Code used by your bank.

5. Enter an optional description of the transaction.

6. Enter Start and End Dates to determine when the bank transaction code is considered active.

7. Enter the number of Float Days that you want Cash Management to add to or subtract from the statement date to create an anticipated value date for automatic lockbox receipts.

8. Enter a Transaction Source for payment and receipt transactions. Choose Journal from the list of values to reconcile statement lines with the assigned transaction code to General Ledger journals. Choose Open Interface to reconcile statement lines to settlements in Oracle Treasury or external transactions in the Reconciliation Open Interface. Choose Payables Payments or Receivables Receipts to reconcile statement lines to transactions in Oracle Payables or Oracle Receivables. Choose Payroll Payments to reconcile statement lines to transactions in Oracle Payroll.
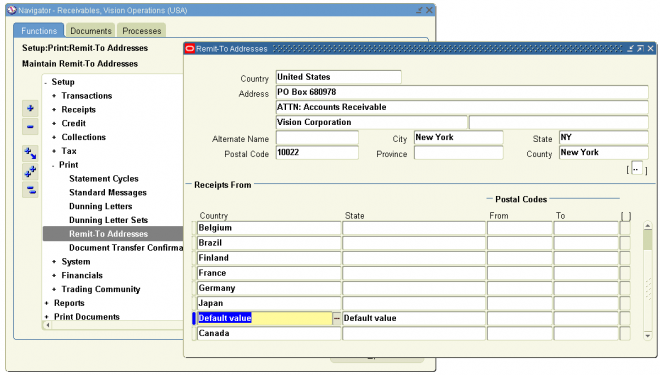
9. Optionally select a value for the Payroll Payment Format field to reconcile statement lines with the assigned transaction code to Payroll EFT payments. The Payroll Matching Order field is automatically populated based on the value selected in the Payroll Payment Format field.. It is populated after a Payroll Payment Format has been selected. This field indicates the order in which you need to set up the format for the BANK_TRX_NUMBER in the bank statement mapping template.
10. If the transaction Type is Miscellaneous Receipt or Miscellaneous Payment, enter the Matching Against field to determine the order of matching and the type of transactions to match.
Since the same transaction code may be used for matching against both miscellaneous transactions and/or correcting statement errors, you need to indicate, for miscellaneous payments and miscellaneous receipts, the type of transactions to match. If you use a transaction code for both miscellaneous transactions and correcting statement errors, you can also specify the sequence of matching. You can choose from the following values to indicate how to use this bank transaction code:
Misc: Only match against miscellaneous transactions.
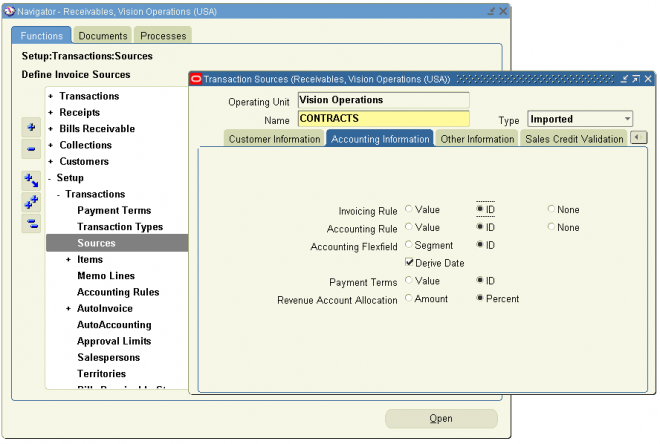
Stmt: Identify the statement line as a correcting entry. The statement line will match against existing statement lines. The netted amount of these lines is used to match to subledger transactions.
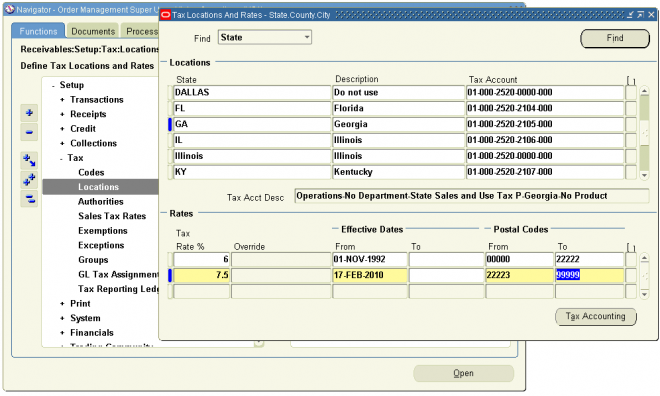
Misc, Stmt: First try to match against miscellaneous transactions, if there is no match, then try to match against statement lines (corrections).
Stmt, Misc: First try to match against statement lines (corrections), if there is no match, then try to match against miscellaneous transactions.
11. Choose the Correction Method your bank uses when correcting bank errors: Reversal, Adjustment, or Both.
This field is only applicable for those Miscellaneous Receipt or Miscellaneous Payment transaction codes that may be used to match to correction statement lines.
12. Choose whether to Create transactions for any Miscellaneous Payments and Miscellaneous Receipts reported on the bank statement when no transaction number is provided.
13. If you chose the Create option in the previous field, specify the Receivables Activity type and Payment Method for any miscellaneous transactions (receipts or payments) you create from within Cash Management.

Banks Window Reference


Bank region
Name The name of the bank.

Alternate Name You can enter an alternate name for your bank. This is particularly useful if you do business in Japan so you can enter both Kanji and Kana values for your bank name. The system does not use the value. It is for your reference only.

Number Identification number of the bank. Payables uses this information to identify the bank in payment formats that use electronic payment methods. The combination of Bank Number, Branch Number, and Country must be unique.

Bank Branch Region
Name The name of the bank branch.

Alternate Name You can enter an alternate name for your bank branch. This is particularly useful if you do business in Japan so you can enter both Kanji and Kana values for your bank branch name. The system does not use the value. It is for your reference only.

Number The bank branch number.
Payables used this information to identify the bank branch in payment formats that use electronic payment methods, in creating positive pay files, and when printing the MICR line on checks.
Note: For banks based in the United States, enter the American Banking Association nine–digit transit routing
number in this field. Also, if you use the National Automated Clearing House Association (NACHA) electronic payment
format, include the bank branch number on both internal and supplier banks.

The combination of Branch Number, Bank Account Number, and Country must be unique within a bank.

Type The banking organization to which this branch belongs. You must enter a value in this field if you will use this bank for payments with Oracle e–Commerce Gateway.

Institution  Enter either Bank or Clearing House to indicate what type of bank branch you are defining.
  • Bank. Bank in which you have a disbursement and/or receipt account. Or bank in which your customer has a disbursement account, or your supplier has a receipt account.
  •  
  • Clearing House. Bank that processes a magnetic tape of your receipt information which you send to it. The clearing institution then creates tapes of your customer receipt information which it forwards to each of your remittance banks

Bank Accounts Window Reference

To help you detect data entry errors, when you enter bank information, the system validates bank numbers and bank account numbers for certain countries.


Operating Unit. Payables displays your operating unit.

Agency Location Code. If your enterprise is a United States federal agency then you might need to enter an Agency Location Code. This code is assigned by the United States Department of the Treasury to
identify the source of financial transactions.
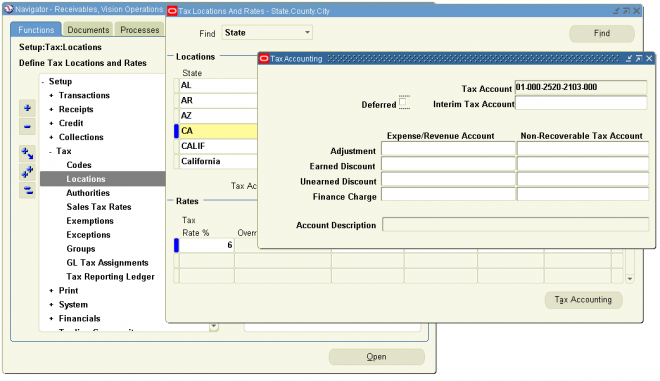
Name. The name you use to refer to the bank account. You may want to use a name that indicates the usage of the bank account.

Alternate Name.
The alternate name for your bank account. You can enter an alternate name for your bank account. This is particularly useful if you do business in Japan so you can enter both Kanji and Kana values for your bank account name. The system does not use the value you enter here unless you enable the Sort by Alternate Fields Payables option. If you enable that option then Payables uses the alternate name when it sorts reports by bank account name.

Account Use. Indicate the account holder of this account.
  • Internal. Your company or organization is the account holder of this account.
  • Customer. (Receivables) Your customer is the account holder of this account. You record Customer Accounts to facilitate unds transfer between the Customer Bank Account and your internal
  • Bank account  Supplier. (Payables) Your supplier is the account holder of this account. You record Supplier Accounts so you can pay your suppliers electronically.

Account Type.
Type of your bank account. For example, Electronic.

Number. The bank account identification number. The combination of Bank Account Number, Bank Branch Number, Account Use, and Currency must be unique for each bank.

Currency. Currency for a bank account. The default value is your functional currency.
If you do not enable the Use Multiple Currencies Payables option, Payables does not allow you to change this value. If you select your functional currency as your bank currency, you can enable the Use Multiple Currencies Payables option and use this bank account to pay foreign currency invoices.
If you select a different currency than your functional currency in this field, when you define Payables Payment Documents, you will only be able to select payment formats that you define in that currency. Also, you will only be able to pay invoices that you enter in this foreign currency.

Inactive On. On and after this date, during transaction entry, the bank’s account will no longer appear on any lists of values in Payables, and you will not be able to enter the bank account.

Check Digits. The value used to validate the authenticity of your bank account number according to country specific bank account validation requirements. This value is provided by your financial institution.

Allow Assignment to Multiple Suppliers  Enable this option if your bank account belongs to a company that receives payments for multiple suppliers (a factor company). With this option enabled, Payables allows you to enter any combination of suppliers and sites in the Supplier Assignments region. It will make the account always available in the list of values for the fields (Bank) Name and (Bank) Number in the Bank Accounts region of the Suppliers and Suppliers Sites windows.
If you do not enable this option in the Supplier Assignments region, then you can enter any combination of supplier and sites within a supplier, but never a different supplier or a site within a different supplier. Also, the account will not appear on the list of values for (Bank) Name and (Bank) Number in the Bank Accounts region of the Suppliers and Suppliers Sites windows once it has been assigned to any other supplier.

Account Contact & Holder


Account Holder Region of the Bank Accounts Window
Account Holder Name of the person or organization within your organization who is responsible for this account (optional).

Alternate Account Holder The alternate name for your bank account holder.
If you are using this internal bank account to process NACHA–formatted electronic payments, enter the name of the tax
reporting entity that will be referenced by the payment files, exactly as it appears in the Reporting Entity window.
If you do not use this bank account for NACHA–formatted payments, then this value is not used by the system and is for your reference only.

EFT Requester ID Numeric designation of the organization or person that is responsible for generating this account’s electronic payments (optional). This number is assigned by the bank.

Account Contact Region of the Bank Accounts Window
Prefix. The prefix (Mr., Ms., etc.) of the contact.

GL Accounts Region of the Bank Accounts Window

You cannot enter GL Account information for Supplier bank accounts.


Cash  Enter the cash account you are associating with a bank account. This account must be an asset account.

When you create a payment, Payables creates accounting entries to credit this cash account. For future dated payments, on the payment’s maturity date, Payables credits the cash account and debits either the future dated payment account or the clearing account (depending on how you account for payments).

If you set up Payables to account for payments at clearing time, then Payables creates accounting entries for your unreconciled invoice payments to credit your cash clearing account, instead of your cash account, using the cash clearing account defined in the next field. After you reconcile your payments using Oracle Cash Management, when
you create accounting entries for the reconciled invoice payments, you debit your cash clearing account and credit the cash account you enter here.

If you enable the Automatic Offsets Payables option and enable the Pooled Account option in the Payables Options region of the Bank Accounts window, then when you create a payment, Payables creates a corresponding cash accounting entry for each liability distribution that you pay using this bank account. Payables uses the cash account you define here together with the Automatic Offset Method you choose in the Payables Options window to create the cash accounting entry.

Cash Clearing If you set up Payables to account for payments at clearing time, enter the cash clearing account you are associating with a bank account. When you create accounting entries for your unreconciled invoice payments, you credit your cash clearing account using this account. After you reconcile your invoice payments using Oracle Cash Management, when you create accounting entries for the cleared payments, you debit this cash clearing account and credit this bank account’s cash account. The account you enter here defaults to the Cash Clearing Account field in the GL Accounts region of the Payment Documents window.

For future dated payments, when the payment is recorded as mature, Payables debits the future dated payment account and credits the cash clearing account. After you reconcile your invoice payments using Oracle Cash Management, when you create accounting entries you debit the cash clearing account and credit the cash account.

Bank Charges If you are using Oracle Cash Management to reconcile your payments, enter the bank charges account you are associating with a bank account. After you reconcile your invoice payments, using Oracle Cash Management, Payables creates accounting entries to record your bank charges using this account. The account you enter here defaults to the Bank Charges account field in the GL Accounts region of the Payment Documents window.

Bank Errors. If you have enabled the Account for Payment When Payment Clears Payables option and if you are using Oracle Cash Management to reconcile your payments, then enter the bank errors account you are associating with a bank account. When you reconcile your invoice payment using Oracle Cash Management, Payables creates accounting entries to record any bank errors using this account.

The account you enter here defaults to the Bank Errors account field in the GL Accounts region of the Payment Documents window.

Confirmed Receipts If you use Automatic Receipts in Receivables and are required to send receipt information to your customer before applying the receipt, the receivable is maintained in the Accounts Receivable account until it is confirmed by the customer. Upon confirmation, it is reversed from the Accounts Receivable account and placed into the Confirmed Receipts account. If you are not required to send receipt information to your customer, the receivable is automatically reversed from Accounts Receivable and placed into Confirmed Receipts.

Future Dated Payment
 
If you will use this bank account to disburse future dated payments, enter the default value for the future dated payment account. This value will default to payment documents you enter for this bank account. When Payables accounts for future dated payments, it uses the future dated payment account from either the payment document or supplier site, depending on how the Use Future Dated Payment Account Payables option is set.

Payables Options Region

You cannot enter Payables Options information for Supplier bank accounts.


Maximum Outlay. The largest currency outlay that you allow for a payment batch for this bank account. If the total outlay of a payment batch exceeds the maximum outlay for the payment batch, Payables displays a warning, but allows you to continue processing the payment batch.

The Maximum Outlay for a bank account defaults from the Payables Options window. When you initiate a payment batch using the bank account, Payables uses the bank account’s Maximum Outlay as a default. You can override this default.

Maximum Payment. The largest payment amount that you allow in a payment batch. When you initiate a payment batch using the bank account, Payables uses the bank account’s Maximum Payment as a default. You can override this default.

Minimum Payment. The lowest payment amount that you allow in a payment batch. When you initiate a payment batch using the bank account, Payables uses the bank account’s Minimum Payment as a default. You can override this default.

Realized Gain. If the bank account is a foreign currency or multiple currency account, enter the account you want Payables to use when creating accounting entries for realized exchange rate gains on foreign currency payments. If you use Payables, the default for this field is the Realized Gain Account you define in the Payables Options window. If you are not using multiple currencies, you can leave this field blank.

Realized Loss. If the bank account is a foreign currency or multiple currency account, enter the account you want Payables to use when creating accounting entries for realized exchange rate losses on foreign currency payments. If you use Payables, the default account is the Realized Loss Account from the Payables Options window. If you are not using multiple currencies, you can leave this field blank.

Multiple Currency Payments
Enable this option if you want to use this bank account to pay invoices entered in multiple currencies. You can select this option only if the Use Multiple Currencies Payables option is enabled and if the bank account is in your functional currency.

Allow Zero Payments If you will allow zero–amount payments from this bank account, enable this option.

Pooled Account If you use Automatic Offsets and you want to associate multiple companies with this bank account, then enable this option. When you enable the Automatic Offsets Payables option, Payables creates one offsetting liability distribution for each invoice distribution. If you then pay the invoice from a pooled bank account, then which Payables accounts for the invoice payment, Payables creates one corresponding cash accounting entry for each liability distribution.

In addition, Payables builds the cash account based on the Cash Account defined for the bank account, and on the account segments of the liability lines. If you do not use a pooled account, then when Payables accounts for the payment, it creates a single accounting entry for the Cash Account, and uses the Cash Account that is defined for the bank account without
modifying any account segments.

Receivable Options

Period Closing Process


Use standard reports to:
  1. Reconcile transactions
  2. Reconcile receipts
  3. Reconcile Receipts to Bank Statement Activity for the Period
  4. Reconcile journals
  5. Reconcile customer balances
  6. Reconciling the General Ledger Transfer Process
Reconcile transactions
  • Generate the Transaction Register and the Sales Journal by Customer for the period under consideration.
  • The Sales Journal balance should match the total of the transactions in the Transaction Register plus twice the Credit Memo totals.
Reconcile Receipts
  • Generate the Receipt Register and the Receipt Journal Report (select Transaction in the Report Mode parameter) for the period under consideration.
  • The balance in the Receipt Journal Report should match the balance in the Receipt Register.
Reconcile Journal
  • Generate the Journal Entries Report-Summary by Account.
  • The totals for each Accounting flexfield in the Sales Journal and the Receipt Journal should match the corresponding totals in the Journal Entries Report.
Reconciling the General Ledger Transfer Process
  • The General Ledger Interface produces an execution report that shows you the total debits and credits transferred from Receivables to the General Ledger Interface table.
  • Compare this report to your Sales and Receipt Journal totals and verify that they match.
Note: Be sure to use the same General Ledger Date ranges for the two journals and your GL transfer.
The following is a list of the Critical Reports required for Reconciliation between AR and GL
  1. Journal Entries Report (AR)
  2. Sales Journal by GL Account Report (AR)
  3. Receipt Journal Report (AR)
  4. AR Reconciliation Report (AR)
  5. Account Analysis Subledger Detail-180 Char (GL)
  6. Third Party Balance Report (New to R12)
The Total Activity in a period is calculated as follows:
Transaction Register for the Period (+) Adjustments Register for the Period (+) Rounding Differences for the Period
(+) Credit Memo gain/loss for the Period (-) Invoice Exceptions for the Period
(-) Applied Receipts Register for the Period (-) Un-Applied Receipts Register for the Period


Reconcile customer balances

1.1 Use the Aging Report as of the last date of the prior month to get the outstanding opening balance.
1.2 Generate the Aging Report as of the last day of the month to get the month-end balance.

2.1 Use the Transaction Detail Report to identify invoices, debit memos, credit memos, deposits, guarantees, and chargebacks that increase the outstanding opening balance.
2.2 Use the Adjustment Register to identify any adjustments that affect the transactions for the month.
2.3 Use the Invoice Exception Report to reduce the outstanding amount where transactions do not update customers accounts.
– These transactions appear in the Transaction Register, but not on the Aging reports.

3.1 Use the Unapplied Receipt and Applied Receipt registers to identify the payments received from customers.
– These reduce the outstanding customer balances.

4. Use the AR Reconciliation Report to help you reconcile your accounts receivable activities.
– This report summarizes all customer, receipt, transaction, and account balances for the period you specify to simplify the internal reconciliation process.

Period close for all modules

Payables
   1. Complete All Transactions for the Period Being Closed
   2. Run the Payables AutoApproval Process for All Invoices / Invoice Batches
   3. Review & Resolve Amounts to Post to the General Ledger
   4. Reconcile Payments to Bank Statement Activity for the Period
   5. Transfer All Approved Invoices Payments, Reconciled Payments to the General Ledger
   6. Review the Payables to General Ledger Posting Process After Completion
   7. Submit the Unaccounted Transactions Sweep Program
   8. Close the Current Oracle Payables Period
   9. Accrue Uninvoiced Receipts
  10. Reconcile Oracle Payables Activity for the Period
  11. Run Mass Additions Transfer to Oracle Assets
  12. Open the Next Payables Period
  13. Run Reports for Tax Reporting Purposes (Optional)
  14. Run the Key Indicators Report (Optional)
  15. Purge Transactions (Optional)


Purchasing
   1. Complete All Transactions for the Period Being Closed
   2. Review the Current and Future Commitments (Optional)
   3. Review the Outstanding and Overdue Purchase Orders (Optional)
   4. Follow up Receipts-Check with Suppliers
   5. Identify and Review Un-invoiced Receipts (Period End Accruals)
   6. Follow Up Outstanding Invoices
   7. Complete the Oracle Payables- Period End Process
   8. Run Receipt Accruals - Period End Process
   9. Reconcile Accounts - Perpetual Accruals
  10. Perform Year End Encumbrance Processing. (Optional)
  11. Close the Current Purchasing Period.
  12. Open the Next Purchasing Period.
  13. Run Standard Period End Reports (Optional)


Inventory/WIP
   1. Complete All Transactions for the Period Being Closed.
   2. Check Inventory and Work In Process Transaction Interfaces.
   3. Check Oracle Order Management Transaction Process.
   4. Review Inventory Transactions.
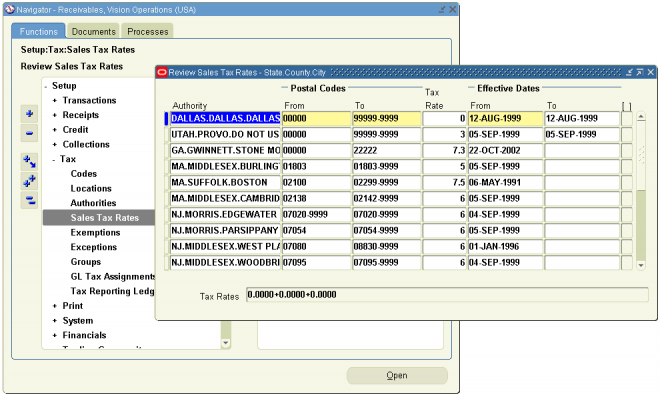
   5. Balance the Perpetual Inventory.
   6. Validate Work In Process Inventory.
   7. Transfer Summary or Detail Transactions
   8. Close the Current Oracle Payables and Oracle Purchasing Periods
   9. Close the Current Inventory Period
  10. Open the Next Inventory Period
  11. Run Standard Period End Reports (Optional)


Order Management
   1. Complete All Transactions for the Period Being Closed
   2. Ensure all Interfaces are Completed for the Period (Optional)
   3. Review Open Orders and Check the Workflow Status
   4. Review Held Orders
   5. Review Discounts
   6. Review Backorders
   7. Review and Correct Order Exceptions
   8. Reconcile to Inventory
   9. Reconcile to Receivables (Optional)
  10. Run Standard Period End Reports

Receivables
   1. Complete All Transactions for the Period Being Closed
   2. Reconcile Transaction Activity for the Period
   3. Reconcile Outstanding Customer Balances
   4. Review the Unapplied Receipts Register
   5. Reconcile receipts.
   6. Reconcile Receipts to Bank Statement Activity for the Period
   7. Post to the General Ledger
   8. Reconcile the General Ledger Transfer Process
   9. Reconcile the Journal Import Process
  10. Print Invoices
  11. Print Statements (Optional)
  12. Print Dunning (Reminder) Letters (Optional)
  13. Close the Current Oracle Receivables Period
  14. Reconcile Posted Journal Entries
  15. Review Unposted Items Report
  16. Open the Next Oracle Receivables Period
  17. Run Reports for Tax Reporting Purposes (Optional)
  18. Run Archive and Purge programs (Optional)

Assets
   1. Complete All Transactions for the Period Being Closed
   2. Assign All Assets to Distribution Lines
   3. Run Calculate Gains and Losses (Optional)
   4. Run Depreciation
   5. Create Journal Entries
   6. Rollback Depreciation and/or Rollback Journal Entries (Optional)
   7. Create Deferred Depreciation Journal Entries (Optional)
   8. Depreciation Projections(Optional)
   9. Review and Post Journal Entries
  10. Reconcile Oracle Assets to Oracle General Ledger Using Reports.
  11. Run Responsibility Reports (Optional)
  12. Archive and Purge Transactions (Optional)

Projects
   1. Change the Current Oracle Projects Period Status from Open to Pending Close
   2. Open the Next Oracle Projects Period
   3. Complete All Maintenance Activities
   4. Run Maintenance Processes
   5. Complete All Transaction Entry for the Period Being Closed
   6. Run the Final Cost Distribution Processes
   7. Interface Transactions to Other Applications (AP, GL, FA)
   8. Generate Draft Revenue for All Projects
   9. Generate Invoices
  10. Run Final Project Costing and Revenue Management Reports
  11. Transfer Invoices to Oracle Receivables
  12. Interface Revenue to General ledger (Project Billing Only)
  13. Run Period Close Exception and Tieback Reports
  14. Change the Current Period Oracle Projects Status from Pending Close to Closed
  15. Advance the PA Reporting Period (Optional)
  16. Update Project Summary Amounts
  17. Restore Access to User Maintenance Activities
  18. Permanently Close the Oracle Projects Period (Optional)
  19. Reconcile Cost Distribution Lines with General Ledger (Optional)

Cash Managment
   1. Load Bank Statements
   2. Reconcile Bank Statements
   3. Create Miscellaneous Transactions
   4. Review AutoReconciliation Execution Report
   5. Resolve Exceptions on the AutoReceonciliation Execution Report
   6. Run Bank Statement Detail Report
   7. Run Transactions Available for Reconcilaition Report
   8. Resolve Un-reconciled Statement Lines
   9. Run the GL Reconciliation Report
  10. Run the Account Analysis Report for the General Ledger Cash Account
  11. Review the Account Analysis Report
  12. Correct any Invalid Entries to the General Ledger Cash Account (Optional)
  13. Perform the Bank Reconciliation

General Ledger
   1. Ensure the Next Accounting Period Status is Set to Future Entry

  Journal
   2.1 Complete Oracle Sub-ledger Interfaces to Oracle General Ledger
   2.2 Upload Journals from ADI (Applications Desktop Integrator) to Oracle General Ledger
   2.2 Complete Non-Oracle Sub-ledger Interfaces to Oracle General Ledger (Optional)
   2.3 Generate Reversal Journals (Optional)
   2.4 Generate Recurring Journals (Optional)
   2.5 Generate Mass Allocation Journals (Optional)
   2.6 Review and Verify Journal Details of Unposted Journal Entries
   2.7 Post All Journal Batches
 
 Reports
 1. Run General Ledger Trial Balances and Preliminary Financial Statement Generator Reports (FSGs)
  2.. Revalue Balances (Optional)
  3. Translate Balances (Optional)
  4. Consolidate Sets of Books (Optional)
  5. Review and Correct Balances (Perform Reconciliations)
  6. Enter Adjustments and / or Accruals and Post
  7. Perform Final Adjustments

  Closing
  1. Close the Current Oracle Gneral Ledger Period
  2. Open the Next Oracle General Ledger Period
  3. Run Financial Reports for the Closed Period
  4. Run Reports for Tax Reporting Purposes (Optional)
  5. Perform Encumbrance Year End Procedures (Optional)

Customer Invoice from SO

Select a.order_number, d.trx_number CUSTOMER_INVOICE, c.name, a.invoice_to_org_id,  a.flow_status_code,
b.ordered_item , b.inventory_item_id, b.invoice_interface_status_code,
b.invoiced_quantity, b.flow_status_code

From apps. oe_order_headers_all a,
     apps. oe_order_lines_all b,
     apps. HR_ALL_ORGANIZATION_UNITS c,
     apps. RA_CUSTOMER_TRX_ALL d

Where
b.header_id = a.header_id
AND a.org_id=c.organization_id
AND a.org_id=d.org_id
AND a.order_number='10090178'  //Saes Order Number
AND c.name LIKE 'XXX%UK%' //Name of Operating Unit
AND d.ct_reference= to_char(a.order_number)

Finding all unapplied receipts in AR


Select a.cash_receipt_id, a.receipt_number, a.Amount, SUM(b.AMOUNT_APPLIED) AS "Unapplied"
from apps. AR_CASH_RECEIPTS_ALL a,
apps. AR_RECEIVABLE_APPLICATIONS_ALL b
WHERE a.ORG_ID='118'
AND a.CURRENCY_CODE='USD'
AND a.cash_receipt_id=b.cash_receipt_id
AND b.STATUS='UNAPP'
GROUP BY a.cash_receipt_id, a.receipt_number, a.Amount

Bank in R12


In Release 12 Bank Accounts are owned by Legal Entities and can be accessed by multiple Operating
Units. In Prior Releases the Bank Accounts were Operating Unit Specific.

For all Internal Banks you must assign a Legal Entity.
If the Legal Entity has been configured and it does not appear in the List Of Values in the Bank Account setup then you may need to run the CE UMX Security Wizard to ensure the Legal Entity is available to the Responsibility you are using to access Cash Management.

CE Bank Account Security setup wizard
1) Login as System Administrator
2) Select User Management responsibility
3) Select Roles and Role Inheritance menu function
4) Create (or query an existing) Role.
5) Click Security Wizards button and Run Wizard - CE UMX Security wizard
6) Click Add Legal Entities button, select your LEs and check Use, Maintenance and Bank Account
7)Transfers to reflect the activities for this Role.
check-box. Apply
8) Assign this role to your user (using the Users tab)

Banks in R12 is defined in legal entity level. Each branch has many branches and account details in a bank branch specify all the oracle relevant data.

Sales person


You set up your salespersons and assign sales territories using the Resource window, with most of the information you enter being on the Receivables tab. Receivables lets you define multiple salespersons to which you can assign sales credits when entering invoices. If AutoAccounting depends on salesperson, Receivables uses the general
ledger accounts that you enter here in combination with your AutoAccounting rules to determine the default revenue, freight, and receivable accounts for your invoices.

Oracle Receivables uses No Sales Credit as the default in the Salesperson field when you enter transactions if the system option Require Salesperson is set to Yes and no salesperson is defined at the bill–to, ship–to, or customer level.

Note: If AutoAccounting is based on salesperson, then you must query the No Sales Credit record in the Resource window and enter revenue, freight, and receivable accounting information. These accounts are required when creating a debit memo reversal or when entering transactions with No Sales Credit.

Active salespersons appear in the list of values in the Transaction and Customers windows. You can make a salesperson inactive by unchecking the Active in Receivables check box and then saving your work, or by specifying an end date for this salesperson.


Revenue Accounting Management


Revenue Accounting uses the Revenue Accounting Management (RAM) wizard to guide you through the process of making and modifying revenue adjustments. You can also use the wizard to update expiration dates of existing revenue contingencies. For example, you can record early acceptance for an invoice line, if the line is associated with a contract that offers an acceptance clause.

You can make revenue and sales credit adjustments to completed invoices and credit memos only. When making adjustments to transactions with rules, the invoicing rule must be In Advance.

When you make adjustments using Revenue Accounting, Receivables uses AutoAccounting to automatically generate all necessary accounting distributions. Before Receivables saves the adjustments, the distributions and/or sales credits resulting from the adjustment are displayed for your review. At this point, you have a final opportunity to approve or cancel the adjustments. In the case of a revenue adjustment, you can also modify the account distributions before saving. You can also review your early acceptance and other revenue contingency actions before saving. In certain cases, recording early acceptance or expiring a contingency can trigger automatic revenue recognition for the invoice line.

When you create or import an invoice, you can defer all revenue to an unearned account by assigning a deferred accounting rule to the invoice. At the appropriate time, you can recognize revenue manually using the Revenue Accounting and Sales Credits window or automatically using the Revenue Adjustment API.

To manage revenue contingencies:


1. Navigate to the Revenue Accounting and Sales Credits window and enter your
query criteria.
2. Choose the Manage Revenue button.
3. Select Modify Revenue Contingencies.
4. Select the transaction line whose contingency you want to adjust. Then, in the Line Revenue Contingencies region, adjust the contingency's expiration date attributes:
• Number of days (days added to event attribute)
• Estimated expiration date
Tip: To expire a contingency, set the expiration date to today's date.


To record early acceptance:
1. Navigate to the Revenue Accounting and Sales Credits window and enter your
query criteria.
2. Choose the Manage Revenue button.
3. Select the Record Acceptance option and click Next.
4. Select a specific item, item category, or line number to indicate the line or lines that you want to accept.
5. The next window displays the lines that Receivables will record early acceptance for.
Click Next to accept the selected lines.
6. Review the results in the Results window.

Event-Based Revenue Management


The Revenue Management Engine automates the timing of revenue recognition for manually entered invoices, or invoices imported via AutoInvoice. If you use event-based revenue management, then Receivables evaluates these invoices and decides whether to immediately recognize revenue, or temporarily defer revenue to an unearned revenue account.  Revenue is subsequently recognized depending on certain events, such as customer acceptance or receipt of payment.

Receivables makes these automatic revenue recognition or deferral decisions based on your organization's established revenue policy, and the existence of any revenue contingencies on the invoice line.

Revenue contingencies are terms and conditions in a sales contract or order that prevent revenue from being immediately recognized, based on strict revenue recognition requirements mandated by US GAAP and International Accounting Standards. Typical contingencies that can delay revenue recognition are fiscal funding clauses (for
government contracts), cancellation clauses, customer acceptance clauses, customer creditworthiness, nonstandard payment terms, and nonstandard refund policies. The extent of the revenue deferral, and subsequent timing of revenue recognition, depends on the revenue contingency. Each contingency has its own related contingency removal event:
• For example, if the customer is not creditworthy, then you can recognize revenue on that customer's invoice only in the amount of any payments received.
• Or, if the customer was offered a nonstandard refund policy on an order, then you can recognize revenue on that customer's invoice only after the refund policy has expired.


The automated process occurs as follows:

1. Receivables evaluates an invoice when manually entered or imported. When first evaluating an invoice for revenue recognition or deferral, Receivables checks transaction lines to determine if any revenue contingencies exist. Contingencies are defaulted to invoices when imported from a feeder system or entered manually in the Transactions workbench. Receivables defaults contingencies if the enterprise revenue policy has been violated, or if certain conditions on the related sales order or contract exist.

If revenue must be deferred, then the Revenue Management Engine does so and records the reason for the deferral.

2. Receivables then waits for an event that can remove the contingency and trigger revenue recognition. The Revenue Contingency Analyzer monitors contingencies until they expire or are removed. When such an event occurs, the Revenue Contingency Analyzer can automatically recognize the appropriate amount of unearned revenue on the invoice.

Specifically, revenue is scheduled according to the initially assigned accounting rules and rule start dates. For invoice lines without accounting rules, the revenue date is set to the latest contingency removal date.

This automated revenue management process helps you to comply with the strict revenue recognition requirements mandated by US GAAP and International Accounting Standards.

Even if you enable this automated revenue recognition process, you can always use the Revenue Accounting Management (RAM) wizard to manually adjust revenue and Modifying Invoices Under Collectibility Analysis. However, once you manually adjust revenue, Receivables discontinues the automatic monitoring of contingencies.

Prerequisites
• Select the Require Salesperson system option in the Miscellaneous tabbed region in the System Options window.

• (Optional) In the Revenue Policy page, populate one of the following fields:

  •      Payment Term Threshold
  •      Standard Refund Policy
  •      Credit Classifications region

• (Optional) Transfer contingency information to Receivables by assigning revenue contingency IDs to billing lines, before invoice import by AutoInvoice or invoice creation by the Invoice API.
Note: When importing parent and child invoice lines from Oracle
Order Management, AutoInvoice automatically copies any contingencies from the parent line to the child line. An example of a parent and child is a purchased item and its related services, such as an extended warranty.

• (Optional) Define your own revenue contingencies, along with corresponding contingency removal events.

• (Optional) Define contingency defaulting rules to automatically assign a contingency to an invoice.
Note: You cannot use this functionality with Oracle Projects invoices, because revenue from Projects is recorded directly in the general ledger, not in Receivables.

Revenue Policy


Use the Revenue Policy page to specify your enterprise revenue policies. The Revenue Management Engine uses the information that you enter in this page to make automatic revenue recognition decisions for your manually entered and imported invoices. The Revenue Management Engine compares each invoice against the revenue policy information that you state here. Any deviations cause the assignment of revenue contingencies to the invoice or invoice line, which impact the timing of revenue recognition for those invoices.

Note: Even if you do not specify anything in this page, Receivables can still automatically defer or recognize revenue for your invoices. If one or more revenue contingencies exist on a billing line, then Receivables enables collectibility analysis for that line, and bases revenue decisions on the contingency.


Defining Your Revenue Policy

Responsibility: Revenue Management Super User
Navigation: Revenue Policy > Revenue Policy

The setup defined at the operating unit level. You can think of the setup at the Revenue Policy form as the default Revenue Contingency to apply to all invoices. It is the general policy that will be used to evaluate all invoices for all customers without exceptions.

Use the Revenue Policy page to enter information about:

The credit classifications that identify your high risk, noncreditworthy customers.
If you enter or import an invoice for a customer that is associated with one of these credit classifications, then:

  • Receivables assigns the Customer Creditworthiness contingency on the invoice.
  • The Revenue Management Engine immediately defers revenue on the entire invoice.
Receivables recognizes revenue for this invoice only to the extent of payments received.

The standard refund period that you typically offer to your customers.
When you enter or import an invoice with a line that is associated with a contract, the Revenue Management Engine analyzes the contract details. If the contract offers a refund period that exceeds the refund period specified here, then:
  • Receivables assigns the Refund contingency on the invoice line.
  • The Revenue Management Engine automatically defers revenue on that invoice line.
Receivables recognizes this line's revenue only after the refund policy period expires.

The maximum time period before a payment term becomes extended.
If you enter or import an invoice with a payment term or installment schedule that exceeds the threshold specified here, then:
  • Receivables assigns the Extended Payment Term contingency on the invoice.
  • The Revenue Management Engine automatically defers revenue on the entire invoice.
For example, you enter a maximum payment term threshold of 180 days, and you later enter or import an invoice with a payment term that has four installments (Net 60, Net 90, Net 120, and Net 200). Receivables defers the entire revenue amount on the invoice because the last installment exceeds the 180-day threshold by 20 days. Receivables recognizes revenue for this invoice only to the extent of payments received.

Revenue contingency


Receivables predefines a set of revenue contingencies that you can use with event-based revenue management. You cannot update or delete these predefined revenue contingencies, but you can create your own. Receivables also predefines contingency removal events, which you cannot delete or modify. A  list of these predefined revenue contingencies, along with corresponding contingency removal events are shown in above pic.

For each contingency, you can define automatic defaulting rules to control which contingencies are assigned to which customer invoices.


To define a revenue contingency:

1. Navigate to the Revenue Contingencies page.

2. Duplicate and then modify an existing contingency. Or, define a new contingency.
Tip: For easier contingency auditing, avoid modifying your user-defined contingencies. Instead, assign an end date to the existing contingency, and create a new contingency.

3. In the General Information region, enter basic details about the contingency, such as name, effective dates, and description.
Note: A contingency's last effective date controls only whether it can be defaulted to new order or invoice lines. An expired contingency on an order or invoice line remains valid, provided that it was valid on the day when originally defaulted.

4. In the Related General Policy region, select the revenue policy that Receivables will review when considering whether this contingency is applicable:
• Refund Policy
Receivables defaults this contingency if the invoice has a refund policy that violates your organization's standard policy.
• Payment Term Policy
Receivables defaults this contingency if the invoice has a payment term that violates your organization's standard policy.
• Credit Classification
Receivables defaults this contingency if the customer has a credit classification that matches one of the credit classifications defined in your organization's revenue policy.
• None
Receivables does not consider any details in your organization's revenue policy.
Note: Receivables reviews the above details in conjunction with any defaulting rules that you define.

5. In the Contingency Removal Event region, select the event that will remove the contingency from the invoice:
• Contingency Expiration
• Customer Acceptance
• Invoicing
• Payment
• Proof of Delivery
You can define multiple contingencies that have the same removal event.

6. Optionally enter removal event attributes and days that indicate the timeline for contingency removal. You can select these event attributes:
• Fulfillment Date
• Proof of Delivery Date
• Ship Confirm Date
• Transaction Date
Tip: If defining a pre-billing acceptance contingency whose removal event is Invoicing, do not select Transaction Date. This is because the order line will not be invoiced until after customer acceptance has been recorded in the feeder system.
For example, once 10 days have passed beyond an order's ship confirm date, you might want Receivables to automatically remove a customer acceptance  contingency. (This is an example of implicit customer acceptance, as opposed to the
Explicit Customer Acceptance contingency that Receivables predefines.)
You can set this up as follows:
• Removal Event: Customer Acceptance
• Event Attribute: Ship Confirm Date
• Days Added to Event Attribute: 10

Assigning Contingencies


You can define defaulting rules for automatic contingency assignment.

Note: You must define defaulting rules to enable automatic contingency assignment. However, do not define defaulting rules to address revenue policy violations, because Receivables automatically
assigns the appropriate revenue contingencies if any revenue policy is violated.

For each rule that you define, you can specify one or more matching criteria. If the rule's stated criteria is matched, then Receivables assigns the contingency that you select.
For example, you might want to require Customer ABC to always manually accept an item before revenue on its transactions can be recognized. To enforce this scenario, create a new rule, select the revenue contingency that is the desired result (in this case, Explicit Acceptance), select Bill To Customer as the rule parameter, and enter the customer condition.

With this defaulting rule in place, Receivables will assign the Explicit Acceptance contingency to all Customer ABC's transaction lines, and revenue will be deferred until customer acceptance is manually recorded.

You can define multiple rules with different matching criteria that return the same contingency. And, you can define multiple rules with the same matching criteria that return multiple  contingencies.

Rule parameters that you can use during rule definition include:

  1. Accounting Rule
  2. Batch Source
  3. Bill To Customer
  4. Bill To Site
  5. Customer Profile Class
  6. Inventory Item
  7. Memo Lines
  8. Operating Unit
  9. Ship To Customer
  10. Ship to Site
  11. Transaction Type
Note: You cannot assign contingencies to transaction lines that have deferred account rules.

Adjustment and Write Off

Adjustment and write off both are done from the receipt application form but adjustment is applied to invoices where as write off is applied to receipts(customer payments).

Scenario 1:  For an Invoice amount of 119, customer pays 125. The best option is to put the EUR6 in On Account but if the business doesn’t expect any further transactions with the customer then the extra amount can be written off.

 Scenario Scenario 2:  For an Invoice amount of 119, customer pays 119 but the bank charges 19 as transaction fee. In this case the business can take 100 cash and 19 to the adjustment. The revenue‘ll remain the same 119.

 Enable Important Points
1. The profile ‘AR: Allow Actions ' shoule be enabled for showing adjustment & chargeback buttons on receipt form.

2. 'Adjustment Reversal' activity is used by the system, for the reversal of an adjustment that is tied to an invoice whose payment has been reversed using the Receipt Reversal form.

Payment Term Discounts


Receivables lets you give discounts to your customers when they pay for their debit items before a certain date. Discounts are determined by the payment terms you assign to your customers. You can also choose whether to allow discounts for partial payments and specify how you want Receivables to calculate the discount on your invoices.

Earned and Unearned Discounts
Receivables lets you determine whether your customers can take earned and unearned discounts. An earned discount is a discount you give to a customer who pays on or before the discount date or within the discount grace period. For example, a customer may earn a 2% discount off the original invoice if payment is received within 10 days. The earned discount period is determined by the invoice date, apply date of the receipt, and any discount grace days.

Receivables also lets you choose whether to allow unearned discounts. Unearned discounts are discounts that you allow after the earned discount period has passed. If the discount is unearned, the default earned discount is zero and the maximum value of the unearned discount is dictated by the payment terms. If the discount is earned, the default discount is the amount of the earned discount. Receivables lets you override the discount amount during payment entry and warns you if you are taking an unearned discount. You specify whether your customers can take unearned discounts in the System Options window.


Discounts on Partial Payments
Receivables lets you choose whether to allow discounts when your customer remits partial payment for an open debit item. If you allow discounts on partial payments, Receivables prorates the amount of the discount based on the applied amount. You can control whether your customers can receive discounts for partial payments by setting the system option Discount on Partial Payment to Yes or
No.

Tiered Discounts
When you define your payment terms, you can assign multiple discounts to each payment schedule. You might want to assign different discount percents based on different discount dates. For example, you might give your customers a 15% discount if they pay within 10 days after the invoice date, but only a 5% discount if they pay within 15 days.

Accounting Entries

Discount Accounts


Discount accounts are defined in the discount window and attached to the bank accounts.

Earned Discount: You use activities of this type in the Adjustments and the Remittance Banks windows. Use this type of activity to adjust a transaction if payment is received within the discount period (determined by the transaction's payment terms).

Unearned Discount: You use activities of this type in the Adjustments and the Remittance Banks windows. Use this type of activity to adjust a transaction if payment is received after the discount period (determined by the transaction's payment terms).

1. Indicate how Receivables should derive the accounts for the expense or revenue generated by this activity by specifying a GL Account Source. Choose one of the following:

Activity GL Account: Allocate the expense or revenue to the general ledger account that you specify for this Receivables Activity. If the activity type is Bank Error, Claim Investigation, Endorsement, Finance Charge, Prepayment, Receipt Write-off, or Short Term Debt, you can only choose this GL account source.

Distribution Set:
Allocate the expense or revenue to the distribution set that you specify for this Receivables Activity . A distribution set is a predefined group of general ledger accounting codes that determine the accounts for miscellaneous receipts and payments. You can choose this option only if the activity type is Miscellaneous Cash.

Revenue on Invoice: Allocate the expense or revenue net of any tax to the revenue account(s) specified on the invoice. If Tax Code Source is set to None, allocate the gross amount to these accounts. You can only choose this option if the activity type is Adjustment, Earned Discount, or Unearned Discount.

If the revenue on the specified invoice is unearned, then Receivables calls the Revenue Adjustment API, which uses AutoAccounting to derive the anticipated revenue accounting distribution accounts and amounts. The accounting engine then uses this information to allocate the adjustment or discount amount to these derived revenue account(s).

Tax Code on Invoice: Allocate the net portion using the Expense/Revenue accounts specified by the tax code on the invoice. If Tax Code Source is set to None, allocate the gross amount to these accounts. You can only choose this option if the activity type is Adjustment, Earned Discount, or Unearned Discount.

In the event of an adjustment to an invoice with zero amount revenue distributions, the adjustment activity's GL Account Source must not be set to Revenue on Invoice or Tax Code on Invoice

2. Specify a Tax Code Source to indicate where Receivables derives the tax code for this activity. Choose one of the following:
Activity: Allocate the tax amount to the Asset or Liability tax accounts specified by the Receivables Activity.
Invoice: Distribute the tax amount to the tax accounts specified by the tax code on the invoice. You cannot choose this option if the activity Type is Miscellaneous Cash or Finance Charges.
None: Allocates the entire tax amount according to the GL Account Source you specified. Choose this option if you do not want to separately account for tax.
In the event of a tax adjustment to an invoice with zero amount tax distributions, the adjustment activity's Tax Code Source must not be set to Invoice.


Customer and supplier architecture differences


Suppliers are first created in header levels which are same for all the operating units. Next we create supplier sites specific to an operating unit. When we create a purchase order/invoice, we create it against a particular site. 

For customers we first create party, which is same across all the operating units. Next we create an account/customer . The customer number can be same/or differnt in different OUs. When we create a sales order/AR Invoice, we create it against a particular account/customer. Each customer/account can have more than one address (like supplier sites)  and each address(party site number) can function as a ship-to/bill-to/drawee.

In summary, Supplier headers are OU independent. Supplier sites are in operating unit level and represent different address. Party is OU independent. Customers numbers can be same/differnt  in operating unit level and customer sites represent different addresses.

Example
In the first picture the part name is 3M Health Care1(no ). This party has 3 different accounts – 2 in vision operation (4301, 4302) and 1 in vision Germany (4303). The account (customer) number 4301 has two different address (sites :  18038 – Bhubaneswar and 18040 Cuttack).

Below img shows the customer (account) 4301 with its two address(sites) and site number 18038 details


Bill Receivable SetUps


1.1 Define the below Auto Accounting rules
Bills Receivable: The bills receivable account for your transaction. Receivables uses this account when you exchange transactions for bills receivable.
Factored Bills Receivable: The factored bills receivable account for your bills receivable transactions.
Remitted Bills Receivable: The remitted bills receivable account for your bills receivable transactions
Unpaid Bills Receivable: The unpaid bills receivable account for your bills receivable transactions.

1.2 System Options
Enable the bills receivables option. Enable the ‘allow payment of unrelated transactions‘ check box as per the business requirement.

1.3 Assign a bills receivable transaction batch source to the AR: Bills Receivable Batch Source profile option

2.2/2.3
 
Bills Receivable – This payment method is used to create bills receivable from transactions. No bank is attached to this method as this method is not used for receipt creation.
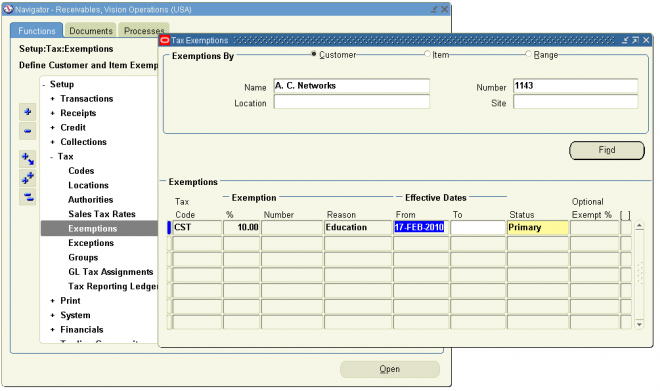
Bills Receivable Remittance - Used for bills receivable remittance


Automatic or Direct Exchange into Bills


To exchange a transaction for a bill receivable using the Bills Receivable Transaction Batches window, the Bills Receivable Batch Creation concurrent program, or the Exchange action in the Transactions window, you must update the transaction with a bills receivable creation payment method. The currency, exchange rate, paying customer bank account, and the grouping rule assigned to the payment method determine how transactions are grouped into bills receivable.

To flag transactions for automatic or direct exchange into a bill receivable, you must assign each transaction a paying customer defined as a drawee, with a bills receivable creation payment method.

A paying customer bank account on a flagged transaction acts as an additional grouping
rule. Bills receivable transactions inherit the bank account entered on a flagged
transaction if:

  • The drawee is also a bill-to site
  • The bills receivable creation payment method does not have a grouping rule of Oneper Customer or One Per Customer Due Date.

If the grouping rule on the bills receivable creation payment method is One per Customer or One per Customer Due Date, then the bills receivable transaction inherits the bank account only if:

  • The bank account is assigned to the primary drawee site
  • The primary drawee site is a bill-to site.
If the bank account on flagged transactions is not assigned to the primary drawee site, then Receivables creates the bills receivable transactions without a drawee bank account.

For transactions imported using AutoInvoice or entered manually, set the bills receivable creation payment method as primary at the customer or customer bill-to site level, if you want to default the bills receivable creation payment method to the transaction. If you also want to default the customer bank account, set the customer bank account as primary for the bill-to site.
 

Batching Transactions for Bills Receivable


Use the Bills Receivable Transaction Batches window or the Bills Receivable Batch Creation concurrent program to select and group transactions to exchange for bills receivable. Batching transactions lets you automatically generate bills receivable and assign transactions marked with bills receivable creation payment methods to the bills.
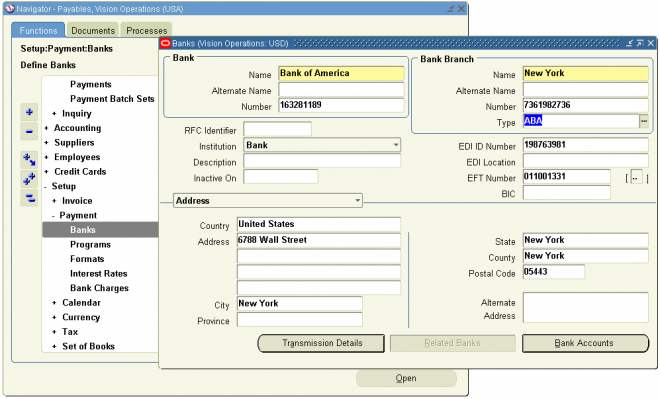
When you submit a batch, Receivables runs the Bills Receivable Batch Creation concurrent program and prints the Automatic Transactions Batch report. The Automatic Transactions Batch report lists the bills receivable created from the batch and the transactions assigned to each bill. You can both print the report and submit the batch, or only print the report for review before submitting the batch. When you submit the batch, you can also print bills receivable if:
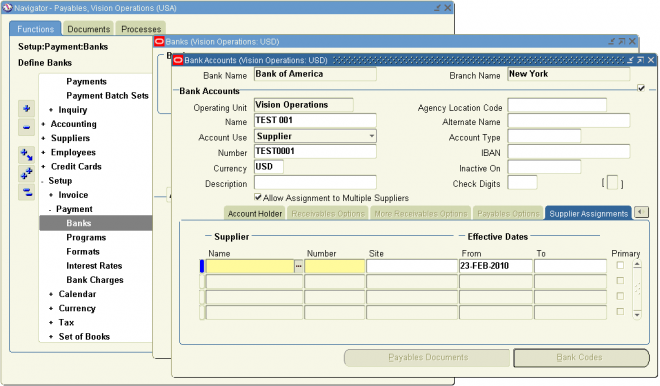
  • the bills receivable transaction type assigned to the batch source is for bills that require acceptance,
  • the transaction type contains a format program

You cannot assign disputed transactions or other bills receivable to a bill using a bills receivable batch. If you are batching debit and credit memos with the payment term Immediate, Receivables includes these debit and credit memos in the first available bill receivable, without regard to the due date grouping rule assigned to the bill.

Numbering Bills Receivable Transactions
If only one transaction is exchanged for a bill receivable, then Receivables uses the transaction number as the bill number if:
• The Inherit Transaction Number box is checked for the bills receivable creation payment method assigned to the exchanged transaction, and
• The transaction number is not already used by another transaction with the same batch source as the bill receivable.
If the Inherit Transaction Number box is not checked, or if the bill contains more than one transaction, then Receivables numbers bills receivable transactions according to the transaction batch source assigned to the batch.

Ordinarily, a bills receivable transaction batch source has the Automatic Transaction Numbering box checked. If you are using document sequences and the Copy Document to Transaction Number box is checked, then Receivables uses the document sequence number assigned to the bill as the bill receivable number.

Exchanging a Bill Receivable for a New Bill Receivable


Use the Exchange option in the Tools menu of the Bills Receivable window or the Bills Receivable Portfolio Management window to exchange an unpaid bill receivable for a new bill receivable.
You can only exchange for the full amount of the original bill. When you exchange an existing bill for a new bill, Receivables assigns a new bills receivable number to the new bill and defaults the maturity date and other existing information from the original bill.

You can use the Bills Receivable window to update information and complete the bill. Receivables updates the status of the original bill to Closed when you complete the new bill, or when you accept the new bill if acceptance is required.

To exchange a bill receivable for a new bill receivable:
1. Navigate to the Bills Receivable window or the Bills Receivable Portfolio Management window.
2. Query or enter the bill receivable that you want to exchange.
3. Choose Exchange from the Tools menu.
The Exchange window appears with the bill number for the new bill receivable.
4. Navigate to the Bills Receivable window.
5. Query the new bill number.
6. Update the information that you want for the new bill.
7. Save your work

Complete / Incomplete Status


Use the Complete Bill button in the Bills Receivable window to complete a bills receivable transaction. Similarly, You can return a completed bill receivable to the status Incomplete by using the Incomplete Bill button.

To complete a bill receivable, you must:

  • Enter all required information for the bill.
  • Assign transactions to the bill. Transactions must have the same currency as the bill, and all transactions must have the same exchange rate.
  • Assign transactions up to the designated maximum amount of the bill, if applicable.

If the bill requires customer acceptance, completing the bill changes its status to Pending Acceptance. While a bill receivable has the status of Pending Acceptance, Receivables reserves the transactions that are assigned to the bill. When you receive written acceptance from the customer, you can update the bill using the Accept Bill button.

If the bill does not require customer acceptance, completing the bill changes its status to Pending Remittance. Receivables records the first accounting for the bill, the assignments reduce the amount due on the exchanged transactions, and the bill appears in the customer’s outstanding balance.

If you are using document sequences, Receivables ignores the Document Number Generation Level system option and generates the document number when you complete the bill receivable. If you want the document number and bill receivable number to be the same, check the Copy Document Number to Transaction Number box in the bills receivable transaction batch source.

Returning a Bill Receivable to Incomplete Status


You can return a completed bill receivable to the status Incomplete by using the Incomplete Bill button. This action applies only to these types of bills receivable: 

  • a bill that requires acceptance with the status Pending Acceptance,
  • a bill that does not require acceptance with the status Pending Remittance.

Printing a Bill Receivable


You can print bills receivable at different stages of the bill cycle. You can print bills receivable that require drawee acceptance individually or in batch after the bill is completed. You can also print bills receivable when you prepare a bills receivable remittance.

To print a bill receivable, you must:

  • Set the Printing Option to Print for the bill. The Printing Option defaults from the transaction type, but you can change it.
  • Assign a format program. You can assign a format program to bills receivable transaction types.

If your printed bills receivable require stamps, you must set up stamp values according to the requirements of your tax authority. Prepare stamps that use preprinted forms or continuous stationery before printing your bills.

You can print bills receivable in these ways:

  • Individually: Print an individual bill receivable from the Bills Receivable window by choosing Print Bill from the Actions menu, provided that the bill is complete and the Bills Receivable: Print function is enabled
  • Bills Receivable Batch: You can print bills receivable when you create a bills receivable batch by choosing the Print Bill button in the Bills Receivable Transaction Batches window.
  • Bill Receivable Remittance Batch: You can print bills receivable (other than promissory notes) that do not require drawee acceptance or were not previously printed when you run a bills receivable remittance batch, by checking the Print Bills box in the Remittance Batch Actions window.
  • Bills Receivable Format Report Program: You can run the Bills Receivable Format Report program to print a bills receivable batch or bills receivable remittance batch

Bills Receivable Portfolio Management


The Bills Receivable Portfolio Management window lets you display bills receivable transactions according to your selection criteria, and provides you with many tools to review, update, and manage the entire life cycle of your bills receivable portfolio.

The life cycle of a bill receivable can vary from bill to bill. To manage your bills receivable, the following activities are available from the Bills Receivable Portfolio Management window:

  • Accept
  • Cancel
  • Eliminate Risk
  • Endorse
  • Exchange
  • Hold
  • Protest
  • Recall
  • Reestablish Risk
  • Release
  • Restate
  • Unpaid

Accepting a Bill Receivable
If a bill receivable requires drawee acceptance (status of Pending Acceptance), enter acceptance information after the drawee returns the signed bill.
The Acceptance Date and Acceptance GL Date must be on or after the bill issue date.
The acceptance GL date updates the bill GL date and the assignment GL date for the transactions that are exchanged for the bill.

Canceling a Bill Receivable
Cancel a bill receivable to return the debt to the transactions that were originally exchanged for the bill. You can cancel a bill that is Pending Acceptance, Pending
Remittance, or Unpaid. If the bill is Pending Acceptance, canceling the bill releases the exchanged transactions and has no accounting effect. If the bill is Pending Remittance
or Unpaid, Receivables unassigns the exchanged transactions and creates reverse accounting entries

Recalling a Bill Receivable
Recall a bill receivable that has been remitted or endorsed without recourse. Recalling a bill returns the bill to its earlier status of Pending Remittance or Unpaid. When you recall a bill that is Factored with Recourse, Receivables reverses the receipt(s) created when the bill was factored. When you recall a bill that is Endorsed with Recourse, Receivables creates a reversing endorsement adjustment.

Marking a Bill Receivable as Unpaid
On the bill receivable maturity date, the drawee is expected to pay the bill. If payment is not received, you should mark the bill as Unpaid. When marking a bill Unpaid, Receivables updates the status of the bill to Unpaid. The open balance is recorded as a debit to Unpaid Bills Receivable. In addition, Receivables performs different actions depending upon the status of the bill that you are marking as Unpaid:

  • When you mark a bill that is Matured Pending Risk Elimination as Unpaid, Receivables reverses the receipt created when the bill was factored with recourse.
  • When you mark a bill that is Remitted or Factored with Recourse and then Closed as Unpaid, Receivables reverses the receipt created as a result of the remittance.
  • When you mark a bill that was Endorsed with Recourse and then Closed as Unpaid, Receivables reverses the endorsement adjustment
Eliminating Risk
You can eliminate risk on matured, factored, or endorsed bills receivable. When you eliminate risk on a factored bill receivable, Receivables reverses the short term debt entry and closes the bill. When you eliminate risk on an endorsed bill receivable, Receivables approves the pending endorsement adjustment and closes the bill.

Reestablishing Risk
You can reestablish risk on a bill that was previously eliminated from risk. When you reestablish risk on a Closed bill receivable that was factored with recourse, Receivables unapplies the receipt that was created when the bill was factored and applies the receipt to short term debt. The status of the bill is updated to Matured Pending Risk Elimination.
When you reestablish risk on a Closed bill receivable that was endorsed with recourse, Receivables reverses the endorsement adjustment and creates an endorsement adjustment pending risk elimination. The status of the bill is updated to Endorsed.

Endorsing a Bill Receivable
You can endorse a bill receivable and use it as payment against your supplier invoices. If you endorse the bill receivable with recourse, Receivables updates the status to Endorsed and creates a pending approval endorsement adjustment. If you endorse the bill receivable without recourse, Receivables closes the bill with an approved adjustment and updates the status to Closed.
Important: Additional steps are required in your Payables application to record the endorsement.

Restating a Bill Receivable
When you restate a bill receivable, Receivables reclassifies the bill from Unpaid to Pending Remittance.

Marking a Bill Receivable as Under Protest
In the collection process, the drawee may officially protest the bill receivable. During this time, you can mark the bill as Under Protest. There is no accounting impact.

Accounting for Bills Receivable


Bills Receivable window doesn’t provide any view accounting menu option under the tools menu. You need to run the report ‘Journal Entries Report’ to check the bills receivable creation accounting entries (BR Dr Rec Cr). If you have created a receipt or an invoice or an adjustment and applied this to the BR then you can use the view accounting option on the receipt form, the adjustment form or the transactions form.
Invoice
When you Complete an invoice , Receivables creates this journal entry:
DR Receivable
                    CR Revenue
                    CR Tax

Bills Receivable
When you Complete a bill receivable (or Accept a bill receivable if it requires acceptance), Receivables creates this journal entry:
DR Bills Receivable
                             CR Receivables

Remitted Bills Receivable
When you Remit a bill receivable with a Standard remittance method, Receivables creates this journal entry:
DR Remitted Bills Receivable
                                            CR Bills Receivable

On Maturity (or Maturity plus the number of collection days if the bill is remitted on or after maturity), Receivables creates this journal entry:
DR Remittance
                           CR Remitted Bills Receivable

Note: If the original transactions exchanged for the bill have deferred tax entries, Receivables also creates this journal entry:
DR Interim Tax
                       CR Collected Tax
When you Clear the receipt, Receivables creates this journal entry:
DR Cash
DR Bank Charges
                             CR Remittance

Unpaid Bills Receivable
When you mark a bill receivable as Unpaid, Receivables creates this journal entry:
DR Unpaid Bills Receivable
                                                   CR Bills Receivable
Note: The credit account depends on the last receivable classification of the bill prior to marking the bill as Unpaid.


Bills Receivable Statuses


The tables in this section describe the accounting entries and bills receivable statuses throughout the entire remittance and clearing process. Each table shows, for a particular type of remittance, the actions that you can perform on a bill receivable and the corresponding accounting entries and status that Receivables creates.

Bills Receivable Remittance


Remit bills receivable to your remittance bank or other financial institution to initiate the collection process from your customers. Before remitting to a bank, you must create, approve, and format/print bills receivable using a remittance batch.

Receivables lets you record the following types of bills receivable remittances:

  • Standard remittances: You remit bills receivable to your bank, and the bank manages the collection process. On the bill receivable maturity date, the bank collects payment in full from your customers and transfers the funds directly to your bank account, less any fees or other charges. With standard remittances, you bear the financial risk of customer default.
  • Factored remittances: You remit bills receivable as collateral in return for cash advances or loans from your bank. Receivables creates a receipt for the bill receivable upon remittance. If the bill receivable is factored with recourse, you bear the financial risk of customer default, and Receivables records a short-term debt for the default risk. If the bill receivable is factored without recourse, the bank assumes the risk of customer default, and Receivables closes the bill upon creation of the receipt.

When you create a bills receivable remittance, the receipt class determines the remittance processes, and the bills receivable remittance payment method that is assigned to the receipt class determines the accounting for the bills receivable. Receivables selects qualifying bills receivable for remittance and groups them according to the remittance bank that is assigned to each bill.

Receipts for Bills Receivable Remittances
Receivables creates a receipt for each bill receivable that is remitted to the bank. The remittance method for the remittance batch determines when a receipt is created. You create a receipt to record the accounting event of the expected fund transfer.

Standard remittances: Run the Bills Receivable Maturity and Risk program to create receipts and apply them to bills receivable, either at the maturity date plus the number of collection days or at the remittance date plus the number of collection days, whichever comes later. Receivables updates the status of the bill receivable to Closed when the receipt is applied to the bill receivable.

Factored remittances: Receivables creates a receipt when a remittance is approved. For bills receivable that are factored with recourse, the receipt is applied to short-term debt and the status of the bill is updated to Remitted. For bills receivable factored without recourse, the receipt is applied to the bill receivable upon remittance and the status of the bill is updated to Closed

Clearing Receipts for Bills Receivable Remittances
The clearing method of the bills receivable receipt class determines when Receivables clears receipts and recognizes cash in the remittance process of bills receivable. You indicate a clearing method when you define the receipt class with a creation method of Bills Receivable Remittance. You enter the number of clearing days and risk elimination days when you define the bills receivable remittance payment method assigned to the receipt class. Choose one of these clearing methods:

Directly: Receivables clears the receipt upon creation, and recognizes cash on the receipt date.

Automatic Clearing: Run the Automatic Clearing program to clear receipts on the receipt dates plus the number of clearing days. For standard remittances, the receipt date is either the maturity date plus the number of collection days or the remittance date plus the number of collection days, whichever comes later. For factored remittances, the receipt date is simply the remittance date.

By Matching: Use Oracle Cash Management to clear the receipt and reconcile cash to your bank statements

Refund to Customer

You receive $1000 from customer against an invoice amount of $500. First create a receipt of $1000 and apply to the $500 invoice. Next, contact the customer regarding the remaining $500. You can put the remaining $500 on account and match it to a new invoice but if the customer asks then you might have to refund the extra amount.

Receivable A/C Dr    500
                               Revenue A/C Cr 500
Cash A/C Dr. 1000
                        Receivable A/C Cr 500 
                        Unapplied A/C Cr 500            

11i
By Misc Payment in AR

1. Make a payment outside the system (check /electronic). Create a misc receipt of negative amount that’s paid the customer. The misc cash account should be a clearing account & should be same as the revenue account in debit memo.
Misc Cash Clearing A/C Dr   500
                                     Cash A/C Cr 500

2. Create a debit memo and match the initial receipt of $1000 to this debit memo.
Debit memo accounting
Receivable A/C Dr   500
                               Misc Cash Clearing A/C Cr  500

Receipt Application
Unapplied A/C Dr 500
                               Receivable A/C Cr 500                                 

By Payment in AP
1. Create a debit memo and match the initial receipt of $1000 to this debit memo.
Debit memo accounting
Receivable A/C Dr   500
                               Misc Clearing A/C Cr  500
Receipt Application
Unapplied A/C Dr 500
                               Receivable A/C Cr 500                                 
2. Create an Invoice for the customer (defined as supplier in AP) with the Misc Clearing A/C as the charge A/C
Misc Clearing A/C Dr 500
                                             Supplier Liability Cr 500
3. Make the payment for the invoice
      Supplier Liability Dr 500
                                      Cash A/C Cr 500

R12
1. Create a Receivables Activity with of type= Refund to process your automated AP refund.
You can only have one receivable activity active with type = Refund.

2. Set Receipt Handling for Credits to Refund, this setting is applicable for both automated credit card refunds and automated AP (non-credit card) refunds.

3. For credit memos created via AutoInvoice, Refunds are automated. There is no need for user intervention.
 To create a manual refund, you need to apply the receipt to “Refund”, you can apply to Refund for Receipts which were already remitted.
The Refund Attributes button get enabled, this form is not applicable to Credit Card Refunds. Attribute values are defaulted from payee setup. You are allowed to overwrite the values.

4. Once you Save, an Invoice will be generated in the Payables (AP)
Query the receipts, click on Apply, the Refund Status button will be enabled.When you click on Refund Status button, you will view the refund status in AP.
 

Customer details from 10 diff tables

Select hpas1.party_site_number,hca.account_number,hca.party_id,hca.cust_account_id, hp.party_name, hp.party_number,hpas1.party_site_id,
  hcas1.cust_account_id,hcas1.cust_acct_site_id, hcsu.SITE_USE_CODE, hcsu.PRIMARY_FLAG, hcsu.STATUS, hca.ORIG_SYSTEM_REFERENCE,
  hpas1.location_id, hl.address1,hl.address2, hl.address3, hl.city,hl.postal_code,hl.state,
  hl.province,hl.country, hcsu.tax_code, hcsu.payment_term_id, rt.NAME payment_term_name,
  DECODE (   gcc.segment1
               || '.'
               || gcc.segment2
               || '.'
               || gcc.segment3
               || '.'
               || gcc.segment4
               || '.'
               || gcc.segment5
               || '.'
               || gcc.segment6
               || '.'
               || gcc.segment7,
               '......', NULL,
                  gcc.segment1
               || '-'
               || gcc.segment2
               || '-'
               || gcc.segment3
               || '-'
               || gcc.segment4
               || '-'
               || gcc.segment5
               || '-'
               || gcc.segment6
               || '-'
               || gcc.segment7
              ) receivable_account,
       NULL interco,
       DECODE (   gcc1.segment1
               || '.'
               || gcc1.segment2
               || '.'
               || gcc1.segment3
               || '.'
               || gcc1.segment4
               || '.'
               || gcc1.segment5
               || '.'
               || gcc1.segment6
               || '.'
               || gcc1.segment7,
               '......', NULL,
                  gcc1.segment1
               || '-'
               || gcc1.segment2
               || '-'
               || gcc1.segment3
               || '-'
               || gcc1.segment4
               || '-'
               || gcc1.segment5
               || '-'
               || gcc1.segment6
               || '-'
               || gcc1.segment7
              ) revenue_account,
       DECODE (  gcc2.segment1
               || '.'
               || gcc2.segment2
               || '.'
               || gcc2.segment3
               || '.'
               || gcc2.segment4
               || '.'
               || gcc2.segment5
               || '.'
               || gcc2.segment6
               || '.'
               || gcc2.segment7,
               '......', NULL,
                  gcc2.segment1
               || '-'
               || gcc2.segment2
               || '-'
               || gcc2.segment3
               || '-'
               || gcc2.segment4
               || '-'
               || gcc2.segment5
               || '-'
               || gcc2.segment6
               || '-'
               || gcc2.segment7
              ) freight_account

 
  from apps.hz_cust_accounts_all hca,
  apps.hz_parties hp,
  apps.hz_party_sites hpas1,
  apps.hz_cust_site_uses_all hcsu,
  apps.hz_cust_acct_sites_all hcas1,
  apps. hz_locations hl,
  apps.gl_code_combinations_kfv gcc,
       apps.gl_code_combinations_kfv gcc1,
       apps.gl_code_combinations_kfv gcc2,
       apps.ra_terms rt,
       apps.ra_terms rt1,
       apps.hz_customer_profiles hcp
      
   WHERE hca.party_id=hp.party_id
  AND hp.party_id=hpas1.party_id
  AND hpas1.party_id=hp.party_id
  AND hpas1.party_site_id=hcas1.party_site_id
  AND hcas1.cust_acct_site_id=hcsu.cust_acct_site_id
  AND hcsu.org_id='8069'
  AND hpas1.location_id=hl.location_id
  AND hcsu.gl_id_rec = gcc.code_combination_id(+)
   AND hcsu.gl_id_rev = gcc1.code_combination_id(+)
   AND hcsu.gl_id_freight = gcc2.code_combination_id(+)
  AND hcp.standard_terms = rt1.term_id(+)
  AND hcsu.payment_term_id = rt.term_id(+)
   AND hcsu.site_use_id = hcp.site_use_id(+)
 

Basics AR invoice informations

Select a.trx_number, a.CT_REFERENCE, a.trx_date invoice_date, a.creation_date,term.NAME pay_term, a.ship_via shiped_how, a.comments, a.invoice_currency_code, a.exchange_rate, b.line_number, b.description, b.taxable_amount tax_amount, b.unit_selling_price,b.extended_amount, b.quantity_invoiced, b.sales_order REFERENCE, f.NAME trx_type_code, c.NAME trx_source, a.cust from apps. ra_customer_trx_all a, apps. ra_customer_trx_lines_all b, ra_batch_sources_all c, ra_terms term, ra_cust_trx_types_all f Where b.org_id='XXX' AND a.cust_trx_type_id = f.cust_trx_type_id and a. customer_trx_id=b. customer_trx_id AND a.batch_source_id = c.batch_source_id AND a.term_id = term.term_id

customer contact & phone number details

Select DISTINCT(hpas1.party_site_number), ac.creation_date, hp.party_name,hca.account_number,hca.party_id, hp.email_address, hp.primary_phone_number, hpas1.PARTY_SITE_ID, ac.first_name, ac.last_name, ac.orig_system_reference, ap.phone_number,ap.country_code, ap.area_code from apps.hz_cust_accounts_all hca, apps.hz_parties hp, apps.hz_cust_site_uses_all hcsu, apps.hz_cust_acct_sites_all hcas1, apps.hz_party_sites hpas1, apps. AR_CONTACTS_V ac, apps. AR_PHONES_V ap where hca.party_id=hp.party_id and hca.cust_account_id=ac.customer_id and ac.orig_system_reference =ap.orig_system_reference(+) AND hp.party_id=hpas1.party_id AND hcas1.cust_acct_site_id=hcsu.cust_acct_site_id AND hcsu.org_id='xxx' AND hpas1.party_site_id=hcas1.party_site_id Order By ac.creation_date desc

Customer Acceptance / Revenue Contingencies


Customer Acceptance is new feature introduced in R 12.It allows system to defer invoicing and/or revenue recognition for shipped goods until the customer receives the shipment and formally accepts the material.


Oracle makes these automatic revenue recognition or deferral decisions based on your organization's established revenue policy, and the existence of any revenue contingencies on the invoice line.

Revenue contingencies are terms and conditions in a sales contract or order that prevent revenue from being immediately recognized, based on strict revenue recognition requirements mandated by US GAAP and International Accounting Standards. Typical contingencies that can delay revenue recognition are fiscal funding clauses (for government contracts), cancellation clauses, customer acceptance clauses, customer creditworthiness, nonstandard payment terms, and nonstandard refund policies.

The extent of the revenue deferral, and subsequent timing of revenue recognition, depends on the revenue contingency. Each contingency has its own related contingency removal event:
• For example, if the customer is not creditworthy, then you can recognize revenue on that customer's invoice only in the amount of any payments received.
• Or, if the customer was offered a nonstandard refund policy on an order, then you can recognize revenue on that customer's invoice only after the refund policy has expired.

Features
Customer Acceptance functionality offers
1. Pre Billing and Post Billing Acceptance
2. Explicit and Implicit Acceptance.
3. It is either Full Acceptance or full rejection, as of now it doesn’t support Partial Acceptance.
4. It support ATO/PTO/KIT/Service & Standard item. Acceptance defined at the parent level (Model) only, and child will inherit that from parent (e.g. ATO/PTO Model).

Restrictions
1. OM supports only full acceptance or total rejection for each outbound order line. One can set the number of days for implicit acceptance, after the product has been shipped.
2. It does not support acceptance on RMA

Setup
1.1 Enable Fulfillment Acceptance  at OM System parameter . Once this parameter is enabled, the Accounts Receivables API is called to invoke the rules engine to validate customer acceptance on every order line.

1.2 Security for a given responsibility for the following two Functions:
a. Sales Orders: Fulfillment Acceptance – This ensures that the action attribute Fulfillment Acceptance is available in the Actions LOV.
b. Sales Orders: Update Acceptance Attributes – This allows for updating the acceptance attributes of Acceptance Name and Acceptance Expire days.These are attached to the sales order menu – ONT_ Sales_Order

2.1 Create Contingency

2.2 Define assignment rule


Business Scenarios

1. Pre Billing – Invoicing
The revenue contingency stops the sales line in creating invoices till the contingency criteria is matched.  Invoice is generated after the acceptance criterion is met; either a certain period of time has elapsed since shipment (Implicit Acceptance) or a user records acceptance using Order Information portal (Explicit Acceptance).

Invoices will only be interfaced to Oracle Receivables after the acceptance is recorded. After that Line status moves to closed and line gets interfaced to AR.
Sales Order Line Workflow process is held at Invoice Interface eligible – Pending Customer Acceptance

2. Post Billing – Customer Acceptance
The revenue contingency stops the invoice lines in creating revenues till the contingency criteria is matched. Invoice is generated upon delivery of goods/ services but the revenue recognition is deferred until the customer accepts the products/ services. Acceptance may be recorded implicitly / explicitly at the line level.
1. Invoices are created but Revenue Recognition happens once acceptance is completed
2. Sales Order Line Workflow process is held at Close Line Eligible – Pending Customer Acceptance

3. Implicit Acceptance
acceptance is automatically after specific interval for specified transaction. An Implicit Acceptance Request set that records Implicit Acceptance consists of the following concurrent programs:

  • Generate Pre-billing Acceptance Program for Pre-billing, Implicit Acceptance
  • Revenue Contingency Analyzer for Post-billing, Implicit Acceptance

4. Explicit Acceptance
Revenue contingency needs an explicit acceptance. Acceptance can be done through :

  • Order Information Portal,
  • Sales Order Actions –Fulfillment Acceptance from Header or Lines.
  • Order Import.