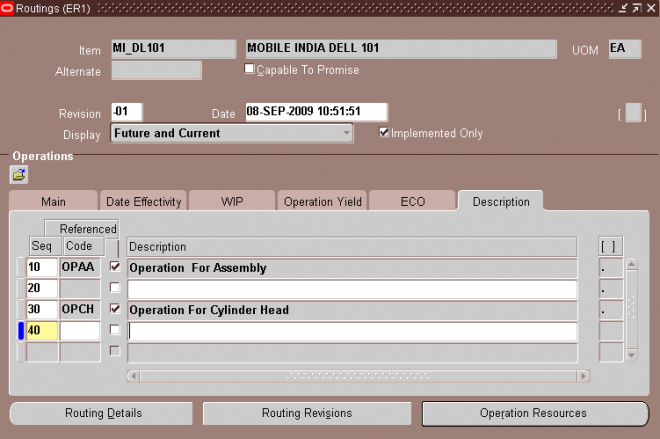
Routing Basics
A routing defines the step-by-step operations you perform to manufacture a product. Each routing can have any number of operations. For each operation you specify a department that determines the resources you may use for that operation.
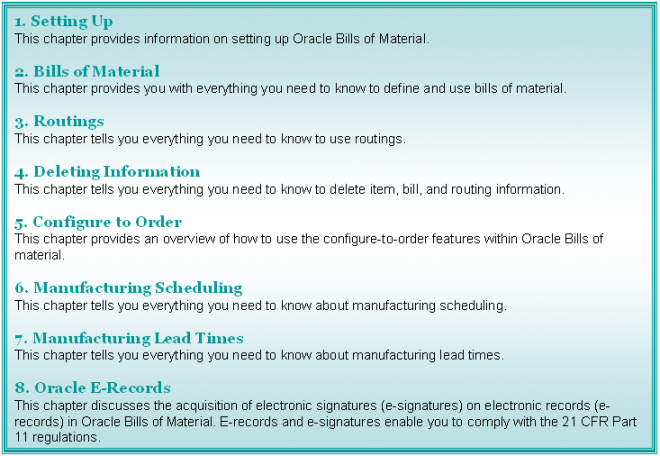
A primary routing is the list of operations most frequently performed to build a product. You can define one primary routing and many alternate routings an item. When you define a new primary routing, you specify only the item (no alternate name) and you can assign a routing revision. For example, you can define a routing for an item that includes two operations-an assembly and a testing operation. You typically build your product with these operations, so you define this routing as the primary routing for the item.
The following table presents an example primary routing.
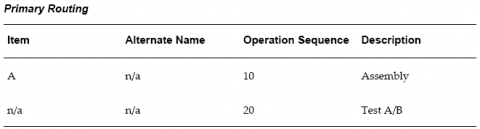
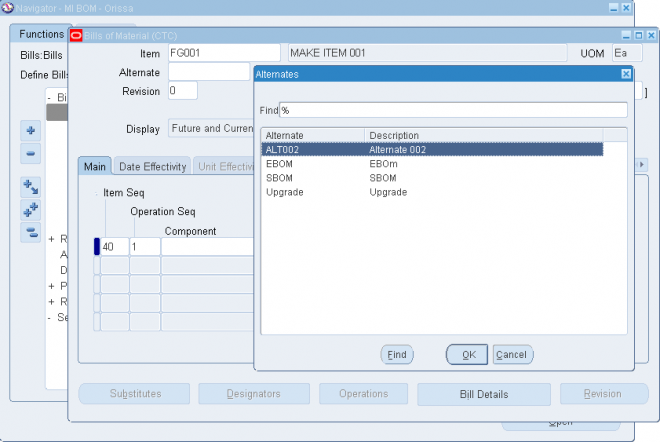
You can define an alternate routing to describe a different manufacturing process used to produce the same product. Unlike a new primary routing, specify the item and alternate name to define an alternate routing. You must define a primary routing before you can define alternate routings, and you can define any number of alternate routings for an item. For example, you have three test machines, one new machine capable of performing both tests A and B and two older machines that can only perform test A or test B. Ideally you would like to use the new machine that can perform both tests, but if it is unavailable, you use the other machines to complete the job.
The following table presents an example of a primary and alternate routing for Item A.
Bills and routings can share alternate labels. If you create an alternate bill with the same label as an alternate routing, components are assigned to operations on the alternate routing. If there is no routing with the same alternate label, components are assigned to operations on the primary routing.
Creating a Routing
You can create a routing manually, copy an existing routing, or reference a common routing.
Prerequisites
1. You must define at least one department before you can create a routing.
2. BOM Allowed must be set to Yes for the item you are creating a routing for.
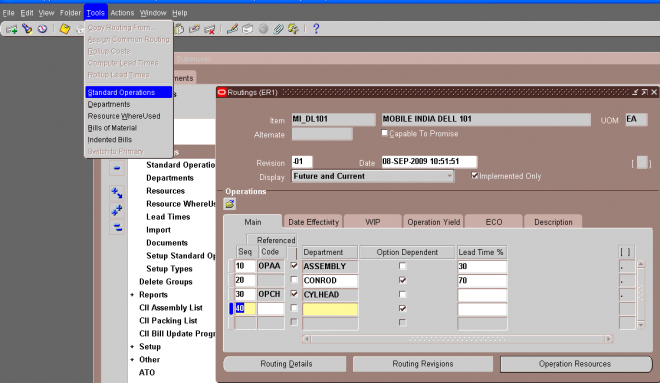
The procedure below describes how to manually create a routing.
1. Enter a manufacturing item to create a routing for.
2. If you are creating an alternate routing, enter an alternate. For a primary routing, do not enter an alternate.
3. If you are updating an existing routing, enter the routing revision and the effective date.
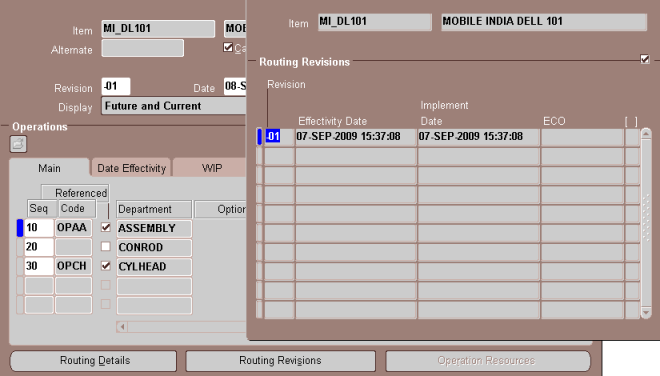
To update the revision, choose the Routing Revisions button to open the Routing Revisions window.
4. If you would like this routing to be capable to promise, then select the Capable to Promise checkbox.
Note: Capable to promise describes an available to promise calculation that considers both available material and capacity of
manufacturing and distribution resources. You are able to define one and only one CTP routing for each item.
5. Select a display option to display All, Current, or Future and Current operations effective as of the revision date you specify.
Manufacturing Scheduling
Oracle Manufacturing schedules production orders and operation dates using three scheduling methods:
- Detailed scheduling
- Repetitive line scheduling
- Dynamic lead time offsetting
Oracle Manufacturing uses scheduling methods along with lead-time information to help you:
- Promise ship dates for orders
- Plan material
- Plan resources
- Purchase material
- Schedule material
- Schedule resources
Oracle Manufacturing Products and Scheduling
The following table lists the Oracle Manufacturing products that schedule orders and operations, and indicates their scheduling method:
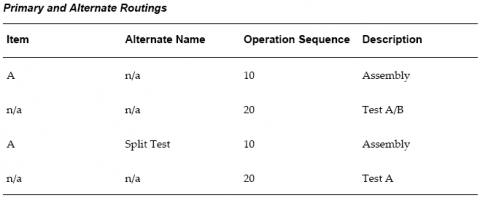
Detailed Scheduling
Detailed scheduling is based on detailed resource availability and usages and is the most precise scheduling method in Oracle Manufacturing. It takes into account minute to minute resource availability information as well as exact resource requirements from routings to schedule precise start and end dates and times for jobs and operations. Detailed scheduling is an infinite scheduling algorithm-so it does not take into account load from other discrete jobs. However, you can simulate the scheduling impact of the load by adding queue, move, and wait resources.
Job and Operation Scheduling
Oracle Work in Process schedules discrete jobs using detailed scheduling. Each resource required on a job is scheduled consecutively. Work in Process can either forward schedule, backward schedule, or both from an operation. Work in Process schedules repetitive production using repetitive line scheduling, schedules each resource in sequence based upon the shift workday calendar, amount of the resource required, and the number of assigned resources that can be simultaneously scheduled.
Repetitive Line Scheduling
Repetitive line scheduling is based on production line attributes including start and stop times, line speed, line capacity, and lead time. Repetitive line scheduling uses your workday calendar and the line start and stop times rather than detailed resource shift availability.
Define Production Lines
Work in Process lets you define production lines and specify a start and stop time for each line. You must also specify the minimum and maximum hourly rate on each line, and specify whether a line's lead time is fixed or routing based.
Repetitive Assembly For lines
with a lead time basis of Fixed, you must enter a fixed lead time. Oracle Manufacturing uses this fixed lead time for all repetitive assemblies assigned to the line. For lines with a lead time basis of Routing-based, you can automatically compute manufacturing lead time based upon a repetitive assembly's routing. Work in Process lets you specify the production line where you build each assembly and the line speed determines the production run rate to shedule that assembly on that line. If you have a fixed speed line, all assemblies should use the same line speed. For variable speed lines, you need to specify different speeds for each assembly. The line speed for any particular assembly cannot exceed the line's maximum rate.
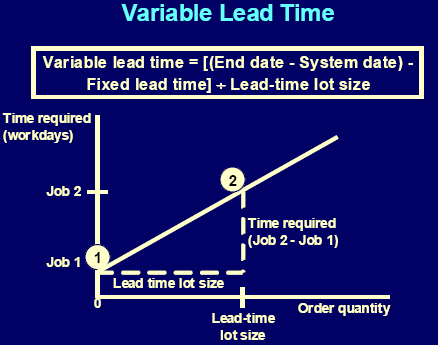
Dynamic Lead Time Offsetting
Dynamic lead time offsetting is based on order quantity, lead times, and the workday calendar. It is a faster scheduling method that quickly estimates the start date of an order, an operation, or a resource.
Dynamic lead time offsetting always computes a date that is a particular number of days from a specified date in the workday calendar. It accounts for changes in lead time based on order quantity, using the fixed and variable components of manufacturing lead time, as well as operation and resource offsets.
Uses of Dynamic Lead Time Offsetting
Oracle Manufacturing functions whose processing performance is most critical use dynamic lead time offsetting while other functions that schedule exact operation and resource start and end times use detailed scheduling.
For example, Master Scheduling/MRP generates MRP plans as quickly as possible, so it schedules planned order start dates using dynamic lead time offsetting. Work in Process, however, uses detailed scheduling to schedule jobs since it schedules resource usages in departments with exact start date, end dates and times, not scheduling a resource when one is not available.
Results from detailed scheduling and dynamic lead time offsetting may differ. The more resource availability exceptions and capacity modifications from the workday calendar you have, the more detailed scheduling results differ from dynamic lead time offsetting results. Assigning preprocessing lead time to manufactured items can also produce different results; detailed scheduling does not use lead times in its calculations while dynamic lead time offsetting does.
Manufacturing Lead Times
This chapter tells you everything you need to know about manufacturing lead times. This chapter covers the following topics:
- Overview of Lead Time Management
- Calculating Lead Times
Computed vs. Assigned Lead Times
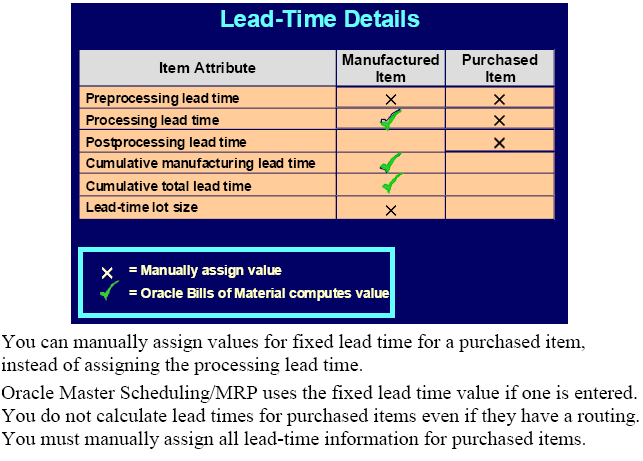
For manufactured items, you can automatically compute manufacturing(processing) and cumulative lead times for a specific item or a range of items. You can also maintain this information manually. You must manually assign all lead time information for purchased items.
Note: You can calculate manufacturing and cumulative lead times for manufacturing or engineering items.
Updating the values assigned to your lead times may impact functions that use dynamic lead time offsetting- such as material and resource requirements planning. Updating cumulative lead times can also impact material plans and available to promise calculations if these lead times are used to set time fences.
Item Lead Time Attributes
For all scheduled time elements, which are less than the standard workday, the system will compute the lead time day by dividing the lead time element by 24. The standard workday is defined in the workday calendar. Oracle Manufacturing stores the following lead time information for each item:
1.1. Preprocessing Lead Time: A component of total lead time that represents the time required to release a purchase order or create a job from the time you learn of the requirement. You can manually enter preprocessing lead time for both manufactured and purchased items.
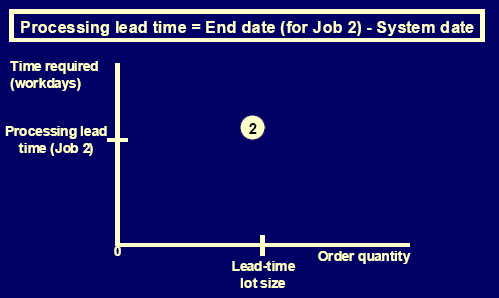
1.2. Processing Lead Time: The time required to procure or manufacture an item. You can compute processing lead time for a manufactured item, or manually assign a value. Processing lead time is computed as the time as total integer days required to manufacture 1 lead time lot size of an item. You must manually assign a processing lead time for purchased items. Processing lead time does not include preprocessing and postprocessing lead times.
For Manufacturing item processing lead time = fixed lead time + (variable lead time * lead time lot size)
1.3. Post Processing Lead Time: A component of total lead time that represents the time to make a purchased item available in inventory from the time you receive it. Manually enter postprocessing lead time for each purchased item. Postprocessing lead time for manufactured items is not recognized.
2.1. Fixed Lead Time: The portion of manufacturing lead time that is independent of order quantity. You can enter this factor manually for an item, or compute it automatically for manufactured items.
2.2. Variable Lead Time: The portion of manufacturing lead time that is dependent on order quantity. You can enter this factor manually for an item, or compute it automatically for manufactured items.
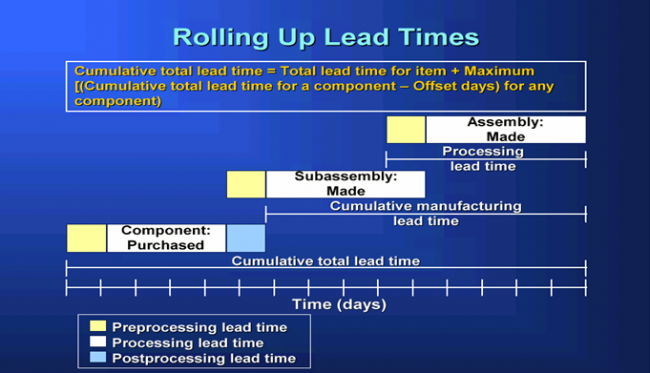
2.3. **Total Lead Time**: The fixed lead time plus the variable lead time multiplied by the order quantity. The planning process uses the total lead time for an item in its scheduling logic to calculate order start dates from order due dates.
3.1. Cumulative Manufacturing Lead Time: The total time required to make an item if you had all raw materials in stock but had to make all subassemblies level by level. Oracle Bills of Material automatically calculates this value, or you can manually assign a value.
3.2. Cumulative Total Lead Time: The total time required to make an item if no inventory existed and you had to order all the raw materials and make all subassemblies level by level. Bills of Material automatically calculates this value, or you can manually assign a value.
3.3. Lead Time Lot Size: The quantity you use to calculate manufacturing lead times. You can specify an item's lead time lot size to be different from the standard lot size.
4. Dynamic Lead Time Offsetting: A scheduling method that quickly estimates the start date of an order, operation, or resource. Dynamic lead time offsetting schedules using the organization workday calendar.
Imp Note
1. Oracle MRP/Master Scheduling considers preprocessing lead time when offsetting dates.
Oracle Bills of Material and Oracle Engineering do not consider preprocessing when computing manufacturing (processing) lead time.
2. Dynamic Manufacturing Lead Times (Fixed lead times, variable lead times and processing lead times) for manufacturing items are claulated by running the Manufacturing Lead Time GUI from Routing window.
Cumulative manf lead time and cumulative total lead times can be calculated by running Rollup cumulative lead times (Cumulative Lead Times for Report Set) request either from bill/Routing window.
Manufacturing Lead Time Computations
Oracle Manufacturing uses Item, routing, operation, and resource information to compute fixed, variable, and processing lead times for manufactured items.Item and routing information is updated as part of the computation. Lead times are not calculated for purchased items even if they have a routing.
When computing manufacturing lead times, primary routings are automatically updated with lead time and offset percents. As with the item lead time attributes, you can also manually assign these values.
Lead Time Percent
Oracle Manufacturing stores the lead time percent for each routing operation as the percent of manufacturing (processing) lead time required for previous operations, calculated from the start of a job to the start of an operation.
For example, if an item's manufacturing lead time is two days and the primary routing has two operations with the same duration (1 day), the first operation's lead time percent is zero and the second operation's lead time percent is 50%.
Offset Percent
Oracle Manufacturing stores the offset percent for each resource on a routing operation as the percent of manufacturing (processing) lead time required for previous operations, calculated from the start of the job to the start time of a resource at an operation.
For example, both operations in the previous example for lead time percent require one day (eight hours) to perform. If you have two different resources assigned to the second operation, and each resource requires four hours to complete their task, the offset percent is 50% for the first resource and 75% for the second resource.
Lead Time Lot Size
Processing lead time is computed as the time required to complete 1 lead time lot size of an item (the time required to complete the second scheduled job). Bills of Material determines an item's lead time lot size from two item master fields: standard lot size and lead time lot size.
For items that you plan and cost by the same lot size, you can specify a value only for the standard lot size. Bills of Material then computes manufacturing lead time using the standard lot size quantity.
For items that you plan with one lot size and cost with a different lot size, you can enter a lead time lot size. Bills of Material then calculates manufacturing lead time using this value (rather than the standard lot size). If an item does not have a value for the standard or lead time lot size, Bills of Material uses a quantity of one to compute manufacturing lead times.
Fixed and Variable Lead Times
You can automatically compute processing, fixed, and variable lead times for manufactured items, whether they are produced using discrete jobs or repetitive schedules.
A value of zero is assigned to the fixed, variable, and processing lead times of a manufactured item that does not have a routing and is not assigned to a production line
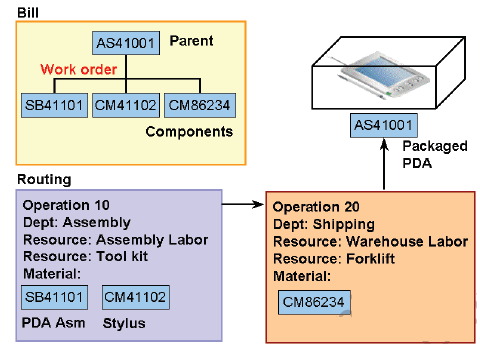
Bills of Material
Oracle Manufacturing and Oracle Order Management use bills of material to store lists of items that are associated with a parent item and information about how each item is related to its parent. Oracle Manufacturing supports standard, model, option class, and planning bills of material.
Standard Bill of Material
A standard bill of material is the most common type of bill and lists the mandatory components, the required quantity of each component, and information to control work in process, material planning, and other Oracle Manufacturing functions.
Examples : include bills for manufacturing assemblies, pick-to-order bills, kit bills, and phantoms.
A configuration bill (a type of standard bill) is a set of option choices made from a model bill that comprise a buildable, sellable product. Configuration items and bills are automatically created from model bills after a customer chooses options on a sales order. Or, you can manually create configuration bills by choosing options directly from a model bill.
Model Bill of Material
A model bill of material defines the list of options and option classes you can choose in Oracle Order Management to order a configuration. A model bill also specifies mandatory components or included items that are required for each configuration of
that model.
- You do not order or build the model itself: you order and build configurations of the model.
- A model bill can be either assemble-to-order or pick-to-order.
Option Class Bill of Material
An option class is an item that groups optional components on a bill. An option class is an item that becomes a level in your model bill of material. Option classes can also have mandatory components that apply for all of its options. For example, when you order a computer, the monitor is an option class, and the specific type of monitor you order is an option within that option class. An option class bill can be either assemble-to-order or pick-to-order.
Planning Bill of Material
A planning bill of material is a bill of material structure that includes a percentage distribution for its components. The percentages associated with the components on a planning bill of material do not need to add to 100%. You can define alternate and common planning bills, where the bill you reference as a common must be another planning bill.
Planning items can be nested within one another any number of times. When you nest planning items, Oracle Master Scheduling explodes forecasts level by level and applies planning percentages at each level.
Engineering Bills of Material
You can define an engineering bill of material as an alternate for a manufacturing bill. The typical use for an alternate engineering bill is to prototype variations from the primary bill that produce the same assembly.
You can specify a list of item catalog descriptive elements for model and option class engineering bills. After you release the engineering bill to manufacturing and take customer orders for specific configurations, Bills of Material creates the new
configuration item and automatically assigns values to each catalog descriptive element.
Oracle Engineering users are allowed to assign manufacturing and engineering items as components to an engineering bill. Bills of Material users can assign only manufacturing items as components to manufacturing bills.
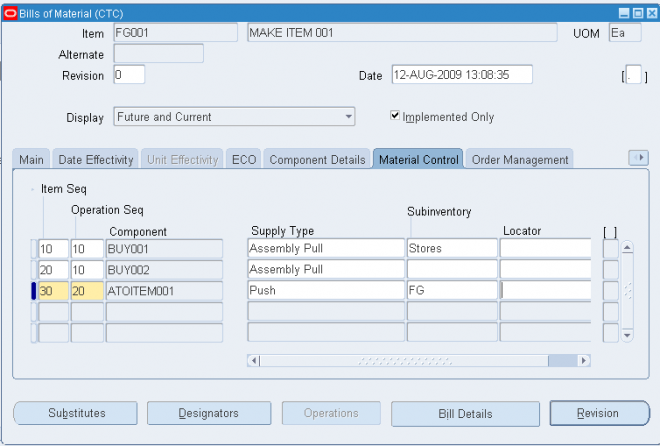
WIP Fields
Count Point and Autocharge
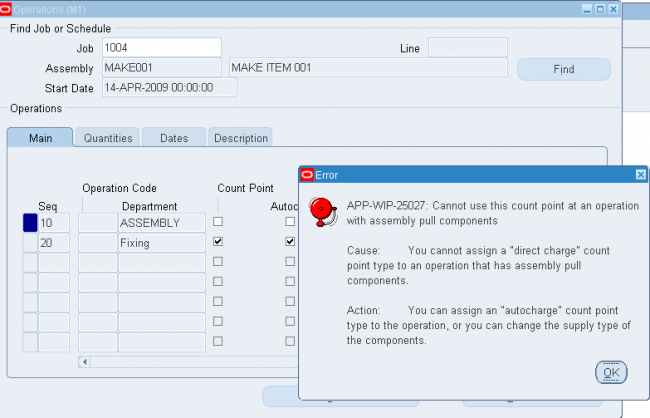
When you define operations in Oracle Bills of Material, you can specify whether an operation is a count point and whether resources at that operation should be automatically charged during a move transaction. You can update this information in Work in Process using the Operations window. Operations that are non-count point/autocharge operations must be defined as backflush operations.
You can define which operations in a routing record move transactions (and there by do the backflushing if its enabled) by defining how resources are consumed at that operation. The Count Point and Autocharge check boxes work together. In the following discussion, the Count Point and Autocharge check boxes can be set to either on or off. However, you cannot set Count Point on and Autocharge off.
When you move assemblies from an operation with Count Point on / Autocharge on operation to another count point operation set the same way, Work in Process automatically completes all Count Point off / Autocharge on count point operations between them.
To transact a Count Point off / Autocharge off count point operation, you must explicitly move assemblies into and out of that operation. Moving assemblies past a Count Point off / Autocharge off count point operation acts as though the operation did not exist in the routing. This is particularly useful for rework or debug operations that are performed on a portion of the assemblies you process.
If you issue components with a supply type of Operation pull to an assembly at a Count Point off / Autocharge off count point operation, Work in Process backflushes these components when you move out of the Count Point off / Autocharge off count point operation into a count point operation that allows backflushing. Work in Process never pulls components with a supply type of Assembly pull from Count Point off/ Autocharge off count point operations. However, you must turn Backflush on for Count Point off / Autocharge off count point operations. The Backflush field should always be turned on for the last operation in a routing.
Notes
1. If count point is on then auto charge needs to be on.
2. If Both count point and auto charge are off then backflush needs to be on.
3. When count point is on and blackflush is on we dont need to explicitly do the move transaction to and from the operation to do material transaction but if count point is off(and thus autocharge) and balckflush is on then we need to do a move transaction to and from that operation to make the backflush takes place
Ex:
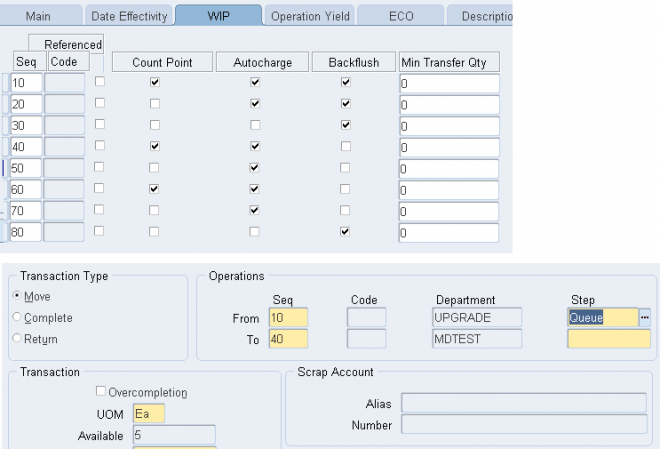
OP seq Count-Point Autocharge Backflush
10 Y Y Y
20 N N Y
30 N Y Y
40 Y Y Y
In the above example if we move from Op 10 to 40(To Move) then resource charges takes place @10,30 & 40 but backflush takes place only @ 10 and 40 though 20 and 30 are also backflush enabled.
To make backflush @20 we need to explicitly move to OP20. i.e we need to do move transaction from OP10 to OP20 and then OP20 to OP 40
Again if we need backflush @30 then we need to from OP20 to OP30 and then OP30 to OP40.
Effects when Count point is OFF
Let consider a routing as shown below
2. If we select 60 as the To operation then system 'll record only the operation step 40 and all the resources attached in between operation seq 10 to 60 'll be charged and backflush 'll takes place if its enabled.
3. If we do move transaction directly from 10 to 40 then no backflush takes place @opration 20 and 30 though for both backflush is enabled.
But if we do a transactio to either 20 or 30 then we'll force the system to backflush the material at that point.
Example Count Point & Auto charge Operations
In the following example, the routing has five operations. The second and fourth operations are not count points, and you must explicitly move units in and out of the fourth operation if you want to charge the job or repetitive schedule for the consumed resources.
The following table presents an example of count point operations.
Operation Sequence Description Count Point Autocharge Backflush Instructions
10 Assembly 1 Yes Yes Yes n/a
20 Assembly 2 No Yes No n/a
30 Painting Yes Yes Yes If color and texture do not meet standards, send to Op 40. If job meets standards, send to Op 50.
40 Painting Rework No Direct charge Yes Sand finish and repaint to meet standards.
50 Packaging Yes Yes Yes Ship directly to customer site when finished with this operation.
Count Point off / Autocharge on
Assign this count point to operations that you always perform in a routing, but where you do not want to monitor assembly moves into, out of, and through the operation. For example, choose this count point for non-bottleneck operations that are not labor or time-intensive, such as inspection or minor assembly operations.
Work in Process automatically completes the operation and charges its WIP move resources to your job or schedule when you record a move transaction through or beyond the operation, as with Count Point on / Autocharge on count point operations. Work in Process does not default the operation, unlike Count Point on / Autocharge on count point operations. You can still record movements into, out of, and through the operation by overriding the default in Work in Process.
Count Point off / Autocharge off
Assign this count point to operations that you do not typically perform in a routing. For example, a rework operation that you only perform on occasion. If you choose this count point for an operation, Work in Process does not complete the operation and charge its resources to your job or schedule unless you explicitly record a move transaction into and through the operation.
Work in Process does not default the operation. You can still record movements into, out of, and through the operation by overriding the default in Work in Process.
Count Point on / Autocharge on
Assign this count point to operations you want to automatically default as destination operations in the Move Transactions window. You should always assign this count point to the final operation in a routing, to insure that you record move transactions into the operation, and then record completion transactions.
You can automatically complete and charge operations in a routing with this count point. Work in Process automatically completes an operation and charges its WIP Move resources to your job or schedule when you record a move transaction through or beyond the operation.
For operations that you always perform in a routing, you can also monitor assembly moves into, out of, and through the operation. For example, choose this count point for critical, time-intensive, or bottleneck operations.
Backflush
Indicate whether to backflush components on shop floor moves at this operation. A backflush transaction automatically pulls Operation pull components from inventory. Work in Process also pulls all Operation pull components at non-backflush operations preceding this operation (through the previous completed backflush operation.)
Minimum transfer quantity
Enter the minimum transfer quantity of assemblies to move from this operation to the next. Work in Process will warn you if you attempt to move a number less than this value. If you used a standard operation, this value defaults to minimum
transfer quantity defined for the standard operation. Otherwise the default is 0.
Bills of Material Parameters
Use bill of material parameters to define modes of operation and default values for an organization that affect functions such as bill definition, bill deletion, and assemble-to-order configuration numbering.
Define bill of material parameters for each organization in which you use bills or routings. (Bill parameters are specific to, and must be defined for, each organization.) Doing so ensures access to resource, outside processing, and overhead cost information for certain cost management functions.
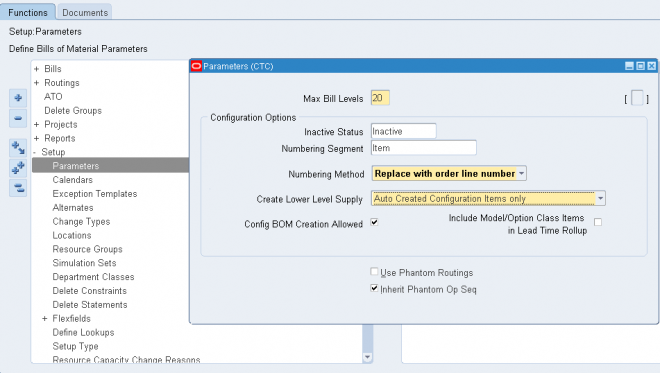
1. Enter the maximum bill levels to explode. The maximum is 60.
2.1. Enter an inactive status.
2.2. Enter the numbering segment to use when creating configuration item numbers.
2.3. Select an automatic or user defined numbering method. A unique configuration item number is automatically assigned based on the numbering method you select:
Append Sequence: Appends a sequence number to the item segment you entered for the numbering segment.
Replace with Sequence: Replace the item segment you entered in the numbering segment with a sequence number.
Replace with Order, Line Number: Replace the item segment you entered for numbering segment with the sales order and line number.
User Defined: Allows you to define a numbering scheme that meets your business needs.
2.4 Select one of the following in the Create Lower Level Supply field: - No (default value) : The system creates supply only for the top level assemble to order (ATO) item or configuration.
- Auto Created Configuration Items Only : Creates supply for any lower level configuration generated because of the specific sales order configuration. Note: This option does not create supply for any lower level configuration that was matched to a preconfigured item.
- Auto Created Configuration Items and ATO Items : Creates lower level supply for all ATO items, preconfigured items, and autocreated configured items. Note: Supply is created even for ATO items set up as standard mandatory components on the model bill. Only use this option if you do not expect to have inventory on hand for your ATO items and preconfigured items.
This parameter indicates whether or not the system creates supply for lower level configurations and assemble to order
items when progressing an order on-line in Oracle Order Management, or when using the Autocreate FAS batch program.
2.5. Check the Config BOM Creation Allowed box to allow the creation of configuration bills of material in the organization.
Check this box in all organizations in which you plan to manufacture or purchase your configurations. Uncheck the box in those organizations where a model BOM exists, but a configuration BOM is not necessary. For example, leave the box
unchecked for an Order Management validation organization that is not a manufacturing organization.
2.6. Check the Include Model/Option Class Items in Lead Time Rollup box to include models and option classes when rolling up cumulative lead times. If you leave this box unchecked, the cumulative lead time calculations are not performed for model or option classes.
3. If you would like Work in Process to maintain the individual operation sequence numbers for phantom subassemblies, and to charge their resource and overhead costs to the parent or higher level assembly, you set the following two parameters in Oracle Bills of Material:
3.1 Use Phantom Routings: Set this parameter to specify whether phantom routing resources and overhead costs (including those for outside processing resources assigned to phantom routing operations) are charged to the parent or higher level assembly. Setting this parameter also implies department inheritance for resources; thus, phantom resources can be used by departments that they are not owned by or assigned to as a borrowed resource. You set the parameter at the inventory organization level and it then applies to all phantoms within a single inventory organization. These are its two values:- Yes: If you select this value, phantom routing components and resources and overheads are included in the cost of the higher level assembly. Routing resource costs are also included in capacity planning.
- No: This is the default. This value specifies that only components are included in the higher assembly's cost, not resources and overheads.
3.2 Inherit Phantom Op Seq: Set this parameter to specify whether phantom subassembly components inherit the operation sequence number of their parent or higher level assembly, or maintain their own operation sequence number. This parameter is set at the inventory organization level, and applies to all phantoms within a single inventory organization. The parameter has these two values:- Yes: This is the default. This value specifies that phantom subassembly components inherit the operation sequence number of their parent or higher level assemblies.
- No: If you select this value, phantom subassembly components maintain their own operation sequence numbers
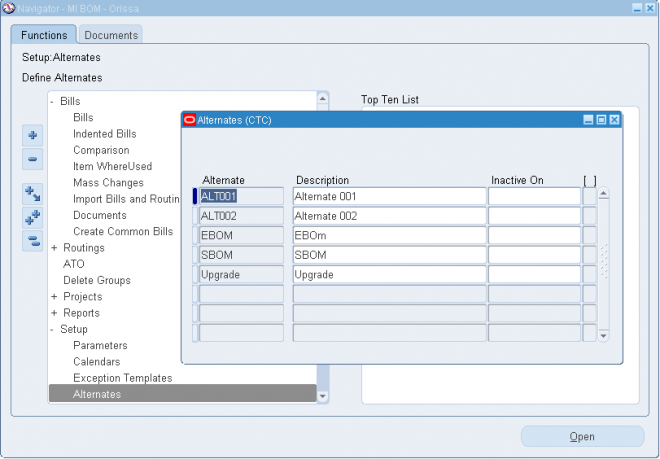
Creating Alternates
An alternate bill describes an alternate list of component items that produce an assembly. An alternate routing describes an alternate manufacturing process that produces an assembly.
To create or update an alternate:
1. Navigate to the Alternates window.
2. Enter an alphanumeric string to describe a unique alternate.
3. Enter a date that the alternate is inactive on. As of the inactive date, you can no longer assign the alternate to a bill of material or routing.
Once an alternate is defined we can create different BOM/Routing structure of the same item with different alternate names.
Custom Deletion Statements and Constraints
You can create custom deletion statements to specify from which database table to delete data that meets the deletion constraint criteria. Create custom deletion constraints to enforce your unique business rules. Custom deletion constraints identify the rows in a table that meet certain conditions for deletion.
Oracle provides seeded deletion statements and constraints, which you can view using the Deletion Statements and Deletion Constraints windows. You cannot modify seeded deletion statements and constraints, though.
To create a custom deletion constraint:
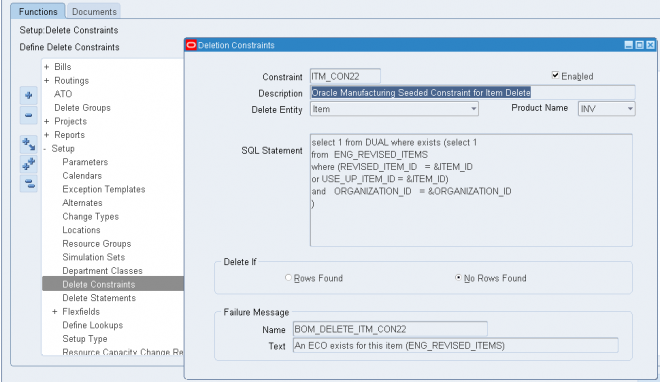
1. Navigate to the Deletion Constraints window.
2. Enter a name for the deletion constraint.
3. Indicate whether the constraint is enabled. An enabled deletion constraint means that it is in effect when the delete concurrent program runs.
4. Select what kind of delete entity the constraint applies to: item, bill, routing, component, or operation.
5. Select the name of the product that applies to this deletion constraint. The Product Name field enables you to group deletion constraints by product.
6. Enter the SQL Select Statement that the delete concurrent program is to execute. You cannot update SQL statements for predefined deletion constraints.
7. Indicate whether to delete if there are rows found or no rows found by the SQL Select Statement.
8. Enter a failure message from Oracle Application Object Library's message dictionary to display if the delete fails.
To create a custom delete statement:
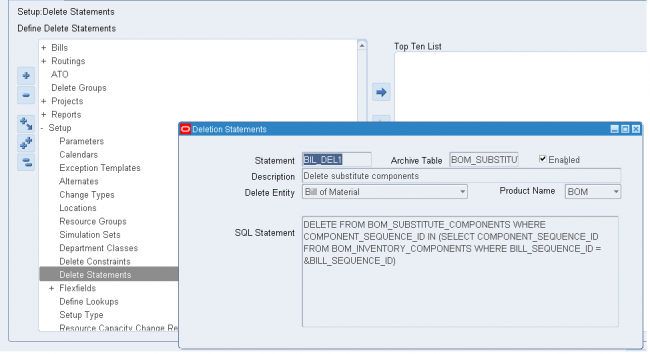
2. Enter a name for the deletion statement.
3. Indicate whether the statement is enabled. An enabled deletion statement means that it is in effect when the delete concurrent program runs.
4. Select what kind of delete entity the constraint applies to: item, bill, routing, component, or operation.
5. Select the name of the product that applies to this deletion statement. The Product Name field enables you to group deletion statements by product.
6. Enter the SQL Delete Statement that the delete concurrent program is to execute. You cannot update SQL statements for predefined deletion statements.
Department
- A department is an area within your organization that consists of one or more people, machines, or suppliers, where you want to collect costs(using resources), apply overhead, and compare load to capacity.
- You assign a department to each operation in a routing, and assign resources that are available for that department.
When you define a department, you specify any department overhead costs and the resources that are available. You can enter multiple resources for each department. For each resource, you can specify the shifts that the resource is available. For each resource shift, you can also specify capacity modifications that change the available hours per day, units per day, or workdays.
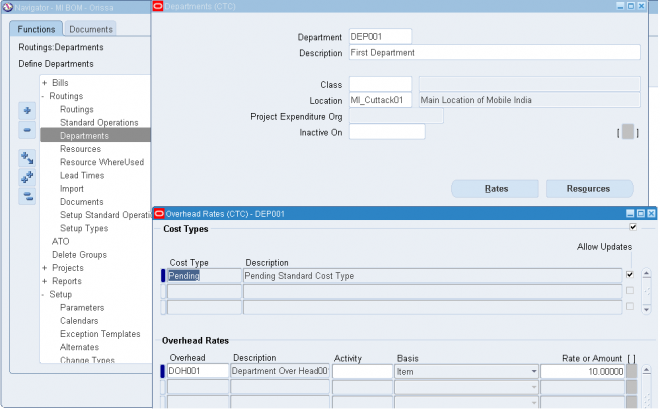
1.1. Enter a name for the department unique for the organization.
1.2. Optionally, enter a department class.
1.3. Enter a location for the department.
1.4. Enter a project expenditure organization.
1.5. Optionally, enter an inactive date on which you can no longer assign this department to routing operations.
2.1. Enter the Scrap Account in order to charge the departments that have scrapped material. This field is displayed for Shop Floor Management enabled organizations.
2.2. Enter the Estimated Absorption Account to estimate the expected scrapped material. This field is displayed for Shop Floor Management enabled organizations that have enabled estimated scrap accounting.
3.1. Choose the Rates button to view the overhead rates for the department.
3.2. Choose the Resources button to assign and update resources to the department.
Note: If you have Oracle Warehouse Management installed, the Departments form is used to group resources that may be needed together, to perform tasks. For example, a warehouse may define a refrigerated picking department, which has all the machine and manual resources associated to it that are required to perform a refrigerated picking task. A warehouse can also use a picking department, or a generic task department with all resources associated that are used for warehouse task management.
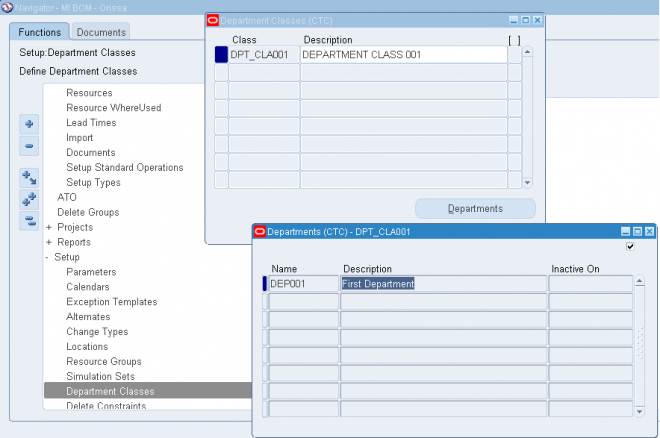
Department Class
Use department classes to group departments for shop floor scheduling and control, and to identify manufacturing cells and flexible machine centers. Department classes are used for reporting purposes.
1. Enter text that uniquely describes the department class. For example, you could use ASSY to group all final assembly departments.
2. Choose the Departments button to display the departments assigned to this department class and the dates when these departments can no longer be assigned to routing operations.
Note: Assign departments to classes when you define departments.
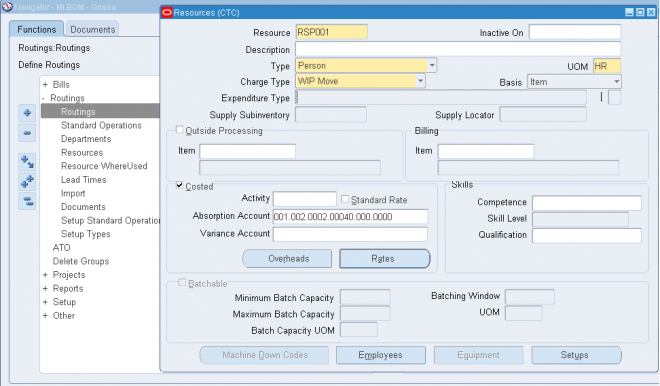
Resource
Use resources to define the time an assembly spends at an operation and the cost you incur at the operation (Both Resource and Resource Over Head). A resource is anything you require to perform, schedule, or cost, including but not limited to: employees, machines, miscellenous, Amount and currency (outside processing services can be any of these type). A resource and usage rate for all scheduled activities is required in a routing. Scheduled resources can include queue, setup, run, and move time.
When you define your departments, you assign the resources available in each department and the shifts that each resource is available. For each operation you define, you specify a department and list of resources and usages. An operation can use any resource that is available in the department, but you do not need to use all resources assigned to the department.
Prerequisites:
- Before you can define resources, set up your units of measure and unit of measure conversion rates. Some resources may represent currency such as a fixed charge resource, but currency resources cannot be scheduled since their unit of measure is not time-based.
- Set the site level profile option BOM: Hour UOM to hold the unit of measure that represents an hour. Oracle Work in Process prevents you from scheduling resources whose unit of measure is not in the same unit of measure class as the hour unit or measure and has no conversions defined to the hour unit or measure.
To define a resource:
Navigate to the Resources window and
1.1. Enter a resource name unique to the organization to describe the resource. For example, you could assign AS1 to signify assembler grade 1, or WE for welder.
1.2. Optionally, enter an inactive date after which you can no longer assign this resource.
1.3. Enter a unit of measure (UOM) that describes how you measure the resource. (You can update this if the BOM: Update Resource UOM profile option is set to Yes.)
Note: This field is protected from changes if this resource is used for any operation with the Scheduled field set to Yes, and if you have previously set it as a time-based UOM.
1.4. Select a resource type: Amount, Currency (the set of books currency as defined in Oracle General Ledger), Machine, Miscellaneous, Person, or physical Space.
1.5. Select a charge type - Manual, WIP Move, PO Move and PO Receipt. When an operation is completed, Oracle Work in Process records the units applied to the job or repetitive schedule in the resource unit of measure for all resources you charge manually or automatically.
1.6. Select a basis type by which to charge and schedule the resource.
Item: Charge and schedule the resource where the resource usage quantity is the amount required per assembly unit you make.
Lot: Charge and schedule the resource where the resource usage quantity is the amount required per job or schedule.
1.7. Select an expenditure type for this resource.
If the Project Cost Collection Enabled parameter is set in the Organization Parameters window, you must associate the resource with an expenditure type. You can only select expenditure types that belong to the Work in Process expenditure type class. Expenditure types are defined in Oracle Projects.
1.8. Optionally, enter the supply subinventory if the resource is a machine. The system uses the supply subinventory specified for the resource if the routing does not specify a supply subinventory.
Optionally, enter the supply locator if the resource is a machine. The system uses the supply locator specified for the resource if the routing does not specify a supply locator.
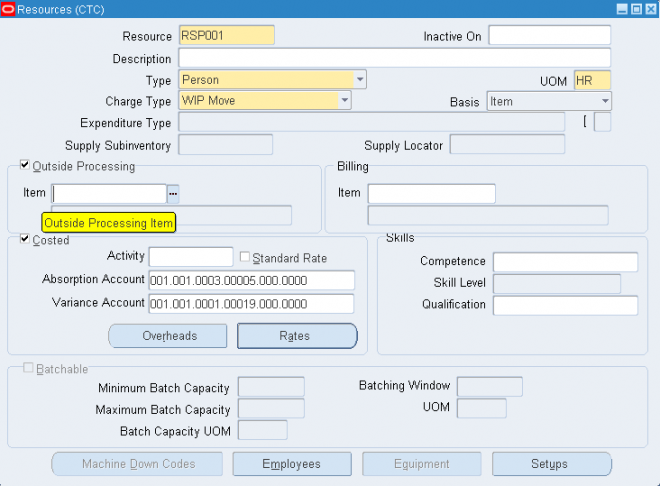
More On Resource
Outside Processing
Indicate whether to enable the outside processing resource, and if so, enter its item number.
Important: If you specify PO Move or PO Receipt, Oracle Purchasing uses this item when it creates requisitions for your
outside processing resource
Billing
If this resource services requests for maintaining assets, you can optionally enter the billable item in the Billing region Item field.
Oracle Enterprise Asset Management (eAM) can use Oracle Bills of Material resources to service requests for asset maintenance. Identifying the billable item for the resource enables eAM to determine the cost of work performed by the resource for the item.
Costed
Enable the Costed check box to collect and assign costs to this resource, and if so, optionally enter an activity for the resource. You cannot view costing information if the Privilege To View Cost Information function is excluded from the responsibility. You cannot update costing information if, in addition, the Privilege To Maintain Cost Information function is excluded. You can use activities to group resource charges for cost reporting purposes.
If this resource is costed, enter a variance account (general ledger account) to accumulate resource rate variances for a job or repetitive schedule. For outside processing resources, this is the purchase price variance account.
To define cost type and resource rate associations:
1. Navigate to the Resource Costs window. Do this by choosing the Rates button from the Resources window.
Note: You cannot view costing information if the Privilege To View Cost Information function is excluded. You cannot update costing information if, in addition, the Privilege To Maintain Cost Information function is excluded.
2. Enter or select a cost type to associate with each resource overhead rate.
3. Enter the Resource Unit Cost, that is, the resource's current standard cost per UOM.
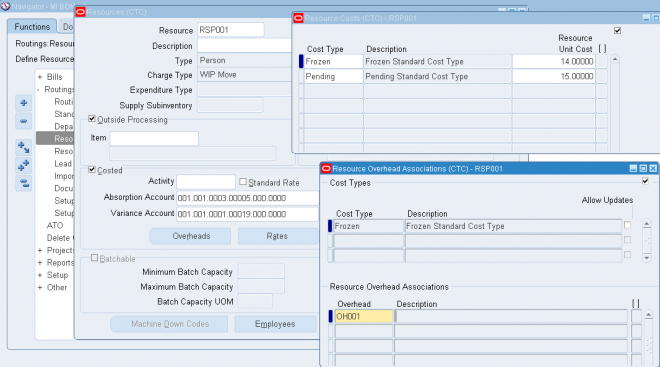
To associate overheads with resources:
1. Navigate to the Resource Overhead Associations window. Do this by choosing the Overheads button from the Resources window.
Note: You cannot view costing information if the Privilege To View Cost Information function is excluded from the responsibility. You cannot update costing information if, in addition, the Privilege To Maintain Cost Information function is excluded.
2. Enter or select the cost type for the resource. The Allow Updates check box indicates whether the cost type is defined as updatable.
3. Enter or select the overhead to associate with the resource. For example, you could assign resource cost as dollars per hour. If you enter a new resource, you can directly enter a frozen unit cost. However, you cannot directly update the frozen unit cost for a previously entered resource.
Skills
If this is a person type resource, enter the skill necessary for a particular person to act as this resource. Define the skill needed by selecting from the following fields' lists of values:
- Competence
- Skill Level
- Qualification
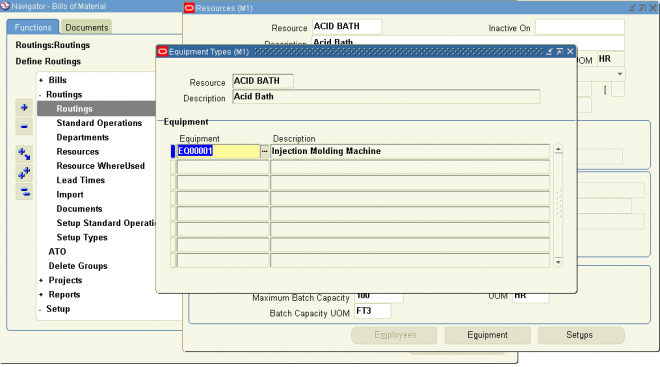
Equipment
To group similar types of equipment by resource:
You can define Equipment Types to group similar types of resources. For example, you can define an Equipment Type of Forklift.
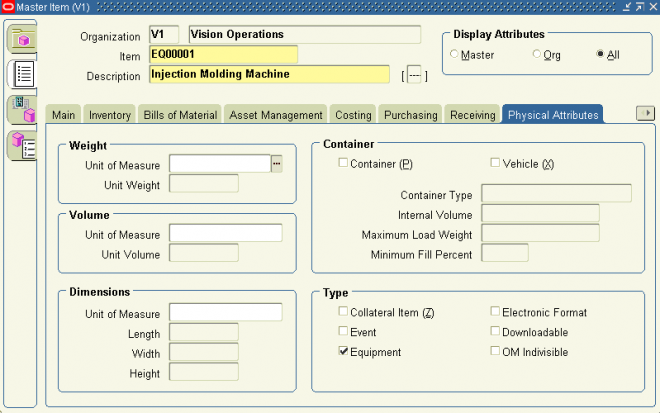
Pre-requisities
Define an item of type equipment i.e. Enable the equipment check box in the physical attribute tab.
Equipments are invenotry expense items.
1. Navigate to the Equipment Types window. Do this by choosing the Equipment button from the Resources window. You can choose the Equipment button if the Resource is a Machine type.
2. Enter an Item Number in the Equipment field.
3. Save your work.
Note: If you have Warehouse Management installed, you can use the Resources form to define a class of manual or machine
resources. For example, a forklift machine resource is indicated by entering the resource name and description, as well as which equipment items are capable of performing pallet picking.
Employees
You can define the roles which represent what an employee can do for a required task. For example, a role could be defined as Cycle Counter, or a Case Picker.
To group employees by resource:
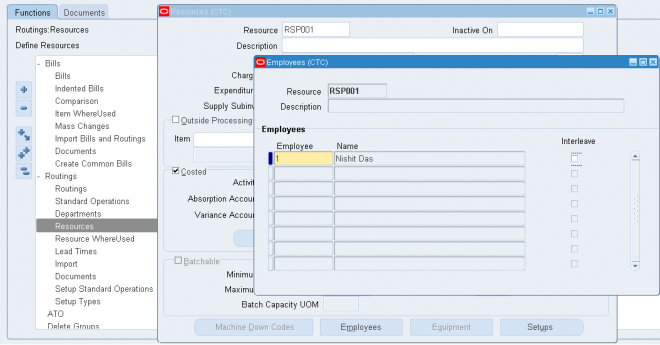
1. Navigate to the Employees window. Do this by choosing the Employees button from the Resources window. You can choose the Employees button if the Resource is a Person type.
2. Select an Employee from the list of values to associate with the resource. If you defined skills in the Resources window, then only those employees that have the competence, skill level, and qualification required for the resource appear in the
list of values.
3. Save your work.
Note: If you have Warehouse Management installed, you can use the Resources form to define employees qualified for each resource. For example, a hazardous materials manual resource is indicated by entering the resource name and description, as well as which employees are capable of performing hazardous material tasks. See:
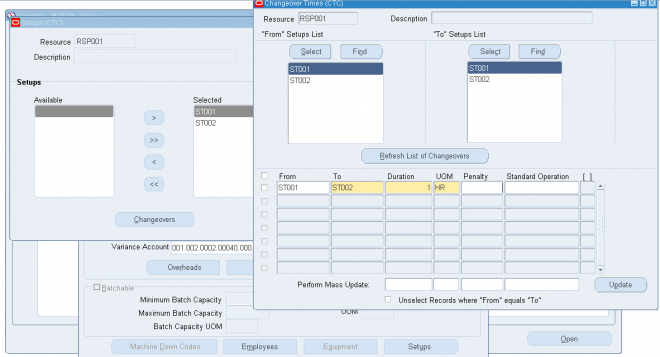
Reason for a resource capacity change
You can assign a reason for a resource capacity change in the Capacity Changes window by selecting the reason from a list
of values. Define the reasons for this list of values in the Resource Capacity Change Reasons window.
Pre-requisities
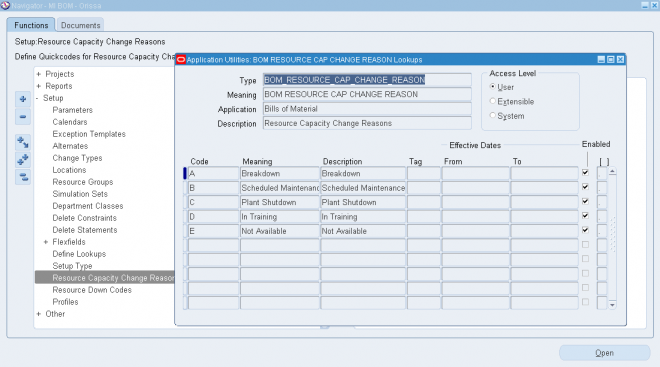
The resource capacity change reasons list of values are defined as lookups. Lookup codes must be decided upon and defined during the implementation process.
1. Navigate to the Resource Capacity Change Reasons window.
2. Enter a numeric Code for the resource capacity change reason. Oracle recommends that you enter values in increments of 10, enabling you to easily add codes later.
3. Enter the Meaning of the code, for example, Breakdown.
4. Enter a Description for the code.
5. Optionally enter a Tag to categorize lookup values. This field is for information purposes.
6. The Effective From Date defaults as the system date, but you can update this. Optionally enter a Effective To Date to indicate an expiration of the code.
7. Select the Enabled check box to enable this code for Bills of Material.
8. Save your work.
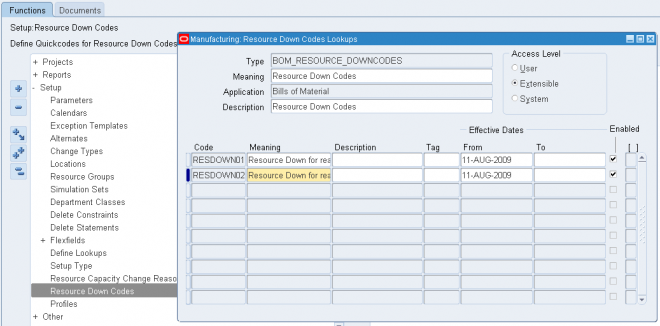
Machine Down Codes
The Machine Down Codes can be accessed and modified from lookup types menu:
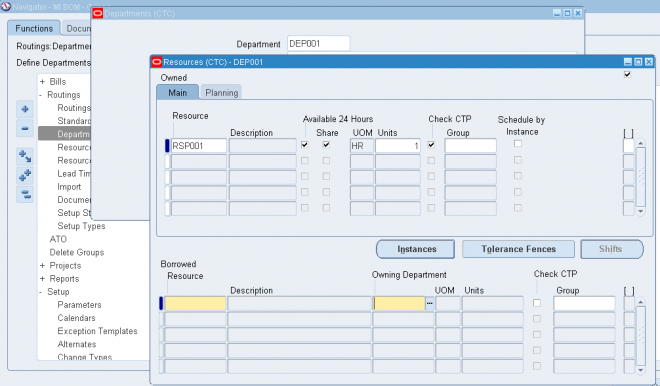
Assigning Resources to a Department
avigate to the Resources window. You can do this by choosing the Resources button from the Departments window.
The Resources window is split into owned and borrowed resources.
1.1. Enter the resource to assign to the current department.
1.2. Optionally, for owned resources, indicate whether the resource is available 24 hours a day. You cannot assign shifts to a resource that is available 24 hours a day.
1.3. For owned resources, indicate whether this department can share the resource and capacity with other departments.
1.4. Enter the number of capacity units (resource units) available for this department, for example, the number of machines for a machine resource.
Each resource can be assigned to any number of departments; multiple resources can be assigned to each department.
1.5. Optionally, select the Check CTP check box. The Check CTP check box tells the system to use this resource in a Capable to Promise (CTP) check.
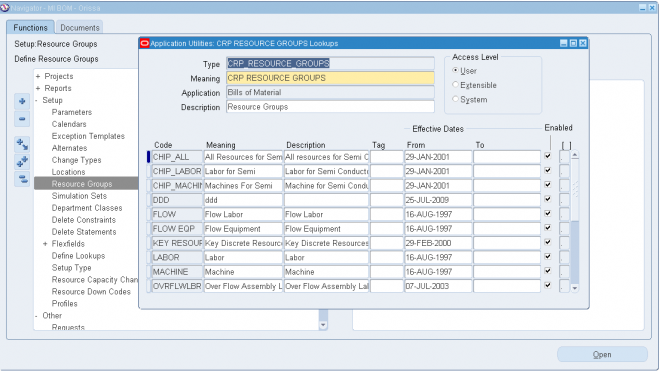
1.6. Optionally, enter a resource group for the resource in this department.
1.7. Optionally, choose the Instances button to indicate if the department resource.
2.1. For borrowed resources, enter the owning department.
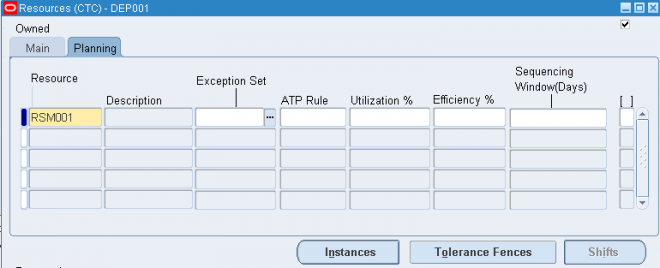
To plan for resources assigned to a department
If you are using Oracle Capacity or Oracle Advanced Supply Chain Planning to ensure that you have sufficient capacity to meet your production requirements, then enter resource availability information in the Planning tab. All fields in this tab are optional.
1. Enter an exception set. The exception sets that you assign help identify capacity problems.
2. Select an ATP rule from the list of values.
3. Enter the utilization and efficiency percentage for the resource. Use these values to calculate the available hours for a resource.
4. Enter the sequencing window (in days) to consider when optimizing the sequence of jobs running on a resource with sequence dependent setups.
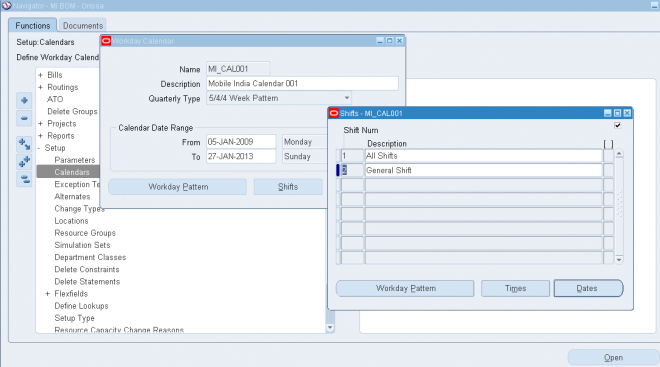
Workday Calendar
A workday calendar defines the valid working days for a manufacturing organization and consists of repeating pattern of days on and days off and exceptions to that pattern. This allows you to, for example, designate a normal workday as a scheduled downtime day, or designate a holiday as a workday.
You can define one or more workday calendars and assign them to any number of organizations, and any number of organizations can share a calendar. You can specify the start and end dates, and the weekend schedule for each calendar.
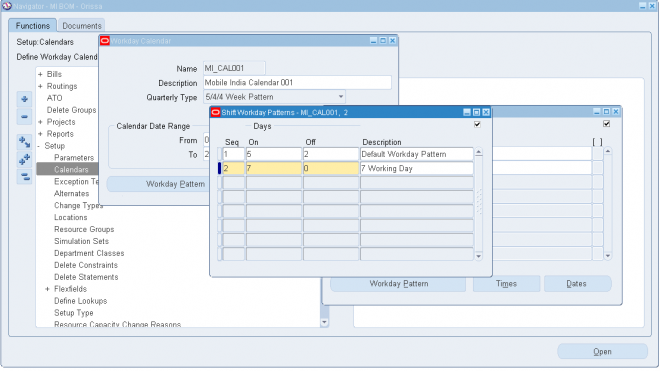
To create a workday calendar:
Navigate to the Workday Calendar window.
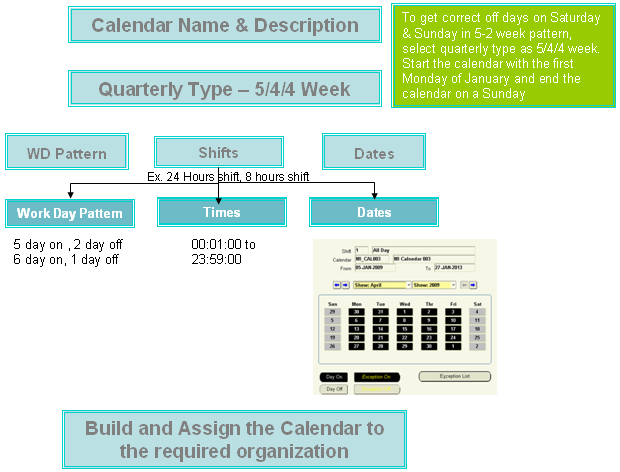
1. Enter a name for the workday calendar.

2. Select a quarterly calendar type:
4/4/5 Week Pattern: Two four-week periods followed by one five-week period.
5/4/4 Week Pattern: One five-week period followed by two four-week periods.
Calendar Months: Twelve periods per year based on calendar months.
13 Periods: Thirteen four-week periods per year.
Note: If you use Oracle Master Scheduling/MRP, choose the 4/4/5 Weekly Pattern or the 5/4/4 Weekly Pattern to report MRP information in weeks and months. Otherwise, if you choose the 13 Periods calendar or Calendar Months, you can only report MRP information in monthly buckets.
3. Enter a date range for the workday calendar. The default end date is four years from the start date.
Note: Days on and off are calculated based on the start date and the day of the week. For example, if you want a standard five day workweek to start on 01-JAN, you must enter the start date as the Monday before 01-JAN (unless 01-JAN falls on a Monday).
Note: Set profile option BOM: Week and Period Start Day, to determine the start date. This profile option works in conjunction with the Workday Calendar.
4. Continue creating the workday calendar by choosing one of the following buttons:
Workday Pattern: Set workdays on or off.
Shifts: Assign shifts to the workday calendar.
Dates: Review your work so far and its effect on the workday calendar. Do this before you build or rebuild the workday calendar you are now creating. (You can only do this after you have defined a workday pattern.)
Once you have created a workday pattern, assigned shifts, assigned workday and shift exceptions, and reviewed your work, you must build the calendar and assign it to an organization.
5. Save your work.
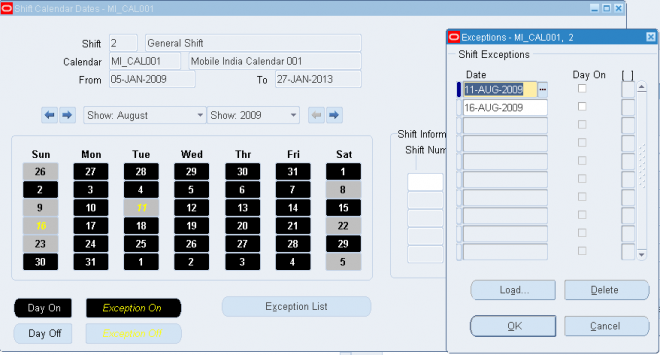
Shifts
For a given workday calendar, you can specify any number of shifts. Each shift can have a different weekend schedule and a list of specific work interval start and end times. For both calendars and shifts, you can assign sets of workday exceptions and repeating workday patterns.
Shifts inherit workday exceptions and workday patterns from the base calendar. Shift exceptions can either add to or override those of the base calendar. If an exception on the base calendar changes, those shifts that do not have an overriding exception on that date will automatically reflect the change. Those shifts that do have an overriding exception on that date will not reflect the change and must be changed manually if they are to reflect the change in the base calendar.
Shift exceptions are applied to a calendar the same way as workday calendar exceptions by selecting individual exception days, by defining exception templates, or by copying a set of exceptions from another shift. The following diagram illustrates the steps Bills of Material uses to determine workdays from an organization's workday calendar and exception template information.
Workday Patterns
You can also define a series of repeating workday patterns for a given calendar. For example, you have a repeating two-week pattern where you work five days the first week, and three days the second week. Or, you have a repeating pattern of 17
consecutive workdays, followed by four days off. When you build the calendar, Oracle Bills of Material automatically determines the valid workdays for you, based on the patterns you specify.
Workday Exceptions
There are three ways to apply exceptions to the workday calendar:
- selecting individual exception days
- loading them from an exception template, another calendar, and another calendar shift
- copying a set of exceptions from another calendar
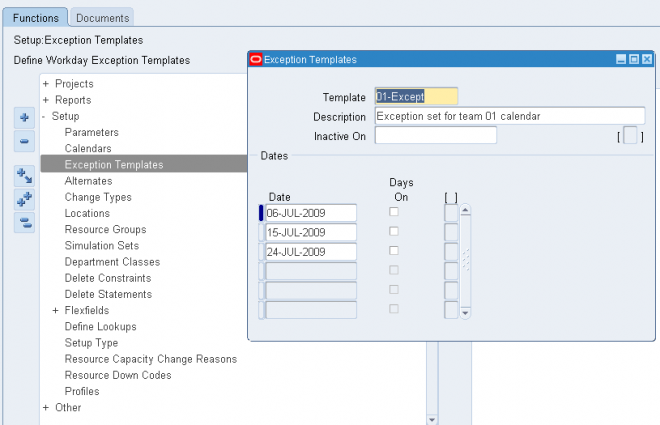
An exception template allows you to create groups of exception dates and apply them to different calendars. You can define multiple workday exception templates that define different holidays and scheduled down times for different organizations. Multiple exception templates can be applied to the same calendar. As each template is applied, new exception dates are added to the exception list for that calendar.
Conflicts on a particular date between one template and another are resolved as follows:
• if the exception date already exists in the target calendar, it is not copied
• if the exception on day falls on a workday, the exception is copied but is redundant and has no effect on the calendar
• if the exception off day falls on a non-workday, the exception is copied but is redundant and has no effect on the calendar
This allows you to define different holidays or scheduled down times, for example, for organizations in different countries. Different organizations can use the same calendar, but apply different exception dates. In addition, you can apply the same exception dates to different organizations.
You can optionally define exception templates, lists of exception dates, before you set up your workday calendar. Then when you define your calendar, you can choose an exception template, and apply its exception dates to that calendar.
BOM Business Terminologies
Assembly
It is the product which is manufactured in the Plant. It need not be the Finished goods which are shipped to ultimate customer. The intermediate product which are manufactured in the plant can also be an assembly (it could rather be called as Sub-Assembly).
Component
These are basically materials which are used for manufacturing the assembly. These components could be raw materials, consumables, by-products etc.
Valid Parent/Component Relationships
The following table lists valid components for each parent item type.
Valid Component Attributes and Bill Types
Each bill of material can have many components. For each component, you specify attributes, such as operation sequence, item sequence, usage quantity, yield, supply type, supply subinventory and locator, and others. Most of the attributes are applicable for all the components except below
1. Standrad items dont use Planning Percent, Mutually Exclusive Options, Optional Flag
2. Optional Flag and Mutually Exclusive Options are only available for Model and Option class.
Example: The front wheel of tractor is of differnt size compared to the rear wheel. So while making the BOM of tracor we 'll create a Option class as Wheel and the BOM of wheel 'll contain two types of wheel which 'll be optional and can be mutually exclusive.
While making the BOM of an option class/Model we can use the optional checkbox in OM tab (for any kind of component) and if those components are again Option class/Model then we can make them mutually exclusive.
3. For Planning components Item, Item Sequence, Effective Date Range & Planning Percent are required. rest are not mandatory
Phantom
Its an WIP Supply type. The WIP Supply type is attached to items in item master in WIP tab but while creating BOM for an assembly the WIP supply type for the components and subassembly can be changed and need not required to be same as specified in Item master.
A phantom assembly is a non-stocked assembly that lets you group together material needed to produce a subassembly. When you create a bill of material for a parent item, you can specify whether a component is a phantom. One bill of material can represent a phantom subassembly for one parent item, and a stocked subassembly for another parent item.
- Oracle Work in Process explodes through a phantom subassembly to the components as if the components were tied directly to the parent assembly. You can define routing for phantoms assemblies the same way as other assemblies. Work in Process ignores phantom assembly routings when you define a job or repetitive schedule.
- You can compute manufacturing and cumulative lead times for phantom assemblies that have routings. If you do not want to offset the components of a phantom assembly in the planning process, exclude the phantom item from the lead time calculations.
- In general, phantom assemblies behave like normal assemblies when they represent a top level assembly, such as when you master schedule them or manufacture them using a discrete job. As a subassembly, however, they lose their identity as distinct assemblies and are a collection of their components. The components of the phantom subassembly are included on the job and on the pick list of the job-not the phantom itself.
- When model or option class bills are components to another bill of material, the component supply type is phantom.
Primary & Alternate Bill
A primary bill is a list of the components you most frequently use to build a product. An alternate bill is another list of components for the same basic assembly. The primary bill is the default for rolling up costs, defining a job, and calculating cumulative item lead times.
Use alternate bills to account for manufacturing variations that produce the same assembly, by specifying the parent item number and an alternate name when you create a bill. You cannot enter new revisions for alternate bills of material.
- You must define a primary bill before you define an alternate. A primary bill can have many alternate bills. Any bill of material type can have an alternate.
- Oracle Master Scheduling/MRP uses the primary bill to plan your material. Oracle Order Management uses the primary bill for model and option class products to list available options.
- When you build an item, roll up costs, and perform other functions that use bills of material, you can specify whether to use the primary bill (the default) or an alternate bill. You can also use engineering change orders to control changes to primary and alternate bills of material.
- You can use an alternate to define an engineering bill or routing. The alternate used as a prototype variation from the primary manufacturing bill that produces essentially the same assembly.
- Bills and routings can share alternate labels. If you create an alternate bill with the same label as an alternate routing, components are assigned to operations on the alternate routing. If there is no routing with the same alternate label, components are assigned to operations on the primary routing.
Item and Routing Revisions
You can define any number of revisions for the item and any number of routing revisions for an item's routing.
Important: Item revisions and routing revisions function alike and are discussed together below. However, item revisions and routing revisions are two distinct pieces of information. They are created and maintained separately and have no influence over each other.
- Assign each revision a unique three character alphanumeric revision identifier (such as A, B, B1, and so on) and a revision date. Revisions are sorted according to ASCII rules.
- Each revision must be greater than the previous revision. Therefore, you cannot use revision 10 after revision 9 because, according to ASCII sorting, 10 precedes 9.
- Use letters and/or numbers to label revisions. Letters are always upper case and numbers may include decimals. To ensure that revisions sort properly (according to ASCII sorting rules), decimals should always be followed by a number. Therefore, valid revisions can include: A, B, 1, 2, A1, B1, 1A, 1B, 0.0, 0.1, A.0, A.1, and so on. When you create an item or a routing, the beginning revision defaults to the value for Starting Revision in the Organization Parameters window.
- When you create or update a bill of material or routing, you can choose to create a new revision or modify an existing revision. When adding new revisions, you should be sure that the revision date you enter does not overlap with other existing revision dates. Revisions are time-stamped, so you can determine the latest revision for multiple revisions defined on the same date. New revision numbers must be greater than the revision number of the currently effective revision.
- Different versions of a bill of material or routing can be defined within the same revision. You can change component information for bills or operation information for routings without modifying the revision.
For example, assume that you defined an initial revision A on 18-AUG and made a change on 20-AUG without creating a new revision. If you make another change on 22-AUG, you can create a new revision B, effective 22-AUG. There are now three different versions of the item: revision A of 18-AUG, revision A of 20-AUG, and revision B of 22-AUG.
Access Control by Item Type
Control access to bills of material by item type using the following profile options:- BOM: Standard Item Access
- BOM: Planning Item Access
- BOM: Model Item Access (also controls access to option class items)
Each profile option can have either a Yes or No value. A Yes value indicates that you can create and update bills for the associated item type. For example, you might specify No at the site level for BOM: Standard Item Access profile to restrict access for creating standard bills. But you might specify Yes for BOM: Planning Item Access profile option at the user level for specific engineers so they can update engineering bills of material for planning items.
Note: Profiles are ignored in query mode. A user with no access to any type of item can query all types of bills.
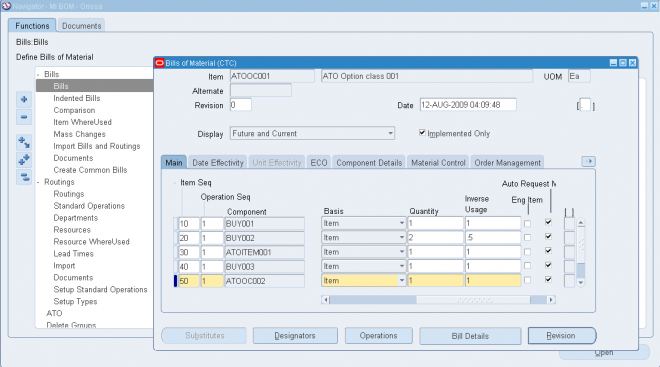
Creating a Bill of Material
A bill of material contains information on the parent item, components, attachments, and descriptive elements.
You can create an engineering, manufacturing, or asset (maintenance) bill, copy an existing bill, or reference a common bill. When you create a bill, it exists only in the current organization. To use a bill in another organization, you must either copy it or reference it as a common.
1.1. Enter the parent item for which you are creating a bill, and if you are creating an alternate bill, enter the alternate.
1.2. Enter or select the revision and the revision date.
1.3. If you are updating or viewing a bill, use the Display poplist to display all, current, or future and current components effective as of the revision date you specify.
Reference designators are used in BOM. Different RD are attached to different components in a BOM which are not lot based. RDs are comments and instructions for a particular component with business information in it.
Example : Item 001
Component 01 RD : U1
Component 02 RD : C2
RD : C2 means capacitor from supplier xyz.
Main TAB
2.1 Enter the item sequence, operation sequence, and the component item.
Item Sequence Field
The item sequence indicates the sequence of the item on the bill. It is used to sort components on reports and when choosing options from a model bill in Oracle Order Management. This defaults to the value of the highest existing component item sequence plus the value of the BOM: Component Item Sequence Increment profile option. If this profile option is not set, the default is 10. You can override or change this number.
Operation Sequence Field
Every routing carries operations. You can use the Routings form to assign operations to routings. Each operation must have a sequence number called the Operation Sequence Number.
On a bill, the operation sequence indicates the order in which you perform operations on a routing. You can have the system automatically generate Operation Sequence Numbers using a user-defined increment factor. A profile must be created where you can indicate how much the Operation Sequence Number will increment every time a new operation is generated. You can change the generated value if necessary in the Routings form. Valid values range from 1 to 9999999.
You can assign any component to any operation on the routing, including all components to the same operation (such as the first operation). The planning process assigns material requirement dates based on the operations to which you assign each component. You can define bills of material for items with or without routings. If you use routings, you can either define the bill first or the routing first.
With component-to-operation assignments, you can schedule and issue component material to the operation that requires the component on the exact requirement date. You can also assign the same component on the bill to different operations on the routing, with different usage quantities for each assignment.
If no routing exists for the item, all components default to operation sequence 1. You cannot change this value until you define a routing for the item. After you define the routing, you can update your bill of material with routing operations if you want specific component-to-operation assignments.
If you define the routing before you define a bill, assign components to valid routing operations, or an operation sequence 1 when you define the bill. If you define an alternate routing and then define the alternate bill, you can assign components to the alternate routing operations. If you define an alternate bill and no alternate routing exists, you can assign components to the primary routing operations.
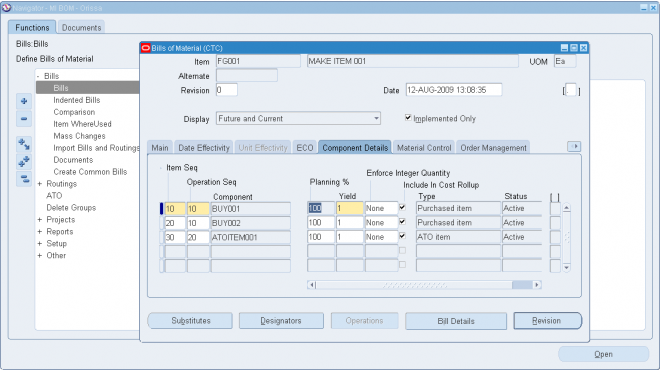
2.2 In the Basis field, select whether the quantity of the component used is a fixed amount (Lot) or increases linearly along with the quantity produced (Item). If the component quantity required increases or decreases linearly along with
changes to the work order or job quantity, then select Item. If the component quantity required remains the same regardless of the work order or job quantity, then select Lot.
Basis Field Constraints
- You can define the Basis field as Item or Lot for mandatory components in an ATO Option Class or an ATO Model bill of material.
- You can only define the Basis field as Item for option items, option classes or submodels in an ATO Option Class or ATO Model bill of material.
- You can only define the Basis field as Item when the WIP Supply Type is Phantom
2.3. In the Main tabbed region, enter either the Quantity or Inverse Usage used to make one unit of this assembly item at the current operation.
The Inverse Usage field calculates a fractional quantity for you in the Quantity field, to 42 decimal places. Use the Quantity field when the quantity used is a whole number. Use the Inverse Usage field when the quantity used is a fractional number. When you enter a value in either field, the system automatically calculates and populates the value in the other field. Inverse usage is also available using Work in Process, Shop Floor Management, and Product Lifecycle Management.
The Quantity and Inverse Usage fields can include negative or decimal values, subject to the following rules:
- Pick-to-order bills cannot have fractional component quantities if Oracle Order Management is installed.
- Pick-to-order option class components cannot have negative values.
- Components with Check ATP turned on cannot have negative or zero quantities.
- If the component has Quantity Related turned on, then the component quantity cannot be fractional or negative.
- If an implemented component has Quantity Related turned on, then the component quantity must be equal to the number of reference designators.
Important:
1. The planning process in Oracle Master Scheduling/MRP ignores negative requirements on standard discrete jobs and components with a negative usage on a bill of material when netting supply and demand.
2. If you enter a negative quantity for a component, you should enter either Assembly pull or Operation pull for the supply type to ensure that you transact the material when you build the bill.
2.4 Select Auto Request Material to automatically create move orders or purchase orders for the component item.
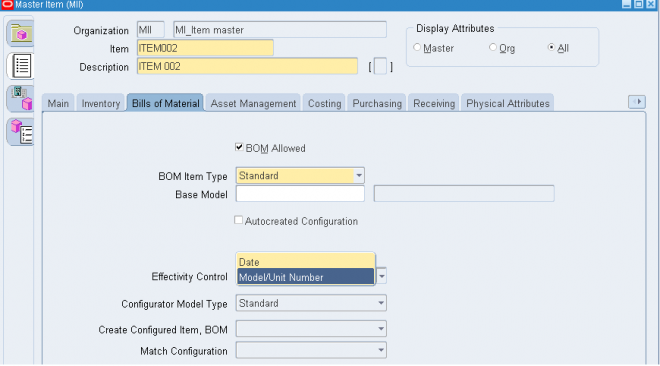
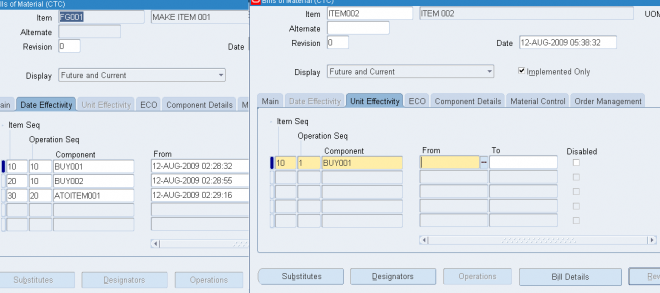
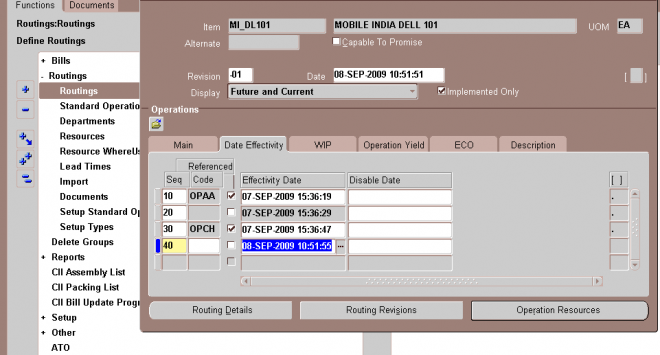
Date/Unit Effectivity
Open the Date Effectivity tabbed region and enter the effective date range for each component.
The Date Effectivity tab is disabled if the BOM item's effectivity control is set to Model/Unit Number.
Open the Unit Effectivity tabbed region and enter the effective unit number range for each component. The unit number list of values displays all of the unit numbers defined in the master organization.
Effective date fields appear throughout Oracle Manufacturing products. These are defined as follows:
- Effective From / Effectivity Date: First date and time the component or operation becomes effective. For components, the effective date is the first day a component becomes effective for a bill. For routings, it is the first day an operation becomes effective in a routing.
- Effective To / Disable Date: Last date and time the component or operation is effective. After this date, you can no longer assign the operation to a routing. From this date, you can no longer assign the component to a bill.
- Inactive On: The first date and time the component or operation is inactive. As of 12:00AM on this date, you can no longer assign the component to a bill or the operation to a routing. If this date equals the effective date, the component or operation is inactive.
To avoid confusion, make sure that effective dates for one revision do not overlap with those of another.
For example, if you must introduce three new components to a bill in a specific order, you should assign each change to the appropriate parent item revision. So, component 1 of revision B may be effective today, component 2 of revision C tomorrow, then component 3 of revision D may be effective the following day. If there are two operations on a routing and you replace the first operation with a new operation, you should set the effective date for the new operation to the date the operation you are replacing becomes inactive.
Effective dates can be either the current date or a date in the future; you cannot enter a date in the past.
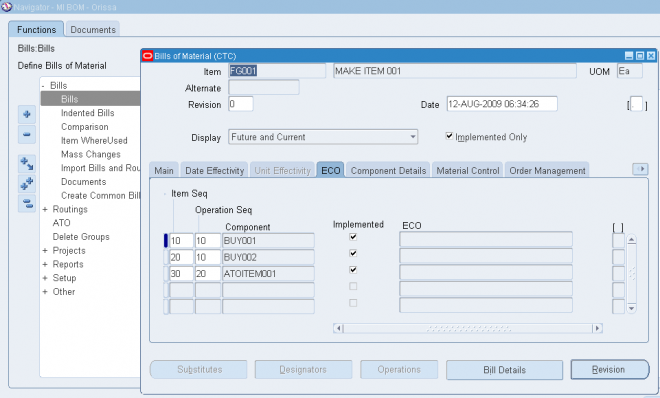
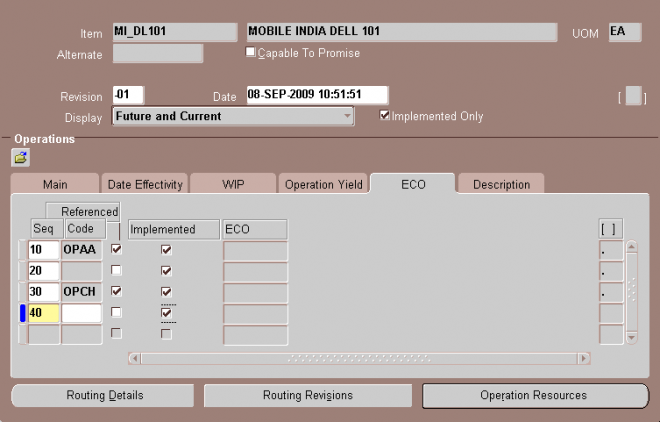
ECO tabbed region
Open the ECO tabbed region and verify the following:
The Implemented check box indicates whether the component is implemented.
Unchecked: Component is on a pending Engineering Change Order (ECO)
Checked: Component is on an implemented ECO or was added directly to the bill If the component is part of a pending or implemented ECO, the ECO field displays this ECO.
Order Manegment
Check ATP (Available To Promise) Field
Check ATP indicates whether to perform an ATP check on the component along with the item if the following conditions exist for the item in the Organization Items window,Oracle Inventory:
- the Check ATP field has a value other than None
- the ATP Components field has a value other than None
When you add the component to the bill of material, Check ATP is automatically selected if, in the Organization Items window for the component, the Check ATP field has a value other than None. You can select or unselect Check ATP for components in the Bills of Material window, overriding the value defaulted from the Organization Items window.
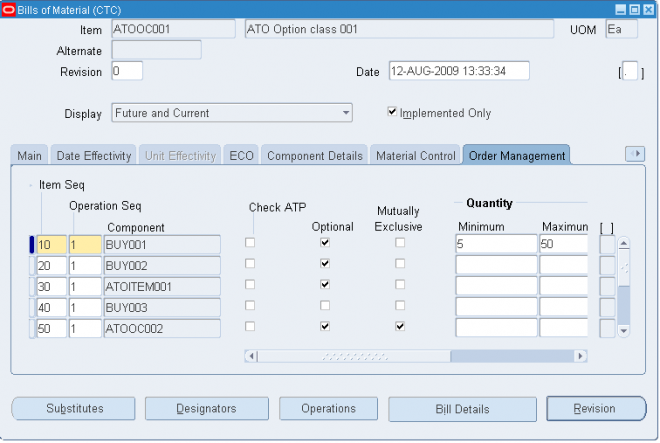
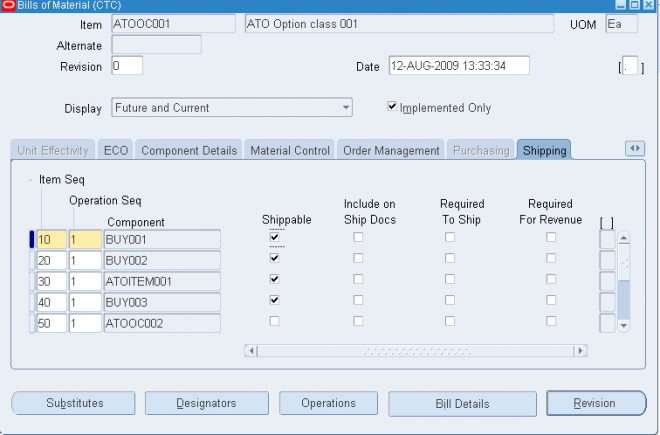
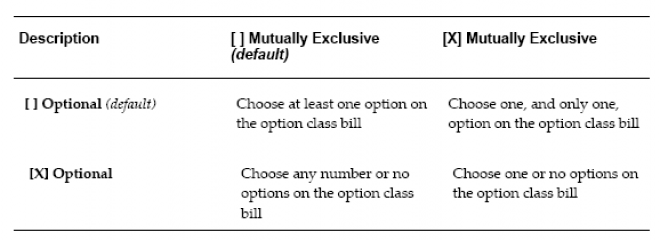
Mutually Exclusive and Optional Fields
The following pertains to options for model and option class bills. All components are mandatory on standard and planning bills. Model and option class bills can have both mandatory and optional components.
The Optional field indicates whether the component is mandatory or optional. The Mutually Exclusive field applies only to option class bills and indicates whether you can choose one or many options within an option class. Oracle Order Management uses the Mutually Exclusive check box in combination with the Optional check box to determine the number of option items you can or must choose to order the components of the option class bill. Refer to the table below for details on how the Optional check box and the Mutually Exclusive check box work together.
Minimum and Maximum Quantity Fields
Oracle Order Management uses the minimum and maximum quantities to determine the number of optional items available when orders are placed for components on option class bills. If you enter a minimum sales order quantity, you must also enter a maximum sales order quantity. You can only enter a minimum and maximum quantity range that contains the quantity for the component. If you update the component quantity, the minimum and maximum values are changed to include the new component quantity.
Caution: These attributes do not apply to mandatory standard components.
Sales Order Basis Field
If the component is an option class item, you must indicate whether you want to override the default quantity for the option class when a sales order is entered (the default). Option class quantities affect the mandatory standard components assigned to the option class.
If you select None for the Sales Order Basis field, Oracle Order Management can override the default quantity for the option class. Order Management defaults the total quantity to release as the component quantity multiplied by the option class extended quantity.
If you select Option class for the Sales Order Basis field, Order Management cannot override the default quantity for the option class. Order Management calculates the total quantity to release as the component quantity multiplied by the option class extended quantity.
Note: Set the sales order basis to Option class for an ATO option class component. When creating a configuration bill, Oracle Manufacturing computes the total quantity required for a mandatory standard component as the component quantity multiplied by the option class extended quantity-regardless of the quantity entered on the sales order.
Populating Oracle Configurator Schema (CZ)
Enterprise Item data is created and maintained in the Oracle Inventory and Bills are maintained in Oracle Bills of Material. This data imported into the Oracle Configurator schema as read-only data for access by Configurator Developer and the run-time Configurator.
The Oracle Configurator schema includes a specialized control table CZ_DB_SETTINGS for custom data import.
The data stored in the CZ schema includes:
- Configuration models
- Item and Model structure data
- Configuration rules
- User interface definitions
- Publication records
- Configurations
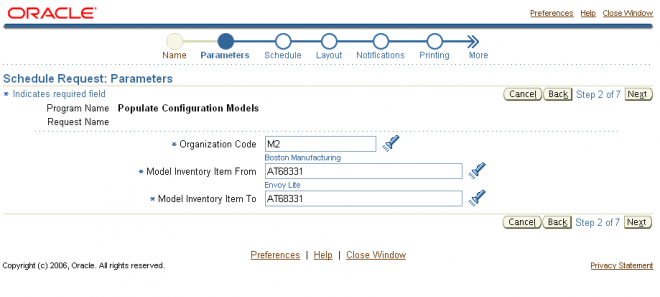
Item and BOM data can be imported into CZ schema using following concurrent programs (registered under Oracle Configurator Administrator responsibility)
- Populate Configuration Models
- Refresh a Single Configuration Model
- Refresh All Imported Configuration Models
- Disable/Enable Refresh of a Configuration Model
To transfer Item/BOM information for a given model to Oracle Configurator Schema (CZ) move to "Oracle Configurator Administrator" responsibility and submit concurrent job Populate Configuration Model with Item number as input parameter.
Bill / Component Validation Rules
The following bill and component validation rules apply when defining, copying, or mass changing bills of material:
- Depending on the setting of the profiles that limit access to different bill types (BOM: Model Item Access, BOM: Planning Item Access, BOM: Standard Item Access), you may not be able to modify bills.
- You cannot add a component with an operation sequence number that does not exist in the routing. The only exception is for operation sequences that are equal to 1.
- You cannot add a component to a bill where the component item is the same as the parent.
- You cannot add a component to a bill where the same component, with the same operation sequence and effectivity, already exists on the bill.
- Only manufacturing items can be added to manufacturing bills.
- You cannot add a component to a bill that is being referenced as a common bill from another organization, where the component does not exist in the other organization.
- You cannot add components to common bills.
- For ATO, PTO, and phantom bills where the parent item has ATP Components set to No, you receive a warning when you add a component that has either the item attributes Check ATP set to Yes or ATP Components set to Yes. The warning says "Order details for the parent item specifies NO for ATP Components", but you can add the component.
- You cannot add an optional component to a bill that is neither model or option class.
- You cannot add a component, whose planning percent is not equal to 100, to a standard bill.
- You cannot add a mandatory component, whose planning percent is not equal to 100 and has the Forecast Control attribute set to Consume or None, to a model or option class bill.
- When adding a component to a bill, the mass change will set the Check ATP component attribute to No if the component quantity is less than or equal to 0.
Creating a Product Family
A product family is a grouping of products whose similarity in resource usage, design, and manufacturing process facilitates planning at an aggregate level. A product family cannot be a part of a Standard, Model, Option Class, or Planning Bill of Material. Consequently, a product family is a single level bill. Members of a product family can belong to one and only one product family.
You will be able to plan based on the planning percentages and effectivity of the product family members.
Caution: You must make sure that the Product Family flex structure is configured to match the System Items structure. If the System Items structure is changed it should be reflected in the Product Family structure as well.
To create a product family item:
1. Navigate to the Master Item window.
Note: If you are a Flow Manufacturing customer, select Product Family from the Flow Manufacturing window. The product family template is automatically applied.
2. Apply the product family template.
To define a default template for product family items, you must select a template from the INV: Product Family Item Template Name profile option. The template assigned in this profile option will be automatically applied when you create a new product family item.
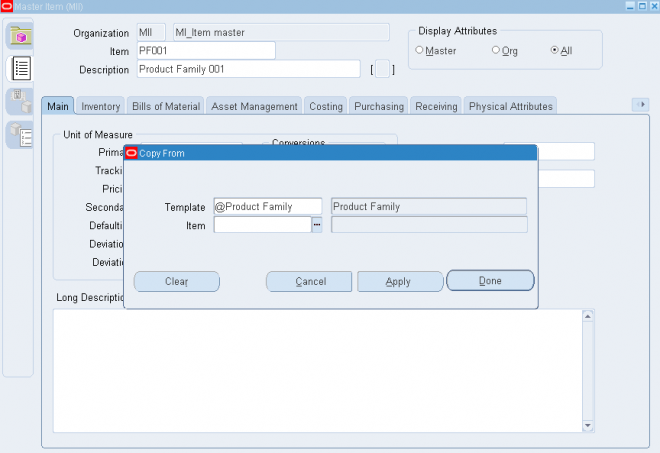
Note: You are not required to use the product family template. If you choose not to use a template, make sure that you define the correct product family attributes. Specifically, the item must be an inventory item and the BOM Item Type must be Product Family. The item must also be BOM allowed.
Each product family corresponds to an item category. A new category is added for each product family item that is defined. The relationship between the product family item and the product family category is established by the equality of their
concatenated key flexfield segment values. The category has the same name as the product family item. Consequently, product family item categories have the same flexfield structure as the System Items Flexfield. A new structure called Product Family has been defined for the Item Categories Flexfield. Each product family member item and the product family item itself are assigned to the corresponding category within the Product Family category set. The assignment is removed when an item is no longer a member of a product family.
To assign product family members:
1. Navigate to the Product Family window.
Note: If you are using Oracle Flow Manufacturing, you can select Product Family Members from the Flow Manufacturing menu.
2. Select a product family item.
3. Select item members of the product family. The description, type, forecast control, and planning method for the member items are displayed for the items selected.
Note: When an item is included in a product family, it will be automatically assigned to the same category as the family item.
4. Commit the record by selecting Save from the File menu.
Note: You can commit a record without assigning planning percentages. The default planning percent is 100. The default
effectivity date is the system date.
Main tab : Operations
To define a routing operation you first specify an operation sequence number to indicate the order to perform operations. Components in your bill of material can reference an operation sequence. Next, you can choose either a standard operation, or you can enter a new operation.
1. Sequence of Operations
Routings define the step-by-step descriptions, or operations, for manufacturing an assembly. Each operation on a routing defines a specific portion of the manufacturing process for the assembly. You can use operations to identify the location, the quantity, and the state of completion of the assemblies you are currently manufacturing.
For each component item on the bill of material associated with a routing, you can specify the operation sequence where you require the item. You can then only issue material where and when it is needed.
2. Code (Standard Operation)
A standard operation is a commonly used operation that you define as a template to default operation information when you define routings. When you define a new operation on a routing, you can specify a standard operation whose information Bills of Material copies into the operation you are currently defining. You can then change any of the copied information for the new operation.
Setup Standard Operation
A setup standard operation is the same as a standard operation except that it defines an operation used for setting up machine type resources only. Use the setup standard operation to specify the operation used during changeovers.
3. Enter the department in which the operation is performed.
If you have entered a code then the depart would default from the operation code
4. For operations in ATO model or option class routings only, indicate whether the operation is option dependant, that is, whether the operation is dependant on the choice of an optional component. All mandatory components and their related
operations appear on the routing for each configuration. The default is enabled.
5. Optionally, enter the item's manufacturing lead time percent required to complete all previous operations on the routing.
If the manufacturing lead time equals 10 days and all previous operations combined require 2 days, the lead time percent is 20%.
Date Effectivity
Open the Date Effectivity tabbed region and enter an effective date range.
Operations Resources
You can associate multiple resources with an operation on a routing. For each resource, you can determine if you want to include that resource in scheduling and lead time calculations. You can also collect costs for a resource on a routing if you specified the resource as a costed resource. If a resource is unavailable, you can define alternate resources. An alternate resource can be a single resource or a set of resources.
Resource parents and resource sets are used to group similar resources. Routings can then be defined with their general resource requirements, while WIP lots are tracked with the usage of the specific resources. While a resource can belong to several resource sets, a resource can only belong to one parent resource. When a WIP lot is at an operation with a parent resource or resource set attached to it, you are prompted to enter a valid resource used in processing the WIP lot.
To assign a resource to a routing operation:
Navigate to the Operation Resources window. You can do this by choosing the Operation Resources button from the Routings window.
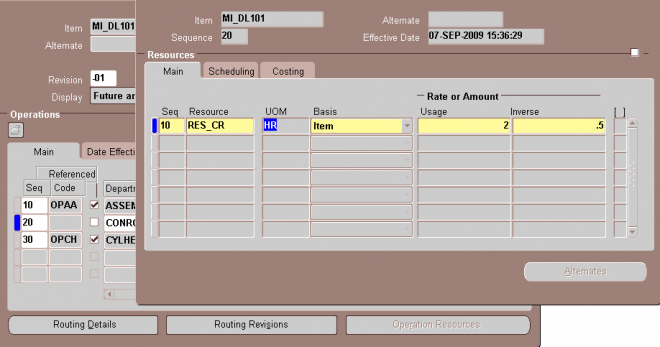
2. Select a basis type by which to charge and schedule the resource. The default is the basis specified for the resource.
Item: Charge and schedule the resource by multiplying the usage rate by the job or schedule quantity for the assembly. Select Item when your charges fluctuate with quantity change.
Lot: Charge and schedule the resource by charging the usage rate or amount once per job or schedule. Select Lot when your resource usage quantity is the amount required per job or schedule, for example, setup charges.
3. Enter a value for the Rate or Amount in either the Usage or Inverse fields. That is, enter the resource consumed at the operation (per item or per lot) or it's inverse.
Entering a value for either field updates the other field.
Resources with time-based unit of measures must have usage rates greater than zero.
Enter an inverse when you know the number of units a resource can process (rather than the duration an assembly unit consumes the resource. For example, if you know a resource can process 10 units per hour, enter 10 for the inverse. Usage or Inverse can be negative only for resources that cannot be scheduled and where the charge type is neither PO move nor PO receipt.
Alternate Resources
You can define alternate resources for each resource. You can define an alternate resource or set of alternate resources to describe a different manufacturing step used to produce the same product. For example, you have a routing for an item TEST. The routing includes an operation with operation sequence number 70. The operation includes two operation resources, R1 (resource sequence 10) and R2 (resource sequence 20). The Substitute Group Number 10 groups the substitute resources R3, R4, and R5. These three resources are further classified into Replacement Group 10 and 20.
Replacement Group 10 includes the resource R3 and Replacement Group 20 contains the resources R4 and R5. If the resources R1 or R2 are not available, you can replace them with either Replacement Group 10 or 20, so either R3 or R4 and R5 can replace R1 or R2. The following table describes how this example is set up in the Operation Resources and Operation Alternate Resources windows.
Resource Scheduling
For each resource, you can specify whether to schedule it, and whether it overlaps the prior or next operation. If you specify that a resource overlaps the prior operation, Oracle Work in Process schedules the resource so that the last resource on the prior operation ends at the same time as this resource. Conversely, if you specify a resource that overlaps the next operation, Work in Process schedules the resource so that the first resource on the next operation begins at the same time as this resource.
Resources can be defined as simultaneous or alternates with other resources, independent of an assembly's routing. Two or more resources can be scheduled to be working concurrently within the same job operation. For example, a drilling machine and machinist must be scheduled at the same time. Each operation contains a scheduled sequence of resources. You can define the sequence in which resources are consumed.
The information in the Schedule Seq field is only used when constraint based scheduling is enabled in Oracle Manufacturing Scheduling, though. You can create a different resource or group of resources that can be used to substitute the primary resource or group of resources within a job operation. For example, if unskilled labor is unavailable to perform a task,
it can be substituted with skilled labor. The scheduling system will schedule the skilled labor if the unskilled labor is fully committed. This is referred to as alternative scheduling.
Work in Process schedules assuming that the department uses up to the number of assigned units of the resource simultaneously - up to the number that exist in the department.
If you specify that a resource is available 24 hours (such as time in a drying area), Work in Process schedules it around the clock regardless of shifts.
Schdule
- Yes: Include this resource when scheduling an operation from a job or repetitive schedule and calculating manufacturing lead time for the assembly.
- No: Do not include scheduling the operation or calculating the lead time.
- Prior: Include this resource when scheduling a job or schedule by backward scheduling the previous operation from the end of this resource. Use this option when setup resources can work in parallel with previous operations. The lead timeis calculated the same way Work in Process schedules the job or repetitive schedule.
- Next: Include this resource when scheduling a job or repetitive schedule by forward scheduling the next operation from the start of this resource. Use this option when the teardown of the current operation can overlap with the execution of the next
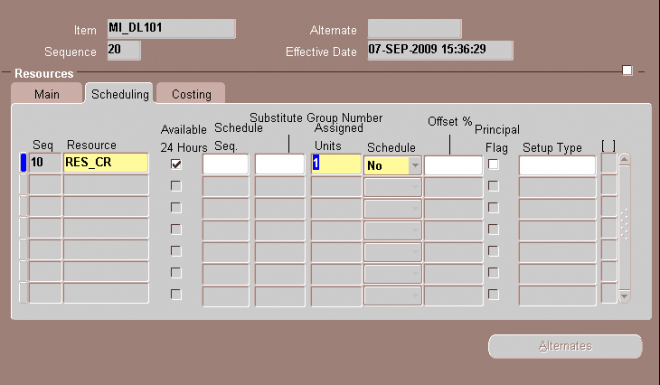
Enter the resource offset percent within this routing.
For example, a value of 50 means that you utilize the resource when the routing is half completed. This value is utomatically calculated when you compute the lead time for the assembly.
Resource Charging Method
You can associate multiple resources with an operation on a routing, and for each resource you can determine how the resource is charged. You can automatically charge resources in Work in Process based on move transactions and purchase order receipts (for outside processing). You can also manually charge resources.
You can collect and group resource charges by activity for cost reporting.
You can determine how each resource is charged in Work in Process. When an
operation completes, Work in Process records the units applied to the job or repetitive
schedule in the resource unit of measure. You can charge resources manually or
automatically.
- Manual: Work in Process does not automatically charge this type of resource to a job or repetitive schedule. You must manually charge it to a job or repetitive schedule using Work in Process.
- PO Receipt: Automatically charge this resource upon receipt of a purchase order in Oracle Purchasing. The assemblies are not automatically moved to the next operation upon receipt, so you must manually move them using Work in Process.
- PO Move: Automatically charge this resource upon receipt of a purchase order in Oracle Purchasing and move the assemblies to the Queue intraoperation step of the next operation, or to the To move intraoperation step if this is the last operation.
- WIP Move: Work in Process automatically charges this type of resource to a job or repetitive schedule when you complete an operation.
Resource Capacity Modifications
For each resource on a shift, you can override the number of resource units available (such as number of machines) and specify additions or reductions to the amount of time the resource is available on that shift. These capacity modifications are assigned to simulation sets that you can use later when you generate a capacity plan or schedule discrete jobs or repetitive schedules to simulate capacity changes.
Lead Time Offsetting Computations
Bills of Material lets you automatically compute item, bill of material and routing information required for dynamic lead time offsetting. You can also maintain lead time information manually.
Manufactured Items
Dynamic lead time offsetting uses the following lead time attributes for discretely manufactured items:
- fixed lead time
- variable lead time
- preprocessing lead time
Dynamic lead time offsetting uses the following lead time attributes for repetitively manufactured items:- processing lead time
- fixed lead time
Purchased Items
Dynamic lead time offsetting uses the following lead time attributes:- preprocessing time
- processing lead time
- post-processing lead time
Routings
When computing manufacturing lead times, operation and resource offsets are automatically assigned to a routing. For material and resource requirement planning, you can optionally include offsets when computing requirement dates.
Dynamic lead time offsetting offsets dates in two steps, computing total lead time and offsetting the date by total lead time. Total lead time contains both fixed lead time and the quantity-dependent portion of lead time. Preprocessing lead time is also included for discrete items.Note: Total lead time equals processing lead time.
To compute the total lead time for discrete items use the following equation:
preprocessing lead time + fixed lead time +(order quantity x variable lead time)
Compute the total lead time for repetitive items using the following equation:
fixed lead time + (daily rate x processing lead time)
Offset the date by total lead time using the following equation:
start date = requirement date - total lead time
Important: Oracle Manufacturing offsets the requirement date by the total lead time using the workday calendar, accounting for any non-workdays. Before subtracting total lead time, Oracle Manufacturing determines the workday for the requirement date. After offsetting by total lead time, the calendar date is derived from the starting workday.
Example
Master Scheduling/MRP uses dynamic lead time offsetting to compute a planned order release date. Master Scheduling/MRP computes total lead time and then uses the workday calendar to calculate the planned order release date.
Suppose your MRP plan produced a requirement for 100 discretely manufactured assemblies on March 12 and the following information exists for that assembly:
• Requirement date = 12-MAR
• Fixed lead time = 2 days
• Variable lead time = .05 days (1 day per 20 units)
• Preprocessing lead time = 0 days
• Order quantity = 100
Master Scheduling/MRP first computes the total lead time as follows:
Total lead time = 0 + 2 + (100 x .05) Total lead time = 7 days
Suppose your organization's workday calendar has a workday pattern with five days on and two days off. Workdays 1 - 5 are March 1 - 5. Saturday and Sunday, March 6 and 7, are off. Workdays 6 - 10 are March 8 - 12. Master Scheduling/MRP then calculates the planned order release date as follows:
Start date = requirement date - total lead time Start date = (12-MAR) - 7 days Convert planned order requirement date to a workday (using your organization's workday calendar).
Start date = Date ((Workday 10) - 7)) Start date = Date (3)
Finally, determine the start date.
Start date = 03 - MAR (planned order release date)
Dynamic Manufacturing Lead Times
Oracle Bills of Material computes the fixed and variable portions of manufacturing (processing) lead time using routings and detailed scheduling.
- Fixed lead time: That portion of time required to build an assembly that is independent of order quantity—for example, setup or teardown.The fixed lead time is calculated by scheduling a job for a quantity of zero with the current date as the job start date.
Because all lead-time offsetting uses the fixed and variable lead time of an item, the processing lead time represents an estimated lead time. Processing lead time represents the typical time required to build a typical number of units.
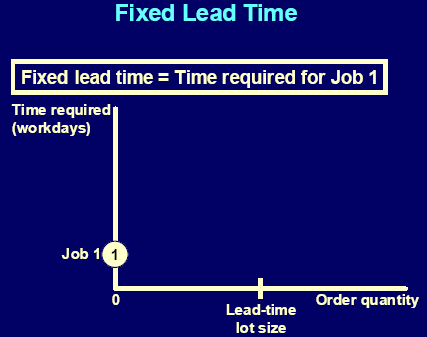
Bills of Material uses the following formulas to compute fixed lead times:
Schedule a job for zero quantity beginning on the system date and compute fixed lead
time as follows:
completion date (of one item) - system date- Variable lead time: That time required to produce one additional unit of an assembly. The variable lead time is calculated by scheduling a second job for the lead time lot size quantity, with the system date as the job start date.
Variable lead time is expressed as days per unit.
These lead times are used by Oracle Manufacturing in dynamic lead-time offset calculations
Schedule a job for the lead time lot size beginning on the system date and compute
variable lead time (rate) as follows:
[(completion date (of all items) - system date) - fixed lead time] / lead time lot size
Repetitive Schedule Lead Times
- Processing (manufacturing) lead time
The algorithm schedules one discrete job for a quantity of zero (fixed lead time) and a second discrete job for the lead-time lot-size quantity (variable lead time).
When computing processing lead time, all calendar days are considered as workdays, regardless of days off or workday exceptions.The processing (manufacturing) lead time is calculated as the time required to manufacture a job for the lead time lot size quantity.
Bills of Material also computes the processing lead time as the time required to complete the second scheduled job (where the job starts on the system date): completion date (of one item) - system date
Processing lead time is presented in whole days rounded to the next day.
Example
For example, if for item A, you had the following data:
- Lead time lot size = 10 units
- System date = 01-JAN
- End date for work in process job for 1 unit = 10-JAN
- End date for work in process job for 10 units = 13-JAN
Then:
fixed lead time = completion date (of one item) - system date
fixed lead time = = 10-JAN - 01-JAN
fixed lead time = = 10 days
Variable lead time = [(completion date - system date) (rate) - fixed
lead time] / lead time lot size
Variable lead time = [(13-JAN - 01-JAN) - 10] / 10
Variable lead time = [13 - 10] / 10
Variable lead time = 0.3 days/unit
Processing lead time = completion date - system date
Processing lead time = 13-JAN - 01-JAN
Processing lead time = 13 days
Calulating Dynamic Manufacturing Lead Times
Optional and Mutually Exclusive
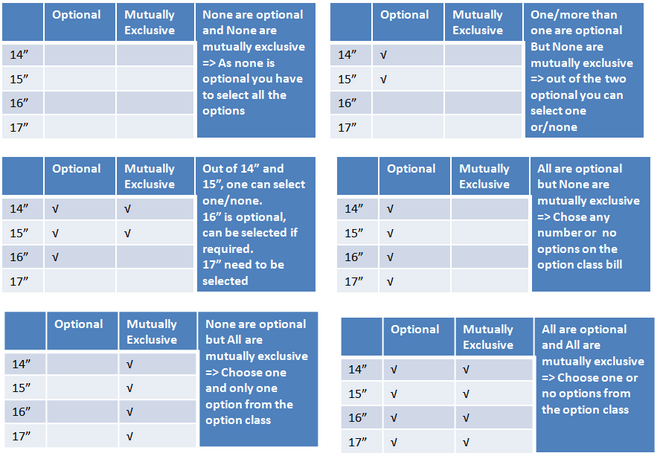
BOM of the option class Samsung Monitor has 4 options 14”M, 15”M, 16”M and 17”M
Case1 : None are optional and None are mutually exclusive => As none is optional you have to select all the options
Case2: One/more than one are optional But None are mutually exclusive => out of the two optional you can select one or/none
Case 3 : Out of 14” and 15”, one can select one/none. 16” is optional, can be selected if required.17” need to be selected
Case 4 : All are optional but None are mutually exclusive => Chose any number or no options on the option class bill
Case 5 : None are optional but All are mutually exclusive => Choose one and only one option from the option class
Case 6 : All are optional and All are mutually exclusive => Choose one or no options from the option class