Basics of Accoutning

Financial statements (or financial reports) are formal records of a business' financial activities. it provide an overview of a business' financial condition in both short and long term. There are four basic financial statements

   1. Balance sheet: also referred to as statement of financial position or condition, reports on a company's assets, liabilities, and net equity as of a given point in time.The balance sheet is the snapshot of the assets and liabilities the company has acquired since the first day of business.
See example of a balance sheet @
http://investor.google.com/releases/2009Q2_google_earnings.html

   2. Income statement: also referred to as Profit and Loss statement (or a "P&L"), reports on a company's income, expenses, and profits over a period of time. in simple words its a summation of the income and expenses from the first day of this accounting period (probably from the beginning of this fiscal year).

   3. Statement of cash flows: reports on a company's cash flow activities, particularly its operating, investing and financing activities.

   4. Statement of retained earnings: explains the changes in a company's retained earnings over the reporting period.

In British English, including United Kingdom company law, financial statements are often referred to as accounts, although the term financial statements is also used, particularly by accountants.

In order understand the financial statements one should understand the below terms


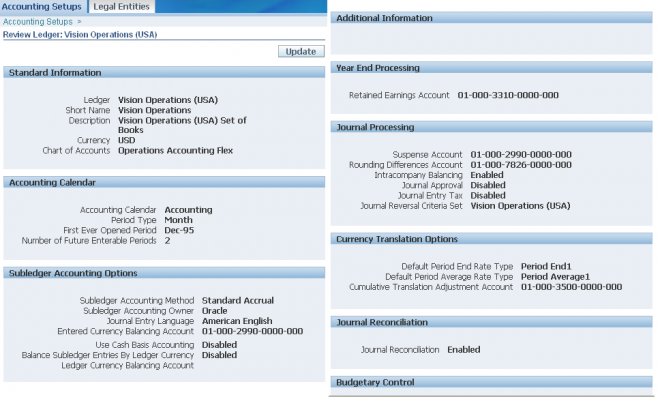
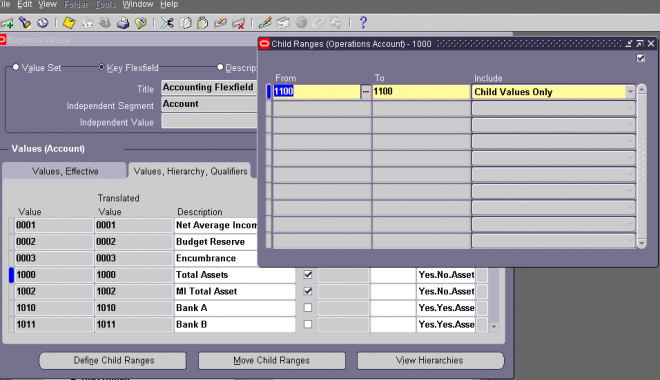
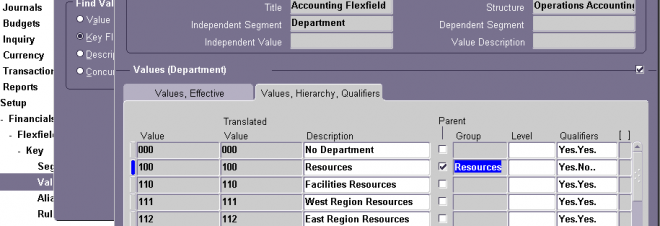
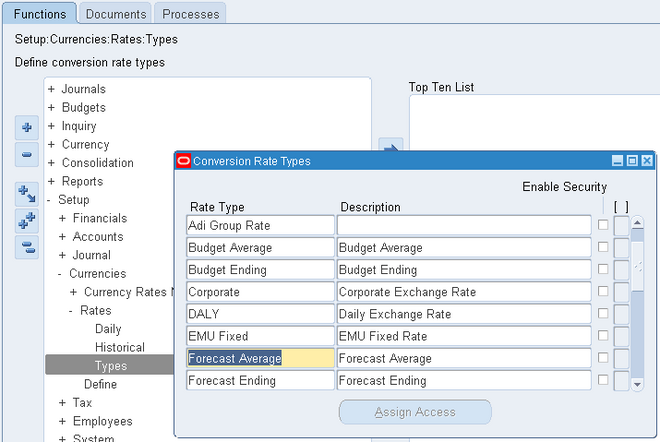
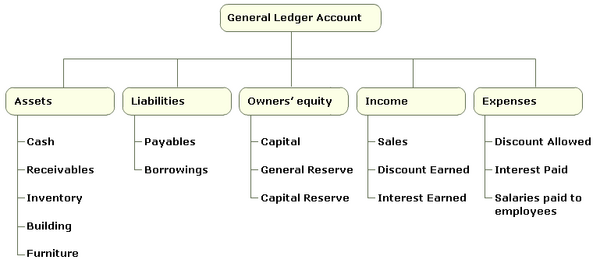
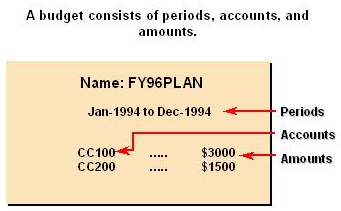
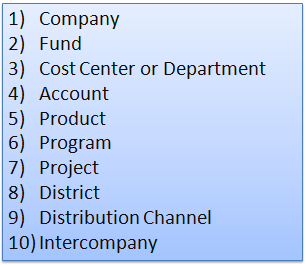
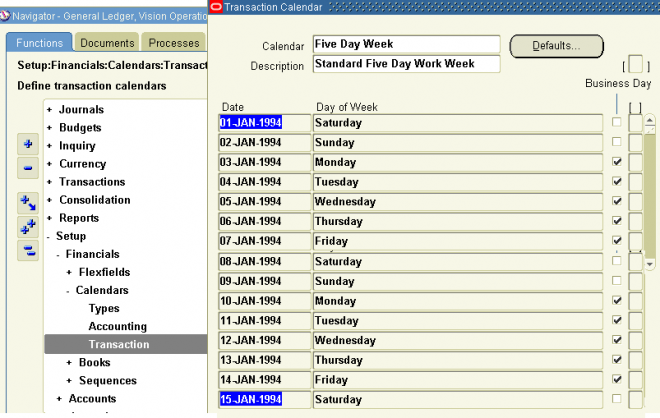
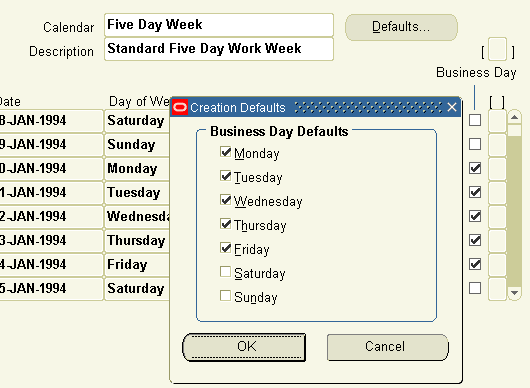
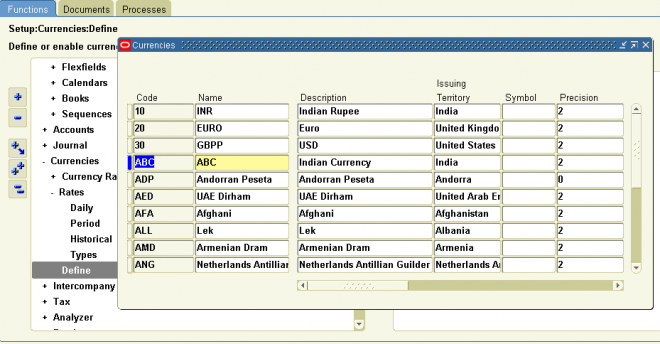
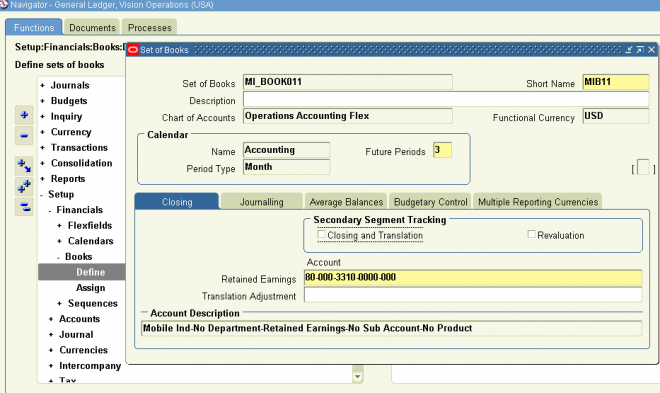
Standrad Oracel has following 5 accoutning types
 
Debit/Credit are the most fundamental concepts in accounting, representing the two records that one party in a transaction makes on its records, transferring a money balance from one account to another, one representing a reduction of liability or increase in asset, and the other representing a balancing increase in liability or reduction of asset.

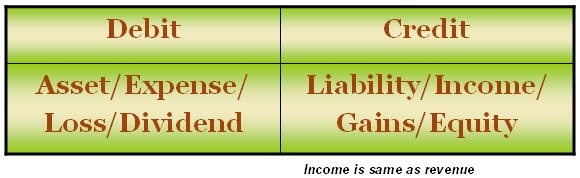
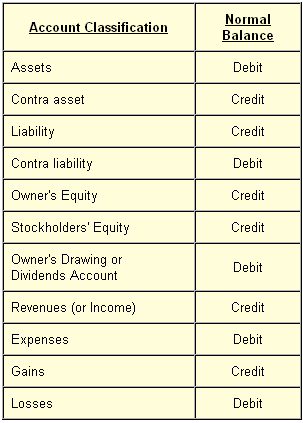
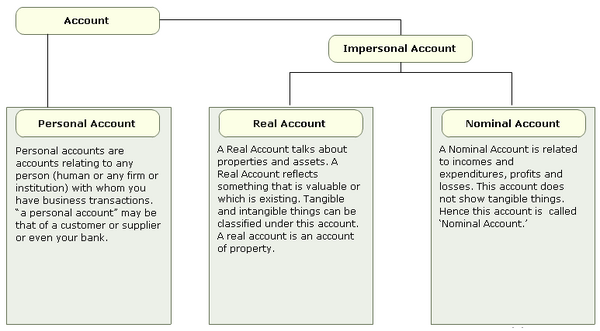
Asset/Liability, Expense/Income are the four baisc type of accounts.
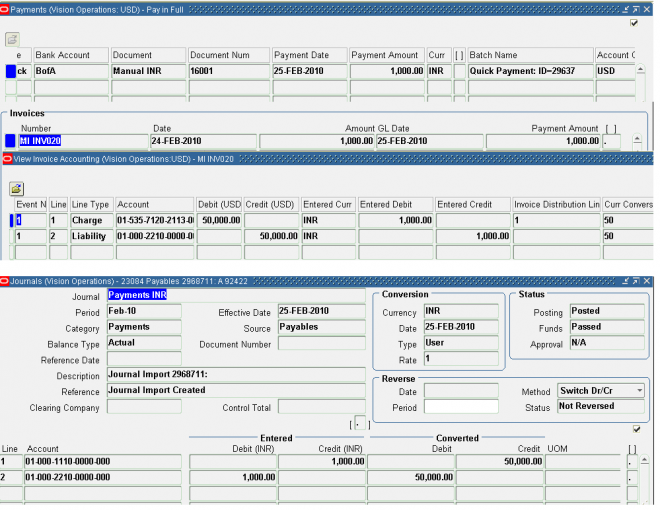
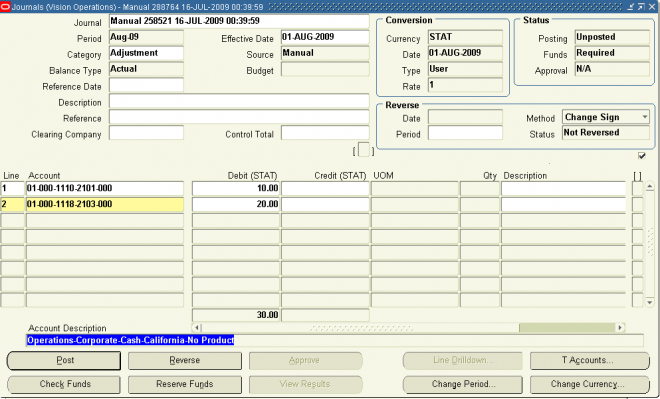
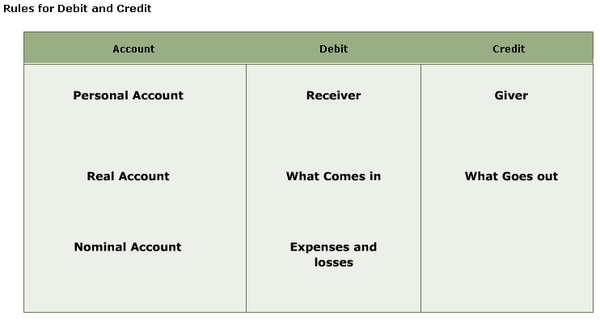


Debit/Credit:
Debits and credits are a system of notation used in accounting to keep track of money movements (transactions) into and out of an account: money paid into an account is a debit, money taken out of an account is a credit. Traditionally, an account's transactions are recorded in two columns of numbers: debits in the left hand column, credits in the right. Keeping the debits and credits in separate columns allows each to be added up independently so that the total debits and credits can be calculated; the smaller of the two totals is then subtracted from the larger to get the account balance. If an account has a debit balance then it owes money (to someone) because more money has been paid into it than has been drawn out, if it has a credit balance then it is owed money.

I find the best way to understand debits and credits is to identify two components of each transaction:
   1. what did you get?
   2. where did it come from?
 
The debit is what you got and The credit is the source of the item you received.
For instance, let's imagine that you purchase a computer with your credit card. Since the computer is what you received it's going to result in a debit to the asset account for your computer. The credit will be applied to the credit card liability account for the same amount.

What is often confusing is that the notion of debit and credit will depend on the perspective of the person preparing the accounts, even though they may be essentially the same account. Take your bank account for example. In your accounts when you pay money into your bank account it is recorded as a debit, your bank account is in debt to you - the bank owes you money. The bank's perspective is different however, their job is to keep track of where all the money in their 'vault' has come from and where it goes. To do this, they create an account for each customer so when you pay money into the bank, from their perspective, it has come out of your account (a credit) into their vault: your account is in credit - your account is owed money. When you receive a statement from your bank, it will give the state of your account from the bank's point of view, which is why people are used to the term 'your account is in credit' to mean that they have money in that account, when technically it means the opposite.

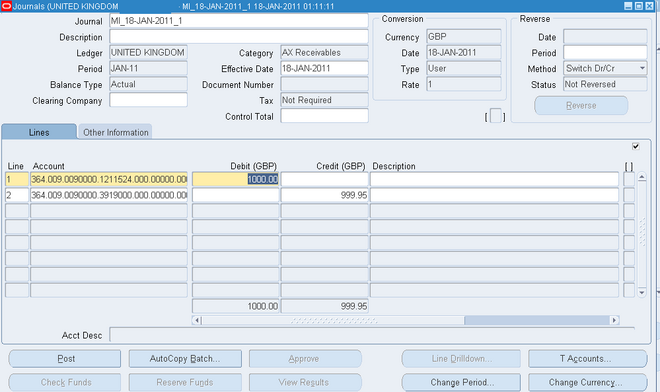
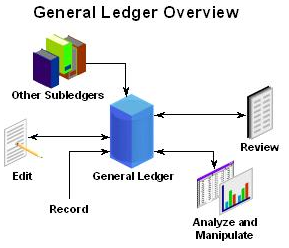
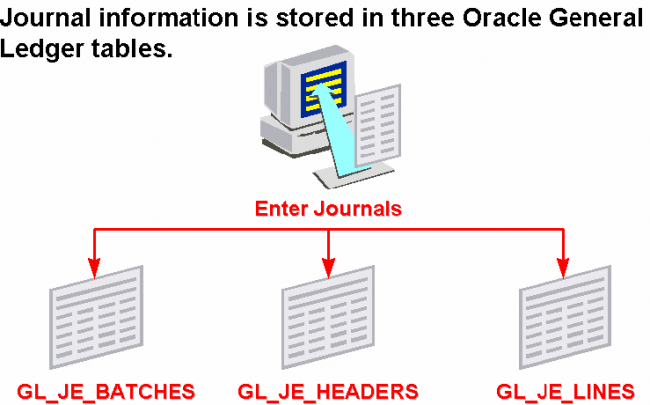
The accounts are collectively referred to as the ledger. A journal is a place where entries (debits and credits) are written before they are written in the ledger. Modern computer systems generally have you make entries directly to the ledger and then produce printouts that are designed to look as if they were journals, which they may not be in reality.

Debits and credits are neither positive nor negative values. The balance on an account is either a debit or a credit, not a positive or a negative value. Dividend, Expense, Asset and Losses (abbreviated as "D-E-A-L") accounts increase in value when debited and decrease when credited, whereas Gains, Income, Revenues, Liability and Stockholder's (Owner's) equity (abbreviated as "G-I-R-L-S") accounts decrease in value when debited and increase when credited.
 
What are Debtors/Creditors ?
Debtors are people or other firms who owe money to the firm. This will usually happen where the firm has sold goods with a period of credit. The firm sells the good or service but allows the purchaser a period of credit to pay - usually a month. During this month the purchaser owes the firm the money and is therefore a debtor.

If the firm has debts these are considered an asset, because when the debtors pay the firm will have converted the debt into cash in the bank. Because most debts are relatively short-term they are considered current assets. The other current assets are stocks and cash.

The amount of debtors a firm has depends on the line of business they are in. If most of their business is with trade customers where they have to offer credit then the level of debtors may be high. For many retail businesses, however, the level of debtors will tend to be relatively low as most of their sales are cash sales.

Creditors are liabilities. They are the businesses and people to whom the business owes money. Debtors are the businesses and people who owe the business money, and so are assets of the company.

Oracle Flexfield

A flexfield is a field made up of sub–fields, or segments. There are two types of flexfields: key flexfields and descriptive flexfields. A key flexfield appears on your form as a normal text field with an appropriate prompt. A descriptive flexfield appears on your form as a two–character–wide text field with square brackets [ ] as its prompt. When opened, both types of flexfield appear as a pop–up window that contains a separate field and prompt for each segment. Each segment has a name and a set of valid values. The values may also have value descriptions.

KFF, DFF, Structure, Segemnt, Value, Value Set, Value Description, Aliases, Rules, Groups, Security.

Key Flexfields
Most organizations use ”codes” made up of meaningful segments (intelligent keys) to identify general ledger accounts, part numbers, and other business entities. Each segment of the code can represent a characteristic of the entity. For example, your organization might use the part number PAD–NR–YEL–8 1/2x14” to represent a notepad that is narrow–ruled, yellow, and 8 1/2” by 14”. Another organization may identify the same notepad with the part number ”PD–8x14–Y–NR”.
Both of these part numbers are codes whose segments describe a characteristic of the part. Although these codes represent the same part, they each have a different segment structure that is meaningful only to the organization using those codes.

The Oracle Applications store these ”codes” in key flexfields. Key flexfields are flexible enough to let any organization use the code scheme they want, without programming. When your organization initially installs Oracle Applications, you and
your organization’s implementation team customize the key flexfields to incorporate code segments that are meaningful to your business. You decide what each segment means, what values each segment can have, and what the segment values mean. Your organization can define rules to specify which segment values can be combined to make a valid complete code (also called a combination). You can also define relationships among the segments. The result is that you and your
organization can use the codes you want rather than changing your codes to meet Oracle Applications’ requirements.
For example, consider the codes your organization uses to identify general ledger accounts. Oracle Applications represent these codes using a particular key flexfield called the Accounting Flexfield. One organization might choose to customize the Accounting Flexfield to include five segments: company, division, department, account, and project. Another organization, however, might structure their general ledger account segments differently, perhaps using twelve segments instead of five. The Accounting Flexfield lets your Oracle General Ledger application accommodate the needs of different organizations
by allowing them to customize that key flexfield to their particular business usage.

Descriptive Flexfields
Descriptive flexfields provide customizable ”expansion space” on your forms. You can use descriptive flexfields to track additional information, important and unique to your business, that would not otherwise be captured by the form. Descriptive flexfields can be context sensitive, where the information your application stores depends on other values your users enter in other parts of the form. A descriptive flexfield appears on a form as a single–character, unnamed field enclosed in brackets. Just like in a key flexfield, a pop–up window appears when you move your cursor into a
customized descriptive flexfield. And like a key flexfield, the pop–up window has as many fields as your organization needs.
Each field or segment in a descriptive flexfield has a prompt, just like ordinary fields, and can have a set of valid values. Your organization can define dependencies among the segments or customize a descriptive flexfield to display context–sensitive segments, so that different segments or additional pop–up windows appear depending on the values you enter in other fields or segments.

  1. KFF & DFF
  2. Structure, Segment & Qualifier
  3. Value (Parent, Group, Hirearchy & Qualifier) , Value Description & Value Set
  4. Security Rule, Cross-Validation & Alias
  5. Accounting Flexfield (Chart of Account & Account Generator processes)


General Ledger

The Oracle General Ledger is the central repository of accounting information. The main purpose of a general ledger system is to record financial activity of a company and to produce financial and management reports to help people inside and outside the organization make decisions.


General Ledger Overview : Oracle General Ledger is a comprehensive financial management solution that enables you to:
  •  Record and Review Accounting Information
  •  Import data from subsidiary ledgers, or enter journals to record actual or budget transactions directly into Oracle General Ledger.
  • Enter encumbrance journals to track encumbrances through the purchase process and to control spending against budgeted amounts.
  • Review account balances online or through reports.
  • Manipulate Accounting Information
  • Correct actual, budget, and encumbrance information.
  • Revalue and translate balances denominated in foreign currencies.
  • Consolidate balances from multiple sets of books.
  • Analyze Accounting Information
  • Integrate Oracle General Ledger with Oracle Financial Analyzer, Oracle Discoverer, or Applications Desktop Integrator to simplify the budgeting and forecasting process.
  • Quickly prepare what if analyses and pro forma reports

General Ledger Accounting Cycle

1. Setup/ Open period
2. Create/reverse journal entries, Post &  Review
3. Conversion, Revaluation, Translation, Re generate &  Consolidate
4. Review/correct balances & Run accounting reports
5. Close accounting period
Functions & Features


Entering Journals

Journal Batches
You can organize journal entries with common attributes into batches. For example, you might group your journal entries by type or date. You can have multiple journals in one batch, or you can have a separate batch for each journal entry.

All journal entries in a batch must share the same period. You can create a journal batch for any Open or Future Enterable accounting period, but you can only post batches in Open accounting periods. If you do not want to enter batch information, you can enter a journal directly. General Ledger will create a batch for the entry automatically, using the source (Manual) combined with a unique batch ID and the system date.

Multiple Reporting Currencies
If you use Multiple Reporting Currencies, General Ledger automatically generates converted journal batches in your reporting
sets of books when you post the original journals in your primary set of books
. You may occasionally want to modify an unposted converted journal batch in a reporting set of books to override the journal’s reporting currency conversion rate or amount.

If you do find it necessary to change a journal batch in your reporting set of books, use the Enter Journals window to make your changes. You must log in to General Ledger using the reporting set of books’ responsibility.

Entering Journals
To manually enter a journal navigate to the Enter Journals window. we can enter journal with an existing batch, or create a new batch or can can enter journal without batch.
1. To enter journals for a new batch, choose New Batch from the Find Journals window and create a new batch.'


2.1. In the Journals window, enter a unique Journal name for the entry. If you do not enter a journal name, General Ledger automatically assigns a name using the following format: Source Journal ID Date. If you did not enter a batch name before entering journals, General Ledger uses the name of the first journal in the batch to create a default batch name.

2.2. Enter the Period for the journal entry. If you entered a period at the batch level, you must use the same period for each journal entry in the batch. If you did not enter a period at the batch level, chooseany Open or Future Enterable period for your journal entry. Note that you can only post journals in Open periods.
Note: If you enter a period prior to the current accounting period and the user profile option Journals: Enable Prior Period Notification is set to Yes, General Ledger displays a message indicating that you are entering a prior period journal. You must confirm that this is what you want to do.

3.1. Enter a Category to describe the purpose of your journal entry, such as accrual, payments, or receipts. All lines in a journal entry share the same journal category.

3.2. Balance Type is a display–only field. It displays Actual when you are entering actual journals, Budget when you are entering budget journals, and Encumbrance when you are entering encumbrance journals.
Functional Actuals to create actual journal entries using the functional currency for your selected set of books.
Foreign Actuals to create actual journal entries using a foreign currency. A foreign currency is one which is different from the functional currency for your selected set of books.
Budgets to create journal entries that are to be posted against a budget.
Encumbrances to create journal entries to update encumbrance balances.

4.1. If you use manual numbering, enter a unique Document Number. This field is only available if the Sequential Numbering profile option is set to Always Used or Partially Used. If you set your profile options to Always Used or Partially Used sequential numbering, and use a defined Automatic document numbering sequence, General Ledger enters a document number automatically when you save your work.
Attention: If sequential numbering is always or partially used, you cannot change the journal category or document number after you save your journal entry.

4.2. Enter a Control Total if you want to verify the total debits for the journal lines against the journal control total.

5. In the Conversion region, accept the default Currency (the functional currency for your set of books), or change the journal currency to enter a foreign currency or statistical journal.

6. In the Status region, the Posting field displays whether a journal batch is posted. The Funds field displays the status of the funds for a journal batch and the Approval field displays whether the journal batch is approved for posting.

7. In the Reverse region, enter a reverse Date, Method, and Period. You can then generate a reversing journal entry to that effective period and date. You can also reverse a journal entry without assigning a reversal period. Reverse Method can be either:
Switch Dr/Cr: General Ledger creates your reversing journal by switching the debit and credit amounts of the original journal
entry. This method is often used when reversing accruals.
Change Sign: General Ledger creates your reversing journal by changing the sign of your original journal amounts from positive to negative. This reversal method is often used when reversing journals to correct data entry mistakes.

 
Entering Taxable Journal Entries
Generally, you enter journals for taxable amounts as usual, and enter additional taxation information, then calculate taxes before you post the journal. However, there are specific restrictions about when you can enter or modify tax information.
After you calculate tax for a journal, the system does not recalculate tax if you revise any line in that journal. If you need to revise a taxable amount or alter its tax information after you have calculated tax, you should either reverse and re–enter the journal (if it is already posted), or delete the unposted journal and re–enter it correctly. After you calculate tax, the resulting new tax journal lines can be edited just like any other journal lines. For example, if you need to change the
tax liability account for a specific calculate tax line, you can edit the account after you calculate tax.


Submitting Journal Batches for Approval
If Journal Approval is enabled for your set of books, journal batches whose journal source requires approval must be approved by a manager whose authorization limit is high enough to allow approval. You will not be able to post your batch to the general ledger until you receive this approval.

When the journal batch is submitted for approval, it will move through  your organization’s approval hierarchy, based on the approver method specified by the Journals: Find Approver Method profile option. Each approver will receive a notification when their approval is required. For more information about checking and viewing your notifications

Entering Journals for a Prior Period

You can post journal entries to a prior accounting period, as well as to a prior fiscal year, as long as the prior period is open. When you post to a prior period, General Ledger automatically updates the beginning balances of all subsequent periods. In addition, if you post a journal entry into a prior year, General Ledger adjusts your retained earnings balance for the effect on your income and expense accounts.
Enter and post prior period journal entries just like any other journal entry. To ensure complete control over prior period adjustments, you can only post journal entries to an open period. When you finalize your activity for an accounting period, simply close the period to prevent the entry or posting of additional journal entries.

Suggestion: To ensure that you don’t accidentally enter a journal for a prior period, choose to have General Ledger
display a message whenever you try to enter a prior period journal. To use this feature, have your system administrator set the user profile option Journals: Enable Prior Period Notification to Yes.

Note that if there are many open accounting periods following the period to which you are posting, General Ledger must update many beginning balances. Therefore, to speed up the posting process, keep a minimum number of accounting periods open.

Suggestion: We recommend that you run a Trial Balance Report whenever you post to a previous fiscal year to ensure that your Retained Earnings account is properly reconciled. General Ledger automatically updates this account whenever you open the first period of a new fiscal year.

Entering Journals for a Future Period

You can enter journal entries for as many future periods as you want. For example, you might want to enter journal entries for the following month while you are closing the books for the current month. You control the number of future accounting periods for which you want to allow journal entry when you define your set of books. General Ledger automatically assigns a status of ”Future–Entry” to the appropriate number of accounting periods following the latest open accounting period in your calendar.

Although you can enter journal transactions to any accounting period with the status of Future–Entry, you cannot post journals into a period until you open the period.

Journal Approval Overview

The GL Journal Approval Process obtains the necessary management approvals for manual journal batches. The process validates the journal batch, determines if approval is required, submits the batch to approvers (if required), then notifies appropriate individuals of the approval results.

The process has a result type of GL Journal Approval Process Result that gives one of four results:

  • Validation Failed: The journal batch failed the validation process and was never submitted to the approver.
  • Approval Not Required: The journal batch does not need approval.
  • Approved: The journal batch was approved by all necessary approvers. In some cases, this may be the preparer.
  • Rejected: The journal batch was rejected by an approver.
The process consists of 5 unique activities, some of which are reused, to comprise the 9 activity nodes that appear in the workflow diagram:


Allocating Amounts with Recurring Journals and MassAllocations

You can allocate amounts from any cost pool (revenues, expenses, assets, or liabilities) to various accounts using recurring journals and Mass Allocation formulas.

With a recurring journal entry formula, you define a separate journal entry for each allocation. You can group related allocation entries together in a recurring journal batch. Use recurring journal entries to perform simple or complex allocations. For example,
you can allocate a portion of your rent expense to another division, or, you can allocate a pool of marketing costs to several departments based on the ratio of department revenues to total revenues.
You define a separate recurring journal entry formula for each allocation, and you can group related allocation entries even if they are for different ledgers, together in a recurring journal batch. Each line of the recurring journal entry contains a target account, as well as the formula you want to use to calculate the allocation amount. Reserve the last line of each entry for the offsetting account. Enter line number 9999 and the offsetting account to have General Ledger automatically generate the offsetting amount. You do not need to enter a formula to calculate the offset.

With MassAllocations, you define one formula to generate allocation journal entries for a group of cost centers, departments, divisions, and so on. You define the allocation pool, the allocation formula, and the target and offset accounts for each MassAllocation formula. You can also group combine related MassAllocation formulas into batches.

Using recurring journal entry and MassAllocation formulas, you can perform a variety of allocations, including:

  • Net Allocations
  • Step–Down Allocations
  • Rate–Based Allocations
  • Usage–Based Allocations
  • Standard Costing Allocations
Creating Net Allocations
Net allocations are allocated amounts that reflect changes to the cost pool. Rather than reallocating the entire revised amount, a net allocation allocates only amounts that update the previous allocations. The net effect is the same as reversing the previous allocations and posting the entire new allocation amount. This enables you to rerun the allocations as many times as you want in the same accounting period without overallocating.
You can create net allocations by generating MassAllocation formulas in incremental mode.

Creating Step-Down Allocations
Step-down allocations distribute amounts from one allocation pool to a subsidiary allocation pool. For example, you might first allocate a portion of your facility costs to your MIS department, then allocate total MIS costs (including the allocated facility
costs) to other departments.
To create a step-down allocation, you must create a different recurring entry or MassAllocation formula batch for each allocation step. Each accounting period, generate and post the first allocation batch, then generate and post each subsequent allocation batch.

Creating Rate-Based Allocations
Rate-based allocations use current, historical or estimated rates to allocate costs such as employee benefits, commissions, bad debt, warranty costs and overhead. For example, you might want to allocate warranty costs to each division based on sales revenues and
a warranty loss rate. To create a rate-based allocation, define a recurring journal or MassAllocation formula using the statistical balance of the appropriate accounts to compute the rate. Alternately, you can enter a formula that uses a fixed rate to represent your best estimate of future costs. Each accounting period, adjust your estimated rate by revising the formula definition.

Creating Usage-Based Allocations
Usage-based allocations use statistics such as headcount, units sold, square footage, number of deliveries or computer time consumed to calculate allocation amounts. For example, you might want to allocate your rental expense based on square foot usage.
To create a usage-based allocation, define a recurring journal formula using the appropriate statistical account balance to compute the allocation amount. Each accounting period, adjust the statistical account balance to reflect the correct usage for the period before you generate the usage-based allocation formula.

Using Allocations for Standard Costing
You can use statistics such as sales units, production units, number of deliveries or customers served to perform standard costing. For example, you might want to calculate cost of sales based on sales units and a standard cost per unit. To perform this type of standard costing, define a recurring journal entry formula using the appropriate statistical account and a fixed amount for standard cost. Or, you can maintain the standard cost as a statistic in a different account. Each accounting period, adjust the statistical account balances before generating the recurring journal formula.

Journal Processing

GL supports a variety of journal entry types to meet your business & accounting reqirements.In GL there are four basic journal entry types.


Basic Processes           Total debits must equal total credits for journal entry.
The basic processes involved in journal entry are
1. Enter manual journal entries, including:
• Standard journal entries.
• Foreign and dual currency journal entries.
• Statistical journal entries.
• Intercompany journal entries.


2. Import journals from subledgers. If you encounter an error when trying to import a subledger journal, you can correct the import data and rerun journal import.

3. Define recurring journal formulas for transactions that have a common format or that you enter frequently. You can also create recurring journal formulas to create allocation entries.
You can use recurring journals to create three types of journal entries:
• Skeleton entries affect the same accounts each period, but have different posting amounts.
• Standard recurring journal entries use the same accounts and amounts each period. See: Creating Standard Recurring Journal.
• Formula entries use formulas to calculate journal amounts that vary from period to period.

4. Define MassAllocation formulas to allocate a cost pool across a group of departments, companies, etc.
 Generate recurring journal and MassAllocation journal batches based on formulas you defined.

5. Review the details of your unposted journal batches. Edit unposted journals to change information about an unposted
batch or its journal detail, including the batch period and the journal currency and finally post your journal batches manually or automatically.

Journal Components


Recurring Journals

Define recurring journal formulas for transactions that you repeat every accounting period, such as accruals, depreciation charges, and allocations.

  • Your formulas can be simple or complex. Each formula can use fixed amounts and/or account balances, including standard, end–of–day, or average balances, actual or budget amounts, statistics, and period–to–date or year–to–date balances from the current period, prior period, or same period last year. You can quickly create new recurring formulas by copying and modifying existing formulas.
  • You can define recurring journal formulas for your functional currency, foreign currencies which have a fixed relationship with your functional currency, and statistical currency.
You can use recurring journals to create three types of journal entries:
Skeleton Journal Entries: Skeleton entries affect the same accounts each period, but have different posting amounts. After you generate skeleton journal entries, you can edit the unposted journal batch using the Enter Journals form and enter the journal line amounts.
Skeleton journal entries are useful with statistical information whenever you want to record journals for actual transactions
based on statistical amounts, such as headcount, units sold, inflation rates, or other growth factors. For example, if you want to enter headcount for each cost center every period, you can define a skeleton entry with your headcount accounts. After you generate the skeleton entries, enter the actual headcount amounts before posting the batch.

Standard Recurring Journal Entries: Standard recurring journal entries use the same accounts and amounts each period.

Recurring Journal Formula Entries: Formula entries use formulas to calculate journal amounts that vary from period to
period

Creating Recurring Journal Formula Batches
To define a recurring journal formula entry, you must create a recurring journal formula batch. Your batch can contain a single recurring journal entry definition, or you can group related recurring journals into the same batch.
To create a recurring journal formula entry for a batch:
1. Navigate to the Define Recurring Journal Formula window.
2. Enter or query the batch name.
3. Enter a Name for the recurring journal entry.
4. Enter the Category.
5. Enter the Currency. You can choose STAT, your functional currency, or a foreign currency which has a fixed relationship to your functional currency.
6. Enter a range of Effective Dates that includes only those periods for which you want the recurring journal entry to be used.
Attention: Recurring journal entries will only be created when you choose to generate them for a date that falls within the Effective Dates range.
7. Choose Lines to enter the account you want General Ledger to update when you generate your recurring journals, as well as the formula to use.

Accounting Setups


Use the Accounting Setup Manager in Oracle General Ledger to define accounting setups that include the following common financial components:
One or more legal entities (optional)
Primary ledger
  • Reporting Currencies (optional)
  • Balancing segment value assignments (optional)
  • Subledger Accounting Options

Operating Units (available if legal entities are assigned)
  • Intercompany Accounts (available if legal entities are assigned)
  • Intracompany Balancing Rules (optional)

Sequencing (optional)
Secondary Ledger (optional)

To use multiple organizations, you must define an accounting setup with at least one legal entity, a primary ledger that will record the accounting for the legal entity, and an operating unit that is assigned to the primary ledger and a default legal context (legal entity). It is also recommended that balancing segment values be assigned to the legal entity to help you identify legal entity transactions during transaction processing and reporting and to take advantage of Intercompany Accounting.
Note: If your enterprise structure requires that you define a business group, you should define accounting setups before business groups.


------------------------------------------------------------------------------------------------------------------------------------------------------------------------

Installation step 1.1 - Create legal entity
Once the installation of R12 is complete, log into the system with user id and password as sysadmin/sysadmin and create the user who 'll handel the Accounting part. Assign Grants Accounting Super User to the user


Go to the grants accouting super user responsibility and define a new legal entity.
Navigation : Grants accouting super user ->Set up -> Financials -> Accounting setup manager -> Accouting setups


Installation step 1.2 - Accounting Setup

Installation step 1.2.1 - Chart of Account 
For details check http://www.oracleug.com/user-guide/oracle-flexfield/accounting-flexfield-chart-account 
Lets define a six segment chart of account as shown below
Navigation : Grants accouting super user ->Set up -> Financials -> Flexfields-> Key ->Segments

 Installation step 1.2.2 - Calendar


Installation step 1.2.3 - Currancy

Installation step 1.3 - Primary Ledger


After defining the primary ledger, attach the Legal entities to it

Entering Statistical Journals

General Ledger provides two ways to enter statistical journals. You can enter journals with only statistical debit and credit amounts. If your user profile permits, you can also combine monetary and statistical amounts in the same journal line.
Note: Statistical journal entries do not require balanced debits and credits.
Note: If you use Multiple Reporting Currencies, statistical journals will be copied to your reporting sets of books, but the journals are not affected by the currency conversion process.


To enter a statistical journal:
1. Navigate to the Enter Journals window.
2. Enter optional batch information.
3. Enter your journal information, specifying STAT for the journal Currency.
4. Enter your journal lines, using statistical debit and credit amounts.
The debits do not need to equal credits for a statistical journal.
5. Save your work.

To enter a combined statistical and monetary journal:
1. Set the profile option Journals:Mix Statistical and Monetary to Yes.
2. Define statistical units of measure for the natural account segment values for which you want to combine statistical and monetary journals.
3. Navigate to the Enter Journals window.
4. Enter optional batch information.
5. Enter your journal information.
6. Enter your journal lines, using debit and credit amounts in any monetary currency.
7. Enter the statistical Quantity for each journal line. General Ledger automatically displays the Unit of Measure associated with the natural account segment value for the line.
8. Save your work.

Bills of Receviables, Bills of Exchange & Promissory note

Factoring
Factoring is a financial transaction whereby a business sells its accounts receivable (i.e., invoices) to a third party (called a factor) at a discount in exchange for immediate money with which to finance continued business. Factoring differs from a bank loan in three main ways. First, the emphasis is on the value of the receivables (essentially a financial asset), not the firm’s credit worthiness. Secondly, factoring is not a loan – it is the purchase of a financial asset (the receivable). Finally, a bank loan involves two parties whereas factoring involves three.

It is different from the forfaiting in the sense that forfaiting is a transaction based operation while factoring is a firm based operation - meaning, in factoring, a firm sells all its receivables while in forfaiting, the firm sells one of its transactions.

Factoring is a word often misused synonymously with invoice discounting - factoring is the sale of receivables whereas invoice discounting is borrowing where the receivable is used as collateral.

Forfaiting
In trade finance, forfaiting involves the purchasing of receivables from exporters. The forfaiter will take on all the risks involved with the receivables. It is different from the factoring operation in the sense that forfaiting is a transaction based operation while factoring is a firm based operation - meaning, in factoring, a firm sells all its receivables while in forfaiting, the firm sells one of its transactions.

Benefits for using forfaiting include eliminating risks (political, transfer and commercial risks) and improving cashflows. Increases cash flow. Forfaiting converts a credit-based transaction in to a cash transaction.

The characteristics of a forfaiting transaction are:
   1. Credit is extended by the exporter for period ranging between 180 days to 7 years.
   2. Minimum bill size should be US$ 250,000/- (US$ 500,000/- is preferred)
   3. The payment should be receivable in any major convertible currency.
   4. An L/C or a guarantee by a bank, usually in importer's country.
   5. The contract can be for either goods or services.

At its simplest the receivables should be evidenced by any of the following debt instruments:
   1. Promissory note.
   2. Bill of exchange.
   3. Deferred payment letter of credit.
   4. A letter of guarantee.

Account Classification


Broadly Accounts are classified as

   Account Classification: Broadly Accounts are classified as

  •    Personal - Related with the Persons E.g. Mr. Paul’s A/C account at ABC Org
  •    Nominal - Pertaining to Income and Expenses E.g. Interest, Wages etc.
  •    Real - Pertaining to things / Properties E.g. Cash , building, Machinery etc .

General Accounting Rules for Every Account
  •     For Real A/C – Debit that whatever Comes in , Credit whatever goes out.
  •     For Nominal A/C– Debit expenses, losses and credit incomes and profits.
  •     For Personal A/C- Debit the Receiver, Credit the Giver.


Budgeting

A budget is a forecast (estimate) of cost, expenditure or /and revenue for a specified period of time. it may include one or mare accounting years. It is used to major the achievement of the company's goal or objectives.

An encumbrance is part of the budgeted amount that prevents the user from exhausting their budget amounts. when a user's expense is extending into the encumbrance amount an alert will be generated so that management can adjust the budgeted amount.

Use budgeting to enter estimated account balances for a specified range of periods. You can use these estimated amounts
  • to compare actual balances with projected results, or
  • to control actual and anticipated expenditures.
General Ledger gives you a variety of tools to create, maintain, and track your budgets, including the ability to upload budget amounts from your spreadsheet software.

Entering Budget amount
Oracle GL provides many methods to enter budget data, depending on your specific organization needs. When you define a budget, you choose whether to require budget journals for your budget. If you enabled the require budget journal flag for your set of books, this option will already be selected and cannot be changed.

When you require budget journals, you can only use budget entry methods that create journals, namely budget journals, mass budgets, budget transfers, consolidation of budget balances, and the application desktop integrator’s journal wizard.

JE : Budget Journals, MassBudget Journals, Journal Wizard and Transfer budget Amounts
Not JE : Budget Amounts, Budget Formulas, Budget Wizard and Upload Budgets

Budgeting Methods
General Ledger supports a variety of budgeting methods that facilitate budget entry and reporting. You can plan your budget setup according to the method that best meets your budgeting needs. Creating Budget Formulas to Allocate Budget Amounts
  • Creating Budget Formulas to Allocate Budget Amounts
  • Creating a Flexible Budget
  • Using Mass Budgeting
  • Using Top-Down, Bottom-Up, and Middle-Out Budgeting
  • Creating Master/Detail Budgets
  • Uploading Budgets from a Spreadsheet
Budget Accounting Cycle
The basic functionalities of budget are
1. Define budget and assign periods
2. Define budget organization and assign a/c ranges to it
3. Enter or generate budget
4. Use budgetary control and online fund checking
5. Generate Reports

Creating Recurring Journal Entries

You can define an unlimited number of journal entry lines for each recurring journal entry. The journal entry lines specify the accounts to update with the recurring journals. Each line also contains the amount to post to the designated account, or a formula to calculate the journal amounts.


1. Navigate to the Define Recurring Journal Formula window.
2. Enter or query the batch name and the journal entry name.
3. Choose Lines.
4. Enter a Line number to set the order of your recurring journal entry lines. You can indicate an automatic offsetting line for your recurring journal entry by entering the line number 9999.
5. Enter the Account you want General Ledger to update when you generate and post your recurring journals.
6. Enter an optional Line Description for the recurring entry line.
7. Enter a Formula for the line.
8. Enter the remaining lines for the recurring journal entry. Remember that you can use line number 9999 as the automatic
offsetting line for each recurring journal entry.
9. Save your work.

To enter an automatic offsetting line:
You can enter a recurring journal entry line and have General Ledger calculate and insert the balancing amount for the recurring journal entry automatically. This is useful for allocation-type entries.
1. Enter one or more lines for the recurring journal entry.
2. Enter 9999 as the line number for the automatic offsetting line.
3. Enter an Account for the line but do not enter a formula. General Ledger will automatically calculate the amount for this journal entry line when you generate your recurring journal.
4. Save your work.

Entering Formulas with EasyCalc
EasyCalc is a powerful, yet easy–to–use calculation notation based on the mathematical logic used by Hewlett–Packard calculators. EasyCalc lets you enter complex formulas to calculate journal entries, allocations, budgets and report balances.
1. Enter the first factor to use in your calculation. The factor can be a fixed amount, or an account balance.
2. Use the EasyCalc operator Enter to save the value of the first factor in memory. Enter identifies the first factor of each calculation, and separates it from previous calculations in the formula. Using Enter enables you to create a logical sequence of formula steps, and enter nested calculations in a formula.
3. Enter the next factor to use in your calculation.
4. Enter the EasyCalc operator to specify the calculation involving the previous two factors. The following are the valid mathematical operators you can use in an entry formula:
 

Creating Skeleton Journal Entries

Create skeleton journal entries for journal entries that affect the same accounts each period, but have different posting amounts. After you generate skeleton journal entries, edit the unposted journal batch using the Enter Journals window and enter the debit and credit amounts for the journal lines.

To create a skeleton journal entry:

1. Navigate to the Define Recurring Journal Formula window.
2. Enter or query the batch name and the journal entry name.
3. Choose Lines.
4. Enter a Line number to set the order of your recurring journal entry lines.
5. Enter the Account you want General Ledger to update when you generate and post your recurring journals. Do not enter a formula.
6. Enter the remaining lines and accounts for the recurring journal entry.
7. Save your work.

To enter amounts for a skeleton entry:
1. Generate the recurring journal batch that contains your skeleton entry.
2. Edit the unposted journal batch using the Enter Journals window, and enter the journal line amounts.
3. Save the revised journals.
4. Post the batch.

Defining Budgets

Create a budget to represent a collection of estimated amounts for a range of accounting periods. You can use AutoCopy to create a new budget from an existing budget. You can create budget hierarchies by assigning lower–level budgets to a master budget. This enables you to track budgeted amounts against your control budget.

To create a budget
1. Enter a Name and Description for your budget.
2. Enter the Status of your budget.
Open: The budget is available for update and budget entry.
Current: The budget is open, and it is the default budget when you use most budgeting and inquiry forms. You can have only one Current budget at a time for each set of books.
Frozen: The budget is unavailable for update or budget entry. General Ledger displays the Created Date and Frozen Date, if
applicable, for the budget.

3.
Choose whether to Require Budget Journals for your budget. If you enabled the Require Budget Journals flag for your set of books, this option will already be selected and cannot be changed.
When you require budget journals, you can only use budget entry methods that create journals, namely budget journals, budget transfers, MassBudgets, consolidation of budget balances, and the Applications Desktop Integrator’s Journal Wizard.
Attention: Use budget journals to maintain an audit trail for your budget balances. Other budget entry methods update budget balances directly.
Note: If you use budgetary control, you must use budget journals to enter amounts in your funding budget (i.e., the budget you use to enforce budgetary control).

4.
Enter the First and Last period for your budget.
Once you save the budget, you cannot change the first period.
Enter the Last period for your budget. Your budget can include up to sixty periods per year, and can span an unlimited number of fiscal years.

5.
Assign a Master Budget if you want to track your budget amounts against a control budget. You can choose any budget in your set of books that has the same period range.

6.
To open the first fiscal year of your budget, choose Open Next Year. General Ledger launches a concurrent request to open the next year.

7.
If you want to copy budget amounts from an existing budget, the first and last periods must be the same as the first and last periods of the budget you are copying from, although the year can be different.

Pracitce

Define a Budget
Responsibility = General Ledger, Vision Operations
1.    Navigate the Define Budgets form:
    * (N) Budgets > Define > Budget

2.    Enter the following:
    * Name = XXCONSULTING
    * Status = Open
    * First = Jan-YY (Use current year)
    * Last = Dec-YY (Use current year)

3.    (B) Open Next Year.

4.    (B) Yes in the Decision window.

5.    (B) OK in the Note window.

Define a Master/Detail Budget
Responsibility = General Ledger, Vision Operations

1.    Navigate the Define Budgets form:
    * (N) Budgets > Define > Budget

2.    Enter the following:
    * Name = XXADMIN
    * Status = Open
    * First = Jan-YY (Use current year)
    * Last = Dec-YY (Use current year)
    * Master Budget = XXCONSULTING (From the List of Values)

3.    (B) Open Next Year.

4.    (B) Yes in the Decision window.

5.    (B) OK in the Note window.

Budget Organizations

Budget Organizations:
  • Contain ranges of accounts that make up the budget.
  • Represent departments, cost centers, divisions, or other groups for which you enter and maintain budget data.
Options:
1. All budget organization
2. Password to restrict access

Budget Organizations window
Use this window to define budget organizations or update existing budget organizations. You can review, assign, delete or copy ranges of Accounting Flexfields to your budget organizations. You must define at least one budget organization before you can enter budget amounts. If you have one or more budget organizations defined already, you can define an "All" budget organization that contains all of the Accounting Flexfields from all of the budget organizations you define. This all-inclusive budget organization is useful if you want one budget organization for budgeting to all accounts, or if you do not need specialized budget organizations now, but may want to add them later.
1. Enter a Name and Description for your budget organization.
  • To define a new budget organization that includes only specific ranges of accounts, enter a unique name.
  • If you have one or more budget organizations defined already, you can create a budget organization named ”ALL” that automatically includes all accounts that are assigned to any budget organization. To do this, enter ”ALL” as the budget organization Name.
2. Enter the sort and display options. The Ordering Segment is the account segment General Ledger uses
to sort accounts when you review the budget organization assignments, and when you use the Enter Budget Amounts and
Enter Budget Journals windows.
Specify the Display Sequence for your account segments. You can use this sequence to change the order of your account segments on the Enter Budget Amounts and Enter Budget Journals windows. For each segment, enter a unique sequence number from 1 to n, where n is the number of segments in your account.

3. Protecting a Budget Organization with a Password
When a budget organization has password protection, you must enter the password before reviewing, entering, or changing budget information for any account within that budget organization. By assigning passwords to different budget organizations within your enterprise, you can distribute budgeting responsibilities among your various organization managers.

4. Enter Effective From and To Dates if you want to set a specific range of time when you can use this budget organization.

5. Assigning Account Ranges to a Budget Organization
  • Enter a Line number and an account Low and High for each range you want to assign to your budget organization. The ranges cannot overlap other account ranges with the same currency for any budget organization in that set of books.
  • Select the budget entry Type for the account range:
Entered: You enter budget amounts, enter budget journals, upload budgets, create MassBudget journals, or transfer budget amounts. Use this entry type if you want to use budgetary control.
Calculated: You use budget formulas or MassBudget journals to enter budget amounts. You cannot use this entry type if you are using budgetary control.
  • Enter the Currency for each account range. For accounts with abudget entry type of Calculated, you must enter either thefunctional currency for your set of books, or STAT.To enter only statistical budget amounts for the account range, enter STAT.
  • You can review, add, or temporarily delete individual accounts assigned to your budget organization by choosing Range Assignments.
  • Save your work. General Ledger launches a concurrent program to assign all the existing accounts within the designated ranges to the budget organization. You can review the Status of each range.
Adding: The concurrent request to add accounts from a range is pending.
In Process: The concurrent request to add accounts from a range is running.
Reporting: The concurrent request to add accounts from a range is generating an execution report of all the accounts it created.
Current: The concurrent request to add accounts from a range has completed.
  • Set the budgetary control options for the range
  • If your funds check level is set to None, you can assign any Currency and a budget entry Type of Entered to the account range. If your funds check level is set to Absolute or Advisory, you must assign your functional Currency and a budget entry Type of Entered to the account range. 
6. Adding or Changing Individual Accounts
You can display each account within a specific range you assigned to your budget organization. General Ledger sorts the accounts in ascending order by ordering segment value. You can add new accounts to your budget organization that fall within the designated range, or you can temporarily delete accounts from the budget organization.
1. Choose the Ranges button.
2. Choose the range in which the account falls.
3. Choose the Range Assignments button.
4. Find the next available Line, and enter the new Account. The account must fall within the range displayed at the top of the window. If you are using dynamic insertion for your set of books, you can enter an undefined account.
7. Assign accounts to the budget organization.
• To assign ranges of accounts to the budget organization, choose Ranges.
• To copy account ranges from an existing budget organization, choose AutoCopy.
If you are creating an ”ALL” budget organization, you do not need to assign accounts.

Setting Budgetary Control Options for an Account Range

If you are using budgetary control for your set of books, you can set budgetary control options for an assigned account range. You can only assign budgetary control options to account ranges with your functional currency and a budget entry type of Entered.


1. Select Automatic Encumbrance accounting to automatically create encumbrance batches for transactions originating from your feeder systems such as Oracle Purchasing and Oracle Payables. If you do not select Automatic Encumbrance, you must enter a funds check level of None.

2. Select the Funds Check Level.
Enter a Funds Check Level to control the severity of budgetary control checks. You use a Funds Check level when setting budgetary control options for account ranges, for source and category combinations in budgetary control groups, and for summary account templates in budget organizations.
None: for no funds checking or funds reservation.
Advisory: for online notification when transactions fail funds checking. The system still reserves funds for transactions even when no funds are available.
Absolute: to prohibit you from reserving funds for a transaction unless funds are available.
Attention: Advisory budgetary control makes it easy for you to overspend a budget by an unlimited amount. You might want to use Absolute budgetary control with tolerances or overrides to allow you to approve selected transactions for which no funds are available.

3. If you select an Advisory or Absolute funds check level, enter the Amount Type and Boundary to determine the time interval over which to perform funds checking.
To check funds, you must define a funds checking time interval. You enter an Amount Type to determine the cumulative balance to use for the funds checking interval. You enter a Boundary to define the end point of the interval.
The combinations of amount types and boundaries that the system supports are as follows:
  • If the amount type is PTD, boundary can be Period.
  • If the amount type is QTD, boundary can be Period or Quarter.
  • If the amount type is YTD, boundary can be Period, Quarter or Year.
  • If the amount type is PJTD, boundary can be Period, Quarter, Year, or Project.
4. If you select an Advisory or Absolute funds check level, enter the name of the Funding Budget against which you want General Ledger to check or reserve funds. You must enter a budget which requires budget journals.

Budget Formula

You define budget formulas to calculate budget amounts. Your budget formulas can be simple or complex. You can use any combination of fixed amounts and account balances, including actual or budget amounts, statistics, and period-to-date or year-to-date balances from the current period, prior period or same period last year.

When you define budget formulas, you create a budget formula batch. The batch contains one or more budget entries, and each entry contains one or more formulas. Use budget batches and entries to group your budget formulas. For example, you might combine all formulas for a single department or division into one batch, or group all formulas for certain types of calculations into separate entries. When you calculate budgets using a budget formula, General Ledger replaces any existing budget amounts directly; it does not create a budget journal.

Prerequisites

  •  Define your budget organizations and assign the budget entry type ”Calculated” to the accounts to which you want to budget.
  •  Define your budgets.
Creating Budget Formula
1.Enter a Name and Description for the budget formula batch.If you want to copy budget formula entries from an existing batch to your new batch, choose AutoCopy.

2. Enter a Name for the Journal formula entry.
 Enter the formula entry Category.
 Enter the formula entry Currency.

3. Enter a Line number to set the order of your budget formula entry lines.
Enter the Account whose budget amount you want to calculate with a formula.
Enter a formula for the line.

 
Calculating Budget Amounts
You must calculate budget amounts whenever you define or revise your budget formulas, or if you change the accounts you use in your formulas.
Calculating budget amounts from budget formulas does not create journal entries; rather, it updates budget balances directly. General Ledger replaces, rather than increments, the account balances with the calculated amounts.
 

Entering Budget Amounts

Enter budget amounts for your accounts to replace any existing budget balances. You can enter budget amounts for each account in the budget organization one–by–one, or you can use worksheet mode to enter budgets for several accounts at once.

  • Budget rules enable you to distribute budget amounts for all periods.
  • General Ledger does not create journal entries when you use the Enter Budget Amounts window. Use the Enter Budget Journals window if you want to create journal entries to maintain an audit trail for your budget amounts.
  • You cannot enter budget amounts for a budget that is frozen.
1. Specify the Budget Organization for the accounts to which you want to budget. If the budget organization is password-protected, you must enter the password before you can enter budget amounts.

2. Enter the Budget for the amounts you are entering.
Note: You cannot enter amounts for a budget that is frozen. If the budget that requires journals, you must use the Enter
Budget Journals window.

3. Enter the range of Accounting Periods to which you want to budget.

4. Enter the Currency of the budget amounts you are entering. The accounts must be assigned to the budget organization for this currency.

5. Choose the Single Row Mode tab to review and enter budget information for one account at a time. You will also see a total for all budget periods when you use Single Row mode.
Query the Account to which you want to budget by specifying one or more segment values (or wildcards).
Note: If you rearranged the display sequence of your account segments when you defined your budget organization, you still enter your account query criteria in numerical segment order.

6. Enter budget amounts for periods in the designated range, or use budget rules to calculate and distribute budget amounts for all periods.

7. Choose Post to submit a concurrent request that updates your account budget balances.

Budget rules


Budget rules are predefined methods for calculating and distributing budget amounts to all periods for an account. You can use budget rules to help you enter budgets quickly and easily.
Note: You cannot use budget rules for disabled, outdated or frozen accounts, or accounts for which budgeting is not allowed.

You cannot enter budget amounts for a budget that is frozen.

You can use these budget rules:
  • Divide Evenly: Evenly distribute the amount you enter across all accounting periods. You can set rounding options to handle any undistributed amount resulting from rounding calculations.
  • Repeat Per Period: Repeat the amount you enter in each accounting period.
  • Prior Year Budget Monetary*: Multiply the amount you enter by the prior year budget monetary balance of the account you enter.
  • Current Year Budget Monetary*: Multiply the amount you enter by the current year budget monetary balance of the account you enter. To include budget amounts you entered in the current session, save your entries before choosing this budget rule. You do not have to post the entries.
  • Prior Year Budget Statistical*: Multiply the amount you enter by the prior year budget statistical balance of the account you enter.
  • Current Year Budget Statistical*: Multiply the amount you enter by the current year budget statistical balance of the account you enter. To include budget amounts you entered in the current session, save your entries before choosing this budget rule. You do not have to post the entries.
  • Prior Year Actual Monetary*: Multiply the amount you enter by the prior year actual monetary balance of the account you enter.
  • Current Year Actual Monetary*: Multiply the amount you enter by the current year actual monetary balance of the account you enter.
  • Prior Year Actual Statistical*: Multiply the amount you enter by the prior year actual statistical balance of the account you enter.
  • Current Year Actual Statistical*: Multiply the amount you enter by the current year actual statistical balance of the account you enter.

Entering Budget Journals


Enter budget journals to maintain an audit trail for your budget balances. You can use budget rules to calculate budget journal amounts automatically. When you post budget journals, the journal amounts update existing budget balances. You can review and change your budget journals before posting them.
Attention: When you use budget rules in Journal Mode, General Ledger calculates the appropriate debit or credit needed to achieve the balance you enter for the account type.

Entering Statistical Budget Journals
You can enter statistical budget journals for accounts that have a currency of STAT in their budget organization assignment. You can enter budget journals that only contain statistical amounts, or, depending on the Journals:Mix Statistical and Monetary profile option, you can combine monetary and statistical budget amounts in your budget journals. The latter option is not available if budgetary control is enabled for your set of books.

Creating Unposted Budget Journal Batches
After entering budget journals, you must run Journal Import to create unposted journal batches. If you are using budgetary control, you must check and reserve funds for the budget journal batches.

GL Setup

General Ledger provides you with the flexibility to manage your financial information within any company structure. You can maintain multiple companies with similar or different accounting structures, and consolidate their results for meaningful financial reporting.

With a multi–company structure, you can:

  • Maintain actual, budget, encumbrance, and average balance information for each of your companies.
  • Control security over each company’s financial information so that only properly authorized individuals can review or change accounting information.
  • Create intercompany accounts for combinations of source, category, and balancing segment value to automatically keep your companies properly balanced and provide detail for reconciliation.
  • Produce consolidated reports.
Before you set up your multi–company organization in General Ledger, determine whether you can maintain information about each company in the same set of books, or whether you need to use multiple sets of books.
You need multiple sets of books if one of the following is true:
  • You have companies that require different account structures to record information about transactions and balances. For example, one company may need a 6–segment account, while another needs only a 2–segment account.
  • You have companies that use different accounting calendars. For example, although companies may share fiscal year calendars, you may want a weekly calendar for one company and a monthly calendar for another.
  • You have companies that require different functional currencies. Consider the business activities and reporting requirements of each company. If you must present financial statements in another country and currency, consider the accounting principles to which you must adhere. Based on such considerations, choose the appropriate functional currency for each company.
  • You use multiple Oracle Applications instances for your companies.
Set Up Underlying Oracle Applications Technology
During GL setup, you need to complete several steps related to other products:
  1. Performing system–wide setup tasks such as configuring concurrent managers and printers
  2. Managing data security, which includes setting up responsibilities to allow access to a specific set of business data and complete a specific set of transactions, and assigning individual users to one or more of these responsibilities.
  3. Setting up Oracle Workflow


Shorthand Aliases

Value Set Windows

The value sets you define using these windows appear in lists of values you see when you define flexfield segments using the Key Flexfield Segments window or the Descriptive Flexfield Segments window. If you are defining reports that your users run from the Submit Requests window, use this window to define value sets for your report arguments. The value sets you define using this window also appear when you define report parameters using the Concurrent Programs window.


You can share value sets among segments in different flexfields, segments in different structures of the same flexfield, and even segments within the same flexfield structure. You can share value sets across key and descriptive flexfields. You can also share value sets with parameters for your concurrent programs that use the Standard Request Submission feature. Many Oracle Applications reports use predefined value sets that you may also use with your flexfield segments. However, any changes you make to a value set also affect all requests and segments that use the same value set.

This window prevents you from changing the validation type or format type of an existing value set because your changes affect other flexfields that use the same value set. In addition, other changes may affect the values in your value set in ways other than you expect. You cannot delete a value set that a flexfield or parameter currently uses. If you make any changes to your value set after you have used your flexfield or concurrent program that uses this value set, you must either change responsibilities or exit to the operating system and log back in before you can see your changes take effect.

1. List Type
Choose List of Values if your value set should not provide the LongList feature in Oracle Forms applications. A user will not see a poplist in Oracle Self–Service applications.
Choose Long List of Values if your value set should provide the LongList feature in Oracle Forms Applications. The LongList
feature requires a user to enter a partial segment value before the list of values retrieves all available values. You may not enable LongList for a value set that has a validation type of None.
A user will not see a poplist in Oracle Self–Service applications. Choose Poplist if your value set should not provide the LongList feature in Oracle Forms applications, but should provide a poplist in Oracle Self–Service applications.

Here are guidelines for the List Type field:
  •  Poplist – fewer than 10 values expected
  •  List of Values – between 10 and 200 values expected
  •  Long List of Values – more than 200 values expected
2. Security Type
Specify the Security Type you plan to use with any segments that use this value set. Security does not apply to value sets of validation type None, Special, or Pair.
Note: Flexfield value security is not available for Translatable Independent and Translatable Dependent value sets.
The possible security types are:
  • No Security – All security is disabled for this value set.
  • Hierarchical Security – Hierarchical security is enabled. With hierarchical security, the features of value security and value hierarchies are combined. With this feature any security rule that applies to a parent value also applies to its child values.Warning: Within a hierarchical tree of values, a value is subject to a security rule if any parent above it is subject to that security rule.
  • Non-Hierarchical Security – Security is enabled, but the rules of hierarchical security do not apply. That is, a security rule that applies to a parent value does not ”cascade down” to its child values.
3. Format Type
Enter the type of format you want to use for your segment values. Valid choices include: Char, Date, DateTime, Number, Standard Date, Standard DateTime, and Time.
Note: Translatable Independent and Translatable Dependent value sets must have the Char format
 
4. Validation types

There are several validation types that affect the way users enter and use segment or parameter values:
• None (not validated at all)
• Independent
• Dependent
• Table
• Special (advanced)
• Pair (advanced)
• Translatable Independent
• Translatable Dependent
None
You use a None type value set when you want to allow users to enter any value so long as that value meets the value set formatting rules. That is, the value must not exceed the maximum length you define for your value set, and it must meet any format requirements for that value set. For example, if the value set does not allow alphabetic characters, your user could not enter the value ABC, but could enter the value 456 (for a value set with maximum length of three). The
values of the segment using this value set are not otherwise validated, and they do not have descriptions.

Because a None value set is not validated, a segment that uses this value set does not provide a list of values for your users. A segment that uses this value set (that is, a non–validated segment) cannot use flexfield value security rules to restrict the values a user can enter.

Independent
An Independent value set provides a predefined list of values for a segment. These values can have an associated description. For example, the value 01 could have a description of ”Company 01”. The meaning of a value in this value set does not depend on the value of any other segment. Independent values are stored in an Oracle Application Object Library table. You define independent values using an Oracle Applications window, Segment Values.
Table
A table–validated value set provides a predefined list of values like an independent set, but its values are stored in an application table. You define which table you want to use, along with a WHERE cause to limit the values you want to use for your set. Typically, you use a table–validated set when you have a table whose values are already maintained in an application table (for example, a table of vendor names maintained by a Define Vendors form). Table validation also provides some advanced features such as allowing a segment to depend upon multiple prior segments in the same structure.

Dependent
A dependent value set is similar to an independent value set, except that the available values in the list and the meaning of a given value depend on which independent value was selected in a prior segment of the flexfield structure. You can think of a dependent value set as a collection of little value sets, with one little set for each independent value in the corresponding independent value set. You must define your independent value set before you define the dependent value set that depends on it. You define dependent values in the Segment Values windows, and your values are stored in an Oracle Application Object Library table

Special and Pair Value Sets
Special and pair value sets provide a mechanism to allow a ”flexfield–within–a–flexfield”. These value sets are primarily used for Standard Request Submission parameters. You do not generally use these value sets for normal flexfield segments.
Special and Pair value sets use special validation routines you define. For example, you can define validation routines to provide another flexfield as a value set for a single segment or to provide a range flexfield as a value set for a pair of segments.

Translatable Independent and Translatable Dependent
A Translatable Independent value set is similar to Independent value set in that it provides a predefined list of values for a segment. However, a translated value can be used. A Translatable Dependent value set is similar to Dependent value set in
that the available values in the list and the meaning of a given value depend on which independent value was selected in a prior segment of the flexfield structure. However, a translated value can be used.

Segment Values Window

Use this window to define valid values for a key or descriptive flexfield segment or report parameter. You must define at least one valid value for each validated segment before you can use a flexfield. These validated segments provide users with a list of predefined valid segment values, and have a validation type of Independent, Dependent, Translatable Independent, Translatable Dependent, or Table.

You should use this window to define values that belong to Independent, Dependent, Translatable Independent, Translatable Dependent, or Table value sets. You can define new segment values, specify value descriptions for your values and to enable or disable existing values as well.


1. The values you define for a given flexfield segment automatically become valid values for any other flexfield segment that uses the same value set. Many Oracle Applications reports use predefined value sets that you may also use with your flexfield segments.

2. If your flexfield segment uses a value set associated with a Standard Request Submission report parameter, creating or modifying values also affects that parameter. If you use the same value set for parameter values, the values you define here also become valid values for your report parameter.

3. You also specify segment value qualifiers, rollup groups, and child value ranges.
You can also view and maintain segment value hierarchies for the Accounting Flexfield or for any custom application flexfields that use the value hierarchies feature.
Attention: Because the Accounting Flexfield is the only Oracle Applications key flexfield that uses the parent, rollup group,hierarchy level and segment qualifier information, you need only enter this information for values that are associated with your Accounting Flexfield.

4. For certain types of changes to value hierarchies, a concurrent request is submitted to rebuild the value hierarchies. One request per value set that the change affects (the value set attached to the segment for which you are defining or maintaining values) may be submitted. For example, if you make hierarchy structure changes for five different key
flexfield segments, all of which use different value sets, up to five concurrent requests may be submitted.
A concurrent request is submitted for the following changes to value hierarchies:
• A new hierarchy range is defined, or an existing hierarchy range is updated or deleted.
• A hierarchy range is moved to another value.
• The value definition for non–parent values is updated in some way. For example, the description is changed.

Rollup Groups

Rollup Group is a collection of Parent values for a given segment.

To be used in a rollup group there are a few requirements:
1.  The value MUST be a Parent value.
2.  The Parent Value MUST contain Child values.
3.  The Parent and Child Values MUST belong to the same Value Set.


Users can summarize on any information in any segment using Rollup Groups.

To define rollup groups
1. Enter a code for your rollup group. The code is required and used internally.
2. Enter a name and description for your rollup group.
3. Save your changes.
4. Apply your rollup group name to particular values using the Segment Values window

Use the above window to define rollup groups to which you can assign key flexfield values. You can use a rollup group to identify a group of parent values for reporting or other application purposes. You assign key flexfield segment values to rollup groups using the Segment Values window.

In Oracle Applications, only the Accounting Flexfield uses rollup groups. Rollup groups are used to create summary accounts for reporting purposes.

Chart of Accounts


Balancing Segment, Cost Center, Natural Account, Secondary tracking segment and Inter compnay.
1. Define value sets. Value sets determine the attributes of your account segments such as the segment length, whether to require a segment value, value alignment, and value security.

2. Define your account structure. Indicate how many separate segments your account will have, and for each segment, enter a name, sequence number, and an associated value set.
  • Designate one of your segments as the natural account segment and another as the balancing segment. You can optionally designate a cost center segment and/or intercompany segment. If you are using Oracle Assets, Oracle Projects, or want to run revaluations by cost center, it is highly recommended that you specify a cost center segment.
  • Assign the Secondary Tracking Segment qualifier to one of the segments in your chart of accounts. You cannot use the primary balancing, intercompany, or natural account as the secondary segment.
  • Assign an intercompany segment. If your subsidiaries share the same set of books, you can use the intercompany segment to identify subsidiaries involved in intercompany transactions.
3. Define your account segment values.
If you plan on defining summary accounts or reporting hierarchies, you must define parent values as well as child or detail values. You can set up hierarchy structures for your segment values.
Define parent values that include child values. You can view a segment value’s hierarchy structure as well as move the child
ranges from one parent value to another.
3.2 Define rollup groups to create summary accounts whose summary balances you can review. You assign parent segment values to rollup groups.

4. Create account combinations.
If you allow dynamic insertion, you can create new account combinations automatically as you use them during journal entry. If you do not allow dynamic insertion, define new account combinations manually in the GL Accounts window.
You can define new account combinations or disable existing account combinations at any time.
In the GL Accounts window, check the preserve check box to preserve account combinations against attribute updates when you run the Segment Value Inheritance program.

5. Define Security Rules to restrict user access to certain account segment values.
http://www.oracleug.com/user-guide/basics-oracle/42-flexfield-value-security
Define cross–validation rules to control the account combinations that can be created during data entry.

Designing Your Account Segments

The account structure helps you categorize your accounting information as you record it. You create an account structure by defining Accounting Flexfield segments that comprise the account. You should design your accounts to determine the number and characteristics of the segments you need. 

Below are some common entities that many organization define with separate account segments. You can also identify one of these as a secondary tracking segment except the primary balancing, intercompany, and natural account segments.


• Company: A segment that indicates legal entities for commercial, for–profit organizations.
• Fund: A segment that indicates a fiscal and accounting entity with a self–balancing set of accounts for governmental or
not–for–profit organizations.
• Cost Center or Department: A segment that indicates functional areas of your business or agency, such as Accounting, Facilities, Shipping, and so on.
• Account: A segment that indicates your ”natural” account, such as Cash, Accounts Payable, or Salary Expense.
• Product: A segment that indicates products, such as disk drives, printer cables or magnetic tapes manufactured by a commercial, for–profit organization.
• Program: A segment that indicates programs, such as, for a university, scholarship program, endowment program, or annual giving program.
• Project: A segment that indicates projects such as work orders, contracts, grants, or other entities for which you want to track revenues and expenses.
• District: A segment that indicates geographical locations, such as Northern California, Central Florida or Western New York.
• Distribution Channel: A segment that indicates the method by which your product reaches your customer, such as Wholesale, Retail, OEM, and so on.
Intercompany: A segment that indicates intercompany entities. If your subsidiaries share the same set of books, you can use an intercompany segment to identify subsidiaries involved in intercompany transactions. This segment usually mirrors your company segment.

To determine your account segment needs
1. Determine the segment that captures the natural account, such as assets, liabilities, expenses, and so on.

2. Define a separate Accounting Flexfield segment for each dimension of your organization on which you want to report, such as regions, products, services, programs, and projects. For example, you may want to record and report on expenses by project. To do this, your account must categorize expenses by project. Define your account to include a ”Project” segment. By doing this, you automatically categorize all your accounting information by project as you enter it, and you can easily report on project information.

3. Group similar business dimensions into one segment. This allows a more simplified and flexible account structure
For example, you only need one segment to record and report on both districts and regions, as illustrated below. Because regions are simply groups of districts, you can easily create regions within your district segment by defining a parent for each region with the relevant districts as children. Use these parents when defining summary accounts to maintain account balances and reporting hierarchies to perform regional reporting.

4. Consider information you track in other accounting information systems. You may not need to capture certain organizational dimensions if another system already records and reports on this information.
For example, if you need to report on sales by product and your sales tracking system already provides this information, General Ledger account structure does not need to categorize information by product. If you are a government or not–for–profit agency using a labor costing system which captures work breakdown structure for reimbursable billing, you may not need to capture this in your account structure.

5. Identify segments that you might need in the future. Consider future expansion and possible changes in your organization and reporting needs. For example, you may not need a region segment now, but eventually you plan to expand you organization to cover multiple regions

6. If you want to perform multi–company or fund accounting within a set of books, choose a primary balancing segment. You must define one and only one primary balancing segment in your account. General Ledger automatically balances all journal entries for each value of this balancing segment and performs any necessary intercompany or interfund posting to the intercompany or interfund account you specify when you define your set of books.
If you generate many intercompany transactions, you can use an intercompany segment to augment resulting intercompany payables and receivables. 

7. Identify a secondary tracking segment in your chart of accounts. General Ledger will track retained earnings, cumulative translation adjustment account, and revaluation gain/loss by primary balancing segment and the secondary segment to provide you with more accounting detail. The secondary tracking segment cannot be the primary balancing, intercompany, or natural account segment.
Assign the Secondary Tracking Segment Qualifier to your secondary tracking segment.

Suppose for an operating unit(which is your balancing segment) you have 10 different cost centers and you want to track the retained earnings and revaluation gain/loss for each cost center then you can make the cost center segment as secondary tracking segment.

8. If you plan to maintain and consolidate multiple set of books, think of common elements among your separate account structures. Consider which segments can share value sets, or where opportunities for rolling up segments from a subsidiary set of books into a parent set of books exist.

9. Plan your value sets. To reduce maintenance and to maintain consistency between sets of books, you can use value sets when defining multiple charts of accounts. Using the same value sets allow two different sets of books to reference the same segment values and descriptions for a specified segment. For example, the values in your natural account segment, such as Cash, Accounts Payable, and so on, may be equally applicable to each of your sets of books. Ideally, when you set up a new set of books you should consider how you will map your new Accounting Flexfield segments for consolidation. When a common natural account segment is used between sets of books, it is easier to map account balances from your subsidiary sets of books to a consolidating entity 

Period Types

You can define your own period types to use in addition to the General Ledger standard period types Month, Quarter and Year. You use these period types when you define the accounting calendar for your organization.

Defining Period Types
Each set of books has an associated period type. When you assign a calendar to a set of books, the set of books only accesses the periods with the appropriate period type. Thus, you can define an accounting calendar with periods of more than one period type; however, each set of books will only use periods of a single period type.
Note: If you close your balance sheet using the Create Balance Sheet Closing Journals program, define 14 accounting periods for your period type.


1. Enter a unique Name for your accounting period type.

2. Enter the number of accounting Periods per Year. For example, you could define a Week period type and specify 52 periods per year. You can assign up to 366 accounting periods per fiscal year for any period type, and maintain actual balances for those periods. However, for budgets you can only use the first 60 periods.

3. Enter the Year Type to specify whether the period is part of a fiscal or calendar year. General Ledger uses the year type to assign a year in the accounting period system name when you set up your calendar.
  • Choose Calendar to use the year in which an accounting period begins for the system name.
  • Choose Fiscal to use the year in which your fiscal year ends for the system name.
For example, assume you have a July 1 to June 30 fiscal year and the current date is July 15, 1995. If you choose the Calendar year type, General Ledger appends the year 1995 to the period name (JUL–95) because July begins in 1995. If you choose the Fiscal year type, General Ledger appends 1996 to the period name (JUL–96) because the fiscal year ends in 1996.
Using the same July to June fiscal year example, if the current date is March 15, 1995 and you choose the Fiscal year type, General Ledger appends the year 1995 to the period name because the fiscal year ends in 1995.

4. (Optional) Enter a Description for the period type.

Difference Between a Fiscal Year and a Calendar Year
The one main difference between a fiscal year and a calendar year is when the year ends. Calendar years start on January 1 and end on December 31 regardless of the finances. A fiscal year can start at any point during a calendar year as long as it ends 12 months later. The US Congress uses October 1 thru September 31 to cover congressional sessions; while most retailers use February 1 thru January 31 so that the holiday rush, returns, and credit card income all are in the same year. School districts end their fiscal year at the end of June to match the end of the school year. The reason for using a fiscal year instead of a calendar year for tracking a fiscal plan is to keep income and the spending of that income in a single cycle.

Read more: http://www.brighthub.com/money/personal-finance/articles/56706.aspx#ixzz0YVUO3jJl


What are the ramifications of using the Year Type of Calendar vs. Fiscal?

SOLUTION DESCRIPTION -  Meta Link : [ID 1013624.102]
------------------------------------------------------------------------------------
The Year Type (Fiscal or Calendar), is used only to determine which two digits to append to the system generated period name.
Regardless of which Year Type is used, the 'Year' entered on the Calendar form must be the same for all periods in your fiscal year - whether it is a calendar year or a fiscal year.

   If Year Type = Calendar:
       The last 2 digits of the 'From' date for the period are used.

   If Year Type = Fiscal:
       The last 2 digits of the value in the 'Year' column are used.


Examples are as follows:
   Your fiscal year runs from April 1998 through March 1999.

  For your 1999 fiscal year, you have defined your calendar as:
 
      Prefix   Year        From             To      
     -----------------------------------------------------------
      Apr     1999   01-Apr-1998   30-Apr-1998  
      May     1999   01-May-1998   31-May-1998
      Jun     1999   01-Jun-1998   30-Jun-1998
      Jul     1999   01-Jul-1998   31-Jul-1998
      Aug     1999   01-Aug-1998   31-Aug-1998
      Sep     1999   01-Sep-1998   30-Sep-1998
      Oct     1999   01-Oct-1998   31-Oct-1998
      Nov     1999   01-Nov-1998   30-Nov-1998
      Dec     1999   01-Dec-1998   31-Dec-1998
      Jan     1999   01-Jan-1999   31-Jan-1999
      Feb     1999   01-Feb-1999   28-Feb-1999
      Mar     1999   01-Mar-1999   31-Mar-1999

   If your Year Type is FISCAL, these are the Period Names that
   would be created:
                                                Period
      Prefix     Year             From          To         Name
      -----------------------------------------------------------------------
      Apr     1999   01-Apr-1998   30-Apr-1998   Apr-99
      May     1999   01-May-1998   31-May-1998   May-99
      Jun     1999   01-Jun-1998   30-Jun-1998   Jun-99
      Jul     1999   01-Jul-1998   31-Jul-1998        Jul-99
      Aug     1999   01-Aug-1998   31-Aug-1998   Aug-99
      Sep     1999   01-Sep-1998   30-Sep-1998   Sep-99
      Oct     1999   01-Oct-1998   31-Oct-1998   Oct-99
      Nov     1999   01-Nov-1998   30-Nov-1998   Nov-99
      Dec     1999   01-Dec-1998   31-Dec-1998   Dec-99
      Jan     1999   01-Jan-1999   31-Jan-1999   Jan-99
      Feb     1999   01-Feb-1999   28-Feb-1999   Feb-99
      Mar     1999   01-Mar-1999   31-Mar-1999   Mar-99

   If your Year Type is CALENDAR, these are the Period Names that
   would be created:
                                                Period
      Prefix   Year       From            To            Name
      --------------------------------------------------------------------
      Apr     1999   01-Apr-1998   30-Apr-1998   Apr-98
      May     1999   01-May-1998   31-May-1998   May-98
      Jun     1999   01-Jun-1998   30-Jun-1998   Jun-98
      Jul       1999   01-Jul-1998   31-Jul-1998     Jul-98
      Aug     1999   01-Aug-1998   31-Aug-1998   Aug-98
      Sep     1999   01-Sep-1998   30-Sep-1998   Sep-98
      Oct     1999   01-Oct-1998   31-Oct-1998   Oct-98
      Nov     1999   01-Nov-1998   30-Nov-1998   Nov-98
      Dec     1999   01-Dec-1998   31-Dec-1998   Dec-98
      Jan     1999   01-Jan-1999   31-Jan-1999   Jan-99
      Feb     1999   01-Feb-1999   28-Feb-1999   Feb-99
      Mar     1999   01-Mar-1999   31-Mar-1999   Mar-99


Calendars

Create a calendar to define an accounting year and the periods it contains. You should set up one year at a time, specifying the types of accounting periods to include in each year. Defining one year at a time helps you be more accurate and reduces the amount of period maintenance you must do at the start of each accounting period. You should define your calendar at least one year before your current fiscal year.

Defining Calendars
You can define multiple calendars and assign a different calendar to each set of books. For example, you can use a monthly calendar for one set of books, and a quarterly calendar for another. Calendars you create are validated online. Full calendar validation is launched whenever you exit the Accounting Calendar window. Navigate to Help>View My Requests to view or print the Calendar Validation Report. You may also choose this report from the Standard Reports list to identify any errors associated with the calendar you created.

 
When you add periods, keep in mind these important rules
Add accounting periods to your calendar to define the number of periods in the calendar year. You can add periods to a calendar at any time. Your calendar can contain both adjusting and non-adjusting accounting periods.
  • Accounting periods cannot overlap, except for adjusting periods.
  • If any of your non–adjusting accounting periods overlap, General Ledger reports an error.
  • Adjusting periods must overlap non–adjusting periods.
  • Periods of the same period type must be consecutively numbered in ascending order without gaps.
  • All periods must have period numbers assigned between 1 and the maximum number for that period type.
  • All periods must have quarter numbers assigned between 1 and the maximum number.
  • Period ordering must be based on the period starting dates.
  • The starting fiscal year must start no earlier than one year before the calendar year and end no later than one year after the calendar year.
  • You cannot report on a year with no periods defined.
Note :
1. You cannot perform foreign currency translations for the first accounting period in a calendar. You must define at least one period preceding, as well as the period immediately following, the first period for which you will perform
translations.
2.  If you close your balance sheet using the Create Balance Sheet Closing Journals program, define a calendar using a
period type that contains 14 periods
. You then assign an adjusting period at the beginning and end of the year to your
accounting calendar.
3. If your are using and Average Daily Balance Non–Consolidation set of books and you close your balance sheet, define a calendar with two adjusting periods at the end of the year.

To add periods to your calendar

1. Navigate to the Accounting Calendar window. Enter or query the Name of the calendar.

2. Enter a period Prefix for each accounting period. General Ledger combines this prefix with the year to create the period name. For example, you can enter Jan, Feb, Mar, etc. or Period1, Period2, Period3, etc.
Note: If a period you specify here has been used (opened or used in an open budget or encumbrance year), the resulting
name in the Name field cannot be updated.

3. Enter the period Type.
When you define a set of books, you assign it a period type. When you assign a calendar to a set of books, only the periods with the corresponding period type apply. Thus, you can define an accounting calendar with periods of more than one period type; however, each set of books will only use periods of a single period type.

4. Enter the Year of the accounting period. This is the year in which your fiscal year ends. For example, if your fiscal year begins in 1994 and ends in 1995, enter 1995 for all periods in the fiscal year. 

5. Enter a number to specify which Quarter of your fiscal year your accounting period is in. General Ledger uses this number to determine how your accounting periods roll up for quarter–to–date balances.

6. Enter the Number of the period within the fiscal year. Be sure to number your accounting periods sequentially, based on the period starting dates you specify in the From/To range.

7. Enter the range of dates (From and To) when the accounting period begins and ends.
General Ledger automatically creates and displays a period Name for each accounting period. The name consists of your period prefix and the last two digits of either your calendar year or your fiscal year, depending on the year type you assigned in the period type definition. General Ledger displays the period name whenever you choose an accounting period.

8. If you choose to make an accounting period an Adjusting period, it can overlap the dates of other accounting periods. For example, you can define a period called DEC–94 that includes 01–DEC–1994 through 31–DEC–1994. You can also define an adjusting period called DEC31–94 that includes only one day: 31–DEC–1994 through 31–DEC–1994. Both your adjusting and non-adjusting periods should have the period type associated with your set of books.

Adjusting periods apply only to General Ledger. They are not used in Oracle feeder systems, such as Inventory, Payables, Purchasing, and Receivables. Note also that you can only import journals into non–adjusting periods.

Transaction Calendars

Each set of books for which average processing is enabled, must be assigned a transaction calendar, which is used to control transaction posting. When you define the transaction calendar, you choose which days of the week will be business days. You can also specify other non–business days, such as holidays, by maintaining the transaction calendar.

1. Enter a Name and Description for the transaction calendar.
2. Optionally, choose Defaults to change the Business Day defaults.
To establish the first transaction day, General Ledger looks at all calendars in the system to determine which calendar has the earliest period. January 1st for the year in which this earliest period occurs is the first transaction day.
3. To make a date a valid business day, mark the Business Day checkbox for the date line. To make a date a non–business day, unmark the checkbox.

Business Day Defaults
When you first define a transaction calendar, General Ledger uses default values for determining which days are business days and which are non–business days. You can change the business day defaults before you have General Ledger generate your initial transaction calendar.

Currencies

Use the Currencies window to define non-ISO (International Standards Organization) currencies, and to enable/disable currencies. Oracle Applications has predefined all currencies specified in ISO standard #4217.
To use a currency other than U.S. Dollars (USD), you must enable the currency. U.S. Dollars (USD) is the only currency that is enabled initially.


1. Enter a unique Code to represent your currency. 
Note: You cannot change a currency code after you enable the currency, even if you later disable that currency.

2. Enter the Name and Description of the currency. 

3. (Optional) Select the name of the Issuing Territory. Oracle Applications has predefined the names of countries (per ISO
Standard #3166) that issue standard currencies.

4. Enter the Symbol for your currency.
Note: Some Oracle Applications use currency symbols when displaying amounts. Others, like General Ledger, do not.

5. Enter the Precision of the currency to designate the number of digits to the right of the decimal point used in regular currency transactions.

6. Enter the Extended Precision to designate the number of digits to the right of the decimal point used in calculations for this currency. The extended precision must be greater than or equal to the standard precision.
Note: Some Oracle Applications use the extended precision. Others, like General Ledger, do not. 

It is documented that internal calculations can be made with the extended precision, were displayed amounts are to be displayed using the currency precision.

7. Enter the Minimum Accountable Unit to designate the smallest denomination used in this currency. Note that this might not correspond to the precision.

8. (Optional) Enter Effective Dates for your currency. You can only enter transactions denominated in this currency for dates within the range. If you don’t enter a start date, the currency is valid immediately. If you don’t enter an end date, the currency is valid indefinitely.

9. Enable your currency.

Definitions
Throughout this site, we refer to currencies in one of three contexts -- primary functional currency, reporting functional currency, and transaction currency. Each is explained below:

Primary Functional Currency: the currency you use to record transactions and maintain your accounting data within Oracle Applications. The primary functional currency is generally the currency in which you transact most of your business and the one you use for legal reporting.

Reporting Functional Currency: a currency other than your primary functional currency for which you need to report accounting data. For example, as of January 1, 1999, the new pan-European currency, the Euro, will become effective. If you need to report in the Euro currency, you will need a reporting set of books with the Euro as the functional currency. Therefore, you need to enable the EUR currency.

Transaction Currency: the currency in which a transaction originates. For example, if you are a Canadian organization and you trade with organizations located in Japan, you must enable the Japanese Yen if you will be issuing purchase orders, generating invoices, paying bills, and receiving payments in Yen.
 

Sets of Books

A set of books determines the functional currency, account structure, and accounting calendar for each company or group of companies. If you need to report on your account balances in multiple currencies, you should set up one additional set of books for each reporting currency. Your primary set of books should use your functional currency. Each reporting set of books should use one of your reporting currencies.

  1. When defining a set of books, you can also choose to enable average balance processing. If you choose this option, General Ledger will track and maintain average and end–of–day balances.
  2. When you define a set of books, you can also choose to enable budgetary control for the set of books. If you choose this option,encumbrances will be created automatically for your transactions in General Ledger, Oracle Purchasing and Oracle Payables. Enabling budgetary control is the first step in setting up funds checking.
  3. If you need to report on your account balances or at the transactions level in multiple currencies, define a primary set of books using your functional currency and additional sets of books using your reporting currencies.
  4. Before you can use a newly defined set of books, your system administrator must associate the set of books with one or more responsibilities. This is done using the profile option GL Set of Books Name. Your responsibility determines which set of books you use.

1. Enter a Name for your set of books. This name appears whenever you choose a set of books from a list and appears as a heading in reports.

2. Enter a Short Name that will appear in the title bar of each window.

3. Enter the name of any enabled Chart of Accounts, or account structure, for this set of books.

4. Enter the Functional Currency for your set of books. The functional currency is also known as the base currency, local
currency, or primary currency.

5. Assign an Accounting Calendar and Period Type to the set of books. General Ledger uses the calendar periods that have the period type you specify for journal entry, budgeting, and reporting with this set of books.
Note: General Ledger will report an error if there are any gaps between periods in your accounting calendar or if any of your
non–adjusting periods overlap.

6. Enter the number of Future Periods to allow for journal entry within this set of books. General Ledger automatically assigns a status of Future Entry to accounting periods following the latest open period in your calendar, based on the number of future enterable periods you define here. If you change the number of future enterable periods for your set of books, General Ledger does not change additional period(s) to the Future Enterable status until you open a new period using the Open and Close Periods window.
Note: You can enter journal batches for a future enterable period, but you cannot post the batches until you open the
period.

7. Assign the default Retained Earnings account for your set of books under the Closing Tab.

8. Complete the remaining options for your set of books under the Closing, Journalling, Average Balances, Budgetary Control, and Multiple Reporting Currencies tabs.

Closing Tab

Identifies closing options and accounts for your Set of Books. Complete the following as necessary:
When you define your set of books, you always specify a Retained Earnings account, and you can also set up other special accounts depending upon the functionality you plan to use.

Retained Earnings account: When you open the first period of a fiscal year, General Ledger posts the net balance of all income and expense accounts from the prior year against your retained earnings account. If you have multiple companies or balancing entities within a set of books, General Ledger automatically creates a retained earnings account for each company or balancing entity.

The Balancing Segment and the nominated secondary tracking segment act as placeholders in this field. General Ledger automatically inserts the appropriate value when transactions are posted.

Translation Adjustment: This account is necessary if you choose to translate your functional currency balances into another currency for reporting, or if you choose to revalue foreign currency–denominated balances. General Ledger automatically posts any net adjustments resulting from currency translation or revaluation to this account, in accordance with SFAS #52 (U.S.). If you have multiple companies or balancing entities within a set of books, General Ledger  automatically creates a translation adjustment account for each company or balancing entity.

The Balancing Segment and the nominated secondary tracking segment act as placeholders in this field. General Ledger automatically inserts the appropriate value when transactions are posted. Set the account type of your Cumulative Translation Adjustment account to Owner’s Equity to create a translation adjustment on your balance sheet. Set the account type of this account to Revenue or Expense to create a translation gain/loss on your income statement.

Secondary Segment Tracking Region: If you have assigned the Secondary Tracking Segment qualifier to a segment in your chart of accounts, you can enable these options. We recommend you review the documentation.
Note: If the Closing and Translation option for a set of books has already been enabled, you cannot disable it. You can
enable/disable the Revaluation option at will.

Journalling Tab

Enable Standard Options for your Set of Books. Each set of books has a number of flags that indicate the accounting practices you want to follow for that set of books.

Balance Intercompany Journals: Allows users to post out–of–balance intercompany journal entries (debits do not equal credits for a particular company or balancing entity), and automatically balance intercompany journals against an intercompany account you specify. If you enable this option, you must specify intercompany account(s) in the Intercompany Accounts window.
If you do not choose to balance intercompany journals, you can only post intercompany journals that balance by balancing segment (usually the company segment).

Journal Approval:
Allows you to use General Ledger’s Journal Approval feature in your set of books. When Journal Approval is enabled and a journal entry’s journal source requires approval, the journal must be approved by the appropriate level of management before any further action can be taken. If Journal Approval is not enabled, approval is not required, even if the journal source requires approval.
Note: When you mark the Enable Journal Approval check box, General Ledger will ask whether you want to require journal
approval for the Manual journal source. Choose Yes or No.
Note that this option applies only to manual journals with actual amounts. To require journal approval for budget or encumbrance journals, you must set the appropriate journal source to require journal approval.

Journal Entry Tax: Allows you to manually enter taxable journal entries in General Ledger. When you enable this feature for a set of books, the system will automatically calculate associated tax amounts and generate tax journal lines.

Suspense: If you choose to allow suspense posting of out-of-balance journal entries, General Ledger automatically posts the difference against this account. If you have multiple companies or balancing entities within a set of books, General Ledger automatically creates a suspense account for each balancing entity.

If you do not allow suspense posting, you can only post journal entries that balance.
You can also define additional suspense accounts to balance journal entries from specific sources and categories using the Suspense Accounts window.
Note: If you update the suspense account in the Set of Books window, the default suspense account is updated in the
Suspense Accounts window. Likewise, if you update the default account in the Suspense Accounts window, the account
in the Set of Books window is updated.

Rounding Differences: Allows you to track penny differences in currency conversions. If you enable this option, you must enter a rounding differences account for the set of books. Enable this feature if your foreign currency transactions include different balancing segments to represent multiple companies. General Ledger will automatically create a rounding differences account for each balancing segment.

If you do not enable this feature, General Ledger will post rounding penny differences to the transaction line with the largest amount.

Average Balance Processing Tab

You can choose to enable average balance processing for a set of books. When enabled, General Ledger will track and maintain average and end–of–day balances. Assign the default Net Income account for your average balance set of
books.

Consolidation Set of Books: You must check this box if the set of books is to be used for consolidating average balances. In a consolidation set of books, standard and average balances are not linked as they are in a non–consolidation set of books.

Transaction Calendar: This calendar is used to ensure that transactions are posted only to valid business days. This field is required for non–consolidation sets of books. For consolidation sets of books, the field is disabled.

Translation Rate Type: You can enter any daily conversion rate type, except User. General Ledger uses the daily rates for the chosen rate type to compute average rates to use when translating average balances.

Translate Optional Amount Types: General Ledger automatically translates period–average–to–date balances. You can also choose to translate end–of–day, quarter–average–to–date, and year–average–to–date balances by marking the appropriate checkboxes.

Net Income account: General Ledger uses this account to capture the net activity of all revenue and expense accounts when calculating the average balance for retained earnings.

Budgetary Control Tab

Using budgetary control requires funds reservation for any transactions you enter in General Ledger, Oracle Purchasing or Oracle Payables. You can only post journal entries that pass funds reservation. If you enable this option, you must enter a reserve for encumbrance account for the set of books. If you do not enable budgetary control, you cannot perform funds
check or reservation in General Ledger, Oracle Purchasing or Oracle Payables.

Budgetary controls can be enabled or disabled even after a set of books has been defined and transactions entered.

Oracle Receivables Note: Receivables does not use the Enable Budgetary Control or Require Budget Journals options.
(Optional) Check Require Budget Journals to allow only those budget journal entry methods that create journal entries, namely budget journals, budget transfers, MassBudgets, and consolidation of budget balances. If you require budget journals, you cannot upload budgets, enter budget amounts, or use budget formulas.

If you are using budgetary control, General Ledger requires you to create budget journals for your funding budget. If you want to require budget journals for all budgets, choose this option. However, if you want to require budget journals for your funding budget only, do not choose this option. Instead, you can require budget journals for your funding budget when you define the budget.

Reserve for Encumbrance account:
If you enter an out-of-balance encumbrance entry, General Ledger automatically posts the difference against the account you specify here. If you have multiple companies or balancing entities within a set of books, General Ledger automatically creates a Reserve for Encumbrance account for each balancing entity.

Journal Approval

Use General Ledger’s Journal Approval feature to ensure that journal entries and batches are approved by appropriate management personnel before the journals can be posted to your account balances. Journal Approval uses Oracle Workflow to control and monitor the approval process, sending notifications to journal batch preparers and approvers when needed. Some of the Journal Approval components can be customized to meet your organization’s specific needs.

Before you use Journal Approval, you must enable journal approval for your set of books. You must also set up your journal sources to use journal approval. Finally, you must create an approval hierarchy and define your approver authorization limits.

1. To enable Journal Approval for your set of books:
When you define your set of books, mark the Enable Journal Approval check box on the Set of Books window.

2. To specify journal sources that require journal approval:
On the Journal Sources window, mark the Require Journal Approval check box for each journal source that should be subject to approval. When a journal entry or batch is created using one of these journal sources, the journal must be approved before it can be posted.

3. When you enter an employee, you also enter the employee’s supervisor or manager name. The supervisor is the default next approver for journal entries and batches. Likewise, the supervisor’s manager is the next approver after the supervisor.

If your organization uses a full installation of Oracle Human Resources, you must log in with a Human Resources responsibility
to enter your employees in the People window. The Enter Person window will not be available from General Ledger.

If your organization does not have Oracle Human Resources installed, you will use some of the Human Resources windows
available through Oracle Applications. Some of the fields in these windows are for Oracle HRMS security only.

4. To define authorization limits:

  • Navigate to the Journal Authorization Limits window.
  • Enter the Employee name, or select it from the list of values.
  • Enter the amount of the employee’s Authorization Limit.
  • Repeat the previous two steps for each employee for whom you want to define authorization limits.
  • Save your work.
There are two Profile Options that affect the Journal Approval process.
1. Journals: Allow Preparer Approval.  Determines whether preparers can approve their own journals.
The following values are available.
Yes: Preparers are allowed to approve journal batches that fall within their authorization limit.
No: Preparers cannot approve their own journal batches.
The default value for this profile option is NO.

2. Journals: Find Approver Method.
   Sets the default method for approval.
The following values are available.
Go Up Management Chain: The journal batch moves up the approval hierarchy until it has been approved by an approver whose authorization limit is sufficient to allow the approval. The journal batch must be approved by all intermediate
approvers as well.

Go Direct: The journal batch is sent directly to the first approver in the approval hierarchy who has an authorization limit high enough to allow approval. The preparer's direct manager receives a courtesy notice.

One Stop, Then Go Direct: The journal batch is first sent to the preparer's manager for approval. If further approvals are required, the journal batch is directly sent to the first approver in the approval hierarchy who has an authorization limit high enough to allow approval.
The default value for this profile option is Go Up Management Chain.

Journal Sources

Journal sources identify the origin of your journal entries. General Ledger supplies a number of predefined journal sources. In addition, you should define at least one journal source for each of your own, non–Oracle feeder systems to help you track imported journal entries.

Defining Journal Sources
For each journal source, you can choose:

  • To import detail reference information for summary journals you import from your feeder systems. If you choose this option, you can also use the Account Inquiry window to drilldown to subledger transactions, transferred from subledgers in summary or detail, for a specified source.
  • To freeze the journal source, preventing users from making changes to any unposted journals from that source.
  • To require that journals with a specific journal source be approved by higher management levels before the journal can be posted. Journal Approval must be enabled for your set of books.
  • Define intercompany and suspense accounts for specific sources, run the AutoPost program for specific sources, import journals by source, and report on journals by source using the Foreign Currency Journals or General Journals reports.
General Ledger provides predefined journal entry sources, listed in the table below:
 
To define a new journal entry source
1. Enter a unique Name and Description for your journal entry source. You cannot delete a source name after saving your work.
2. Enable/Disable the following check boxes for this journal source:

Import Journal References Enabled
  • In the Account Inquiry window, you can drilldown to subledger transactions, transferred from subledgers in summary or detail, for this source.
  • Journal References will be imported from your feeder systems to maintain a mapping of summarized transactions when you run Journal Import and choose to create summary journals. This information is stored in the GL_IMPORT_REFERENCES table.
  • You can request a mapping report from your feeder systems after Journal Import completes. Or, you can write your own report referencing the GL_IMPORT_REFERENCES table which stores the mapping information.
Disabled: In the Account Inquiry window, you cannot drilldown to subledger transactions, transferred from subledgers in summary or detail, for this source.

Freeze Journals
If you enable this checkbox, journals from this source cannot be changed in the Enter Journals window. If you subsequently disable this checkbox, you can make changes to journals from this source.

Require Journal Approval
If journal approval is enabled for your set of books and you enter a journal whose journal source requires journal approval, the batch must be approved before it can be posted.

3. (Average Balance Processing only) From the poplist, select an Effective Date Rule for this journal source:
  • Fail: Journal Import will reject transactions when the effective date is not a valid business day. No posting takes place.
  • Leave Alone: Journal import will accept all transactions regardless of the effective date.
  • Roll Date: Journal Import will accept the transaction, but roll the effective date back to the nearest valid business day within the same period. If there is no prior valid business day within the same period, the effective date is rolled forward.
Note: The Effective Date Rule field will not appear unless you have average balance processing enabled for at least one set of books.

Notes: You can change the Name, Description, Import Journal References setting, Freeze Journals setting, and Require Journal Approval setting. You can change the Effective Date Rule for any journal source except Average Consolidation.

Journal Categories

Journal categories help you differentiate journal entries by purpose or type, such as accrual, payments or receipts. When you enter journals, you specify a category.

Defining Journal Categories

You can define intercompany and suspense accounts for specific categories. You can also use document sequences to sequentially number journal entries by category. Journal categories appear in standard reports, such as the General Journals report. General Ledger provides the predefined journal categories shown in the following table:

To define a new journal category
1. Navigate to the Journal Categories window.
2. Enter a unique Name and Description for your journal category. You cannot delete a category after saving your work.
3. (Optional) Specify the Reversal Method you want to use for this category in the Reversal Criteria window.

Encumbrance Types

Encumbrance types let you classify and track expenditures according to the purchasing approval process. You can define encumbrance types in addition to the General Ledger standard encumbrance types or disable existing encumbrance types.
General Ledger has the following predefined encumbrance types:

  • Commitment An encumbrance you record when you complete a purchase requisition.
  • Obligation An encumbrance you record when you turn a requisition into a purchase order.
You can define as many additional encumbrance types as you want or change the names of the standard encumbrance types to reflect the terminology you use within your organization. You specify an encumbrance type when you enter an encumbrance and when you perform inquiries.

To define an encumbrance type

1. Navigate to the Encumbrance Types window.
2. Enter a name and description.
3. Enable the encumbrance type.
4. Save your work.

AutoPost - Posting Journal Batches Automatically

You can automatically post journal batches that meet specific criteria you've defined in an AutoPost criteria set. You can define multiple criteria sets that include a range of journal effective dates and multiple AutoPost priorities. AutoPost priorities include combinations of journal source, journal category, balance type, and period.

Once you define an AutoPost criteria set, run the AutoPost program to select and post any journal batches that meet the criteria defined by the criteria set. You can also schedule the AutoPost program to run at specific times and submission intervals. You can submit the AutoPost program or schedule AutoPost runs directly from the AutoPost Criteria Sets window. Alternatively, you can use the Submit Request window.

When you enter the AutoPost priorities for a criteria set, you can enter All for one or more of the selection fields. Use this feature to select all journal sources or categories, all balance types, or all accounting periods. For example, suppose you enter journals every period that adjust your budget balances for subsequent periods. You can define a criteria set that selects all unposted journal batches with a source of Manual and a balance type of Budget for all periods. You can then schedule the AutoPost program to run at the beginning of every period, automatically post your budget adjustments, and update your budget balances.

If you use budgetary control, you can define a criteria set that posts the encumbrance journal batches that are created after the funds have been successfully reserved.

1. Enter a Criteria Set name and Description.
2. Mark the Enabled check box if you want to enable the criteria set now. Otherwise, leave the check box unmarked.
3. Set your Posting Submission Options. If you choose the Submit Only Priorities with Batches in Order option, be sure to also enter the Number of Priorities.
4. Enter the range of Journal Effective Dates:
From: starting effective date of the range, entered as the number of days before the AutoPost submission date. This must be a number from 0 to 1000.
To: ending effective date of the range, entered as the number of days after the AutoPost submission date. This must be a number from 0 to 999.
AutoPost will only select journals whose effective date is within the range of days before and after the AutoPost submission date.
5. Enter your AutoPost priorities for this criteria set. Each priority includes a Priority number, journal Source, journal Category, Balance Type, and Period.
Additional Information: The priority number must be a value from 1 to 99, where 1 is the highest priority and 99 is the lowest. Batches with higher priorities are posted first. You can use the same priority number more than once.
You can enter All in any field (except Priority number) to select all journal sources or categories, balance types, or accounting periods.

Posting Submission Options
Submit All Priorities in Order: Select this option to submit the batches for all of your AutoPost priorities in the same AutoPost run. Note that priorities are processed in order, based on the Priority number.

Submit Only Priorities with Batches in Order: Select this option to submit batches only from the specified Number of Priorities in the same AutoPost run. If a priority results in no selected batches it is not included in the count of the number of priorities whose batches are processed. For example, if the number of priorities is 2 and your first priority has no selected batches, AutoPost will process priorities 2 and 3. If you submit AutoPost again, it will process priorities 4 and 5, and so on for each priority that has selected batches.

Suggestion: Use this option when you need to balance the load on your concurrent manager. This may be necessary since a single AutoPost request that contains multiple priorities can result in numerous instances of the Posting program running concurrently. The load on the concurrent manager is increased further if a large number of journal batches are selected by your AutoPost priorities


Automatic Journal Reversal

If you routinely generate and post large numbers of journal reversals as part of your month end closing and opening procedures, you can save time and reduce entry errors by using Automatic Journal Reversal to automatically generate and post your journal reversals.

  • First you define journal reversal criteria for journal categories. Journal reversal criteria lets you specify the reversal method, period and date. You can also choose to enable automatic generation and posting of journals.
  • When you create a journal entry you want to automatically reverse, specify a journal category that has assigned reversal criteria. Your journal will be reversed based on the method, period and date criteria you defined for that journal category.
Once you have posted journals using journal categories associated with journal reversal criteria, you can:
  1. Automatically generate reversals when a new period is opened.
  2. Manually launch a reversal program which finds and generates all journals marked for reversal for a specific period, including any journals that were manually selected for reversal.
  3. Automatically post any reversal journals including reversals that were not automatically generated.
Note: Automatic Journal Reversal reverses posted journals of the balance type Actual. You cannot use this feature to automate budget or encumbrance journal reversals.

Prerequisites
General Ledger generates and posts reversals for journals that satisfy the following conditions:
  • The journal balance type is Actual.
  • The journal category is enabled to be Autoreversed.
  • The journal is posted but not yet reversed.
  • The journal reversal period is open or future enterable.
Once reversals are generated, General Ledger posts all reversed journals that satisfy the following conditions:
  • The journal category is enabled to AutoPost reversals.
  • The reversal period is open or future enterable.
Note: General Ledger automatically submits the AutoReverse program when a new period is first opened in the Open and Close Periods window. You can also launch AutoReverse at any time through the Submit Request window. If you do not want reversals to be generated when a period is opened, set the Profile Option, GL: Launch AutoReverse After Open Period, to No.

To automatically reverse journals
1. Define reversal criteria by journal category in the Journal Reversal Criteria window.
2. Enter and post Actual journals with journal categories that have reversal criteria defined.
3. Choose one of the following to reverse your journals:
  • Run the Open Period program to launch the Automatic Reversal program.
  • Navigate to the Submit Request window and select the program, Automatic Reversal.
All reversal journals with AutoReverse and AutoPost enabled will be generated and posted according to the reversal criteria you defined.

Suspense Accounts

If you allow suspense posting for your set of books, General Ledger uses suspense accounts to balance journals for specific sources and categories.


Defining Suspense Accounts
When you define your set of books, you assign a default suspense account. You can define suspense accounts in addition to the default suspense account for your set of books. General Ledger posts a balancing amount to the default account when there is no suspense account defined with a matching source and category.

Prerequisites

❑ Define your set of books
❑ Define your journal entry sources
❑ Define your journal entry categories

To define a suspense account:
1. Navigate to the Suspense Accounts window.

2. Specify the Source and Category that applies to the suspense account you are defining.
The default suspense account you specified when you defined your set of books appears with the source and category Other. You can define additional suspense accounts using Other for either the source or the category, but not both.

Note that if you update the suspense account in the Set of Books window, the default suspense account is updated in the Suspense Accounts window. Likewise, if you update the default account in the Suspense Accounts window, the account in the Set of Books window is updated.

3. Enter the Account against which the balancing amount should be posted. You can assign multiple unique combinations of source and category to a single account.
General Ledger automatically creates a suspense account for each balancing segment value. For example, if you want to create additional suspense accounts for the five companies in your chart of accounts, define suspense accounts for only one company segment value. General Ledger uses the account you enter for one company as a template for the remaining four companies. When you post out-of-balance transactions against any of the other four companies, General Ledger automatically substitutes the appropriate company segment value in your template.

Summary Accounts

A summary account is an account whose balance is the sum of balances from multiple detail accounts. Use summary accounts to perform online summary inquiries, as well as speed the processing of financial reports, MassAllocations, and recurring journal formulas.

Determining Your Summary Account Needs
The first step in defining your summary accounts is to determine your summary account needs. Summary accounts provide you with significant benefits when you produce summary reports and perform allocations.
1. Consider the summary information you need for reports.
Although you can easily define financial statements that sum a number of accounts together for a given row, you can use summary accounts for faster access to summarized balances.

2. Identify the summary balances you need for online inquiries.
For example, you may need ”flash” inquiries on the total of all cash balances for your domestic organizations to make daily decisions about investments or foreign currency hedging. You may also want to review the amount of working capital (current assets less current liabilities) for each division or department on a weekly basis.

3. Consider how you want to use summary accounts in formulas and allocations. You can use summary accounts as factors when defining journal formulas and allocations.

  • Use summary accounts to reference summary balances in a recurring journal formula. For example, to estimate a sales commission accrual based on the total of all product sales for each division, you can use a summary account that totals all product sales in each division.
  • Use summary accounts to reference summary budget balances in a budget formula. For example, to base the budget for employee benefits in each company on the total of all budgeted employee salaries, use summary accounts that total all employee salaries in each company.
  • Use summary accounts when entering budgets with budget rules. For example, you can base your budget for the current year’s Salary account on a percentage of the prior year’s total Overhead expense, a summary account.
  • Use summary accounts to indicate the total amount you want to allocate when defining your allocation formulas. Also, use summary accounts to help you calculate the allocation ratios to use in your allocation formulas.
Planning the Summary Account Structure
After determining your summary account needs, plan your summary account structure according to how you want to summarize your accounting information.

Choose ways to summarize your accounting information depending on the structure of your account and your informational needs. Generally, organizations structure their accounts such that each segment represents a particular dimension, or a way of looking at their organization.

Planning Parent Values and Rollup Groups
After determining your needs and organizing your summary account structure, define your parent values and your rollup groups.
Note: You can use the Account Hierarchy Manager or the Account Hierarchy Editor, if Applications Desktop Integrator is
installed, to create and edit your account hierarchies graphically. You can use the Account Hierarchy Manager or the Account Hierarchy Editor to define parent and child segment values, as well as rollup groups.

Planning Summary Account Templates
Set up templates to define and maintain summary accounts. You can enhance the speed of your summarizations by controlling the number of summary accounts created by your template. The number of summary accounts your template creates depends on the template segment values.

 
Defining Summary Accounts
General Ledger uses summary templates to create summary accounts, whose balances are the sums of multiple detail accounts. Use summary accounts to perform online summary inquiries, as well as to speed the processing of financial reports, MassAllocations, and recurring journal formulas.

You specify when you want General Ledger to begin maintaining your summary account balances. You can also assign budgetary control options to a summary template for which you want to perform summary level budgetary control.
When you delete a summary template, General Ledger deletes all summary accounts created from that template and their associated balances.

To define a new summary account template:
1. Navigate to the Summary Accounts window.
2. Enter a Name for the summary account template.
3. Enter the Template.
4. Enter the Earliest Period for which you want General Ledger to maintain your actual, encumbrance and budget summary account balances. General Ledger maintains summary account balances for this accounting period and for subsequent periods.
5. If you are using budgetary control for your set of books, set the budgetary control options for the summary template.
6. Save your work. General Ledger submits a concurrent request to add the summary accounts, and displays the Status of your summary template.
Current: The summary accounts are active.
Adding: The concurrent request to create summary accounts is pending or running.
Deleting: The concurrent request to delete summary accounts is pending or running.

To enter a summary account template:
From the Summary Accounts window, enter the summary account Template using one of the following values for each segment:
D: Your template creates and maintains a summary account for every detail segment value. This value creates the most summary accounts of any template value.
Note: General Ledger will not allow you to define a summary account template using only D template values.

T:
Your template creates and maintains a summary account that sums balances of all detail segment values. This value creates the fewest summary accounts of any template value.
If you enter T for a segment, all summary accounts created by the template will have the value T for the segment. Therefore, the value T must be defined and enabled for the segment. Also, the segment value must be a parent and detail posting and budgeting are not allowed.
Note: Do not define a summary account template using only T template values. A template using T values for every segment will have a zero balance if your general ledger is in balance.

[Rollup Group Name]: Your template creates and maintains a summary account for each parent segment value assigned to the rollup group you specify. The more parent segment values in a given rollup group, the more summary accounts your template creates.

Summary Account Example
Use the following formula to determine the number of summary accounts any given template will create:


Example 1 : First system finds out the segments for which detail value is required. Then system finds out the summation of each segements against each uniqe combination of the detail segemnts.

 For T-D-T-T-T only  second segment is unique so system 'll calculate 2 summary accounts T-521-T-T-T &
T-520-T-T-T

Statistical Units of Measure

Define statistical units of measure if you want to enter both statistical and monetary amounts for the same account within a single journal entry. You can maintain any type of statistical account, including headcount, number of units produced or sold, and so on. You associate a single unit of measure with an account segment value. You must also enable the profile option Journals:Mix Statistical and Monetary.

Note: To enter both statistical and monetary amounts for budget journals, you must assign accounts to your budget
organization using both monetary and STAT currencies. Also, you cannot enter statistical amounts for budget journals if you
are using budgetary control.
Use the Units of Measure Report to review your statistical units of measure and the account segment values to which you assigned them.

To define a statistical unit of measure:

1. Navigate to the Statistical Units of Measure window.
2. Enter the Account segment value that you want to associate with a statistical unit of measure. You can only enter detail account segment values (no parent account segment values), and you can enter only one unit of measure for each account segment value.
You can change the unit of measure associated with an account segment value at any time.
3. Enter a Unit of Measure name and Description. For example, you might enter a unit of measure ”Hours” with a description ”Hours Worked.”
4. Save your work.

Document Sequences

Create a document sequence to uniquely number each document generated by an Oracle application. In General Ledger, you can use document sequences to number journal entries, enabling you to account for every journal entry.

Attention: Once you define a document sequence, you can change the Effective To date and message notification as long as the document sequence is not assigned. You cannot change a document sequence that is assigned.

1. Enter a unique Name for your document sequence.

2. Select Oracle General Ledger as the Application to associate with the document sequence. Audit records for your sequence are stored in the application’s audit table.

3. Enter the Effective From and To dates for your document sequence. If there is no end date defined and there are no assignments for a sequence, you can disable the sequence by entering the current date as the end date. Once disabled, you cannot reactivate a sequence.

4. Select the Type of numbering you want your documents to have.
Automatic: General Ledger sequentially assigns a unique number to each document as it is created. Documents are numbered in order by date and time of creation. Numbers are in sequential order, with no gaps or omissions.

Manual: The user must assign a number to each document when it is created. You must enter unique values. Sequential ordering and completeness are not enforced.

5. For an automatic sequence, choose whether to display a Message to inform the user of the sequence name and number.

6. For an automatic sequence, enter an Initial Value for the first document in your sequence.

7. Grant Access to your document sequence from General Ledger by selecting Oracle Usernames (ORACLE IDs). The additional applications may use the sequence to number their own documents. Extending access to your document sequence from more than one ORACLE ID is especially useful when there is more than one installation of a given product, for example, when there are multiple sets of books.

8. Save your work. General Ledger launches a concurrent process to create the document sequence.

9. When the concurrent process is completed, assign the sequence to an application and category, and optionally to a set of books and method.

Assigning Document Sequences
After defining document sequences, you must assign a specific sequence to an application and category. If you enabled the Set of Books and/or Method Document Flexfield segments, you can also assign sequences based on the set of books and/or creation method of the document.
You can assign sequence numbers to journal entries, but only to those journals created for actual transactions. You can choose to assign sequence numbers to journal entries that General Ledger automatically creates, or to journal entries you enter manually in the Enter Journals window. General Ledger automatically creates journal entries for actual transactions when you perform the following tasks:
  • Import Journals
  • Reverse Journals
  • Revalue Balances
  • Generate Recurring Journals
  • Generate MassAllocation Journals
  • Consolidate Sets of Books
You can assign only one active document sequence scheme to each unique combination of Application, Category, Set of Books, and Method. However, you can assign the same document sequence to more than one combination of Application, Category, Set of Books, and Method. 


System Controls

You can set the concurrent program controls to improve the performance of the Journal Import, MassAllocation/MassBudgeting, and Open Period programs. For example, you can speed Journal Import by increasing the number of journal lines it holds in memory.
By increasing concurrent program control values, you increase the amount of memory the Journal Import or MassAllocation/
MassBudgeting programs can use, thereby increasing their throughput.

The total amount of main memory required for the programs and your accounting data is:
Size of program (Journal Import or MassAllocation/MassBudgeting) + Memory used for journal lines held in memory (Journal Import or MassAllocation/MassBudgeting) + Memory used for accounts held in memory (MassAllocation/MassBudgeting only)


For the Open Period program, you can specify a rollback segment to be used whenever the program runs. Open Period typically requires a rollback segment larger than that used for normal transaction processing. The Concurrent Program Controls window allows you to assign the large rollback segment once during your setup procedures. You can override the concurrent program control values. If you do not enter your own values, General Ledger uses default values that work well for most installations.
1. Navigate to the Concurrent Program Controls window.
Note: The Applicable Programs region displays the programs to which the concurrent program controls apply:
Control Segment — MassAllocations/MassBudgeting/MassEncumbrance, Journal Import
Number of Accounts in Memory — MassAllocations/MassBudgeting
Number of Journal Lines to Process at Once — Journal Import, MassAllocations/MassBudgeting
Archive Journal Import Data — Journal Import
Rollback Segment — Open Period

2. Enter a Control Segment to minimize the list of accounts that
MassAllocations/MassBudgeting must search during validation.
This should be the account segment with the largest number of different segment values. The default value is the natural account segment. You must choose an indexed account segment. When you define your chart of accounts, you typically index one or more segments of your account. To create these indexes, you must run the General Ledger Optimizer.

3. Enter the Number of Accounts in Memory. The more accounts MassAllocations/MassBudgeting can hold in memory, the faster the program will run. If you do not enter a value here, your program process 2500 accounts at once.

4. Enter the Number of Journal Lines to Process at Once. The more journal lines the Journal Import and MassAllocations/ MassBudgeting programs can hold in memory, the faster they will run. If you do not enter a value here, your concurrent programs process 1000 journal lines at once.

5. Choose to enable Archive Journal Import Data. When this check box is checked, the data in the GL_INTERFACE is saved to GL_INTERFACE_HISTORY at the end of each Journal Import run.
Note: If this check box is enabled, Journal Import runs slower.

6. Enter the name of the Rollback Segment to use whenever you run the Open Period program.

Storage Parameters for Interim Tables
You can change the storage parameters for all interim tables and indexes in General Ledger. Several concurrent programs in General Ledger use interim tables as temporary storage space for transaction ata. These programs create interim tables when they start and drop them when they finish.
Although the default storage parameters meet the needs of most installations, you can increase interim table allocations if the default parameters are inadequate. The following General Ledger concurrent programs use interim tables:
Posting: GL_POSTING_INTERIM
MassAllocations: GL_ALLOC_INTERIM
MassBudgets: GL_ALLOC_INTERIM
Translation: GL_TRANSLATION_INTERIM
Archive and Purge: GL_ARCHIVE_BALANCES,
GL_ARCHIVE_BATCHES, GL_ARCHIVE_HEADERS,
GL_ARCHIVE_LINES
Budget Posting: GL_BUDGET_INTERIM,
GL_BUDGET_RANGE_INTERIM
Create Summary Accounts: GL_SUMMARY_INTERIM


Opening and Closing Accounting Periods

Open and close accounting periods to control journal entry and journal posting, as well as compute period– and year–end actual and budget account balances for reporting.


Accounting periods can have one of the following statuses:
  1. Never Opened: Journal entry and posting are not allowed. General Ledger assigns this status to any period preceding the first period ever opened in your calendar, or to any period that has been defined, but is not yet future–enterable. You cannot change this period status.
  2. Future–Entry: Journal entry is allowed, but posting is not. Your period is not yet open, but falls within the range of future-enterable periods you designated in the Set of Books window. You cannot change this period status without using the concurrent process to open the period.
  3. Open: Journal entry and posting allowed.
  4. Closed: Journal entry and posting not allowed until accounting period is reopened. Reporting and inquiry allowed.
  5. Permanently Closed: Journal entry and posting not allowed. You cannot change this period status. Reporting and inquiry allowed.

You can open new accounting periods, close accounting periods, reopen closed accounting periods, and open an encumbrance year (if you are using encumbrance accounting).

If you are using the secondary tracking segment with the Closing and Translation option enabled, General Ledger processing is affected.

Note: 
1. When you define a new set of books, choose carefully the first accounting period you want to open. Once you open
your first accounting period, General Ledger does not allow you to open prior accounting periods.
Additionally, you cannot translate account balances for the first period ever opened. Therefore, we recommend that you open at least one period prior to the first accounting period in which you wish to enter transactions.

2. If you use Multiple Reporting Currencies, you must open/close accounting periods in your primary set of books and in each of your reporting sets of books.

Budgetary Controls

Budgetary Controls allows you to check to see if the expenditure is within your budget constraints, i.e. if there are funds available for that expenditure. That is to say, “do we have enough money (funds available) to incur this expenditure”? Budgetary controls help to control and analyze spending practices.

Budgetary Controls consists of two processes: Funds Checker and Funds Reservations.

Funds Checker
Funds Checker is a feature of budgetary controls that helps prevent overspending budgets by verifying available funds online
before processing a transaction. Funds Checker both checks and reserves funds and is shared by Oracle Payables, Oracle Purchasing and Oracle General Ledger.You can elect to do funds checking with encumbrance accounting. Funds Checking used with Encumbrance Accounting immediately updates the accounts and verifies that funds are available.

Funds Reservations
Funds Reservation reserves the funds for the expenditure and immediately updates the funds available. You can view Funds Available in GL (Inquiry –> Funds Available) this screen is automatically updated when funds are reserved.
The formula for funds availability is:

 
  • Budgetary Controls have three levels:Absolute, Advisory and None.
  1. Absolute – funds reservation will not take place unless there are funds available. This prevents overspending the budget.
  2. Advisory – funds reservations will take place even if there are insufficient funds. This will produce a warning message on the screen advising that this expenditure will cause you to exceed the budget.
  3. None – funds reservation will take place even if there is insufficient funds, although no message will be produced. This level  is the most likely to allow overspending.
Summary and Detail Level Control:
Detail Budgetary Control is used to control expenditures against a budget amount for a particular GL account. When using this method of control you must budget to each account for which you enable budgetary controls. Summary Budgetary Control is used to control budget expenditures at a less detailed level, such as department or cost center. The advantage here is that each account does not need a budget.

Budgetary Control Setup:
1. Assign Reserve for Encumbrance Account and Enable Budgetary Control Options in Oracle General Ledger (Setup -> Set of Books)

2. Open the latest Encumbrance year (Setup - > Open/Close)

3. Define the Budget which will be the Funding Budget (Budgets -> Define Budgets)

4. Define a Budget Organization and specify the accounts for which Funds Checker will take place including the level of checking, i.e. absolute vs. advisory (Budgets -> Define Organizations)

5. Click the MAINTAIN button to submit the program – Maintain Budget organization (Budget -> Define Organizations)

6. Select Budget Organization and Budget for steps 2 & 5. Enter accounts to budget and amounts for each period. Click on the “Create Journals” button and go to the Check and Reserve Funds Screen. Reserve Funds (Budgets -> Enter Journals)

7. Query the journal batch created in step 6 and post it. (Journals -> Post)

8. Select Encumbrances to be created (i.e. Requisition, PO), and select the type of encumbrance (obligation, commitment)
(Payables –> Setup -> Options -> Financial, Encumbrance Region)

Encumbrance Accounting

Encumbrances are obligations for future expenditures made to an employee or made to an outside vendor. Encumbrances are tracked to help departments forecast their expenditures so that they do not exceed their budget available.

In business, an encumbrance is created when a Purchase Order is issued to buy goods or services. The money has not yet been spent, but is "earmarked" for that purchase and no one else can use it. In real life, if you put money into an envelope to hold it to pay a bill, you have encumbered that money. You probably don’t use budget codes, but if you have an envelope in your dresser drawer marked “ELECTRIC BILL”, the money you stash away for the next bill is your encumbrance. How much should be encumbered? How much do you THINK your bill is going to be? That’s the encumbrance.

The primary purpose of  tracking encumbrances is to avoid overspending a budget. Encumbrances can also be used to predict cash outflow and as a general planning tool.

To use the full capabilities of encumbrance accounting, you must enable the budgetary control flag for a set of books. When you enable the budgetary control flag, the system automatically creates encumbrances from requisitions, purchase orders and other transactions originating in feeder systems such as Purchasing and Payables.

When you do not enable the budgetary control flag, you can still enter manual encumbrances via journal entry, but you cannot generate encumbrances from requisitions and purchase orders. You have two options for using encumbrance data to monitor over–expenditure of a budget: After actuals and encumbrances have been posted, you can generate reports to show over–expenditures. You can also use funds checking to prevent over–expenditures before they occur.

The following figure shows the encumbrance accounting process with the budgetary control flag enabled.

Financial Reporting

General Ledger provides you with a variety of reporting capabilities, including the Financial Statement Generator, online inquiries, and standard reports and listings.

  • The enables you to build your own custom reports without programming. You can define reports with complete control over the rows, columns, contents, and calculations in your report.
  • You can perform online inquiries to search for detailed information quickly. For example, you can perform an online inquiry of your account balances or journal entries. You can also review any of your financial statements, accounting reports, or listings online.
  • General Ledger’s standard accounting reports and listings include trial balances, journals, general ledgers, account analysis reports, chart of account listings, and more. You can set the runtime options for detail or summary information, sort sequence, and the selection of data you want to see on the report.
Overview of the Financial Statement Generator
Financial Statement Generator (FSG) is a powerful report building tool for Oracle General Ledger. With FSG, you can:
  • Generate financial reports, such as income statements and balance sheets, based upon data in your general ledger. Note that If you have average balance processing enabled in your set of books, you can report on functional, foreign–entered, or translated average balances.
  • Generate presentation quality financial reports with XML Publisher so you have more control with report formatting options, including changing font characteristics, inserting graphical images or logos, and adding color.
  • Define segment value security rules to restrict financial information contained in FSG report output generated by specific users and responsibilities.
Note: To apply segment value security rules, the profile option FSG: Enforce Segment Value Security must be enabled.
  • Define your reports with reusable report objects, making it easy to create new reports from the components of reports you’ve already defined.
  • Print the same report for multiple companies, cost centers, departments, or any other segment of your account structure, in the same report request.
  • Schedule reports to run automatically.
  • Produce ad hoc reports whenever you need them.
  • Print reports to tab–delimited files for easy import into client–based spreadsheet programs
  • Create XBRL instance documents for easier exchange and analysis of your reporting information.

FSG Basics

In Financial Statement Generator, you build a report by defining, then combining, various reusable report objects. Some objects are required for every report you intend to build. You can use others to apply special formatting to reports. Finally, there are objects you can use to control report content, distribution, and scheduling. The objects you need for a specific report depend on the report’s complexity. In the next three sections, we discuss report objects in terms of:

  1. Simple reports
  2. Special format reports
  3. Report distribution
Simple Reports

The simplest reports consist of a few headings to describe the information in the report, followed by the report data, which is often presented in tabular form as a series of intersecting rows and columns. Therefore, simple reports are two dimensional in nature, similar to what you might create in a spreadsheet. The rows and columns determine the values which appear in the body of a simple report, by virtue of the attributes those rows and columns possess. For example, consider a row whose attribute is the balance sheet account named ”Inventory” and a column whose attribute is ”Sept. 1996.” A report ”cell” defined by the intersection of row ”Inventory” and column ”Sept. 1996,” will contain the inventory account balance for September 1996

Typical Report Dimensions

The example in above Figure illustrates another important FSG concept: Generally, accounts are assigned to row definitions and amount types are assigned to column definitions.
In the example, these typical report dimensions produce an expense listing where each report line is an expense account and the two primary columns are the year–to–date actual expenses as of December 1995 and December 1994.

Special Format Reports

FSG lets you add special formatting to your reports and create custom reports which meet specific business needs. You do this by taking a simple report and adding other report definitions and report objects. For example, you can define your own column sets instead of using the standard column sets.
FSG also provides you with more formatting options for the design layout and format of your FSG report. Use XML Publisher to apply a report template layout that you design to your FSG report. Publishing FSG reports with XML Publisher allows you to change font characteristics, add logos or images, and insert headers or footers into your report.

Report Distribution
After you’ve created report–building objects and defined various reports, you can use FSG’s optional report distribution features to control report production and distribution. With these features you can:
  • Produce special report variations, such as separate reports for each value of an account segment or for different account ranges.
  • Produce multiple reports in a specified order, from one report definition.
  • Produce ”breakdown” reports where the segment breakdowns are on separate reports rather than on the same report (as with the segment override feature).
  • Produce report variations which omit sensitive organization information.
  • Create report ”sets” by grouping multiple report definitions, to run multiple reports by requesting one report set.
  • Schedule reports for automatic production.
  • Download reports into spreadsheet programs, for subsequent editing, formatting, and printing.
1. Row Sets
A Row Set defines the format and content of the rows in an FSG report.
In FSG, the commonly assumed attribute for a row definition is an account assignment, whereas the attribute for a column definition is a time period (amount type).

2. Row Orders
You can use a row order to control how detail rows appear in your report. You can:
• Display account descriptions in addition to or instead of segment values.
• Sort detail rows by amounts displayed in a column.
• Sort detail rows by account segment values or segment value descriptions.
• Rearrange the sequence of your account segments to fit specific reporting needs. For example, you may want to see product segment values displayed before cost center values.
• Suppress header descriptions for particular account segments.

3. Column Sets
A column set defines the format and content of the columns in an FSG report. In FSG, the commonly assumed attribute for a column definition is a time period (amount type), whereas the attribute for a row definition is an account assignment. Therefore, typical column sets include headings and subheadings, amount types, format masks, currency assignments, and calculation columns for totals.

4. Content Sets
By assigning a content set to a report request, you can generate hundreds of similar reports in a single run. The content set controls how the numerous reports differ from each other. For example, assume your organization has 50 departments and that Department is one of your account segments. Also assume that you already have an FSG report for travel expenses, which you run weekly. By using a content set with your existing report definition, you can print a travel expense report for each department, in one report request. You can then distribute the reports to the 50 department managers for review
purposes.

Content sets are similar to row sets and actually work their magic by overriding the row set definition of an existing report. The subtle report variations discussed in the previous paragraph are achieved by the content set altering the row set account assignments and/or display options.

5. Display Sets
With display sets and groups you can produce report variations which omit sensitive information or which include information normally not included in a report. To do this, you simply tell FSG which rows or columns should or should not be displayed.

6. Financial Report Sets
Use financial report sets to group FSG reports that you run together frequently. You can only assign predefined reports to a report set. You can copy a financial report set that you have already defined, then modify the new report set as needed.

Row Sets


A Row Set defines the format and content of the rows in an FSG report. In FSG, the commonly assumed attribute for a row definition is an account assignment, whereas the attribute for a column definition is a time period (amount type).
When you define a row set, you can:
  • Assign accounts — to indicate which general ledger account balances you want to include in the row. You can assign an individual account or range of accounts to each row.
Note: If you have average balance processing enabled in your set of books, you can report on functional, foreign–entered, and translated average balances.
  • Define calculations — to perform a variety of complex computations in your report. The calculations can refer to any previous rows in a report, including rows you choose not to display.
  •  Specify formatting — to control page breaks, indentation, line spacing, and underline characters.
You can define a new row set, or use FSG’s AutoCopy feature to copy an existing row set, which you can then modify as needed.

To define a row set
1. Enter a Name and Description for the row set. Do not use the ampersand (&) symbol in your Row Set name.
Choose an XBRL taxonomy if you want to use the row set to generate XBRL output.

2. Enter a Line number and description for each row of the row set. The line number controls the order in which rows appear in a report. You also use the line number when creating a row calculation. Rows are subcomponents of row sets—they are defined when you create a new row set. Each row definition for a simple report includes, at a minimum:
• A sequence number to indicate its order in the row set.
• An account assignment (a range of accounts) or a description.
You use a description row to display a subheading immediately above a group of related rows.

3. (Optional) Enter the Format Options, Advanced Options, and Display Options for each row.
Note: If you want to create a report which reverses the commonly assumed attributes for row sets and column sets, you should also set your Balance Control Options for each row.

Basic Report Formatting
In a simple report, the standard column set you choose determines the basic data item formatting—for example, whether to display a currency symbol or how many decimal positions to include. Standard column sets also have predefined column headings.
Row labels, as well as the column headings above the row labels, are inserted into your report by FSG automatically. The Report Title, which you specify when you define the report’s row set, is also added automatically, along with the date/time the report is printed, page

4. To have the row generate account balances on your report, choose Account Assignments to assign accounts to the row. To create a calculation row (for report totals and subtotals), choose Calculations.
Note: A row definition can have account assignments or calculations, but not both.

4.1 Assigning Accounts
Display Types

When you make an account assignment to a row definition, you also specify one of three display types for each segment of the account structure. The display type controls the level of detail FSG will show on your report for individual report lines:
Expand: Your report will include one line for each value of the account segment. For example, assume your last account segment can have one of three values and that the account balance is as follows:
4.2 Defining Report Calculations
You can define formulas to calculate row or column amounts. For example, you can define a row calculation which sums all of the rows above it in the report. Or, you can define a column calculation which calculates the difference between two previous columns.
Note: General Ledger stores credit balances as negative numbers and debit balances as positive numbers, so you
should define your calculations accordingly. For example, if you want to calculate a gross margin row, add (rather than
subtract) your cost of sales row to your sales row.

Use the Absolute Value function to display only positive numbers. You can apply the Absolute Value function to
balances or calculation results regardless of the underlying debit or credit balance.

Column Sets

A column set defines the format and content of the columns in an FSG report. In FSG, the commonly assumed attribute for a column definition is a time period (amount type), whereas the attribute for a row definition is an account assignment. Therefore, typical column sets include headings and subheadings, amount types, format masks, currency assignments, and calculation columns for totals.

When you define a column set, you can:
  1. Specify account balance types — to include in the column. For example, you can define a column with actual, budget, or encumbrance amounts. Amount types
    determine whether your report includes:
    – Actual, budget, or encumbrance amounts.
    – Period–to–date, quarter–to–date, year–to–date, or project–to–date account balances.
  2. Create Headings — for your columns. You can also create relative headings, which change depending on the period of interest specified when you run the report.
  3. Define calculations — to perform a variety of complex computations in your report. The calculations can refer to any previous columns in the report, including rows you choose not to display.
  4. Specify formatting — using format masks, which determine how numbers in your report are displayed.
You can define a new column set or use FSG’s AutoCopy feature to copy an existing column set, which you can then edit as needed. You can also define column sets graphically, using the Column Set Builder

Column Headings
Headings can include any alphabetic or numeric characters. They may  also include special characters, except for the ampersand symbol (&). FSG also provides a default heading option, which you can use as is or modify to build a custom heading.
Relative Headings
You use FSG’s Relative Headings feature to define dynamic headings whose content changes depending on some value you provide when you request the report.
You define relative headings by combining:
• An ampersand (&) — Identifies the following token and number as a relative heading.
• A token — Representing period of interest (POI), budget (BUDGET), encumbrance (ENCUMBRANCE), or currency
(CURRENCY). The most often used token is POI.
• A number — For POI relative headings, the number is a period offset. For budgets, encumbrances, and currencies, the number is an associated control value.
Note: The number is expressed as a positive or negative value. For negative values, the minus sign (–) is required. For positive values, the plus sign (+) is optional. For example, &POI–10 indicates the tenth period before the period of interest. &POI+6 or &POI6 indicates the sixth period following the period of interest. POI0 is the period of interest.

To define a column set
Navigate to the Column Set window.
1.1 Enter a Name and Description for the column set.

1.2 (Optional) Enter an Override Segment & Choose Define Columns.

2.1 Enter the starting Position for each column. This is the number of characters from the left edge of the page that marks where each column starts. Consider the following factors when determining the starting positions of your columns:
• Total report width —With FSG, you can create reports with unlimited columns. This allows you to download reports of any
width to an Excel spreadsheet using Applications Desktop Integrator (ADI).
• Number of columns in the column set and Width of each column — determined by the format mask and expected size of numbers to be displayed in the column.
• Starting position and width of previous columns.
• Currency profile options — determine whether you are using thousands separators, as well as positive and negative number formats. If these options are enabled, you must provide enough
space in your column width.

2.2 Enter a unique Sequence number for each column. You can use the sequence number to define column calculations.
Note: The sequence number does not control the order of the columns on a report like it does for rows in a row set. Instead, column order is determined by the column starting positions.

2.3 Enter a Format Mask to control the display of values which FSG prints in the column.
A format mask defines how numbers are displayed in your reports. You can specify numbers, decimal places, currency symbols, and other display characters. For example, if you use a format mask of $99,999,999, FSG will display the number 4234941 as $4,234,941.
Note: To use all of the available formatting options, additional set up steps may be required in General Ledger. The most important thing to remember when using format masks is to make sure you include enough space in your column definition to print all the numbers and special characters allowed by the format mask you use.

2.4 Enter factor for the column set that determines how to display numeric values.
For example, if you use the factor Thousands with the format mask 99,999,999.99, the number 23,910 will appear as 23.91 on your report. If you use the factor Percentiles with the format mask 99.99, the number .1258 will appear as 12.58 on your report. To display amounts using no factor, choose Units.

3. Advance Option
3.1 Column Names : When creating a calculation row which uses another row in the calculation, you refer to the row by its assigned Sequence Number. Optionally, you may give the row a Row Name when you define it, then refer to the name when building a calculation. The same rules apply to columns.
If you use the optional row and column names, the names will appear in other FSG windows, making it easier to remember what those rows or columns represent. Also note that if you use row and column names in your calculations, the names must be unique within the row set or column set. If not, your calculations may yield incorrect results.

3.2 Override Segments : You use the override segments feature to produce ”breakdown” reports. For example, let’s say that you’ve defined a report which produces a corporate income statement. Now you want to create a breakdown version of the same report which shows income statement line items for each department, one report column per department. Department is one of your account segments, and can have one of five values (01 = Sales, 02 = Manufacturing, 03 = Finance, 04 = Administration, 05 = Corporate).
The original report definition uses a row set named Income Statement and a column set named Corporate YTD–Actual. To produce the breakdown report, you need to define a new column set with the following properties:
• Uses the Department segment as an ”override segment.”
• Includes one column definition for each department.
• Specifies, for each column definition, the department segment value as its override value. For example, the first column would be defined with an override value of 01, for the Sales department.
• (Optional) Define a column to total all the departments.
The following table shows your column set definition might look like, when you are done:
3.3 When there are conflicting calculations in a report, FSG will use the column calculation instead of the row calculation, unless you tell FSG (in the row definition) to override any conflicting column calculations. There are other situations besides calculations where row and column definitions might conflict, such as format masks, period offsets, and
amount types. FSG follows a set of precedence rules for all such row/column conflicts.


4. Balance Control
4.1 Most columns are defined using an amount type. General Ledger provides numerous amount types, which define a period type and balance type. For example, the amount type QTD–Actual specifies a quarterly period type and actual balances. The amount type YTD–Encumbrance specifies a yearly period type and encumbrance balances.

4.2 Enter the currency of the column set.

4.3 FSG uses the Period Offset to determine which specific periods’ balances to include on a report. Period offsets are specified relative to the period you specify when you request that FSG run a report. For example, if you want a report of monthly cash balances for January, 1996 through December, 1996, the period–of–interest is DEC–1996. If one of your
column definitions has a period offset of –6, FSG will display the cash balances for June, 1996 in that column.

5. Display Options
FSG provides a number of additional display options you can apply to the rows and columns in your reports. These include:
5.1 Display or don’t display a row or column: You can define rows or columns which are not displayed on a report. You might use such rows or columns to perform intermediate calculations which you don’t want on the report itself, but which are needed to build the values you do want.

5.2 Display or don’t display when balance is zero: You can choose to suppress the display of rows and columns whose balance is zero.

5.3 Change sign: General Ledger stores debits as positive numbers and credits as negative numbers. FSG will print such values with their respective signs. You can choose to change the sign, printing debits with negative signs and credits with positive signs. For example, to print revenue (credit) amounts on an income statement so they appear without negative signs, set the Change Sign option for any rows or columns which use revenue accounts in an account assignment range.
Suggestion: If you want FSG to suppress the display of positive signs, set the profile option Currency:Positive Format.
Suggestion: You can also use the Absolute Value function to control the display of negative numbers. S

5.4 Display factors: You can select to display amounts on your report at different precision levels, or factors, such as units, thousands, or millions. FSG will perform the appropriate rounding to arrive at the factor you’ve chosen.

5.5 Level of detail reporting: This feature lets you indicate the level of detail so you can screen out excessively detailed information when you run reports for a high–level audience. Level of detail is indicated for each row and column, as well as for a report. When the report prints, FSG will display only those rows and columns whose level of detail are the same as or less than that of the report.
With this feature, you can use the same row set and column set definitions to define multiple versions of the same report, to serve different levels of your organization.

Row Orders

There are three key things which you can do in your reports, using FSG’s Row Orders feature

  • Change the account segment order. There may be times when you want to change the order in which your account segments print.This is achieved by sequence number. For example, your natural account might be defined as the third segment, but you want it to print first then enter a row order with natural account as sequence and attach the row order to the FSG.
  •  Display account segment values and their descriptions. There is a Display option on the Row Order window where you can tell FSG to display the value, description, or both for your account segments. So, instead of 01.200.1000, you can have FSG display 01 ABC Company. 200 Headquarters. 1000 Cash. Optionally, you can display the description or account segment value by itself.
    Sort detail rows based on values in a column. You can tell FSG to sort your report’s detail rows based on the values in one of your columns. For example, let’s say you’ve built a sales report which displays current month sales figures for each of your 150 sales offices. If you want to sort this report from highest to lowest sales amount, you simply define a Row Order to tell FSG to sort the sales column in descending order.
  • Sort detail rows by account segment values or segment value descriptions. To sort detail rows by an account segment’s values or descriptions, the segment’s display type in the related row definition must be either Expand or Both. Optionally, you can use a content set whose display type is set to Row/Expand or Row/Both.
Note: A row order can be saved as part of a report definition, or can be added dynamically at the time you request an FSG
report.

To create a new row order:
1. Navigate to the Row Order window.
2. Enter a Name and Description for the row order.
3. (Optional) Enter Rank by Column information.
4. (Optional) Enter Account Display information.

To sort detail rows by amounts displayed in a column (Rank by Column information):
1. Create a new row order or query an existing one.
2. From the Row Order window, enter the Name or the Order of the column whose values will be used to sort the detail rows. Order corresponds to the sequence of the sorting column relative to other displayed columns in the column set, where the leftmost column has an Order of 1.
For example, assume you’ve defined the following column set:
If you want to sort detail rows based on the amounts in Column 1, enter 1 as your Order. If you want to sort based on the amounts in Column 3, enter 2 as your Order (since Column 2 is not displayed).
3. Select a Ranking method. You can sort amounts in Ascending or Descending order
4. Save your work.

To sort detail rows by account segment values or segment value descriptions (Account Display information):
1. Create a new row order or query an existing one.

2. (Optional) Enter Rank by Column information in the Row Order window.

3. Enter the Sequence number of the segment to use for sorting detail report rows.

4. Enter the Segment name.

5. Choose an Order By method to control sorting of the detail report rows:
• Description — sort by the account segment description.
• Value — sort by account segment value.
Note: If you enter Description or Value as your Order By method, FSG will ignore any information you entered in the
Rank by Column region.
• Ranking — sort by the Rank by Column information.
Note: If you assign the Order By Ranking method to a segment, you must also enter Rank by Column information. If
you don’t, FSG will sort by account segment values. Also, when you use the Order By Ranking method, all segments
following the sorting segment must have a display type of Total or Both. Otherwise, FSG cannot derive the totals needed to
sort the report rows.

6. Enter a segment Display method:
• Description — will display the segment description on your report.
• Value — will display the segment value on your report.
• Value and Description — will display both the segment value and description on your report.

7. Enter a printingWidth for your account segment. If you choose to print a segment’s description, make sure the printing width is large
enough to accommodate the description.
Note: You must also make sure that in your column set definition you have provided enough room at the left of your
report to accommodate the cumulative printing widths of all the segments specified in your row order.

Using the Column Set Builder

With the Column Set Builder, you can define a column set by laying it out graphically. You can also modify existing column sets.
Column Set Builder is primarily a layout and design tool. It does not include all of the options available from the Columns window. As a result, you cannot assign accounts, calculations, or exceptions within the Column Set Builder. However, you can add these things from the Columns window after you’ve designed your column set with the Column Set Builder.

The number of columns the The Column Set Builder can view depends on the character width of each column. You can view a maximum of 20 columns with a limited character width. However, the Column Set Builder can view only one column with a character width of 500.

Exception Reports

Exception reports are very easy to build in FSG. When you define a column set, you can also define exception conditions for any or all of your column definitions. FSG will apply these exception conditions to any report which uses the column set.

For example, assume you’re building a variance report and you want to flag any variance amount which exceeds $50,000. In the variance amount column definition you simply create an exception condition which tells FSG, ”if the amount in this column is greater than 50000, print an asterisk character.”

Content Sets


By assigning a content set to a report request, you can generate hundreds of similar reports in a single run. The content set controls how the numerous reports differ from each other. For example, assume your organization has 50 departments and that Department is one of your account segments. Also assume that you already have an FSG report for travel expenses, which you run weekly. By using a content set with your existing report definition, you can print a travel expense report for each department, in one report request. You can then distribute the reports to the 50 department managers for review purposes.

Content sets are similar to row sets and actually work their magic by overriding the row set definition of an existing report. The subtle report variations discussed in the previous paragraph are achieved by the content set altering the row set account assignments and/or display options.
Note: A content set can be saved as part of a report definition, or can be added dynamically at the time you request an FSG report.

Display Group and Set

Defining Display Groups
A display group defines a range of rows in a row set or columns in a column set. Display groups are assigned to display sets to control which rows and columns appear on a report.

To define a display group:
1. Navigate to the Display Group window.
2. Enter the Name and Description of the display group.
3. Enter the name of a Row Set or Column Set. To create a generic display group, leave these fields blank.
4. Enter the From and To Sequence numbers in your row or column display range.
For example, if you specify a row set and choose 10 through 40 as your sequence range, your display group will affect rows 10 through 40.

Defining Display Sets
With display sets and groups you can produce report variations which omit sensitive information or which include information normally not included in a report. To do this, you simply tell FSG which rows or columns should or should not be displayed.
Prerequisite
❑ Define display groups for ranges of rows in a row set or columns in a column set.

To define a display set:
1. Navigate to the Display Set window.
2. Enter the Name and Description of the display set.
3. Enter the name of a Row Set or Column Set whose row or column display definitions you want to override with your display set.
4. Enter a Sequence number for each display group assignment. This sequence number pertains only to the display set and is not related to the row set or column set sequence number.
5. Choose a Display option for each display group assignment. If you check the Display checkbox, the values related to the row and/or column ranges specified in the assigned display groups will be shown on your report. If you do not check the Display checkbox, the row and/or column values will not be shown.
Note: Even if you choose not to display the row and/or column values, the row titles and/or column headings will still appear
on the report.
6. Enter the display group names in the Row Group and Column Group fields. If desired, you can enter both a row group and a column group.
Note: If your display groups do not include all the rows and/or columns defined in the related row sets and column sets, the
rows and/or columns not included in the display groups will appear on your report, just as they would if you were not using
a display set.
7. (Optional) Enter a description for the display group assignment.
8. (Optional) Enter additional display group assignments.
9. Save your work.

Financial Reports & Report Sets

A report is defined by specifying the report objects FSG should use to build the report. The simplest reports are defined by a row set and a standard column set. Optionally, you can specify your own custom column set. Also, you can add a content set, row order, and/or display set to enhance the report or refine the information in the report. You can also specify the budget, encumbrance types, and currencies to include on a report.

Once you define and save a report, you can use it any time — to run the report, define a report set, or copy and save it as a new report.
Note: You can also define ad hoc financial reports, as necessary, to meet one–time reporting needs. You create ad hoc
reports from the Run Financial Reports window.

Intercompany within & across SOB

Accounting for Multiple Companies Using a Single Set of Books
You can maintain one set of books for multiple companies as long as the companies share the same account structure, accounting calendar, and functional currency. When setting up the account structure for your set of books, use the segment representing all your companies as the balancing segment (Company = OU = BS = Finance Statement). This ensures that each company is always in balance, which makes it easy for you to maintain and report on multiple companies as stand–alone entities when you maintain all their accounting records in the same set of books.

Optionally, you can define an intercompany segment in your chart of accounts. You can use this segment to track intercompany transactions by company or trading partner. The intercompany segment helps your reconciliations by identifying all transactions for each subsidiary company.

You can also create summary accounts that maintain balances for faster reporting and online inquiry. For example, you can see summarized cash balances, or nonexempt salaries across all companies. If you set up your accounts to capture the appropriate information, you can use the Financial Statement Generator (FSG) to report separately on different companies, foreign operations and export sales, and major customers in accordance with national accounting standards, including SFAS #14 (U.S.).


Accounting for Multiple Companies Using Multiple Sets of Books

If your companies have different account structures, accounting calendars, or functional currencies, you will need to create a set of books for each company. You also need separate sets of books if you use multiple Oracle Applications instances for your companies.

When you are ready to consolidate and report on your multiple companies, use Global Consolidation System (GCS).

When you are ready to process intercompany transactions, use the Global Intercompany System (GIS).

Create a single set of books for multiple companies
1. Define the account structure, accounting calendar, functional currency, and set of books, as described in the setup chapter.
  • When you define the account structure, identify your company segment as the balancing segment.
  • (Optional), Define an intercompany segment to help you track intercompany transactions during period end reconciliations.
2. Set up a separate company segment value for your eliminating entries. You can then automatically generate elimination entries for this company during the consolidation process.
 
3. Set up a parent company segment value that includes as children all the company segment values you want to  consolidate. Be sure to include the eliminating entries company you set up in the previous step. For example, if you want to consolidate companies 01 through 07 and your eliminating entries are made to company 08, define a consolidated company 99 whose children are companies 01 through 08.

4. Include the parent company you defined in Step 3 in a rollup group. Use this rollup group when defining summary templates. Summary templates create your summary accounts, whose balances are the sums of multiple detail accounts. When consolidating your financial results with summary accounts, you can:
  • Perform online summary inquiries when viewing the sum of all your subsidiaries’ balances
  • Improve performance when generating consolidated financial reports
Create multiple sets of books for multiple companies
1. Define value sets to enter your segment values once and use them for multiple sets of books within the same Applications instance. This enables you to access existing segment values when defining a new chart of accounts, and facilitates mapping segments or accounts during consolidation.

2. Define the account structure, calendar, and functional currency you want to use for each set of books. Optionally, you can use the same structure, calendar, or currency more than once if the sets of books reside in the same Applications instance.
Note: If you want to consolidate budgets, your parent and subsidiary sets of books must share the same calendar.

3. Define a set of books for each subsidiary company, as well as for the parent company.
  • You can create consolidated reports only in your parent set of books. If you define a separate consolidation set of books with a unique chart of accounts, you will have to define new reports in that consolidation set of books.
  • Anyone with access to your parent set of books will be able to view consolidated data from your subsidiary sets of books.
  • If your subsidiary has local currency reporting needs, consider using General Ledger’s Multiple Reporting Currencies (MRC) feature to define both a primary and reporting set of books for the subsidiary. Use your parent company’s functional currency as the reporting currency for the reporting set of books.
4. Complete your setup tasks

Global Consolidation System

Consolidation is the period–end process of combining the financial results of separate subsidiaries with the parent company to form a single, combined statement of financial results. The Global Consolidation System (GCS) provides the flexibility to help you manage your consolidation needs regardless of your company structure.


The flexibility of the Global Consolidation System (GCS) allows you to manage financial information within any company structure. You can maintain multiple companies with similar or different accounting structures, and consolidate their results for meaningful financial reporting. You can consolidate budget and actual balances.
Note: If your companies are sharing a single set of books for operational accounting purposes, you do not need to use GCS.
You can use the Financial Statement Generator (FSG) to create consolidated financial reports.

1. There are two methods you can use to achieve consolidated results with Oracle Applications:
  •  Reporting Consolidations: Define an FSG report which consolidates data stored in a single set of books or which sums data across separate sets of books on the same applications instance.
  •  Data Transfer Consolidations: Serves global enterprises with multiple sets of books or multiple applications instances. With data transfer consolidations, you move your financial data from diverse sets of books and data sources into a single  consolidation set of books. You can report on and analyze consolidated financial information from this consolidated set of books.
2. Consolidating Budgets Like Actuals, you can consolidate budget periods one period at a time. You can also consolidate budgets that do not share the same calendar and/or beginning and ending periods. The following restrictions apply to consolidating budget balances:
  • If the source and target budgets do not share the same calendar, you must consolidate a specific period to a specific period.
  • If the source and target budgets do not share the same start period, you must consolidate a specific period to a specific period.
  • If the source and target budgets share the same calendar and start period, you can consolidate all periods or a specific period to a specific period.
3. Feature for Alternative Accounting Representations : These consolidation features complement the Global Accounting Engine Dual Posting solution. The Global Accounting Engine Dual Posting solution enables you to transfer a single Payables or Receivables transaction to two sets of books using different accounting rules. These features are also available to users who do not use Global Accounting Engine Dual Posting, but want to create alternative accounting representations of their accounting data using the standard consolidation functionality. These features apply to the journal batches created in the target set of books after running a transfer using the transactions method.

4. What You Can Consolidate : With GCS, you can consolidate any business dimension at any level of detail from any point of view:
  • Any Source: Data from any source system, including ledger, databases, Oracle and non–Oracle applications can be consolidated with GCS. For Oracle Applications, use Cross Instance Data Transfer to transfer consolidation data to your parent on a remote instance. Fornon–Oracle applications use a customizable spreadsheet front–end or the open consolidation interface to upload your data into GCS.
  • Any Chart of Accounts: Subsidiaries can use separate chart of accounts from the parent to address unique operational accounting practices and meet local statutory requirements. GCS enables you to consolidate across diverse charts of accounts.
  • Any Calendar: Subsidiaries can use different accounting calendars from the parent. GCS enables you to consolidate across calendars.
  • Any Currency: Subsidiaries can use a functional currency which differs from the functional currency of the parent. GCS revalues and translates all subsidiary balances to ensure consistent consolidated results.
  • Any Level of Detail: Consolidate detail transactions, detail balances, and summary balances.
Consolidate transactions when you want the convenience of accessing detailed information in the consolidated ledger.
Consolidate balances when you want the flexibility to transfer account details for only selected accounts.
Consolidate summary balances when you only want to transfer aggregated account balances to the consolidated ledger. This method requires fewer resources and enhances processing performance.
  • Any Balance Type: Consolidate any balance type; including actual, average, translated, budget, and statistical balances
5. Special Considerations for Average Daily Balance Sets of Books When consolidating average balances, you will need to reverse the prior period’s consolidation in the current period to avoid double counting. Period average balances represent standalone balances for each period, and is the same balance for every day within the same period. Without a reversal adjustment, the prior period’s average balance will be incorrectly included in the current period’s average balance.

For example, you are performing periodic average consolidation using PATD balances for Jan–01 and Feb–01. After consolidating Jan–01, and before consolidating Feb–01, you will need to reverse the Jan–01 PATD average consolidation journal as of Feb–01. This will set the Feb–01 PATD balance back to zero. You can then perform a PATD average consolidation for Feb–01.

This same reversal adjustment is required for quarterly QATD consolidations and year YATD consolidations. You will need to reverse the prior quarter’s QATD average consolidation in the first day of the current quarter before running the current consolidation. For year YATD average consolidations, you will need to reverse the prior year’s YATD avergae consolidation in the first day of the current year before running the current consolidation. If you perform average consolidations on the most frequent basis, as in doing periodic PATD average consolidations, you will automatically have available to you QATD and YATD average consolidation balances. To review the correct QATD and YATD information will be derived from the PATD balances. To review the correct QATD and YATD balances under this method, you need to select the date for the last day of the quarter or the year. For all other dates within the range, the balances will not be accurate.

4.2 Flexfield Value Security

Flexfield Value Security gives you the capability to restrict the set of values a user can use during data entry. With easy-to-define security rules and responsibility level control, you can quickly set up data entry security on your flexfield segments and
report parameters.

Flexfield Value Security lets you determine who can use flexfield segment values and report parameter values. Based on your responsibility and access rules that you define, Flexfield Value Security limits what values you can enter in flexfield pop-up windows and report parameters. Flexfield Value Security gives you greater control over who can use restricted data in your application. When you use Flexfield Value Security, users see only values they are allowed to use; restricted values do not appear in lists of values associated with the flexfield or report parameter.
 

To define security rules


1. In the Segment Values block, identify the value set to which your values belong. You can identify your value set or by the flexfield segment or concurrent program parameter that uses the value set.
2. In the Security Rule region, enter a name and description for your security rule.
3. Enter a message for this security rule. This message appears automatically whenever a user enters a segment value that violates your security rule.
4. Define the security rule elements that make up your rule.
5. Save your changes.

Security Rule Elements

You define a security rule element by specifying a value range that includes both a low and high value for your segment. A security rule element applies to all segment values included in the value range you specify.

You identify each security rule element as either Include or Exclude, where Include includes all values in the specified range, and Exclude excludes all values in the specified range. Every rule must have at least one Include rule element, since a rule automatically excludes all values unless you specifically include them. Exclude rule elements override Include rule elements.

You should always include any default values you use in your segments or dependent value sets. If the default value is secured, the flexfield window erases it from the segment as the window opens, and the user must enter a value manually.

If you want to specify a single value to include or exclude, enter the same value in both the Low and High fields.

Minimum and maximum possible values
The lowest and highest possible values in a range depend on the format type of your value set. For example, you might create a value set with format type of Number where the user can enter only the values between 0 and 100. Or, you might create a value set with format type of Standard Date where the user can enter only dates for the current year (a range of 01-JAN-2001 to 31-DEC-2001, for example). For example, if your format type is Char, then 1000 is less than 110, but if your format type is Number, 110 is less than 1000. The lowest and highest possible values in a range are also operating system dependent. When you use a Char format type for most platforms (ASCII platforms), numeric characters are "less" than alphabetic characters (that is, 9 is less than A), but for some platforms (EBCDIC platforms) numeric characters are "greater" than alphabetic characters (that is, Z is less than 0). The window gives you an error message if you specify a larger minimum value than your maximum value for your platform.

If you leave the low segment blank, the minimum value for this range is automatically the smallest value possible for your segment's value set. For example, if the value set maximum size is 3 and Right-justify and Zero-fill Numbers is checked, the minimum value is 000. However, if the value set has a maximum size of 3, has Numbers Only checked and Right-justify and Zero-fill Numbers unchecked, the minimum value is 0.

If you leave the high segment blank, the maximum value for this range is automatically the largest value possible for your segment's value set. For example, if the value set maximum size is 3 and Numbers Only is checked, the maximum value is 999. However, if the value set maximum size is 5, and Numbers Only is checked, the maximum value is 99999.

Suggestion: Use blank segments to specify the minimum or maximum possible values for a range to avoid having operating system dependent rules.
Note that security rules do not check or affect a blank segment value (null value).

To define security rule elements
1. In the Security Rule Elements block, select the type of security rule element. Valid types are:
Include  Your user can enter any segment value that falls in the following range. 
Exclude  Your user cannot enter any segment value that falls in the following range. 

2. Enter the low (From) and high (To) ends of this value range. Your value does not have to be a valid segment value.

Assign security rules
1. Navigate to Assign Security Rules window.
2. In the Assign Security Rules block, identify the value set to which your values belong. You can identify your value set or by the flexfield segment or concurrent program parameter that uses the value set.
3. In the Security Rules block, enter the application and responsibility name that uniquely identifies the responsibility to which you want to assign security rules.
4. Enter the name of a security rule you want to assign to this responsibility.
5. Save your changes.

Consolidation Process

Implementation Options
The consolidation you choose depends upon how many sets of books you use to satisfy the requirements of your global accounting operation.

1. Accounting Operations Using a Single Set of Books
If your subsidiaries all share the same set of books with the parent company and all reside on the same applications instance, you can consolidate financial results using the Financial Statement Generator reporting engine.

2. Accounting Operations Using Multiple Sets of Books - Single Applications Instance
If you have some subsidiaries that use their own set of books, you must perform a data transfer consolidation using the Global Consolidation System to manage your consolidation process.

3. Accounting Operations Using Multiple Sets of Books - Multiple Applications Instances
If your subsidiaries manage their accounting operations using Oracle applications and different sets of books on separate instances, you can transfer consolidation data using the Global Consolidation System to manage your consolidation process. You do this through your corporate intranet using Cross Instance Data Transfer

Consolidation Process Steps
Every company must complete common consolidation steps in order to consolidate financial results. The following table details each consolidation implementation option:

Consolidated Statements and Eliminating Entries

Consolidated financial statements are required when there are two or more affiliated companies. When a parent company either directly or indirectly controls a majority interest of a subsidiary, consolidated financial statements must be presented. Consolidated financial statements present the results of operations, statement of cash flows, and financial position of the combined entity. Separate accounting records are kept for each separate company, but not for the consolidated entity. To determine the consolidated amounts, the amounts for the individual affiliated companies are added together. Elimination entries are made to remove the effects of inter-company transactions.
        
When one company acquires another company, a consolidated balance sheet needs to be prepared. The first step is to eliminate the effects of any inter-company transactions. There are three basic types of inter-company eliminations. The first type is the elimination of inter-company stock ownership. This entry eliminates both the asset and the stockholders’ equity accounts for the parent company’s ownership of the subsidiary.

The second type of inter-company elimination is the elimination of inter-company debt. When the parent company makes a loan to a subsidiary, the parent company would have a note receivable and the subsidiary a note payable. When the two companies are consolidated, or combined, the loan is just a transfer of cash, so both the note receivable and note payable are eliminated.

The third type of inter-company elimination is the elimination of inter-company revenue and expenses. These inter-company revenues and expenses are eliminated since they are really just transfers of assets from one affiliated company to another and have no effect on consolidated net assets. Some examples of inter-company revenues and expenses are sales to affiliated companies, cost of goods sold as a result of sales to affiliated companies, interest expense or revenue on loans to or from affiliated companies, and rent or other revenue received or paid for services either rendered to or received from affiliated companies.

An important item to understand in regard to consolidated financial statements is the concept of minority interest. A minority interest exists when a parent company owns a majority interest in a subsidiary, but not 100% of the outstanding shares. In this case, the minority interest would be shown on the balance sheet as a type of ownership equity. The minority interest is the ownership interest in the subsidiary that is held by stockholders other than the parent company. Since there are minority stockholders, just the amount of the stockholders’ equity that is owned by the parent company is eliminated.

One of the GAAP guidelines related to consolidated financial statements states that the retained earnings of a subsidiary company that were created before the date of its acquisition can’t be included in the consolidated retained earnings of the parent company and its subsidiaries. In addition, any dividends declared from those retained earnings can’t be included in the parent company’s net income. GAAP also states that comparative financial statements are preferred for annual reports.
Eliminating Entries
The purpose of eliminating entries is to reflect the amounts that would appear if all the legally separate companies were actually a single company.

Elimination entries appear only in the consolidating workpapers and do not affect the books of the separate companies.

For the most part, companies that are to be consolidated record their transactions during the period without regard to the consolidated entity.

  • Transactions with related parties tend to be recorded in the same manner as those with unrelated parties.
  •  Elimination entries are used to increase or decrease (in the workpaper) the combined totals for individual accounts so that only transactions with external parties are reflected in the consolidated amounts.
  •  Some eliminating entries are required at the end of one period but not at the end of subsequent periods.
  • For example, a loan from a parent to a  subsidiary in December 20x1, repaid in February 20x2, requires an entry to
  • eliminate the intercompany receivable and payable on December 31, 20x1, but not at the end of 20x2.
  •  Some other elimination entries need to be placed in the consolidated workpapers each time consolidated statements are prepared  for a period of years.
  • For example, if a parent company sells land to a subsidiary for $5,000 above the cost to the parent, a workpaper entry is needed to reduce the land amount by $5,000 each time a consolidated balance sheet is prepared, for as long as the land is held by an affiliate.
  • It is important to remember that elimination entries, because they are not made on the books of any company, do not carry over from period to period

Consolidation Workbench

The Consolidation Workbench provides a central point of control for consolidating an unlimited number of subsidiaries to your parent, while keeping you informed about each subsidiary’s consolidation status. The workbench also monitors subsidiary account balances for any changes that occur after the subsidiary data has already been transferred to your parent set of books.


The Consolidation Workbench monitors the activity of all your subsidiaries to display the status of each process you submit. The table below lists all possible statuses for consolidation processes displayed in the status column:
 
In addition, the Transferred Balances column lists the following statuses for each consolidation process you submit:
Current: The consolidated data from the subsidiary to parent is current. The status is always current before a consolidation is transferred.
Obsolete: Any account balance for your subsidiary has changed after a transfer of subsidiary data to the parent.
Note: Even if a particular consolidation is only for a partial account range of the subsidiary, any account updated in the
subsidiary will result in an obsolete status for that consolidation process.

The obsolete status lets you know that subsidiary balances no longer agree with balances previously transferred to the parent. You must reverse the original consolidation process, then initiate another consolidation transfer. The status of the new transfer will be Current. 

Consolidation Reversals
If you reverse a subsidiary consolidation process, the Status column displays Reversed for that process if all the following conditions have been met:
  •  You must post the original consolidation journal
  •  You must generate a reversal of the original consolidation journal
  •  You must post the generated reversal consolidation journal
These operations can be completed in any order but they must all be complete for a status display of Reversed

State Controller

From the Consolidation Workbench you access the State Controller, a navigation tool to guide you through the consolidation process. From the State Controller, you can quickly select the consolidation step you want to perform. Each State Controller button corresponds to one of the functional steps of a consolidation:
 
Selecting the State Controller button will open the General Ledger window related to the consolidation step you need to complete. The section below provides a functional overview of the consolidation steps, an outline of the related State Controller actions you need to perform to complete a consolidation step, and references to the detailed task descriptions for each action.
Blue: represents a recommended step.
Gray: represents a step that is not recommended. Optionally, the button might be disabled instead of colored gray.
Red: represents a warning. For example, a red Translation Status button indicates that the subsidiary’s translated balances are out of date.
When you select a subsidiary from the Consolidation Workbench, the State Controller’s buttons change color based on which steps you’ve performed or need to perform for that subsidiary. After you successfully complete a consolidation step, the State Controller’s buttons may change color to reflect the current status. For example, the Review Journal button is gray until you have successfully transferred your subsidiary data to your parent and imported the consolidation journal. After these steps complete successfully, the color of the Review Journal button changes to blue, to indicate that reviewing the
consolidation journal is now a recommended step.


Mapping Subsidiaries to Your Parent

To consolidate multiple sets of books that have different functional currencies, accounting calendars, or charts of accounts, you must first map your subsidiaries’ charts of accounts to your parent’s chart of accounts.

A consolidation mapping is a set of instructions for mapping accounts or entire account segments from a subsidiary set of books to the parent set of books. When you subsequently transfer amounts from a subsidiary to your parent, General Ledger creates an unposted consolidation journal batch in your parent set of books based on the subsidiary’s mapping information.

Additional Information: You define one consolidation mapping for each subsidiary. If you want to change how a subsidiary consolidates to your parent, change the subsidiary’s consolidation mapping before you transfer the data. You can group multiple consolidation mappings into a consolidation mapping set. You can then transfer the mapping set to your parent rather than transferring each subsidiary’s data separately.

To define a consolidation mapping
Navigate to the Consolidation Mappings window.
1.1 Enter a Mapping name and Description for the mapping.

1.2 Choose a consolidation Method.
Balances: Consolidate actual, average, translated, budget, or statistical balances. This method does not include journal entry
detail. If you have average balance processing enabled, your parent should be defined as a consolidation set of books with
average balances enabled. Note that your are consolidating average balances.
Transactions: Consolidate actual journal entry detail from a subsidiary set of books. You can use this method only if both sets of books have the same functional currency. You cannot use this method for budgets. If you have average balance processing enabled, your parent should be defined as a non–consolidation set of books with average balances enabled. Note that you are averaging balances once you consolidate detail from your subsidiaries sets of books.

2.1 Enter the name of the Subsidiary set of books you will be consolidating.

2.2 Enter the Parent set of books name.

2.3 Enter the Currency to use for the consolidation:
• If you are consolidating balances, enter the parent set of book’s functional currency. Optionally, enter STAT to consolidate
statistical balances.
• If you are consolidating transactions, enter the parent set of book’s functional currency. This must be the same as the
subsidiary set of book’s functional currency.

2.4 Enter a range of Effective Dates for which the consolidation mapping can be used. If you use the mapping to transfer
consolidation data for periods that fall outside the effective date range, the transfer will fail.

2.5 If you have average balance processing enabled, select a default Usage type from the poplist.
Standard: Only standard balances are transferred to the parent set of books.
Average: Only average balances are transferred to the parent set of books.
Standard & Average: Both standard and average balances are transferred to the parent set of books.
Additional Information: You can create separate consolidation mappings for standard and average balances. This is helpful if you want to use different mapping rules to get different levels of detail. For example, you might map standard balances so you can view consolidated totals for each cost center within each company. However, you might map your average balances so you can view consolidated details for each cost center.
Note: If you choose Transactions as your consolidation method, General Ledger enters Standard as the Usage type.You cannot override this when you transfer your subsidiary data.

3. Select your consolidation run options.
 
Selecting Mapping Rules
Use segment rules, account rules, or a combination of both to specify how to consolidate balances or transactions from your subsidiary to your parent.
Segment rules: map subsidiary account segments to parent account segments. For example, you can map your subsidiary’s Department segment to your parent’s Cost Center segment.
Account rules: map a specific subsidiary account or a range of accounts to a specific account in your parent set of books. For example, you can map subsidiary account 02.300.5400.100 to account 01.100.3000.000.000 in your parent set of books. Or, you might map the entire range of subsidiary accounts 02.300.5400.100 through 02.300.6999.100 to account 01.100.3000.000.000 in your parent set of books.

1. You must define a segment rule action for each segment in your parent’s chart of accounts. You cannot define more than one action per parent segment.

2. Segment rules are preferable to account rules because:
– It’s fast and easy to create a consolidation by using segment rules. For example, if your parent account has only three
segments, you can map a subsidiary’s entire chart of accounts with just three segment rules.
– Consolidations based on segment rules process faster.
Suggestion: Use account rules only for specific exceptions where a subsidiary account cannot be mapped correctly with a
segment rule.

3. Account rules override segment rules if there is any conflict.

4. If you define segment rules for dependent segments in your chart of accounts, the list of values for the dependent segment value may appear to contain duplicate entries (if you have defined the same dependent value and description for different independent segment values). Choose any entry with the appropriate value; the Global Consolidation System does not use the description.

Entering segment rules
For each subsidiary segment being mapped, enter the Parent segment name to which it will map, an Action, and the Subsidiary segment name. You can use only one action for each parent segment. Possible Actions include:
Copy Value From: Copy all values in your subsidiary segment to the same values in your parent segment. The segments do not have to use the same value set, but must use the same segment values.
Note: This action produces the same result as the Copy Value segment rule in earlier versions of General Ledger. General
Ledger also prevents you from copying larger subsidiary segments to smaller parent segments. For example, you cannot
copy the subsidiary value 101 to a parent value set with a maximum length of 2.

Assign Single Value: Assign one specific value that will be used for the parent segment. You must enter the value that the parent chart of accounts will use.
Suggestion: Use this action when your parent account has more segments than your subsidiary account.
Note: This action produces the same result as the Single Value segment rule in earlier versions of General Ledger.

Use Rollup Rules From:
Map values from your subsidiary segments to your parent segments using the rule specified in the
Rollup Rules region.

Entering account rules
1. Navigate to the Consolidation Mappings window.
2. Enter or query a consolidation mapping.
3. Choose the Account Rules button.
4. Enter the Subsidiary Accounts that you want to consolidate. If you enter multiple ranges, they must not overlap.
5. Enter the Parent Account to which you want to map each subsidiary account range.

Rollup Rules
You can choose one of four rollup rules when specifying segment rules for your consolidation mapping. A rollup rule consists of a Transfer Level value and a Using value, entered in the Segment Rules window. The four rollup rules are shown in the following table:
 
  • When specifying a rollup rule, you must enter the Parent Segment Detail Value, Transfer Level, and Using fields. If you select the Detail/Parent or Summary/Parent rules, you must also enter a Subsidiary Segment Parent Value. If you select the Detail/Detail Ranges or Summary/Parent Ranges rules, you must enter Low and High values for the Subsidiary Segment Ranges.
  • You can enter multiple rollup rules for a single segment as long as the segment values specified in each rule do not overlap.
  • You can enter more than one subsidiary segment range as long as the segment values included in the ranges do not overlap.
Note: An overlap occurs when two or more rollup rules map the same detail source accounts to the same target account. The matching detail source accounts in the different rollup rules may be a partial or complete match.

Using Summary Accounts (Role up rule)

You can choose to consolidate balances from your subsidiaries’ summary accounts when you do not want to consolidate detail accounts. A summary consolidation will generally run faster than a detail consolidation because there is less data to transfer. Note: You can only consolidate summary accounts if you are using the balances consolidation method.

When you transfer your subsidiary data for a summary consolidation, General Ledger checks for overlapping accounts. If overlapping accounts are defined solely within your segment rules, the consolidation transfer will fail and the system generates an exception report showing which accounts overlapped. If accounts defined by your segment rules overlap with accounts defined by your account rules, the account rules override the segment rules. General Ledger corrects any double–counted balances that result from the overlapped accounts. If your subsidiary account has more segments than your parent, the additional subsidiary segments are left unmapped. During a summary consolidation, the unmapped segment is treated as a summary account segment with a value of ”T”.

To map subsidiary summary accounts

1. Specify segment rules for your consolidation mapping.
2. For your account segments, select the Use Rollup Rules From action.
3. For your rollup rules, use either the Summary/Parent or Summary/Parent Ranges rule.
4. Select your summary accounts. For the Summary/Parent rollup rule, enter the summary account in the Subsidiary Segment Parent Value field. For the Summary/Parent Ranges rollup rule, enter a range of summary accounts in the Low and High fields of the Subsidiary Segment Ranges region.
Suggestion: Map summary accounts first before mapping the 
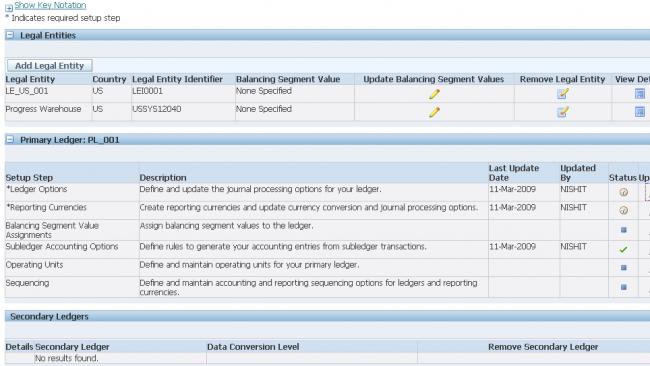
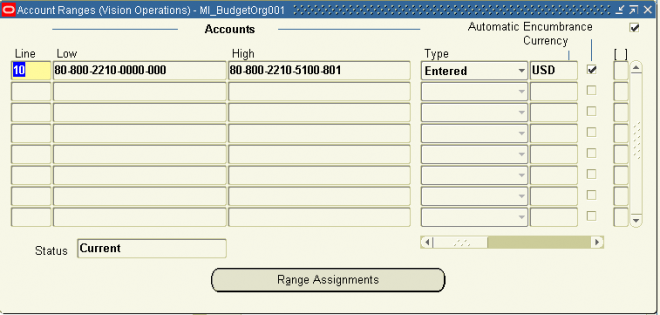
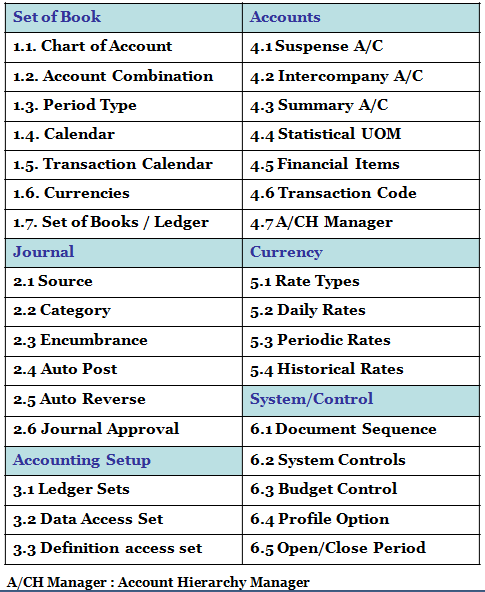
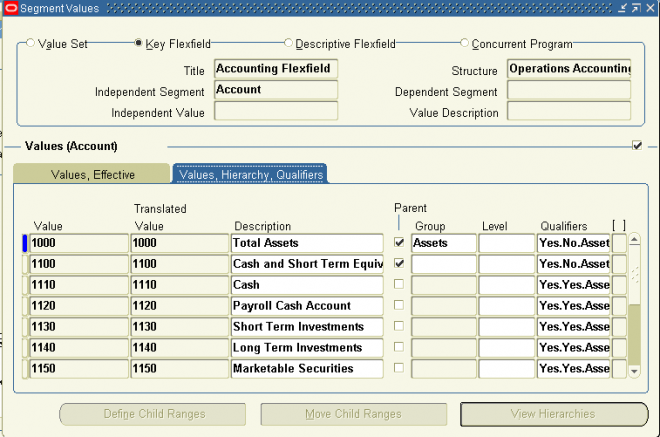
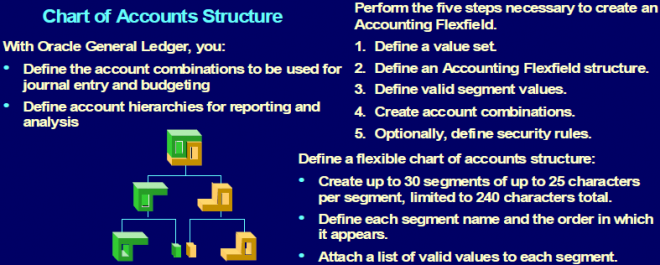
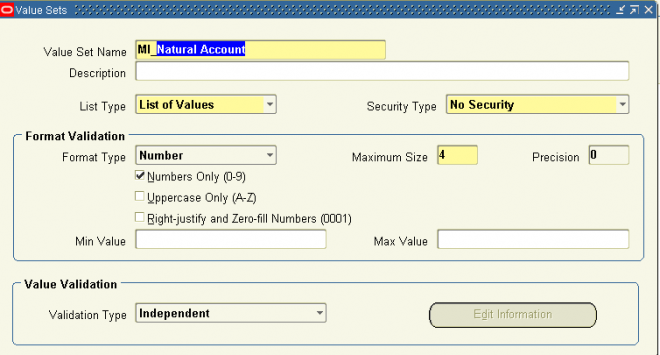
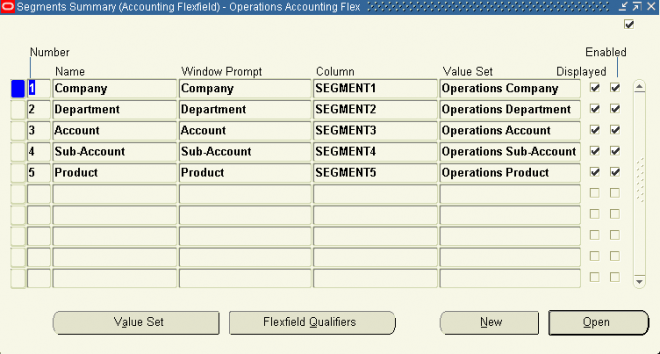
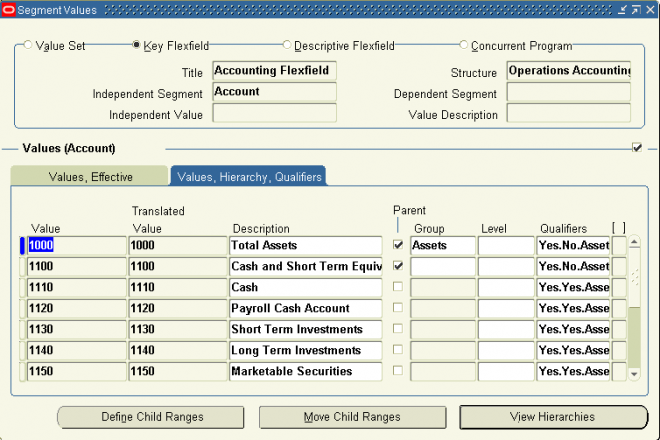
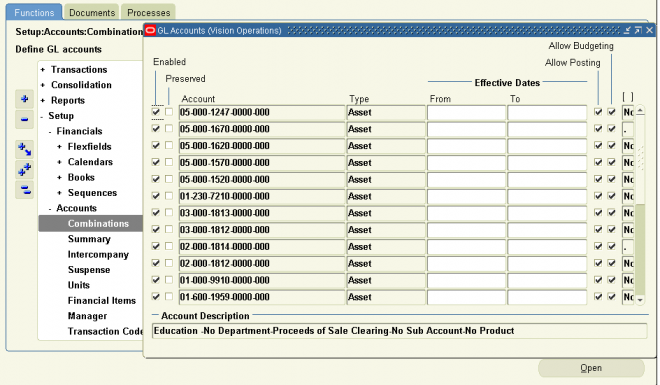
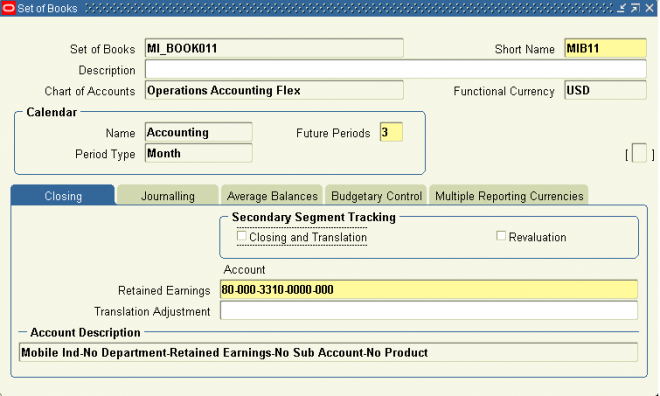
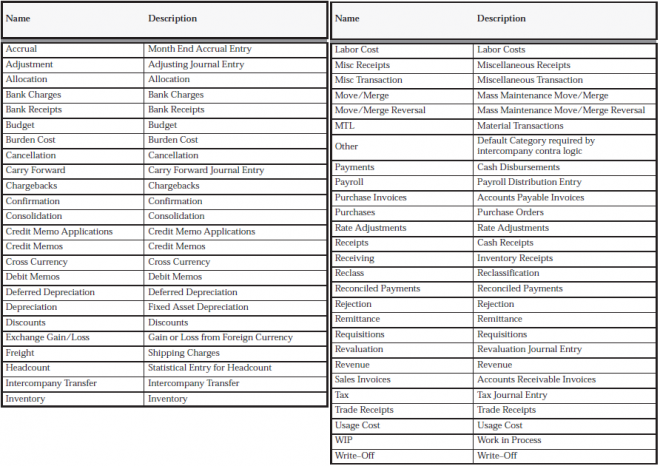
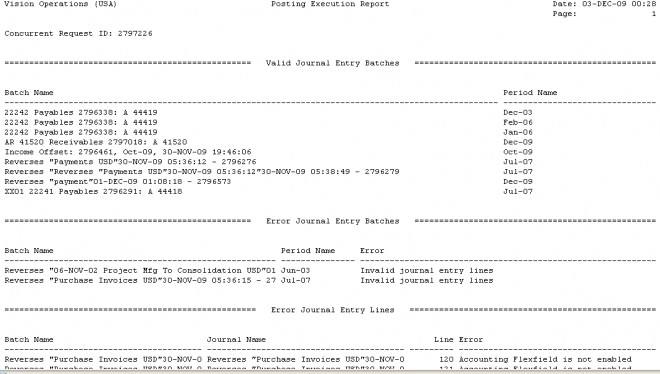
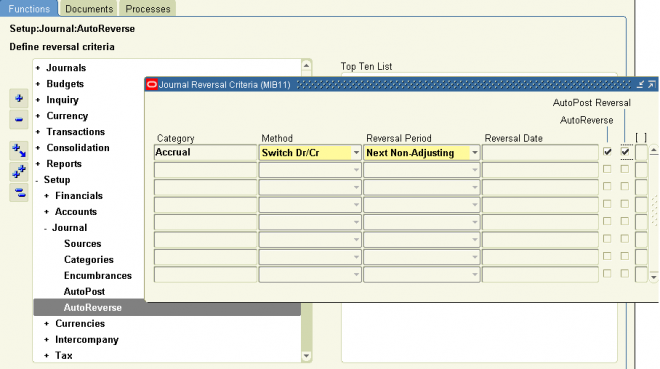
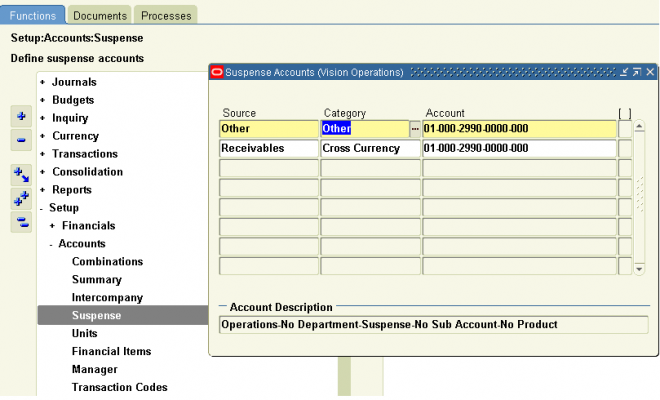
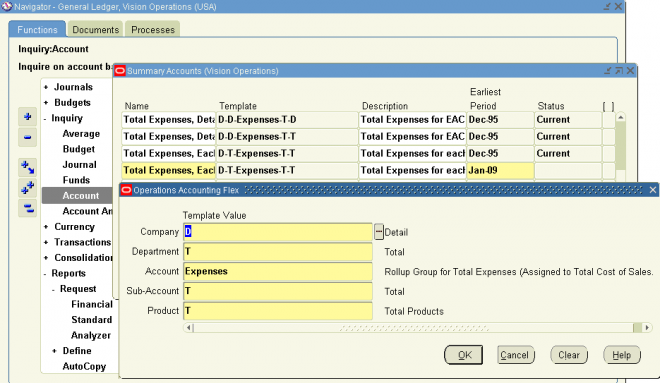
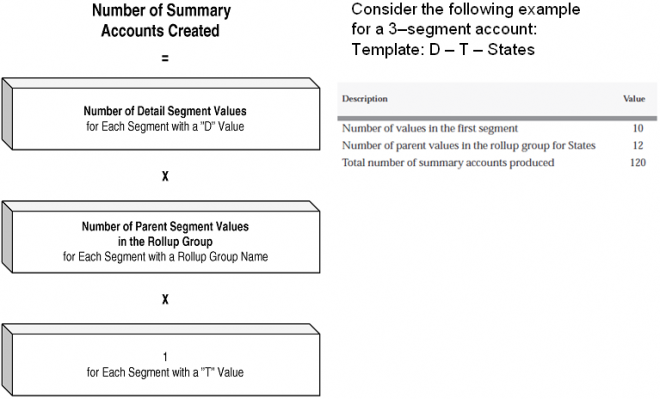
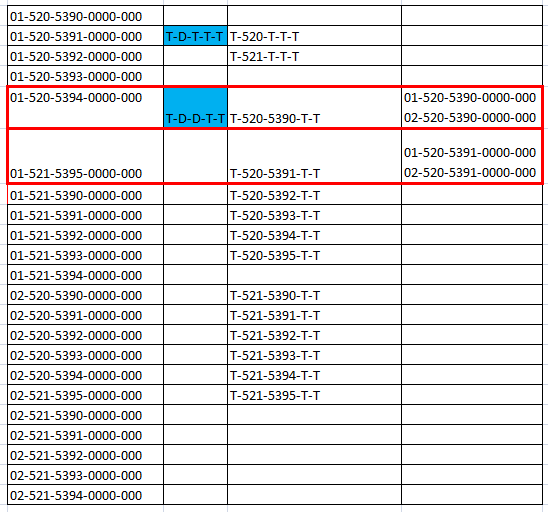
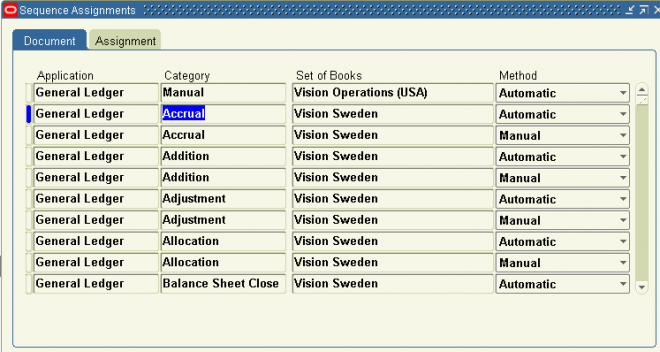
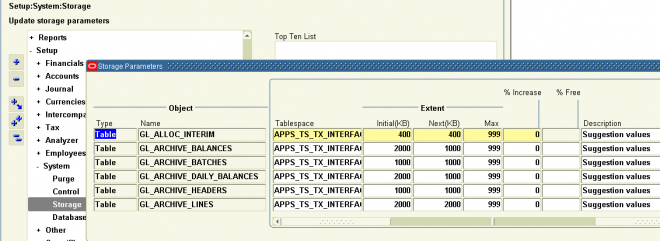
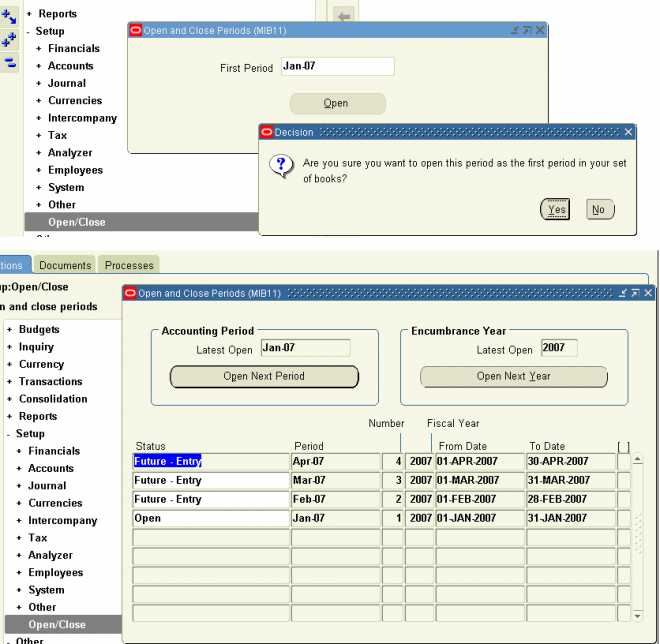
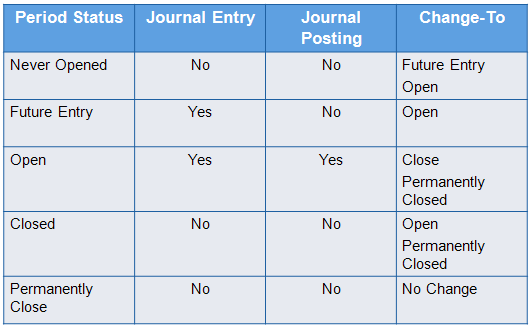
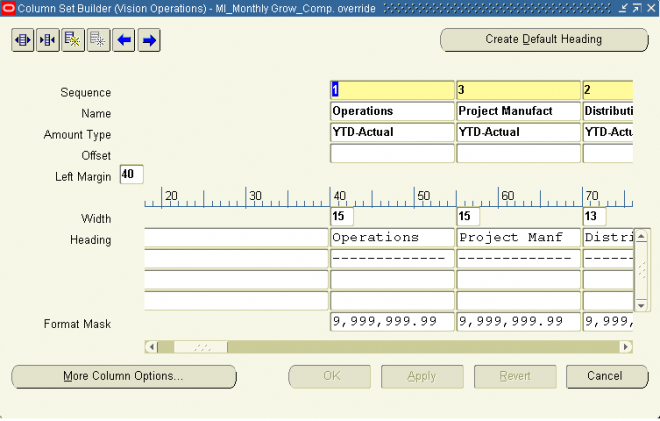
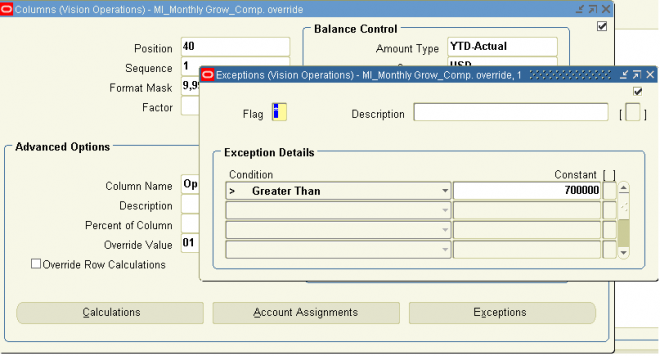
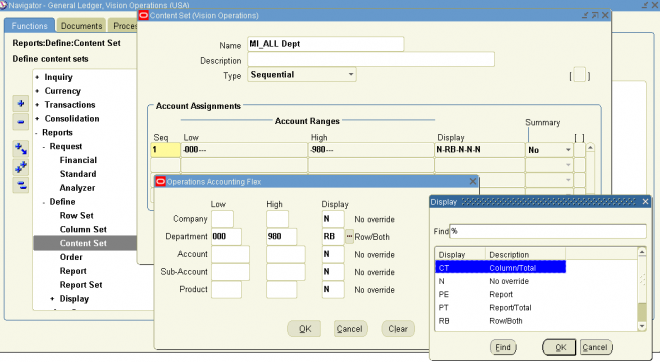
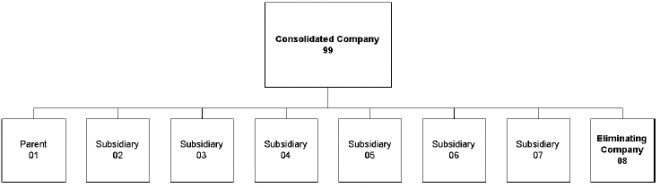
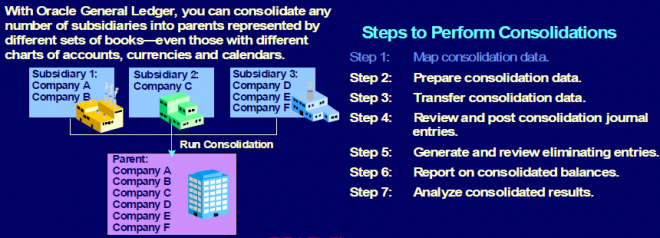
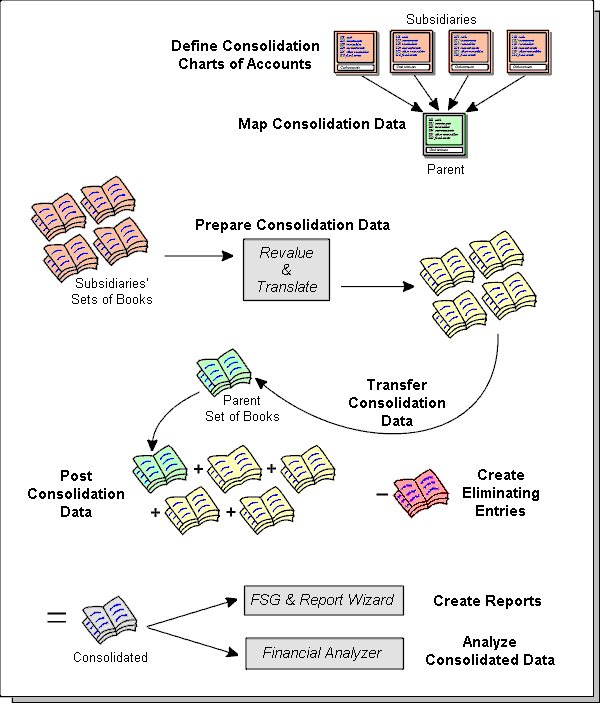
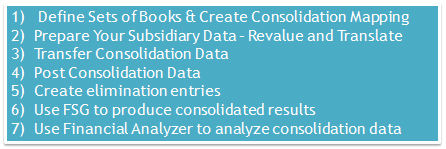
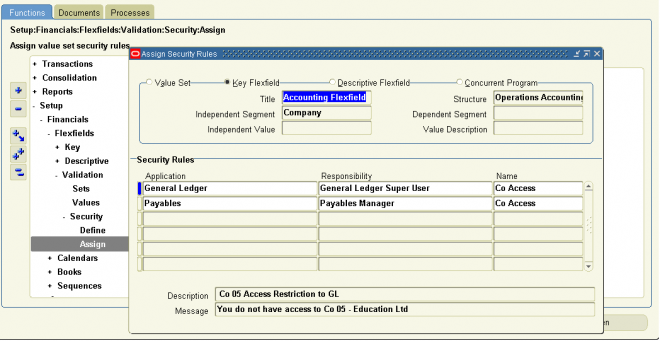
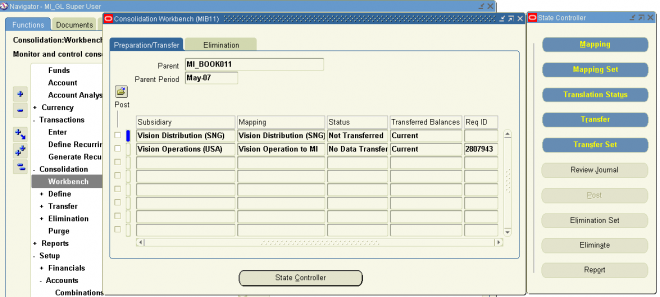
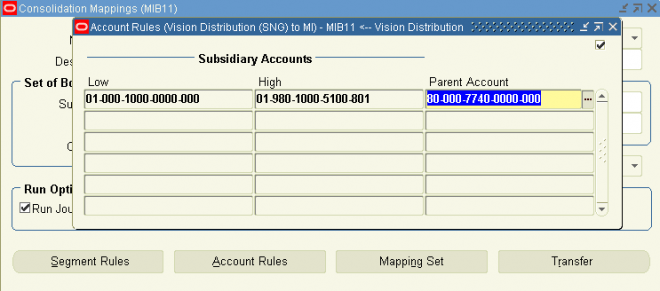
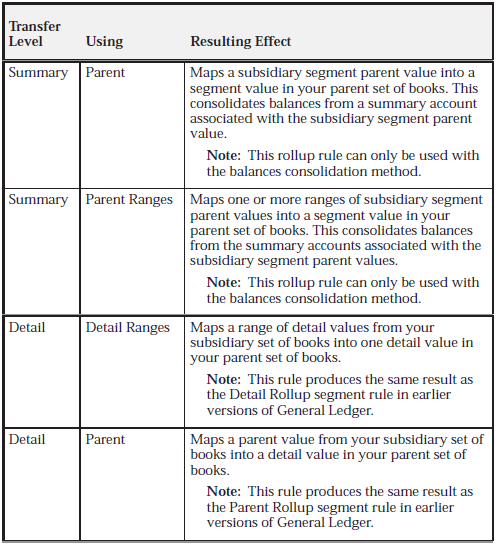
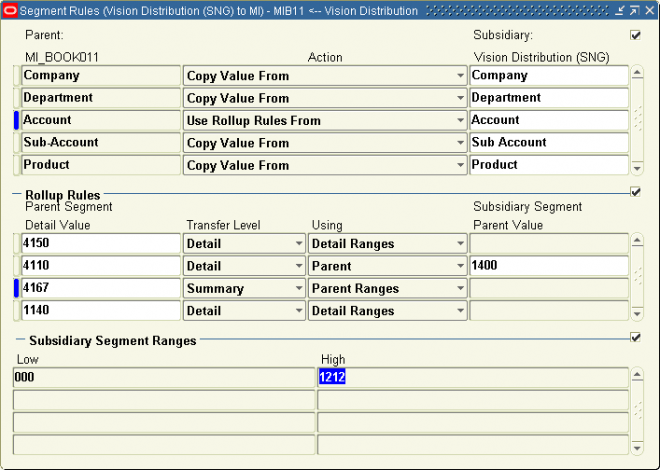
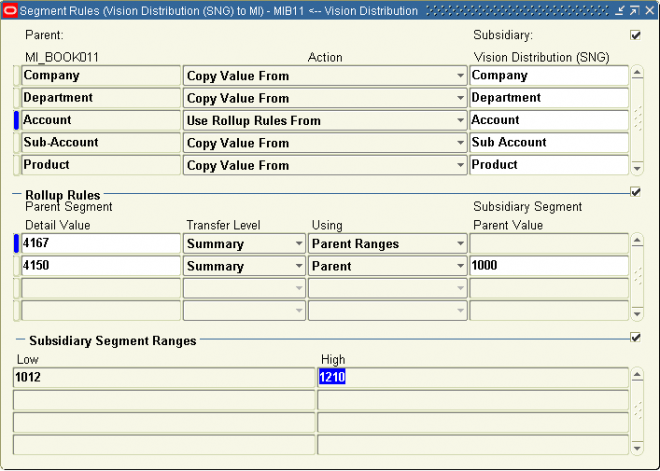
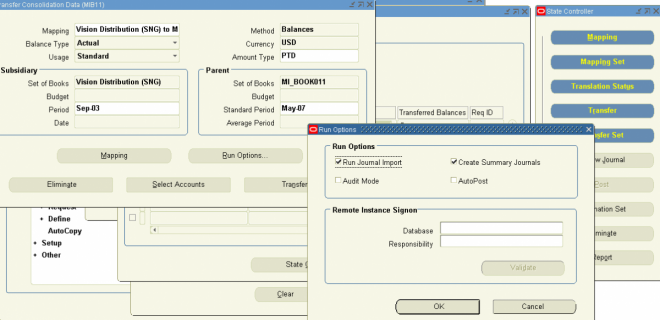
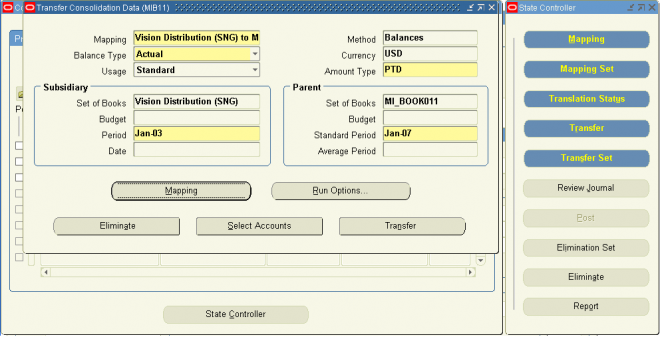
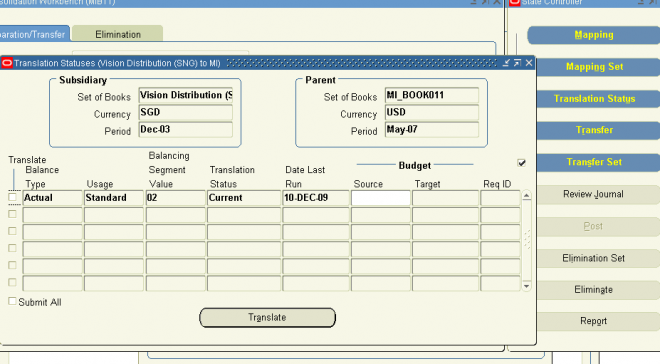
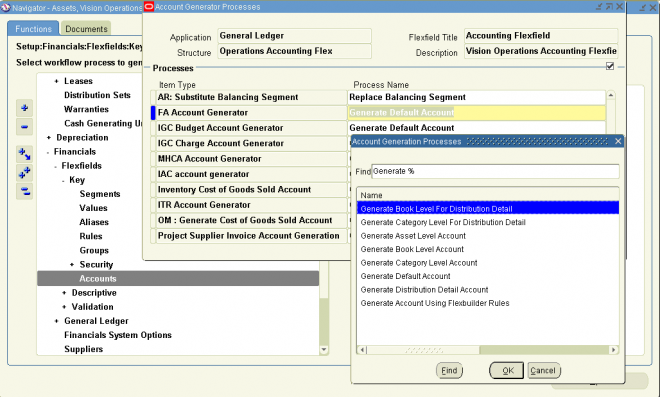
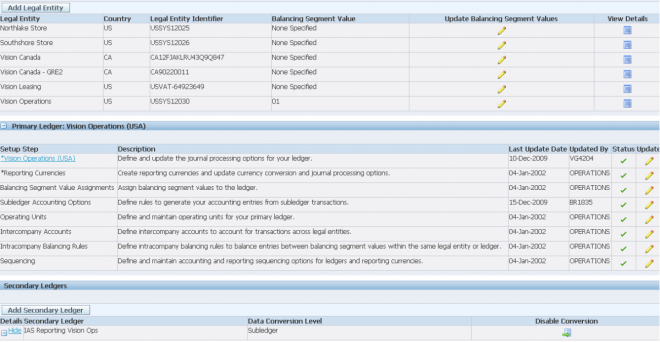
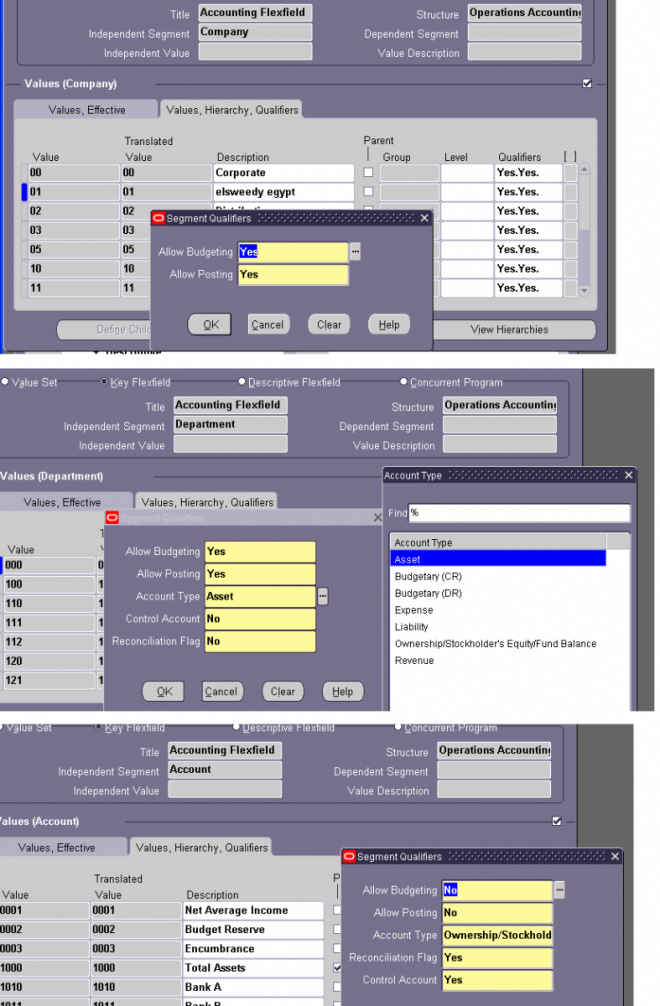
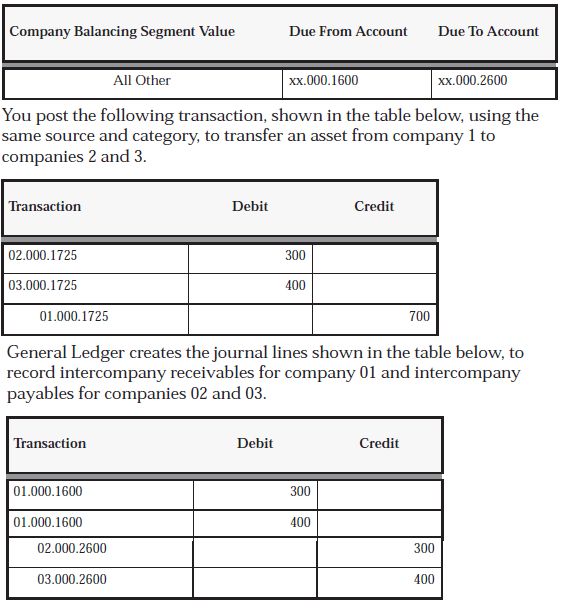
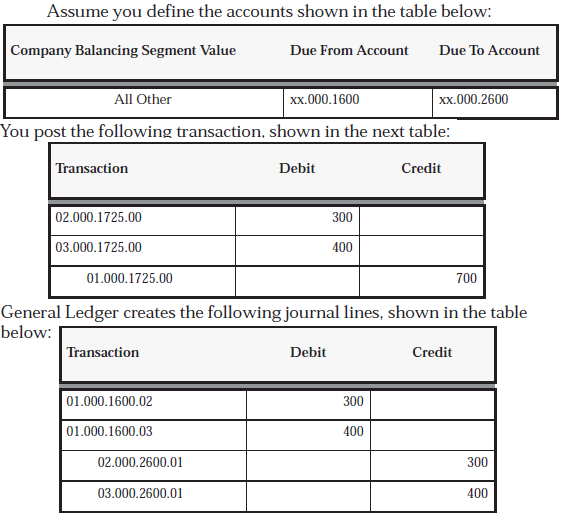
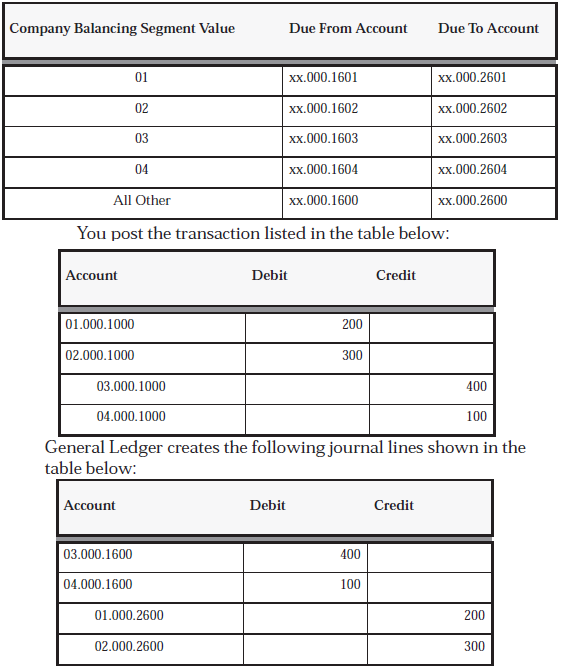
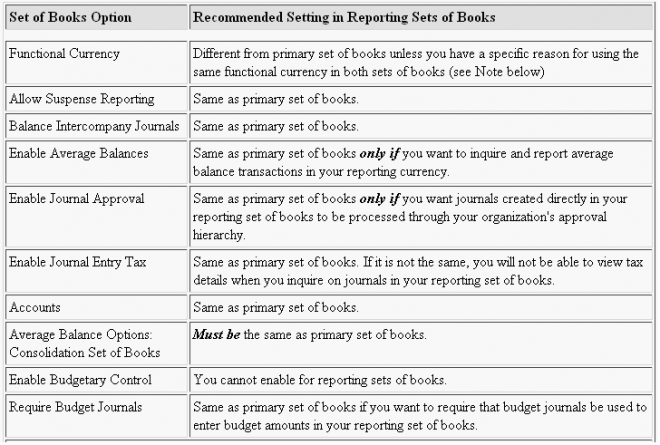
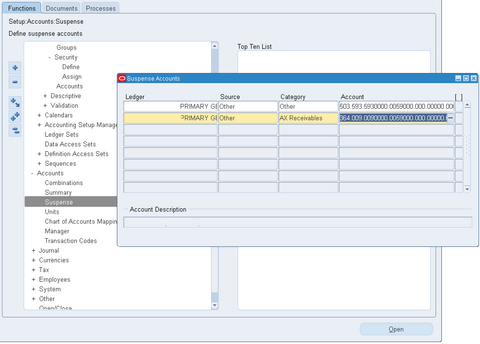
entire chart of accounts.
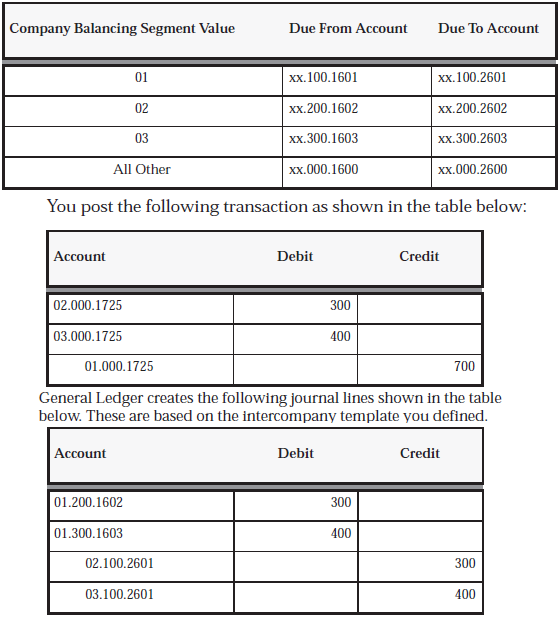
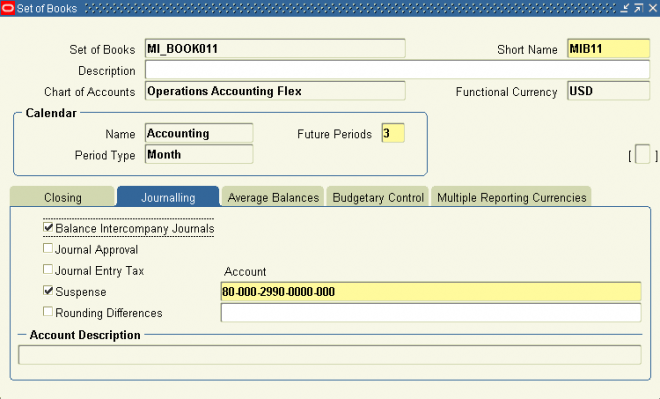
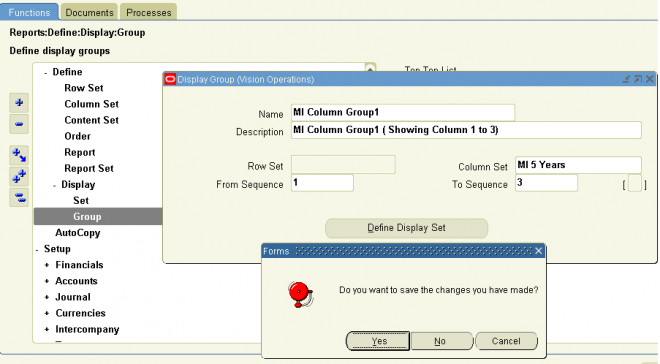
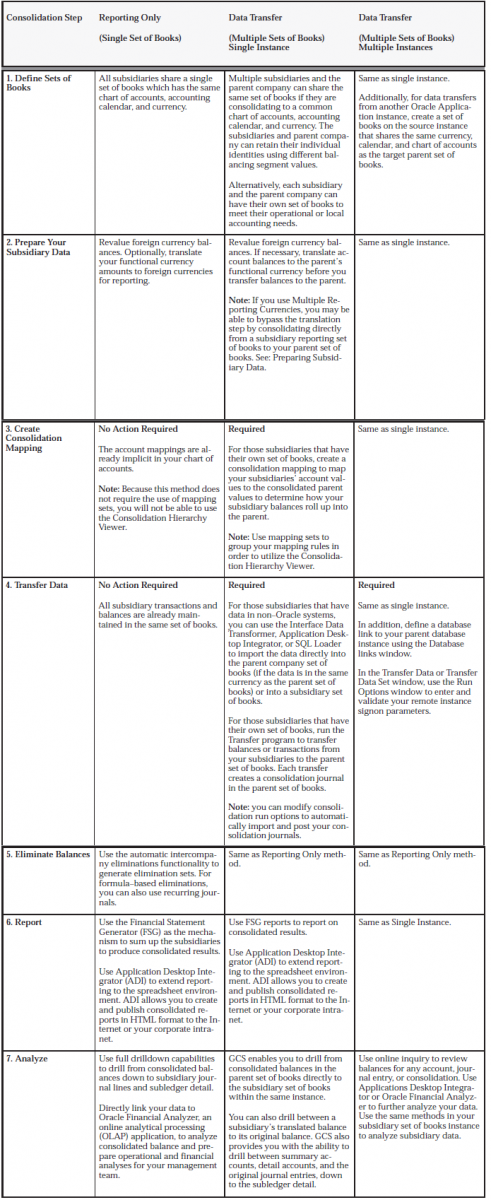
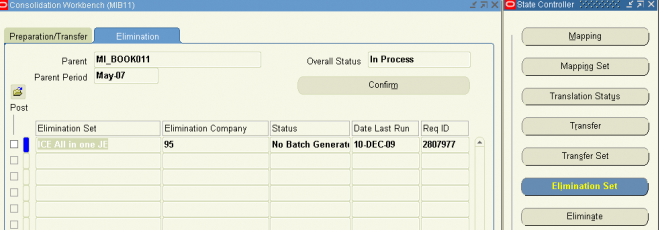
3. Consolidation Run Options

When you create a consolidation mapping or mapping set you can select any of four run options listed below and transfer your consolidation journals to the parent set of books. You can override these selections when you transfer subsidiary data to your parent.

Run Journal Import: Checking this option launches Journal Import after your subsidiary data has been transferred. This creates an unposted consolidation batch in your parent set of books automatically.
General Ledger names your batch in the following format: <Date> <Consolidation Mapping Name> Consolidation <Request ID>: <Balance Type> <Group ID>; for example, 31–JAN–95 US to Global Consolidation 50835:A 534. You may not want to run Journal Import if you want to schedule your batch processes to run later or if you want to transfer consolidating data across different machines or databases. If you choose not to run Journal Import, the transfer process populates
the GL_INTERFACE table so that you can run Journal Import later.
 
Note: If you are utilizing the Feature for Alternative Accounting Representations, General Ledger preserves up to
50 characters of the source batch name plus batch ID in the format <original batch name>:<batch ID>. If applicable, the following information is added after the first 50 characters: <Source><Request ID>:<Actual Flag><Group ID>; for example, Travel Summary:7708 Consolidation 1677754: A 3822.
 
Audit Mode: Check this option to keep a record of how accounts from your subsidiary set of books map to accounts in your parent set of books. You can then run the Consolidation Audit Report, the Disabled Parent Accounts Report, and the Unmapped Subsidiary Accounts Report to see consolidation audit information.

Suggestion: Use audit mode for new consolidations to ensure that your definition is correct and your sets of books are
mapping as you expected. Once you have verified this, you can improve performance by disabling audit mode.
After your subsidiary data has been transferred and you have requested the audit reports, purge your consolidation audit data using the Purge Consolidation Audit Data window.

Create Summary Journals: Check this option to summarize all journal lines that affect the same account code combination into one line in the parent set of books. Since this is a summary action, General Ledger creates one journal entry line showing debits and credits for each account code combination.

AutoPost: Check this option to automatically post your consolidation journals in the parent set of books.

Remote Instance Signon Region
Complete the following fields and choose the Validate button to verify that you can transfer consolidation data from your source instance to your parent instance. Note your parent instance must be on the same corporate intranet.

Database: Select the remote instance database.

Responsibility: Enter the remote instance responsibility that allows you to transfer consolidation data to the remote parent instance. Choose the Validate button to verify that the parent set of books on the source and target instances share the same calendar, currency, and chart of accounts.

Transferring Subsidiary Data to Your Parent


Transfer the balances or transactions to be consolidated from your subsidiary set of books to your parent. General Ledger accumulates your subsidiary information based on the mapping rules you defined, then populates the GL_INTERFACE table with the consolidation data. Choose the Run Options button to define consolidation run options and enter remote instance signon parameters if applicable. For example, you can run Journal Import and AutoPost automatically at the time you
transfer your subsidiary data.

Note: You can initiate a subsidiary–to–parent transfer from the subsidiary set of books or from the parent set of books only
when transferring within the same instance. The source instance must initiate a cross instance data transfer.

Consolidation Run Options
When you create a consolidation mapping or mapping set you can select any of four run options listed below and transfer your consolidation journals to the parent set of books. You can override these selections when you transfer subsidiary data to your parent.

Run Journal Import: Checking this option launches Journal Import after your subsidiary data has been transferred. This creates an unposted consolidation batch in your parent set of books automatically.
General Ledger names your batch in the following format: <Date> <Consolidation Mapping Name> Consolidation <Request ID>: <Balance Type> <Group ID>; for example, 31–JAN–95 US to Global Consolidation 50835:A 534. You may not want to run Journal Import if you want to schedule your batch processes to run later or if you want to transfer consolidating data across different machines or databases. If you choose not to run Journal Import, the transfer process populates
the GL_INTERFACE table so that you can run Journal Import later.
 
Note: If you are utilizing the Feature for Alternative Accounting Representations, General Ledger preserves up to
50 characters of the source batch name plus batch ID in the format <original batch name>:<batch ID>. If applicable, the following information is added after the first 50 characters: <Source><Request ID>:<Actual Flag><Group ID>; for example, Travel Summary:7708 Consolidation 1677754: A 3822.
 
Audit Mode: Check this option to keep a record of how accounts from your subsidiary set of books map to accounts in your parent set of books. You can then run the Consolidation Audit Report, the Disabled Parent Accounts Report, and the Unmapped Subsidiary Accounts Report to see consolidation audit information.

Suggestion: Use audit mode for new consolidations to ensure that your definition is correct and your sets of books are
mapping as you expected. Once you have verified this, you can improve performance by disabling audit mode.
After your subsidiary data has been transferred and you have requested the audit reports, purge your consolidation audit data using the Purge Consolidation Audit Data window.

Create Summary Journals: Check this option to summarize all journal lines that affect the same account code combination into one line in the parent set of books. Since this is a summary action, General Ledger creates one journal entry line showing debits and credits for each account code combination.

AutoPost: Check this option to automatically post your consolidation journals in the parent set of books.

Remote Instance Signon Region
Complete the following fields and choose the Validate button to verify that you can transfer consolidation data from your source instance to your parent instance. Note your parent instance must be on the same corporate intranet.

Database: Select the remote instance database.

Responsibility: Enter the remote instance responsibility that allows you to transfer consolidation data to the remote parent instance. Choose the Validate button to verify that the parent set of books on the source and target instances share the same calendar, currency, and chart of accounts.

Preparing Subsidiary Data

Prepare your subsidiary data by revaluing and translating balances before you transfer the balances to your parent.

Revalue Balances
If any of your subsidiary sets of books have balance sheet accounts that are denominated in a foreign currency, revalue the balances to reflect the impact of any changes in exchange rates. Post the resulting revaluation journal.

Translate Balances
If any of your subsidiary sets of books uses a functional currency different from your parent, you should translate the account balances before you transfer the subsidiary data to your parent. You should translate into the parent set of books’ functional currency.

You can use the Global Consolidation System to check the translation status of any subsidiary set of books. Also, from the Translation Statuses window you can submit a request to rerun a translation.
Note: From the Consolidation Workbench, you can only rerun translations that have already been run at least once for the
period. You cannot modify a translation or define new translations. To define new translations, use the Translate
Balances window.

Multiple Reporting Currencies
If you use Multiple Reporting Currencies, you may be able to bypass the translation step by consolidating directly from a subsidiary’s reporting set of books to your parent set of books. You still need to run revaluation on the primary and reporting set of books before you consolidate.


To check translation status for a subsidiary set of books:

1. Navigate to the Consolidation Workbench.
2. Query the consolidation mapping of the subsidiary whose translation status you want to check.
3. Choose the Translation Status button from the State Controller.
4. Review the information on the Translation Statuses window. The Translation Status column indicates whether a translation is Current or Not Current. The Date Last Run column displays the date that translation was last run.

To submit a translation:
1. From the Translation Statuses window, select the translation you want to run by marking the Translate check box.
2. Choose the Translate button.

Account Generator in Oracle Assets

Oracle Assets uses the Account Generator to generate accounting flexfield combinations for journal entries. The Account Generator allows you to designate a specific source for each segment in the account for which Oracle Assets creates a journal entry. The Account Generator gives you the flexibility to create journal entries according to your requirements. You can specify to what detail to create journal entries, and you can specify the detail level for each book and account type.

For example, when creating journal entries for asset cost, you can specify that the cost center segment comes from the depreciation expense account of the distribution line you entered for the asset in the Assignments window. Or, you can specify that the cost center comes from the default value you defined for the depreciation book.


Oracle Assets provides two seeded Account Generator processes.
  • Generate Default Account process
  • Generate Distribution Detail Account process
  •  
The Generate Default Account process creates journal entries without cost center level detail, except for depreciation expense. Using the default assignments, it creates journal entries using the balancing segment from the distribution line in the Assignments window and the natural account segment from the asset category or book, depending on the account type. The Account Generator gets the other segments from the default segment values you entered for the book. You can modify the default Account Generator processes so that Oracle Assets creates journal entries to a different detail level.

The Generate Distribution Detail Account process creates journal entries with cost center level detail. It creates journal entries using the distribution expense account for all segment values, except the natural account segment. The natural account segment is created from the asset category or book, depending on the account type. You can modify the default Account Generator processes so that Oracle Assets creates journal entries to a different detail level.

Release R12

Ledgers

A ledger determines the currency, chart of accounts, accounting calendar, ledger processing options and subledger accounting method, if used, for a legal entity, group of legal entities, or some other business purpose that does not involve legal entities.
  • You define ledgers when you create accounting setups in Accounting Setup Manager.
  • Each accounting setup requires a primary ledger and optionally one or more secondary ledgers and reporting currencies.
Types of Ledgers
There are two types of ledgers: primary and secondary.
Primary Ledger
The primary ledger acts as the main record-keeping ledger. If used for the purpose of maintaining transactions for one or more legal entities, it uses the legal entities' main chart of accounts, accounting calendar, currency, subledger accounting method, and ledger processing options to record and report on all of their financial transactions. If used for another business purpose where no legal entities are involved, then the primary ledger is defined with the chart of accounts, accounting calendar, and currency that is suited for the business need. One primary ledger is required for each accounting setup.

Secondary Ledger
The secondary ledger is an optional, additional ledger that is associated with the primary ledger for an accounting setup. Secondary ledgers can be used to represent your primary ledger's accounting data in another accounting representation that differs in one or more of the following from the primary ledger:
• Chart of accounts
• Accounting calendar/period type combination
• Currency
• Subledger accounting method
• Ledger processing options

Secondary ledgers can be used in many ways.
  1. For example, if a legal entity must perform corporate and statutory reporting, you can use the primary ledger to satisfy corporate reporting requirements and then use a secondary ledger to satisfy statutory reporting requirements.
  2. If a legal entity is a subsidiary of a parent company and must produce its financial results according to the parent company's reporting requirements in addition to its own local reporting requirements, then a secondary ledger may be used to satisfy the additional reporting requirement.
Secondary ledgers can be maintained at the following data conversion levels:
• Balance: The balance level secondary ledger maintains your primary ledger account balances in another accounting representation. This type of secondary ledger requires you to use Oracle General Ledger Consolidation to transfer your primary ledger balances to this secondary ledger. 
• Subledger: The Subledger level secondary ledger maintains subledger journals, general ledger journal entries, and balances in the additional accounting representation. This data conversion level uses both Oracle Subledger Accounting and General Ledger Posting to create the necessary journals in both your primary and secondary ledgers simultaneously.
• Journal: The journal level secondary ledger maintains your primary ledger journal entries and balances in an additional accounting representation. This type of secondary ledger is maintained using the General Ledger Posting Program. Every
time you post a journal in your primary ledger, the same journal can be automatically replicated and maintained in the secondary ledger for those journal sources and categories that are set up for this behavior.
• Adjustments Only: The Adjustments Only Secondary Ledger is an incomplete accounting representation that only holds adjustments. The adjustments can be manual adjustments or automated adjustments from Oracle Subledger Accounting.
This type of ledger must share the same chart of accounts, accounting calendar/period type combination, and currency as the associated primary ledger. To obtain a complete secondary accounting representation that includes both the transactional data and the adjustments, you must then combine the adjustments-only secondary ledger with the primary ledger when running reports.
Note: If you only need to represent your primary ledger transactions in another currency, you do not need to use secondary ledgers; you can use reporting currencies.

Reporting Currencies
If you want to maintain your ledger transactions in multiple currencies, you can use reporting currencies. Reporting currencies are additional currency representations of primary or secondary ledgers. Unlike secondary ledgers, reporting currencies can only differ by currency from their source ledger and must share the same chart of accounts, accounting calendar/period type combination, subledger accounting method, if used, and ledger processing options. Reporting currencies can be used for supplementary reporting purposes, such as consolidation or management reporting. They can also be used if you operate in countries with highly inflationary economies.
Reporting currencies can be maintained at the following currency conversion levels:
• Balance Level: The Balance level reporting currency is maintained only for GL account balances by using translation to convert the balances from the ledger currency to the reporting currency. Balance level reporting currencies can be assigned to primary and secondary ledgers using Accounting Setup Manager, or they can be system-generated the first time you run translation using a different currency.
• Journal Level: The Journal level reporting currency is maintained for GL journal entries and balances when you post journals in your primary or secondary ledger.
This type of reporting currency is maintained using the General Ledger Posting program. Each time you post a journal entry in the associated primary or secondary ledger, another journal is created and posted to the Journal level reporting currency within the same journal batch.
• Subledger Level: The Subledger level reporting currency is maintained for primary ledgers only. They maintain a currency representation of the primary ledgers' subledger journals, journal entries, and balances. This type of reporting currency is
maintained by Oracle Subledger Accounting (SLA) and the GL Posting program.

Ledger and Data access Sets

Ledger Sets

A ledger set is a group of ledgers that share the same chart of accounts and calendar/period type combination. Ledger sets allow you to run processes and reports for multiple ledgers simultaneously.

For example, you can open/close periods for multiple ledgers at once, run recurring journals that update balances for multiple ledgers, or run consolidated financial reports that summarize balances across multiple ledgers in a ledger set.

1. You can group all types of ledgers in a ledger set, such as primary ledger, secondary ledgers, and reporting currencies (journal and subledger levels), as long as they share the same chart of accounts and calendar/period type combination. The same ledger can belong to multiple ledger sets, and ledger sets can contain other ledger sets.

2. Oracle General Ledger automatically creates a data access set when the following occurs:
  • A ledger is created
  • A ledger set is defined
The system-generated data access set for a ledger uses the same name as the ledger. This data access set uses the Full Ledger access set type that provides full read and write access to the ledgers. The system-generated data access set for ledger sets uses the same name as the ledger set. This data access set uses the Full Ledger access set type that provides full read and  write access to all of the ledgers assigned to the ledger set.

If the level of access provided by the system–generated data access set is sufficient for your needs, you do not need to manually create a data access set; just use the one created by the system. You only need to create your own data access sets when you want to further limit read and write access to ledgers, ledger sets, or specific balancing segment values or
management segment values for a ledger or ledger set.

Data Access Sets
Data access sets control which ledgers can be accessed by different responsibilities. Data access sets can also limit a user from accessing certain balancing segment values or management segment values or grant read–only or read and write access to data in a ledger.

General Ledger automatically creates a data access set when you define a ledger or ledger set. This system-generated data access set provides full read and write access to ledgers. You can also provide more limited access to your ledgers and ledger sets by defining your own data access sets. Your System Administrator must assign the data access set that you want to use to the profile option GL: Data Access Set for each responsibility.
You can define three types of data access sets:
  • Full Ledger: Grants access to all the data in a ledger. For example, in a data access set with two ledgers, A and B, you can grant read-only privileges to all the data in Ledger A and grant read and write privileges to all the data in Ledger B.
  • Balancing Segment Value: Grants access to all or specific ledger/balancing segment value (BSV) combinations. For example, you can have a data access set with Ledger A, and grant read-only privileges to balancing segment value 01, grant read and write privileges to balancing segment value 02, and grant no access to balancing segment value 03 in the same ledger. This is useful for companies that use a small number of ledgers with a high number of balancing segment values to represent multiple companies or legal entities.
  • Management Segment Value: Grants access to all or specific ledger/management segment value (MSV) combinations. For example, you can have a data access set with ledger A and grant read only privileges to management segment value 100, grant read and write privileges to management segment value 200, and grant no access to management segment value 300. This can only be used if you have specified a management segment in your chart of accounts
Note: The Full Ledger access set type provides better system performance than the Balancing Segment Value or Management Segment Value access set type.
Note: When you assign specific balancing segment values/management segment values, you can specify all values,
parent values that include their child values, or child valuesindividually.

You must specify one of the three types for each data access set. Once defined, you cannot alter the type. You can only add or delete ledgers/ledger sets and segment values specified in the data access set.

Definition Access Sets

Definition Access Sets are an optional security feature that allow you to secure shared General Ledger definitions such as MassAllocations, Recurring Journal Formulas, and Financial Statement Generator (FSG) components. Definition Access Sets allow you to:
• Assign a user or group of users access to specific definitions.
• Specify what actions can be performed on secured definitions for a user or group of users.

For example, you can secure FSG reports to allow some users to modify the report definition, other users to only view the report definition, while other users can modify, view, and submit the report. To use Definition Access Set security you:


1. Create a Definition Access Set.
2. Assign it to one or more responsibilities.
3. Create a definition.
4. Secure the definition in its respective window and assign it to a Definition Access Set with the proper privileges.

Intercompany Invoicing Setups

1. For a single process flow (one procure-to-pay cycle or order-to-cash cycle), you can model Oracle to generate intercompany invoices between two or more operating units. The building block of intercompany invoicing is the setup of intercompany transaction flow.


The intercompany transaction flow establishes the physical flow of goods and financial flow relationship between two operating units. The intercompany transaction flow establishes the relationship between one operating unit (known as Start Operating Unit) and another operating unit (known as End Operating Unit) about the actual movement of goods. Similarly, it also establishes the invoicing relationship between Start Operating Unit and End Operating Unit.

2. Intercompany transaction flow is of two typesshipping flow and procuring flow. You need to setup intercompany transaction flow of type shipping when selling operating unit is different from shipping operating unit. You need to setup intercompany transaction flow of type procuring when buying operating unit is different from receiving operating unit.
 

3.1 By enabling advanced accounting for an intercompany transaction flow, you would be able to generate multiple intercompany invoices between different operating units for the same physical movement of goods.
Oracle supports intercompany invoicing for both shipping and procuring flows. However, you need to use the ‘Advanced Accounting’ option for enabling intercompany invoicing for procuring flow even if it involves only two operating units. If you do not enable ‘Advanced Accounting’ option at the intercompany transaction header, then no logical transactions will be generated and no intermediate nodes can be defined

3.2 You need to define intercompany relations between each pair of operating units in the intercompany transaction flow. When advanced accounting is enabled for an intercompany transaction flow, you will be able to define multiple intercompany relationships between different operating units. If advanced accounting is set to No, then an intercompany transaction flow can have only one intercompany relation (it is between start operating unit and end operating unit).
 
 
At each pair of intercompany relationship, you will define the intercompany accounts, and currency code to be used on AR and AP invoices.
Note that in Figure 3.1 - Intercompany Transaction Flow, physical goods never flow through intermediate operating unit. Oracle creates ‘Logical Material Transactions’ between the operating units, based on which intercompany invoices between multiple operating units are raised.

3.3 No logical transactions will be created when you do not choose ‘Advanced Accounting’. For example, the transactions in Figure 4 can be broken down as depicted in Figure 6.
 
Logical transactions are useful to record financial transactions between two operating units without physical movement of goods. For example, in Figure 3.2 - Logical Material Flow, Vision Japan is an intermediate operating unit through which no physical goods flow. However, it is a financial intermediate node, which is involved in intercompany invoice flow. To facilitate accounting in the intermediate OUs, logical intercompany receipt and issue transactions are created. Similarly, logical receipt and logical sales order issue transactions are created for those receipts and issues that are not accompanied with physical receipt and issue of goods.

3.4 Advanced Accounting’ option is not available for internal requisitions – internal sales order business flow. Though you can set the ‘Advanced Accounting’ flag at Intercompany Transaction Flow header to ‘Yes’, system ignores the flag and does not generate any logical transactions. This means you cannot have an intermediate financial node in the intercompany transaction flow. Also, you cannot have intercompany invoicing for internal sales order with direct transfer (in shipping network between the inventory organizations) as an option. You have an flexibility to switch off intercompany invoicing for internal sales orders by setting the profile ‘INV: Intercompany Invoice for Internal Orders’ to No.

Intercompany invoicing is possible for inter-org transfers of type ‘In-transit’ only through ‘Internal sales Orders’. No intercompany invoicing is possible if you perform org transfers between two inventory orgs belonging two different operating units without ‘internal sales Orders’. Also note that intercompany invoice cannot be raised for inter-org transfers of type ‘Direct Transfer’ through Internal sales Orders.

Customer and Supplier relationship

Intercompany invoicing is widely used in multinational organizations. Sometimes you will find that these companies engage in a customer – supplier relationship.
For example, in above Figure you need to define Vision Japan as a customer in Vision China operating unit. Similarly, Vision China should be defined as a supplier in Vision Japan. When you define an intercompany relationship between Vision Japan and Vision China, actually you are establishing an internal customer and supplier relationship. Similar is the case for every intercompany relationship in an intercompany transaction flow. However, at present intercompany invoicing does not support any sales credit check.

Standard Reports and Listings

General Ledger gives you a complete set of standard reports such as journal reports, general ledgers, account analyses and trial balances. You can also request standard listings to review key non–financial information, including your chart of accounts, row sets, column sets and content sets, reporting hierarchies, consolidation definitions, recurring journal formulas, and more.

General Ledger provides the following categories of standard reports and listings:


  • Account Analysis: These reports list the accumulated balances of a range of accounts and all journal entry lines that affect that range. The same segment security rules defined for your chart of accounts extend to account analysis reports.
  • Budget: These reports and listings contain information about your budgets and budget organizations, including account assignments and budget hierarchies.
  • Chart of Accounts: These reports and listings provide information about the accounts in your chart of accounts, including segment values, rollup ranges and suspense accounts.
  • Multi–Company Accounting and Consolidation: These reports and listings provide information about your multi–company
  • accounting and consolidation activities. You can request reports about intercompany transactions made using General Ledger’s CENTRA feature.
  • You can also request reports about a specific consolidation, including how your subsidiaries’ accounts are mapped into your parent accounts. You must use the audit mode run option in order to request the Consolidation Audit Report and the Consolidation Exception Reports, and you can only request the Consolidation Journals Report for consolidations using the Transactions method.
  • Currency: These listings show the daily, period and historical rates you defined for foreign currencies.
  • Financial Statement Generator: These listings provide summary or detail information about the definitions of your Financial Statement Generator report components, reports and report sets.
  • General Ledger: These reports list beginning and ending account balances, and all journal entry lines affecting each account balance in your functional and foreign currencies. The same segment security rules defined for your chart of accounts extend to general ledger reports.
  • Journals: These reports provide journal information in functional and foreign currencies, including posted, unposted and error journals. You can also review journal activity for particular periods and balancing segments. The same segment security rules defined for your chart of accounts extend to journals reports.
  • Trial Balance: These reports list account balances and activity for functional and foreign currencies, budgets, encumbrances and actuals. You can request this information by currency, accounts, and so on. The same segment security rules defined for your chart of accounts extend to trial balance reports.
  • Other: These reports and listings provide information about MassAllocation/MassBudget definitions, actual or budget recurring journal formulas, statistical units of measure and value–added taxes received and paid.
  • Execution: These reports are automatically generated when you submit and complete a concurrent process.
Note: General Ledger only supports text format for any of the standard report output. No other format is supported.

Shorthand Aliases Window

Define account shorthand aliases to speed entry of account segment values. If you enable shorthand alias flexfield entry when you define your account structure, then you can define aliases, or codes, which stand for complete or partial accounts.


And set the profile 'Flexfields:Shorthand Entry' as per the business requirement.

Defining Intercompany Accounts

If multiple companies in your enterprise share the same set of books, you can automatically balance intercompany journals. To do this, you define intercompany accounts for different combinations of source, category, and balancing segment value.
When you define your set of books, check the check box, Balance Intercompany Journals in the Set of Books window. General Ledger then creates balancing entries for out of balance intercompany journals that are based on templates you have defined in the Intercompany Accounts window.


You can use an intercompany segment to help you maintain your intercompany accounts. You must define this segment in your chart of accounts structure. The intercompany accounts and balancing options you define in the Intercompany Accounts window can have the following results when you create intercompany transactions:
  • Require a user to specify a clearing company when entering an intercompany transaction in the Journals window.
  • Require all intercompany transactions to balance with the company clearing the intercompany transaction.
  • Require all intercompany transactions to balance against a specific intercompany account.
General Ledger can also balance your intercompany transactions in summary or detail, depending on your business practices.

Define an intercompany account:
Navigate to the Intercompany Accounts window.
1. Specify the Source and Category that apply to the intercompany account(s) you are defining.
Note: When the posting program applies intercompany balancing, it will search for the intercompany account template
that matches the source and category of your journal entry. If the program cannot find an intercompany template with a
matching source and category, the program searches for the intercompany account template for the journal source and
category Other.
If the program cannot find an intercompany template with a matching journal source and category Other, the program will
search for the intercompany template with the journal source Other, and the category Other.

2. Select Summary or Detail Balance from the Balance by poplist. Transaction examples for Summary or Detail balance are listed below.
 
3. Complete the Clearing Company Usage and Default Options tabs.
 
The Clearing Company Usage and Default Options tabs let you specify options for processing intercompany transactions among multiple companies or subsidiaries. The choices you select in these tabs determine how General Ledger automatically creates balancing entries for these types of journals. You can select only one option each from the Clearing Company Usage tab and Default Options tab per source and category combination of intercompany account definitions.

The Always Use Clearing Company option lets you define how clearing companies are applied to all types of transactions as described below. The relationship refers to how many companies are involved on the debit and credit side of the transaction.
  • Single to Single: If you transfer an asset from one company to another, you create a single to single transaction that debits one company and credits another company.
  • Many to Single: If one company charges many companies for engineering services in a single transaction, you create a single to many transaction that debits multiple companies and credits a single company.
  • Single to Many: If many companies transfer inventory items to one company, you create a many to single transaction that debits a single company and credits many companies.
  • Many to Many: If many companies are cross charging one another, you create one many to many transaction that reflects all the business transactions between the many companies. A single transaction debits many companies and credits many companies.
Note: General Ledger determines whether a transaction is a single to many or many to many before applying the associated
balancing options. General Ledger will net multiple journal entry lines for the same balancing segment value before the
determination is made.
 
Clearing Company Usage Tab
Always Use Clearing Company: Choose this option to apply one of the two choices in the Default Options tab; Error Out or Use Default Clearing Company. This Clearing Company Usage option applies to any intercompany transaction you enter whether it involves single to single, single to many, many to single, or many to many companies

Many to Many Intercompany Transactions Only: Choose this option to apply one of three choices in the Default Options tab; Error Out, Use Default Clearing Company, or Use Default Balancing Account. This clearing company usage option applies only when the intercompany transaction involves many companies to many companies.

4. Intercompany Detail Region
You can record your intercompany transactions in detail by defining specific balancing segments and Due From and Due To accounts in the Intercompany Detail region. If you want to use the same account for both debit and credit entries, you must enter the same account in the Due From and Due To Accounts fields.

Balancing Segment Column:
Enter a specific balancing segment or press the Tab key and All Other appears. All Other includes all balancing segment values not explicitly defined.
For example, suppose your balancing segment is defined as your company segment. You have 7 companies in your multicompany organization and you want specific Due From and Due To account when balancing intercompany transactions against companies 1 and 2.
In rows 1 and 2, specify the Balancing Segment Values for companies 1 and 2 in the Company field and the corresponding accounts in the Due From and Due To fields.
Complete row three for your remaining five companies. Press the Tab key to specify All Other in the Company field and complete the corresponding Due From and Due To accounts. In this example, All Other includes companies three through seven.

Due From Account:
Specify a debit balancing account.
Due To Account: Specify a credit balancing account.

Segment Qualifier

When you define a segment value for your natural account segment in the Segment Values window, you must also assign qualifiers which determine the account type (asset, liability, expense, revenue, or
equity), whether budgeting is allowed, whether posting is allowed and other information specific to the segment value. For segments other than the natural account segment, you must specify if budgeting or
posting are allowed for each value.

When you change the Budget Entry or Posting Allowed qualifiers for segment values that you already defined, you should also make a corresponding change to all accounts that include the value in the
account code combination.

You can run the Segment Value Inheritance program to propagate these changes to all accounts that contain the changed segment value instead of changing all affected account code combinations individually in the GL Accounts window.

Note: Segment qualifiers can be defined for other Oracle Applications. These are listed in each Oracle Applications User’s Guide. Additional segment qualifiers can be defined for use by your custom programs.

You can define the following segment qualifiers for your Accounting Flexfield:
  • Account Type: Defines the account type for the natural account segment value. You can enter only valid account types.
  • Budget Entry Allowed: Indicates whether General Ledger should allow detailed budgeting to accounts with this segment value.
  • Posting Allowed: Indicates whether General Ledger should allow detailed posting to Accounting Flexfields with this segment value.
  • Reconciliation Flag: Indicates whether General Ledger should allow reconciliation for natural accounts that should balance to zero. You can enable or disable reconciliation for an account segment value or for specific accounting code combinations.
  • Control Account: Control accounts are General Ledger accounts accessed from Oracle Payables, Receivables, and Inventory, for which the Global Accounting Engine automatically creates detailed balances. The control account segment qualifier lets you indicate which account segment values represent control accounts. You must define the control account segment qualifier before you can define accounting segments as control accounts.
  • Other Segment Qualifiers: You can define additional segment qualifiers that are used by other Oracle Applications and your custom programs.

Parent and Child Values and Rollup Groups


You can create parent–child relationships for account segments with a validation type of Independent or Table. Since you can enter any value in a value set with a validation type of None, you cannot create parent–child relationships for segments that use these non–validated value sets. In addition, you cannot create parent–child relationships for dependent value sets.

Attention: Only Oracle General Ledger and Oracle Public Sector General Ledger use these features, and only with the Accounting Flexfield. Note that parent and child value sets have a relationship different from the relationship between independent and dependent values.
2. The rollup group assignments cannot be updated for this flexfield structure while the 'Freeze Rollup Groups' checkbox is checked, on the Key Segments form.

Parent Value
A parent value is a value that has one or more child values associated with it. A parent value can be assigned to a rollup group. You create parent–child relationships by defining a range of child values that belong to a parent value. You can use parent–child relationships for reporting and other application purposes. In above, account 1000 is a parent value with child values 1100 and 1200. Account 1100 is a parent value with child values 1125, 1150, and 1175.

Child Value
A child value is a value that lies in a range of values belonging to a parent value. A child value can belong to more than one parent value. A child value is not a dependent value; that is, the actual value of the child does not depend on the value of another segment. You create parent–child relationships by defining a range of child values that belong to a parent value. In above Figure , accounts 1125, 1150, and 1175 are child values of parent value 1100.

Rollup Group
A rollup group is a collection of parent values. Only parent values can be assigned to a rollup group. Parent values and child values belong to the same value set, which is then attached to a key flexfield segment. A rollup group allows you to group related parent values for creating summary templates. Given a summary template, General Ledger creates summary balances using all parent values assigned to that rollup group.
(Roll up groups are available in summary account form and can be used inplace of D: Detail, T: Total)

You define rollup groups using the Rollup Groups window before you define your key segment values. Then, you assign your parent values to the rollup groups when you define the parent values.

Rollup groups are separate from parent–child relationships. You can assign any parent value to a given rollup group, regardless of that parent value’s position in a value hierarchy you might create.

Intercompany Accounting for Multiple Companies with a Single Set of Books

Depending upon your company and subsidiary business needs, General Ledger offers a number of solutions to automatically account for intercompany transactions within a single set of books.

General Ledger can automatically balance intercompany journals based on accounts you define in the Intercompany Accounts window. General Ledger creates balancing journal lines when you post, using the appropriate intercompany accounts you specify for the source, category, and balancing segment.

For General Ledger to automatically balance intercompany journals, you must enable the Balance Intercompany Journals option in the Set of Books window. (Optional) You can create an intercompany segment in your chart of accounts structure. The intercompany segment shares the same value set as the balancing segment and is used in the account code combination General Ledger creates to balance intercompany journals.

The intercompany balancing segment provides more detail for reporting and reconciliation.

1. Standard Intercompany Balancing
General Ledger can create generic balancing lines against the intercompany accounts that you have defined for specific sources and categories. This method does not track payable and receivable balances for specific trading subsidiaries.
Assume you define the intercompany accounts shown in the table below for a specific source and category:

2. Enhanced Intercompany Balancing
You can define separate intercompany account templates to record more detail for your intercompany journals and track intercompany balances by trading subsidiary.
In the detail region below, you define the accounts shown in the following table:

Note: The balancing segment value you define in the template behaves dynamically in the resulting balancing lines. It will
change based on the balancing segment value of the trading partner. The other segments in the template remain unchanged in the resulting balancing lines. These account templates are used when a transaction is balancing against a specific company. For example, if a transaction is balancing against company 01, then the accounts defined for Company 01 in the Due From and Due To Account fields are used.

3. Intercompany Segment Balancing
Instead of using different natural accounts to track intercompany balances, you can use an intercompany segment in your chart of accounts to record the same detail as the enhanced intercompany balancing described above.
 
 
This method records information similar to that of the enhanced balancing method. The results of the above transactions show that company 01 has intercompany receivables of 700: 300 from company 02 and 400 from company 03. We can also tell that company 02 has an intercompany payable to company 01 of 300 and company 03 has an intercompany payable to company 01 of 400.

4. Enhanced Intercompany Balancing – Intercompany Transactions with many companies to many companies
The following example shows how General Ledger treats intercompany transactions when many companies are trading with many companies. Assume you create the accounts listed in the following table:

The result tells us that company 01 has intercompany receivables of 200, company 02 has intercompany receivables of 300, company 03 has intercompany payables of 400 and company 04 has intercompany payables of 100. This result does not track from which companies the receivables are due or to which companies the payables are due.

To track receivable and payable relationships among many companies trading with one another, see the clearing company
models below.

5. Clearing Companies
Your organization can designate one company to act as an operational unit for all subsidiary companies in the organization for certain kinds of transactions. Intercompany Balancing in General Ledger supports this kind of operational decision.
For example, company 01 among your subsidiary companies may  provide the accounts payable function for your entire organization. All accounts payable transactions clear through company 01. When you create a clearing company like this, you can:
  • Consolidate the accounts payable activities for the entire company
  • Automatically balance multi company intercompany transactions
  • Track the amounts each individual subsidiary owes to each other subsidiary
You can use enhanced intercompany accounting or the intercompany segment to implement the clearing company model.
 
The result tells us that company 04 has intercompany receivables of 700: 300 from company 02 and 400 from company 03. It also tells us that company 02 has an intercompany payable to company 04 of 300 and company 03 has an intercompany payable to company 04 of 400. Company 01 has intercompany receivables of 700 from company 04. Company 04 has an intercompany payable to company 01 of 700. Companies 01 through 03 balance against the clearing company, 04.

If you create an intercompany journal and you do not specify the clearing company in the Enter Journals window, the transaction posts against the default balancing segment value you specify in the default clearing company field.

6. Using the intercompany segment in the clearing company model:
Assume you define the accounts, listed in the table below, in the detail region of the Intercompany Accounts window. You choose company 06 as the clearing company.
If you create an intercompany journal involving many companies and you do not specify the clearing company in the Enter Journals > More Criteria window, the transaction posts against the default company you specifed in the Default Clearing Company field. General Ledger automatically uses the intercompany segment in the account code combination to track balances by trading subsidiary.
You can override the default clearing company in the intercompany account definition by specifying a clearing company in the Enter Journals window.

Consolidating Multiple Companies using a Single Set of Books

To consolidate multiple companies with a single set of books, first complete your eliminating entries, and then create reports on the consolidated parent.

Creating Automatic Eliminating Entries
To complete your eliminating entries for multiple companies using a single set of books, you can use the following General Ledger features:

  • Automatic Eliminating Entries
  • Recurring Journals
  •  
Automatic Eliminating Entries
With the Automatic Intercompany Eliminations program you can eliminate intercompany balances and transactions that are based on mapping rules you have defined in the Elimination Sets window.

If you maintain multiple companies within one set of books, you can define automatic entries to eliminate intercompany receivables and payables, investments in subsidiaries, intercompany sales, and so on.
Note: The Automatic Intercompany Eliminations program eliminates standard balances, not average balances.

To expedite consolidations and enhance consolidation reporting, define a separate company for your eliminating entries. Post eliminating entries to this elimination company so you do not have to reverse them later. You can also prepare financial statements to clearly identify consolidating and eliminating amounts to ease reconciliation of your consolidated balances.
Note: If you define a separate company for your eliminating entries, be sure to include it as a child of your consolidated
company.

Recurring Journals
You can also create Recurring Journal formulas or MassAllocations to create elimination entries. These formulas can be simple or complex. Each formula uses fixed amounts and/or balances that include:
  • Standard, end–of–day, or average balances
  • Actual or budget amounts
  • Statistics and period–to–date or year–to–date balances from the current period, prior period, or same period last year
  • You can quickly create new recurring formulas by copying and modifying existing formulas.
  •  
This method is most beneficial for elimination entries that require complex formulas, such as eliminating minority interest or eliminating costs of goods sold. Calculate the amounts for your eliminating entries by using the accounts in your consolidating companies as formula factors. For example, define amounts for a journal entry line affecting your investment in subsidiary account by summing your subsidiary equity accounts in your formula calculations.
Note: You must use this method to eliminate average balances.

Creating Consolidated Reports
If you maintain multiple companies within one set of books, you can use the Financial Statement Generator (FSG) or the report definition tool in the Applications Desktop Integrator (ADI) to create and generate consolidated financial statements using the consolidated parent accounts.

Financial Statement Generator

You can use FSG to create a consolidating report — a side–by–side listing of all your consolidating companies. You may find this useful when reconciling your subsidiaries’ totals to the consolidated total. For example. a consolidating report might show your report line items down the left side and present each subsidiary and your consolidated totals in separate columns. This example is shown in the following table:
To create a consolidating trial balance report with the Financial Statement Generator:
1. Define your balance sheet row set. Include rows for your intercompany receivables and payables, your investments in
subsidiaries, and your intercompany amounts.
2. Create a column set that has separate columns for each company. If you enter your eliminating entries in a separate company, also define a column for that company.
3. Define a total consolidated column by adding all the columns for each of your companies, including the eliminating company.
4. Edit the column headings to show the names of each company.
5. Run the consolidating report with the consolidating row and column sets. Note that to get a consolidating income statement report, you can simply define a consolidating income statement row set and run it with the same consolidating column set.

Applications Desktop Integrator
You can extend consolidation reporting to the spreadsheet environment using Applications Desktop Integrator (ADI). With ADI you can create standard reports in a spreadsheet and publish them in HTML format to the Internet or your corporate intranet, distributing consolidation information throughout the organization at once. Authorized users can enter a password to log on to a secure web site or download a spreadsheet version of the report to perform additional analysis.

Intercompany Transactions for Multiple Companies Using Multiple Sets of Books

General Ledger’s Global Intercompany System (GIS) feature helps you manage your intercompany transactions through a highly centralized process. With GIS, your parent and subsidiaries can send intercompany transactions to one another for review and approval, before the transactions are posted in each company’s set of books.

We generally recommend that you use GIS for your intercompany transaction needs. However, if you prefer a decentralized approach where each subsidiary enters intercompany transactions autonomously, you can choose not to use GIS. In this case, each subsidiary enters intercompany transactions directly into their set of books.

To enter intercompany transactions without using GIS:
You must enter separate transactions in each subsidiary set of books to reflect each subsidiary’s portion of a multi–company transaction. For each subsidiary:
1. Choose the subsidiary set of books by selecting a responsibility that has access to the set of books.

2. Enter the subsidiary’s portion of the multi–company transaction, making sure to balance the entry against an intercompany account. Post the transaction when complete.
For example, to record a cash sale from Company A to Company B (subsidiaries of the same parent), you might make the entries shown in the next two tables:


Consolidation Methods
To consolidate multiple companies whose accounting information is maintained in separate sets of books in one Applications instance, use the Global Consolidation System (GCS). You can also use the Global Consolidation System if you maintain multiple sets of books in multiple Applications instances.

Multi–Currency(MRC)


MRC is a set of unique features in Oracle Applications that allow organizations to report and maintain accounting records:
– at the transaction level
– in more than one functional currency

MRC benefits those organizations that must routinely report their transactions and financial
results in multiple currencies, other than their primary functional/accounting currency.

Business Usages

• Transitioning to the euro
• Supporting operations in countries with highly inflationary economies
• Supporting corporate exchange rates
• Reporting to management globally

With MRC you can report balances and transactions in multiple functional currencies :
Perform online inquiries and generate reports, with GL account balances stated in reporting
currencies, without first translating primary functional currency amounts
• Perform online inquiries and generate reports of detail subledger transactions, with amounts stated in reporting currencies (no translation necessary)
• Build custom FSG reports with amounts stated in reporting currencies
• Consolidate subsidiary reporting currency account balances to the parent set of books.

MRC Process

1.
Define currency, conversion type, primary SOB, Reporting SOB and assign the reporting SOB to primary SOB.

2. Create the journal in foreign currency and the system ‘ll automatically do the conversion to functional currency.
In the journal the entered currency‘ll be in foreign currency and converted (accounting currency) currency‘ll be in functional currency.
Remember you create invoices, payments and receipts in different foreign currency for the business requirement (to pay your supplier or receive check from the customer for convince) but the entire accountings takes place only in functional currency. If we enable MRC then the system‘ll also maintain all the transactions in reporting currency.

3.  Import the journal and Post it to GL.
You must post subledger transactions to General Ledger in the primary set of books and in each reporting set of books.
After you have posted your subledger transactions to General Ledger in the primary set of books and in each associated reporting set of books, you can log into a General Ledger reporting responsibility, post the newly created journals, and report the journals and the account balances of the reporting set of books.

Remember you need to setup MRC only if you want to maintain and report all the transactions in a different currency from your primary currency. If you only need to report balances in a currency other than your primary functional currency, you can use General Ledger translation.

Translating Balances


You can translate your actual and budget account balances from your ledger currency to another currency. You can launch translation from the Translate Balances window or from the Standard Request Submission (SRS) window. Translated balances are stored in balance-level reporting currencies. Balance level reporting currencies are defined in the Accounting Configuration using the Accounting Setup Manager or automatically generated during translation.

After completing Translation you can Translation Trial Balance Report to view the balances of all the accounts in the translated currency.


Multiple Reporting Currencies Overview

Multiple Reporting Currencies (MRC) is a set of unique features imbedded in Oracle Applications that permits an organization to report in multiple functional currencies. Using MRC, you can maintain and report accounting records at the transaction level in more than one functional currency. You do this by defining one or more reporting sets of books, each associated with a primary set of books. Each set of books has its own functional currency. The following Oracle Applications support Multiple Reporting Currencies:
a) General Ledger
b) Payables
c) Purchasing
d) Receivables
e) Cash Management
f) Projects
g) Assets
h) Cost Management
i) Global Accounting Engine

Use of MRC:

MRC is intended for use by organizations that must regularly and routinely support statutory and legal reporting of both transactions andGeneral Ledger account balances in multiple currencies, other than the primary functional currency. If you only need to report balances in a currency other than your primary functional currency, you can use General Ledger translation.

MRC Features
a) Transaction–Level Conversion
When you enter transactions in Oracle Applications that support MRC, they are automatically converted into your primary functional currency and each of your reporting functional currencies, in accordance with the following:

  • Primary functional currency transactions: All transactions denominated in your primary functional currency are recorded in this currency. The transactions are also converted automatically into each of your reporting functional currencies.
  • Foreign currency transactions: Transactions denominated in a foreign currency are automatically converted into your primary functional currency and into each of your reporting functional currencies as wellunless the foreign currency matches the reporting functional currency (conversion not required).
b) Subledger Transactions
When you enter transactions into Oracle Applications subledgers that support MRC, the  transactions are converted into your primary and reporting functional currencies at the time of original entry. The primary functional currency amounts and their associated reporting currency amounts are stored together in your subledgers. You must post subledger transactions to General Ledger in the primary set of books and in each reporting set of books.

c) Inquiry and Reporting in Multiple Currencies
Because subledger transactions are converted into your reporting functional currencies at the time of original entry, the converted transactions are available for immediate inquiry and reporting.

After you have posted your subledger transactions to General Ledger in the primary set of books and in each associated reporting set of books, you can log into a General Ledger reporting responsibility, post the newly created journals, and report the journals and the account balances of the reporting set of books. When you inquire on account balances and journals in a reporting set of books, you can drill down to the subledger details (in your reporting functional currency), using General Ledger’s integrated drilldown features to provide complete and consistent views of underlying subledger transactions.

You can drill down from General Ledger to transaction details within Oracle Receivables, Oracle Payables, Oracle Projects, Oracle Assets, Oracle Purchasing, Oracle Inventory, and Oracle Work in Process.

Processes

There are three key processes in Oracle General Ledger to address multi-currency requirements:

1. Conversion: refers to foreign currency transactions that are immediately converted at the time of entry to the ledger's currency in which the transaction takes place.

2. Revaluation: adjusts asset or liability accounts that may be materially understated or overstated due to a significant fluctuation in the exchange rate between the time the transaction was entered and the time revaluation takes place.

3.1. Translation: restates an entire ledger or balances for a company from the ledger currency to another currency. The cumulative translation adjustment is typically recorded as part of equity.

3.2 Remeasurement:
restates an entire ledger or balances for a company from the ledger currency to another currency. For non-monetary items, remeasurement uses historical rates. The cumulative translation adjustment is typically recorded as part of profit or loss.

To use multi–currency accounting, you must first define Currencies and Conversion Rate Types. Currency processes perform revaluation, translation, and remeasurement using daily or historical rates that you enter. Daily rates can be entered manually, using a spreadsheet interface or loaded in the GL_DAILY_RATES_INTERFACE table using SQL instructions.

Translation vs. Remeasurement


General Ledger performs translation in compliance with multiple national accounting standards, in particular SFAS #52 and IAS 21. General Ledger can perform two types of translation stipulated in SFAS #52 and IAS 21:

1. Translation or Equity Translation Method
2. Remeasurement or Temporal Method Translation

The translation method you use depends on your ledger currency (as discussed in SFAS #52 and IAS 21):

1. If the accounting ledger currency (as discussed in SFAS #52 and IAS 21) is different from the currency assigned to the ledger, books of record must be remeasured into the ledger currency before being translated into the reporting currency. If the ledger currency (as discussed in SFAS #52 and IAS 21 is the reporting currency, remeasurement
eliminates the need for translation.

2. If the accounting ledger currency (as discussed in SFAS #52 and IAS 21) is the same as the currency assigned to the ledger, books of record can be directly translated into the reporting currency without remeasurement.
The example and table, below, illustrates when translation and remeasurement are required.
Consider U.S. company A has a wholly owned subsidiary, company B, that operates in Europe. The reporting currency is USD. The translation–remeasurement possibilities for company B are listed horizontally by case examples in the following diagram:

In Case 1, Company B's accounting ledger currency and ledger currency are the same. Company B's
ledger currency is not the same as the parent's functional or reporting currency.
However, this usually arises when the subsidiary is not integral to the parent's business.
In order to meet the reporting requirements of the parent, Company B has to perform translation from EUR to USD.

In Case 2, Company B's accounting  ledger currency is different from its ledger currency. However, Company B's accounting ledger currency is the same as the parent's functional or reporting currency. This usually arises when the subsidiary is integral to the parent's business and cannot be sold without a severe impact to the parent. Company B remeasures its accounts from EUR to USD, which is also the reporting currency. In this case, remeasurement into the reporting currency eliminates the need for translation.

In Case 3, Company B's accounting ledger currency is GBP. Company B's accounting ledger currency is neither
its ledger currency nor the reporting currency
. This is a rare case and could arise if the subsidiary is a holding company for operations in England. In this case, both remeasurement and translation are required. Company B first remeasures its accounts from EUR to GBP, then translates the accounts from GBP to USD.

Reporting SOB

Selec the Set of BOOks type as reporting set of books


To use MRC, you must define reporting sets of books and associate them with your primary set of books.

Note: A reporting set of books is a financial reporting entity that is associated with a primary set of books. The reporting set of books has the same chart of accounts and accounting calendar as the primary set of books, but usually has a different functional currency.

For example, assume that your company headquarters is located in Australia and that its primary functional currency is Australian Dollars (AUD). Assume also that you have one subsidiary each in Canada and Germany, both of which maintain a primary set of books in its local functional currency -- Canadian Dollars (CAD) for the Canadian subsidiary and Deutsche Marks (DEM) or the Euro (EUR) for the German subsidiary. Each subsidiary should maintain a reporting set of books in AUD, so it can analyze and report transactions using the parent's functional currency.

For each reporting set of books you define, you need to specify it as a reporting set of books on the Set of Books window, using the Reporting Currency Options alternative region.


Other Considerations
1. If your primary set of books is defined as an average balances consolidation set of books, any associated reporting sets of books must also be defined as average balances consolidation sets of books.

2.  If you use combined basis accounting with Oracle Payables, you will have two Payables sets of books (primary and secondary). One will be for accrual basis accounting and the other will be for cash basis accounting. If you want to report Payables transactions in your reporting currencies for each accounting basis, you must define a reporting set of books for each.

3. Some set of books options, such as the chart of accounts and accounting calendar, must be the same in both your primary and reporting sets of books. For other set of books options, we specifically recommend or do not recommend that they be the same in both your primary and reporting sets of books. For still other set of books options, you set them in each reporting set of books depending on what features you want available in that reporting set of books.

The following table summarizes the set of books options and provides guidance for setting them in your reporting sets of books.

Setting Up MRC

1. Define currency - http://www.oracleug.com/user-guide/general-ledger/currencies
2. Conversion type
3. Primary SOB - http://www.oracleug.com/user-guide/general-ledger/sets-books
4. Reporting SOB - http://www.oracleug.com/user-guide/general-ledger/reporting-sob
5. Responsibility and Profile Options
.
6. Define the first period for Reporting SOB.
7. Assign the reporting SOB to primary SOB. (Conversion options and rules)

5. Responsibility and Profile Options
Create the responsibilites for GL to assign the reporting SOB data. Assign the below profiles.
GL Set of Books Name:        Reporting SOB
MRC: Reporting Set of Books  Reporting SOB

Its not mandatory to create AP/AR responsibilites in 10.5.2 as we can check the accounting in reporting SOB from the primary SOB responsibility itself.The subledger responsibilities like AP, AR, PO, etc now do not require a separate responsibility to reflect the subledger data. After the data has got accounted in AP and AR, you can check on the subledger data by navigating to the View accounting form and then clicking on the ‘Alternate Currency’ button. You then have to choose the desired set of books to check the converted data

6. Define 1st period of R/SOB


   a. Use the MRC General Ledger responsibility.
   b. Setup -> Open/Close
   c. Define the first period. The first ever calendar periods in the primary set of books does  not have to be the same as the associated reporting book.

7. Assign the reporting SOB to primary SOB
Use the Assign Reporting Sets of Books window to assign each reporting set of books to its related primary set of books. Note the following rules:

  • You can assign up to eight reporting sets of books to a single primary set of books. Most organizations will find no need to assign more than three.
Caution: If you need to assign more than three reporting sets of books to a primary set of books, be aware that each additional assignment will have an incremental impact on your system's performance and disk space consumption.
  • You can assign the same reporting set of books to more than one primary set of books, provided they all have the same calendar and chart of accounts. You might want to do this if you need to consolidate transactions from multiple primary sets of books (with the same or different functional currencies) into the same reporting currency.
  • You cannot assign a primary set of books to another primary set of books, or to a reporting set of books.
  • If you use combined basis accounting in Oracle Payables, you only need to assign the related reporting set of books to your Payables primary set of books in this step. The relationship for the Payables secondary set of books will be made in the next step when you define the Payables conversion options.
To assign a reporting set of books to a primary set of books:
      1. Navigate to the Assign Reporting Set of Books window.

      2. Select your primary set of books from the list of values. The set of books' functional Currency, Chart of Accounts, and accounting Calendar will be displayed.
    Note: Only those sets of books that have been defined as a primary set of books will be included in the list of values.

      3. From the list of values in the Reporting Set of Books region, select the reporting set of books that you want to assign to the primary set of books. The reporting set of books' functional currency will be displayed.
    Note: Only those sets of books that have been defined as a reporting set of books will be included in the list of values.

      4. Choose the Conversion Options button to define conversion options for each combination of Oracle Application and operating unit for which you want to convert transactions to your reporting functional currency for this reporting set of books. See: Define Conversion Options for Each Application.

      5. Save your work.

      6. Repeat the previous three steps for each reporting set of books you want to assign to the primary set of books.

Define Conversion Options for Each Application

For each reporting set of books assignment you make, you must define conversion options for each combination of Oracle Application and operating unit for which you want to convert transactions to your reporting functional currencies. You can set conversion options for these applications:
General Ledger, Assets, Payables, Receivables, Projects & Purchasing

Conversion options you can set include the reporting conversion type, the action to take when a conversion rate cannot be found, and the range of effective dates for which transactions should be converted to reporting currencies. Also, you need to set some application specific options, such as

          o Oracle Assets: specify the Asset Book (depreciation book).
          o Oracle Payables: optionally specify the AP Reporting Secondary Book if you use combined basis accounting.
          o General Ledger: specify GL Conversion Rules, which control journal conversion at the journal source and category level.

 
To assign conversion options to Oracle Applications:

1. From the Assign Reporting Set of Books window, choose the Conversion Options button. The Conversion Options window will appear, displaying your primary and reporting set of books information.

2. Select Operating Units/Books from the poplist.

3. In the region below the poplist, select the application for which you want to define conversion options.

4. Enter your operating units/books information.

5. Choose Conversion Options from the poplist. The Conversion Options alternative region will appear.

6. Enter your conversion options.

7. Save your work.

Operating Units/Books Information

Operating Unit: For Payables, Receivables, Purchasing, or Projects, specify the operating unit for which your conversion options apply. This allows you to define different conversion options for each operating unit. Also, if you don't want an operating unit's transactions converted to your reporting currencies, you can choose to omit that operating unit when you define the conversion options for the related application.

Asset Book: For Assets, specify the asset depreciation book for which your conversion options apply. The asset depreciation book can be either a corporate book or a tax book. You can associate multiple asset depreciation books to a reporting set of books.
    Note: The asset depreciation book you specify must be linked to your primary set of books.

AP Reporting Secondary Book: For Payables, enter the AP Reporting Secondary Book if you use combined basis accounting and want your Payables secondary set of books transactions to be converted to your reporting currencies.

The diagram below illustrates the relationship between the AP primary and secondary books, and their related reporting sets of books. In the diagram, the Payables primary set of books is used for accrual basis accounting and the Payables secondary set of books is used for cash basis accounting.

Conversion Options
Reporting Conversion Type: The conversion rate type MRC uses to retrieve exchange rates for converting transactions to your reporting currency. This differs from the conversion rate type you specify when you enter a transaction. Oracle Applications use the transaction conversion rate type to retrieve exchange rates for converting entered amounts from the transaction currency to your primary functional currency (alternatively, you can specify your own rate).

You must enter a Reporting Conversion Type when defining conversion options for your subledger applications, such as Payables and Receivables.
Note: For General Ledger, the reporting conversion type is set for specific combinations of journal source/category on the GL Conversion Rules window.

For the reporting conversion type, you can specify your own conversion rate type or choose one of the predefined rate types. To specify your own, you must first define it in General Ledger.

No Rate Action: Determines the action MRC should take if it cannot find a rate for converting transactions to your reporting functional currency, for the reporting conversion type as of the conversion date.

Note: For General Ledger, the No Rate Action field is set for specific combinations of journal source/category on the GL Conversion Rules window. See: Define General Ledger Conversion Rules

You can select one of two options:
  • Report Error: If MRC cannot find an exchange rate for converting to the reporting functional currency, you will receive an error when you try to save the transaction.
  • Use Last Rate: If MRC cannot find an exchange rate for converting to the reporting functional currency, it retrieves the most recently entered exchange rate. If MRC cannot find a stored exchange rate, you will receive an error when you try to save the transaction.
  •  
Note: If you do not enter a value for the No Rate Action field, it defaults to Use Last Rate.

Additional Information: When searching for the exchange rate, MRC will only look backwards the number of days specified in the profile option, MRC: Maximum Days to Roll Forward Conversion Rate. If you have not specified an entry for the profile option, MRC will search back as far as the first entered exchange rate.

Effective Dates -- From/To: The range of effective dates for which you want to convert transactions to your reporting functional currency for the specified:

          o Application and operating unit for Receivables, Payables, Purchasing, and Projects
          o Application and Asset Book for Assets
          o Application only for General Ledger

You must enter a From date, which is the first date for which MRC will convert transactions.
Note: If you specify a To date for Assets or Projects, the Application will immediately stop converting transactions to your reporting currencies. This happens regardless of the To date you specify, even if it is a future date.

Changing Conversion Options
You cannot delete conversion options once you save them. You can, however, change some of them, depending on the application to which they apply:

All applications: You can change the effective dates any time. Note that the changes are effective immediately, but that they apply only to new transactions. The change has no effect on previously entered transactions.
Caution: We strongly recommend you do not change effective dates once you begin using MRC. Changing the effective dates may result in inconsistent transaction amounts and balances in your reporting sets of books.

All applications except General Ledger: You can change the Reporting Conversion Type and the No Rate Action values any time. Note that the changes are effective immediately, but that they apply only to new transactions. The change has no effect on previously entered transactions.

Payables: You can change the AP Reporting Secondary Book. The change is effective immediately, but applies only to new transactions. The change has no effect on previously entered transactions.
Caution: We strongly recommend you do not change the AP Reporting Secondary Book once you begin using MRC. Changing the AP Reporting Secondary Book may result in inconsistent transaction amounts and balances in your AP Reporting Secondary Book.
 

Define General Ledger Conversion Rules


When you use MRC with General Ledger, you need to define conversion rules in addition to the effective dates you specify for General Ledger's conversion options in the previous step. Conversion rules control journal conversion at the journal source/category level.

You can define conversion rules for all predefined journal sources except these:


    • Revaluation, Move/Merge, and Move/Merge Reversal -- MRC will not convert journals that have these journal sources. Instead, you need to run each of these processes in both your primary and reporting sets of books.
    • Receivables, Assets, Projects, AX Payables, and AX Receivables -- MRC converts transactions from these sources directly in the subledgers and stores the related reporting currency amounts in those subledgers.
Note that GL Conversion Rules for the Payables and Purchasing journal sources are applied only to encumbrance journals. MRC will not convert actual journals that have these journal sources assigned.

 To assign conversion rules to General Ledger:

    2. Mark the Convert check box if you want journals with the specified journal source and category to be converted to your reporting currency. Leave the check box unmarked if you do not want journals with the specified journal source and category to be converted.
    3. Enter the journal source and category for which you want to set conversion rules.
Note: You can enter a specific journal source or category or enter Other to select a source or category other than those you have specifically defined.
    4. Select the Reporting Conversion Type and No Rate Action to use when converting journals with the specified journal source and category.
    5. Save your work.

Journal Source/Category Combinations

MRC uses the journal source and category combinations you define in your GL conversion rules to determine if a journal should be converted.

When you post journals in your General Ledger primary set of books, MRC notes each journal's source and category as it is posted. MRC then searches your defined conversion rules for a matching source and category combination. MRC searches the conversion rules in the following order, regardless of the order you entered the rules on the GL Conversion Rules window:

Search Order Journal Source Journal Category

1 Specific source Specific category
2 Specific source Other
3 Other Specific category
4 Other Other

If MRC finds a matching source/category combination, it notes the reporting currency type and checks to see if transactions with the identified source/category combination are to be converted. If they are to be converted, MRC converts the journal amount to the reporting currency and creates the converted journal in the reporting set of books. Otherwise, the journal is not converted and the next journal in the posting batch is processed.


Note: If MRC cannot find a matching source/category combination, or if you have not defined any GL conversion rules, the journal will not be converted.

Below are three examples that illustrate how journals are converted based on different conversion rules.

Example Assumptions


  Journal Source Journal Category
Journal #1 Manual Adjustment
Journal #2 Consolidation Consolidation
Journal #3 Manufacturing Freight
Journal #4 Spreadsheet Adjustment
Journal #5 Manufacturing Labor Cost

Example 1


The following six conversion rules are defined:

Source Category Convert Result

Manual Adjustment Yes Journal #1 is converted, using the defined conversion options for this combination.
Consolidation Consolidation No Journal #2 is NOT converted.
Other Freight Yes Journal #3 is converted, using the defined conversion options for this combination. (i.e., All journals with category Freight are converted).
Spreadsheet Reclass Yes No journals in the example match this combination. (All journals with source Spreadsheet and Category Reclass are converted, using the defined conversion options for this combination.)
Spreadsheet Other No Journal #4 is NOT converted. (i.e., All journals with source Spreadsheet (except those with category Reclass) are NOT converted.)
Other Other Yes Journal #5 is converted, using the defined conversion options for this combination.

Example 2


The following three conversion rules are defined:

Source Category Convert Result

Manufacturing Freight No Journal #3 is NOT converted. (i.e., All journals with source Manufacturing and category Freight are NOT converted.)
Manufacturing Other Yes Journal #5 is converted. (i.e., All journals with source Manufacturing are converted, except those with category Freight.)
Other Other Yes Journals #1, 2, and 4 are converted, using the defined conversion options for this combination.

Example 3


The following two conversion rules are defined:

Source Category Convert Result

Manufacturing Freight No Journal #3 is NOT converted. (i.e., All journals with source Manufacturing and category Freight are NOT converted.)
Manufacturing Other Yes Journal #5 is converted. (i.e., All journals with source Manufacturing are converted, except those with category Freight.)

Note: In this example, Journals #1, 2, and 4 are NOT converted, since there is no conversion rule defined with a source of Other and a category of Other.

Changing Conversion Rules

You can delete General Ledger conversion rules at any time. You can also change a conversion rule as needed. For example, for any journal source/category combination, you can change the Convert option, Reporting Conversion Type, and No Rate Action value. Note that the changes are effective immediately, but that they apply only to new journals. The change has no effect on previously entered journals.


Revaluing Balances

Use the Revaluation window to define, run, update, and delete revaluations for foreign currency–denominated balances. Revaluation launches a process that revalues the functional currency equivalent balances for the accounts and currencies you select, using the appropriate current market rate for each currency. Resulting gain or loss amounts are posted to the gain/loss or cumulative translation adjustment accounts you specify and balanced by balancing segment values. This process creates a revaluation batch containing separate journal entries for each revalued foreign currency.

You can revalue a single account or ranges of accounts, for both income statement and balance sheet accounts. Income statement accounts are revalued on the basis of their period–to–date or year–to–date balances, in accordance with the Income Statement Accounts Revaluation Rule profile option. Balance sheet accounts are always revalued on the basis of their year–to–date balances.

When you revalue balances in an average balance set of books, General Ledger only revalues standard balances. When you post the revaluation journal entries to update your standard balances, the system recomputes your average balances automatically. If you use Multiple Reporting Currencies, revaluation journal entries generated and posted in your primary set of books are automatically replicated and converted to each of your reporting sets of books. You must separately post these replicated journal batches in each of your reporting sets of books.

Secondary Tracking Segment
You can use the secondary tracking segment to track revaluation results using the primary balancing segment and secondary tracking segment. Revaluation gain or loss amounts will be posted to the gain/loss or cumulative translation adjustment account you specify and balanced by each balancing segment value and secondary tracking segment value pair.

Defining, Saving, and Running Revaluations

Single Currency – Revalues standard balances denominated in the selected currency for the selected period and range of accounts. Currency is revalued using the rate defined in the Revaluation window.

All Currencies – Revalues all standard balances denominated in a currency other than your functional currency, for the selected period and range of accounts. Currencies are revalued using the rate defined in the Revaluation window.
 
You can define new revaluations, update existing revaluations and delete revaluations. You can launch any revaluation from the Revaluation window or you can launch saved revaluations and revaluations grouped into Request Sets from the Submit Request window.
  • To define a new revaluation, complete the fields in the revaluation window and save your work.
  • To update an existing revaluation, query a revaluation, change the fields in the window as necessary and save your work.
  • To delete a revaluation, query a revaluation and choose View>Delete from the menu.
  • To run a revaluation from the Revaluation window, enter a new revaluation or query a revaluation and choose the Revalue button. Complete the Period, Effective Date, and Rate Date fields in the Submit Request window.
  • To run a revaluation or group of revaluations from the Submit Request Window, choose the Revaluation program. In theParameters window that appears, specify the Revaluation Name or Request Set Name for a group of revaluations, Period, Effective Date, and Rate Date.

Segment Value Inheritance

The Segment Value Inheritance program automatically propagates the attributes of a segment value to all account combinations that contain that segment value.

To protect account combinations from changes when you run the Segment Value Inheritance program, check the Preserve check box in the GL Accounts window. You can assign attributes at two levels:

  • The individual segment value in the Segment Values window.
  • The account combination in the GL Accounts window.
For example, you can disable the 200 cost center segment in the Segment Values window, but retain existing account combinations using cost center 200 by marking the Preserve check box for each combination in the GL Accounts window. Then, when you run the Segment Value Inheritance program, all account combinations that contain the 200 cost center will be disabled except for those you preserved and no new combinations will be created during data entry.

You can view the account code combinations that have been changed in either the GL Accounts window or the Segment Value Inheritance Execution Report.
Warning: Individual segment value attributes override account combination attributes.

Letter Of Credit

A letter of credit is a promise to pay. Banks issue letters of credit as a way to ensure sellers that they will get paid as long as they do what they've agreed to do.

Letters of credit are common in international trade because the bank acts as an uninterested party between buyer and seller. For example, importers and exporters might use letters of credit to protect themselves. In addition, communication can be difficult across thousands of miles and different time zones. A letter of credit spells out the details so that everybody's on the same page.

Letter of Credit Lingo

To better understand letters of credit, it may help to know the following:

    * Abbreviations for 'letter of credit' include L/C, LC, and LOC
    * Applicant - the buyer in a transaction
    * Beneficiary - the seller or ultimate recipient of funds
    * Issuing bank - the bank that promises to pay
    * Advising bank - helps the beneficiary use the letter of credit

The Money Behind a Letter of Credit

A bank promises to pay on behalf of a customer, but where does the money come from?

The bank will only issue a letter of credit if they know the buyer will pay. Some buyers have to deposit (or already have) enough money to cover the letter of credit, and some customers use a line of credit with the bank. Sellers must trust that the bank issuing the letter of credit is legitimate.

Executing a Letter of Credit

A seller only gets paid after performing specific actions that the buyer and seller agree to.

For example, the seller may have to deliver merchandise to a shipyard in order to satisfy requirements for the letter of credit. Once the merchandise is delivered, the seller receives documentation proving that he made delivery. The letter of credit now must be paid even if something happens to the merchandise. If a crane falls on the merchandise or the ship sinks, it's not the seller's problem.

To pay on a letter of credit, banks simply review documents proving that a seller performed his required actions. They do not worry about the quality of goods or other items that may be important to the buyer and seller.

Pitfalls of Letters of Credit

Letters of credit make it possible to do business worldwide. They are important and helpful tools, but you should be careful when using letters of credit.

As a seller, make sure you:

    * Carefully review all requirements for the letter of credit before moving forward with a deal
    * Understand all the documents required
    * Can get all the documents required for the letter of credit
    * Understand the time limits associated with the letter of credit, and whether they are reasonable
    * Know how quickly your service providers (shippers, etc) will produce documents for you
    * Can get the documents to the bank on time
    * Make all documents required by the letter of credit match the letter of credit application exactly

Getting a Letter of Credit

To get a letter of credit, visit your bank. Ask if they can help you with a letter of credit, or if they have any suggestions. Small banks and credit unions might not be able to accommodate you.

Suspense A/C Example


A suspense account is an account in the general ledger in which amounts are temporarily recorded. The suspense account is used because the proper account could not be determined at the time that the transaction was recorded. When the proper account is determined, the amount will be moved from the suspense account to the proper account.

In Oracle, suspense accounts are used to balance journals which are out of sync. The suspense account entries are automatically created by the system when we post a journal whose debit and credit balances are not equal. We can create suspense accounts for a particular combination of invoice source and category else system picks up the default suspense account from the set of book/Primary Ledger.

1. Define the Suspense account by specifying the Source and Category that applies to the suspense account you are creating.

2.  Enter a manual journal with a disparity between the debit and credit amount.
3. Post the journal and requery it.

Mass Allocation


Use a MassAllocation formula to create journals that allocate revenues and expenses across a group of cost centers, departments, divisions, and so on. By including parent values in allocation formulas, you can allocate to the child values referenced by the parent without having to enumerate each child separately. Hence, a single formula can perform multiple allocations.

Use Mass Allocation batches to group your Mass Allocation formulas. For example, you might combine all formulas for a single department or division into one batch, or group all formulas for certain types of calculations into separate entries. You can create Mass Allocations in your functional currency, a foreign currency or statistical currency.

MassAllocations versus Recurring Journals


Creating MassAllocation Batches & Formulas

Navigate to the Define MassAllocations window, Enter a Name and description for the MassAllocation batch. Choose Actual or Encumbrance from the Balance Type poplist, for the types of balances to use in your mass allocation batch.

Choose Validate All to validate the batch, as well as all previously unvalidated batches. If you do not validate all batches, General Ledger will ask if you want to validate all unvalidated batches
when you close the Define Mass Allocations window.


To enter a MassAllocation formula:
1. Navigate to the Define MassAllocations window. Enter or query the name of the MassAllocation batch to which you want to add the formula.  Choose Formulas. Enter the Name, Category, and Description of the MassAllocation formula. Categories help you group journal entries in a convenient
manner for reporting and analysis.

2. Choose whether to Allocate Balances From the full balance or from a single entered currency.
• If you choose Full Balance, General Ledger allocates your entire account balance, which is comprised of amounts entered in your functional currency, as well as amounts converted to your
functional currency from a foreign currency. The generated MassAllocation will be a functional currency journal entry.
• If you choose Single Entered Currency, General Ledger allocates the portion of your account balance entered in the Currency you specify. The generated MassAllocation will be a journal entry in
the specified currency.

Note: If you choose a foreign currency with a fixed relationship to your functional currency, the conversion rate used to calculate the accounted amount will be the fixed conversion factor between the transaction and functional currencies.

If you are allocating encumbrance balances, you must allocate the full balance. You cannot allocate foreign currency encumbrances.

3. Choose Full Cost Pool Allocation to have any rounding difference resulting from the MassAllocation computation added to the allocations with the largest relative balance. If you do not choose this option, any rounding differences will remain in the original account.

4. Enter the formula lines and Save your work.

Entering Mass Allocation Formula Lines


All MassAllocation formulas use the following equation to determine allocation amounts:
COST POOL * (USAGE FACTOR / TOTAL USAGE)

General Ledger uses the following format to represent the equation. Each factor in this equation relates to a separate formula line.  A * B / C
You can enter any combination of fixed amounts and accounts in formula lines A, B, or C.
Note: When you create MassAllocation formulas, you can enter specific amounts or specify an account for lines A, B or C.

If you do not choose Full Cost Allocation: you can enter an amount instead or an account in any of lines A,B or C.
If you choose Full Cost Allocation: you can enter an account or amount in line A but lines B and C must contain accounts only.

To enter an account in a MassAllocation formula line:
1. Enter the account for the A, B, or C line of your formula. Enter accounts with parent segment values to create a formula that references accounts with the corresponding child segment values.
When you enter an account, General Ledger ensures that segment values are valid and enabled.

1.1 Assign a segment Type for each account segment. The combination of parent/child segment values and types tells General Ledger which related accounts are affected or used by that portion of the
formula.
You can assign one the following segment types to each segment:
Looping (L): Assign this type to a parent segment value to include each child value assigned to the parent value in the formula. The allocation program runs each formula once for each corresponding
child segment value. You can loop only on parent values.
Summing (S): Assign this type to a parent segment value to sum the account balances of all the child segment values assigned to a parent. For example, if you enter a parent that has five child values, the allocation program adds the account balances of the five child accounts and uses the sum in each MassAllocation formula. You can sum only on parent values.
Constant (C): Assign this type to a child segment value to use the detail account balance associated with the child. You can use this type with a parent segment value only if there is a summary
account associated with the parent.
Note: To use summary accounts in a mass allocation formula, all segments in the formula must be assigned a segment type of Constant.

1.2 Enter the currency.

1.3 Enter the Amount Type you want to use: Period–to–Date, Quarter–to–Date, Year–to–Date, project–to–Date

1.4 Enter the Relative Period for the account balance you want to use:
• Current Period
• Previous Period
• Year Ago, Same Period

1.5 Enter the account Balance Type to use for the formula line. If you enter the Budget balance type, you must also enter a Budget name. If you enter the Encumbrance balance type, you must also enter an
Encumbrance Type.

2. Entering a Target Account
Enter an account in the Target line to specify the destination for your allocations.
When the result of your allocation formula is a positive number, the resulting journal entry debits the target account and credits the offset account. When the result of your allocation formula is a negative number, the resulting journal entry credits the target account and debits the offset account.

Note: The target account must conform to the allocation formula rules for target accounts. Be sure to also follow the account segment cross–validation rules. The validation program does not check for account cross–validation rule violations. If you enter a target account that violates a
cross–validation rule General Ledger creates invalid journal lines when you generate the formula. You must correct the resulting journals in the Enter Journals window before you post.

3. Entering an Offsetting Account
Enter an account in the Offset line to specify the account to use for the offsetting debit or credit from your allocation. The Offset account is usually the same account as formula line A to reduce the cost pool by the allocated amount.
When the result of your allocation formula is a positive number, the resulting journal entry debits the target accounts and credits the offset account. When the result of your allocation formula is a negative number, the resulting journal entry credits the target accounts and debits the offset account.

Note: The offset account must conform to the allocation formula rules for offsetting accounts. Be sure to also follow the account segment cross–validation rules. The validation program does not check for account cross–validation rule violations. If you enter an offset account that violates a
cross–validation rule General Ledger creates invalid journal lines when you generate the formula. You must correct the resulting journals in the Enter Journals window before you post.

4. Save your work.


Allocation Formula Rules


Use the following definition rules when creating your allocation formulas. The allocation validation program checks that your formulas adhere to these rules.

For formula lines A, B and C (operand lines):
• You can enter either an amount or an account in lines A, B and C.
• If you enter an account, child values must have a Constant segment type.
• Parent values may have a Constant, Looping or Summing segment type.
• You can use a Constant segment type with a parent value only if it references a summary account.
• If you use a Looping segment type on the same segment in more than one of the operand lines, you must use the same parent.
• If you use a Looping segment type in your Target line, you must use a Looping segment type on the same segment using the same parent in lines A, B or C.
• To use summary accounts, all segments in your formula must be assigned a segment type of Constant.

For target and offset lines (lines T and O)
• You must enter an account in the Target and Offset lines.
• Detail values must have a Constant segment type.
• Parent values must have a Looping segment type.
• Your Target account must be different from your Offset account.

Validation Business Rules
If you choose to use Full Cost Pool Allocation, below are the business rules used to validate your Allocation Formula Rules for lines A, B, and C. If your full cost pool allocation contains violations of the business rules, the execution report will detail the errors.
1. Line A is account or constant based.
2. Line B is account based.
3. Line B has at least one looping segment.
4. Line C is account based and has the same segment values as line B.
5. Line C uses Constant or Summing segment type if line B uses Constant or Summing segment type.
6. At least one Summing or Constant segment in line C corresponds to a looping segment in line B.

FULL / INCREMENTAL ALLOCATION


FULL ALLOCATION
---------------

The balance in the cost pool for the period is allocated per the formulas to
the target accounts.

Example: If your cost pool for the period is 1000 and your targets each get 1\3,
a full allocation will result in:

         Balance
a/c A     333.33
a/c B     333.33
a/c C     333.33

If you ran a full allocation again in the same period, result:

          Balance
a/c A      666.66
a/c B      666.66
a/c C      666.66

You still have only 1000 in your pool, but now 2000 in your targets. In this
type of situation you need to reverse the first entry.


INCREMENTAL ALLOCATION
----------------------

The balance in the cost pool for the period is allocated per the formulas, from
these results the previous balance in (for the period) the target account is
subtracted.  The difference is the amount of the entry for the incremental
allocation.


Example: If your cost pool for the period is 1000 and your targets each get 1\3,
an incremental  allocation will result in:
         Balance
a/c A     333.33
a/c B     333.33
a/c C     333.33

The entry is 333.33, which is 333.33 less 00.00.

If you ran an incremental allocation again in the same period 
(with no change in the pool balance), result:

         Balance 
a/c A     333.33
a/c B     333.33
a/c C     333.33

The entry is 00.00, which is 333.33 less 333.33

You add an additional 2000 to your cost pool in the same period resulting in a
balance of 3000, (assume the original 1000 was allocated), you run incremental
allocation again, result:


         Balance 
a/c A     999.99
a/c B     999.99
a/c C     999.99

The entry is 666.66, which is 999.99 less 333.33

It is very important when using incremental allocation that your target
accounts are only populated with amounts generated from the mass allocation
entry, because their balances are part of the calculation. If other allocation
or non allocation entries are posted to the target accounts of your allocation
forumula, the results will be inncorrect

Another situation that causes unexpected results,  the pool
account(s) is the same as the offset. (It is recommended that the
offset be a contra account, not the same account as the pool.)

Usage of Data Access Sets

1. Create a data access set by navigating into
General Ledger -> Setup -> Financials -> Data Access Sets

2.Assign ' GL: Data Access Set ' to one responsibility.

3. Now you can create journals for any of the Ledgers by acessing the responsibility to which the GL Data access is attached.


You can also open/close period (do any GL activity) for any Ledger using the single responsibility.

2. Conversion type


Use conversion rate types to automatically assign a rate when you:
1. convert foreign currency journal amounts to your ledger currency equivalents
2. run Revaluation
3. run Translation or Remeasurement

You enter daily conversion rates for specific combinations of foreign currency, date, and conversion rate type. When you enter a foreign currency journal, General Ledger automatically displays the predefined exchange rate based on the currency, rate type (unless you are using the User rate type), and conversion date you enter. When you have a User rate type, you enter the rate directly when you enter a foreign currency journal.

Note: If you want to enter different daily rates for the same combination of from-currency, to-currency, and conversion date, you must define separate conversion rate types.


General Ledger provides the following predefined daily conversion rate types:

Spot : An exchange rate which you enter to perform conversion based on the rate on a specific date. It applies to the immediate delivery of a currency.

Corporate : An exchange rate you define to standardize rates for your company. This rate is generally a standard market rate determined by senior financial management for use throughout the organization.

User: An exchange rate you specify when you enter a foreign currency journal entry.

You can use these predefined rate types to enter exchange rates, or you can define additional conversion rate types. After defining a conversion rate type, enter daily rates using that rate type.

Using Period-End and Period-Average Rates in Translation
According to SFAS #52 and IAS 21, the period-end rate represents the rate at the balance sheet date and the period-average rate represents the average exchange rate. General Ledger uses Period - average and period-end rates when you translate your actual and budget account balances.

Typically, you use period-average rates to translate income statement accounts and period-end rates to translate balance sheet accounts. The default period-average and period-end rate types must be assigned when you create the ledger.

Oracle General Ledger enables you to assign a conversion rate type for your period-end and period-average rates to comply with the accounting standards. You can assign any conversion rate type as your period-average and period-end rates for the ledger. For example, you can assign the predefined rate type Spot to be used as your period-average rates and the predefined rate type Corporate to be used as your period-end rates. These rate types are used in translation of actual account balances.

For budget account balances, you can specify the period-end and period-average rate types when you submit the translation.

Entering Historical Rates

Enter historical rates or amounts for translating actual and budget account balances.
You can enter rates for any foreign currency you have enabled.

You can assign historical rates to accounts, either individually or by range. Generally, you enter historical rates only for specific balance sheet accounts. For example, you can use historical rates to translate non-monetary and selected owners' equity account balances.

Note: Usually, if you are performing translation, enter historical rates only for owner's equity accounts. If you are performing remeasurement, enter historical rates for owner's equity accounts as well as for non-monetary balance sheet accounts and income statement accounts related to non-monetary items.

If you have average balance processing enabled for your ledger, you need to enter separate historical rates for standard and average balances for specific balance sheet accounts.
Note: If you change a historical rate after you've already run translation, you must retranslate your account balances for the period whose rate has changed.

COGS Cost of Goods Sold

COGS is the costs that go into creating the products that a company sells; therefore, the only costs included in the measure are those that are directly tied to the production of the products.
 
For example, the COGS for an automaker would include the material costs for the parts that go into making the car along with the labor costs used to put the car together. The cost of sending the cars to dealerships and the cost of the labor used to sell the car would be excluded. The exact costs included in the COGS calculation will differ from one type of business to another.

The cost of goods attributed to a company's products are expensed as the company sells these goods. There are several ways to calculate COGS but one of the more basic ways is to start with the beginning inventory for the period and add the total amount of purchases made during the period then deducting the ending inventory. This calculation gives the total amount of inventory or, more specifically, the cost of this inventory, sold by the company during the period. Therefore, if a company starts with $10 million in inventory, makes $2 million in purchases and ends the period with $9 million in inventory, the company's cost of goods for the period would be $3 million ($10 million + $2 million - $9 million).

Read more: http://www.investopedia.com/terms/c/cogs.asp#ixzz1csJpJnl7

GL Batch & Line details

SELECT l.period_name, c.concatenated_segments, h.je_source, b.NAME as BATCH_NAME, fu.user_name as CREATED_BY, b.creation_date as CREATION_DATE, h.NAME as JOURNAL_NAME, --l.je_header_id, l.je_line_num, sum(NVL (l.accounted_dr, 0) - NVL (l.accounted_cr, 0)) "Net Amount", l.accounted_dr, l.accounted_cr, l.status, l.reference_1, l.reference_2, l.reference_3, l.reference_4, l.reference_5 FROM apps.gl_je_lines l,apps.gl_je_headers h, apps.gl_je_batches b,apps.gl_code_combinations_kfv c , apps. FND_USER fu WHERE fu.user_id=b.CREATED_BY AND b.je_batch_id = h.je_batch_id AND h.je_header_id = l.je_header_id AND l.set_of_books_id = 62 --And b.name = --AND h.je_source = 'Inventory' AND l.code_combination_id = c.code_combination_id -- and c.concatenated_segments = '0750-000-0000-13203001-LAL-0000-000' and c.segment4='41104530' and l.period_name = 'Aug-FY12' group by c.concatenated_segments,h.je_source, l.accounted_dr, l.accounted_cr, l.status, l.reference_1, l.reference_2, l.reference_3, l.reference_4, l.reference_5, h.NAME, b.NAME, l.period_name, b.creation_date,fu.user_name