Oracle Applications Architecture(Sys Admin)

The Oracle Applications Architecture is a framework for multi-tiered, distributed computing that supports Oracle Applications products. In this model, various servers or services are distributed among three levels, or tiers.

A tier is a logical grouping of services, potentially spread across more than one physical machine. The three-tier architecture that comprises an Oracle E-Business Suite installation is made up of the database tier, which supports and manages the Oracle database; the application tier, which supports and manages the various Applications components, and is sometimes known as the middle tier; and the desktop tier, which provides the user interface via an add-on component to a standard web browser.


Centralizing the Oracle Applications software on the application tier eliminates the need to install and maintain application software on each desktop client PC, and also enables Oracle Applications to scale well with an increasing load. Extending this concept further, one of the key benefits of using the Shared Application Tier File System model (originally Shared APPL_TOP) is the need to maintain only a single copy of the relevant Applications code, instead of a copy for every application tier machine.

The Desktop Tier
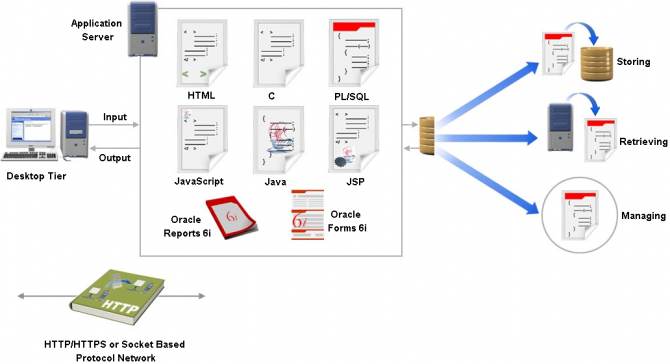
The client interface is provided through HTML for HTML-based applications, and via a Java applet in a Web browser for the traditional Forms-based applications.


In Oracle Applications Release 12, each user logs in to Oracle Applications through the E-Business Suite Home Page on a desktop client web browser. The E-Business Suite Home Page provides a single point of access to HTML-based applications, Forms-based applications, and Business Intelligence applications.
Once logged in via the E-Business Suite Home Page, you need not sign on again to access other parts of the system. Oracle Applications does not prompt again for user name and password, even when you navigate to other tools and products. Oracle Applications also retains preferences as you navigate through the system. For example, if you registered in the E-Business Suite Home Page that German is your preferred language, this preference carries over whether you access Forms-based or HTML-based applications.

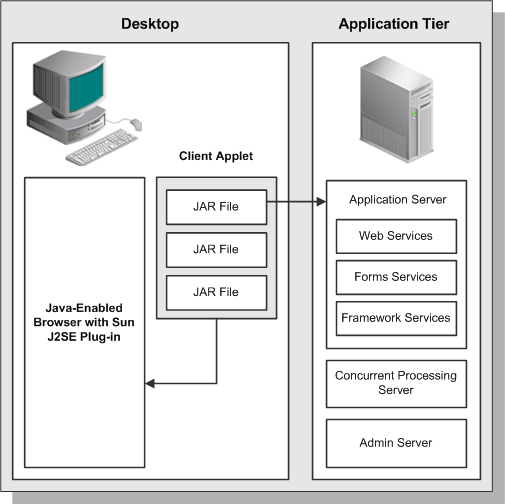
The Forms client applet is a general-purpose presentation applet that supports all Oracle Applications Forms-based products, including those with customizations and extensions. The Forms client applet is packaged as a collection of Java Archive (JAR)
files. The JAR files contain all Java classes required to run the presentation layer of Oracle Applications forms.


The Application Tier
The application tier has a dual role: hosting the various servers and service groups that process the business logic, and managing communication between the desktop tier and the database tier. This tier is sometimes referred to as the middle tier.
Four servers or service groups comprise the basic application tier for Oracle Applications:
  • Web services
  • Forms services
  • Concurrent Processing server
  • Admin server
Note: In Release 12, the Web and Forms services are provided by  Oracle Application Server (OracleAS) 10g. They are no longer servers in the sense of being a single process, as was the case in previous Applications releases.  It is advisable to avoid using a mixture of different platforms on your application tier. This makes maintenance easier, since only one set of patches needs to be downloaded.

The Database Tier

The database tier contains the Oracle database server, which stores all the data maintained by Oracle Applications. The database also stores the Oracle Applications online help information.
More specifically, the database tier contains the Oracle data server files and Oracle Applications database executables that physically store the tables, indexes, and other database objects for your system. The database server does not communicate directly with the desktop clients, but rather with the servers on the application tier, which mediate the communications between the database server and the clients.

OUM Setup and Administration


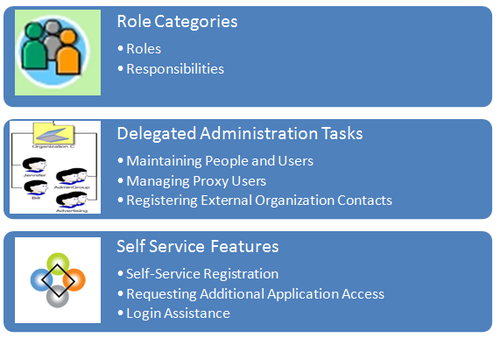
The implementor or system administrator sets up access control and security policies in Oracle Applications by defining roles, role inheritance hierarchies, role categories, and registration processes. These components specify the different levels of access to various application menus and data that are available to administrators.

Defining Role Categories

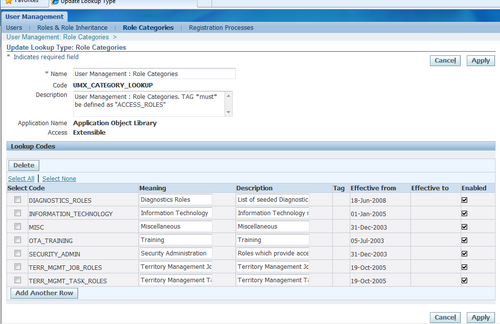
As part of the Oracle Applications RBAC model, Oracle User Management introduces Role Categories. Administrators can create role categories to bundle roles and responsibilities to make the process of searching for roles and responsibilities easier.

Steps
1. Log on as a user that is assigned the Security Administrator role (typically as sysadmin), select the User Management responsibility in the navigator and then click the Role Categories subtab.
2. Go to the editable table, click the Update button and then click the Create Lookup Code button.
3. Enter the required information in the Create Lookup Code fields and click the Apply button.

The newly created Role Category can be verified in Roles & Responsibilities of Roles & Role Heritance Tab.

Creating and Updating Roles

In Oracle Applications, a role represents a job function that confers the privileges required to perform that job. Roles can be defined to determine what applications (responsibilities) as well as what data and functions within those applications users can access.


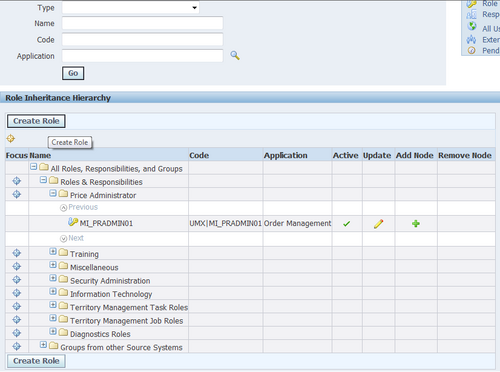
1. Log on as a user that is assigned the Security Administrator role (typically as sysadmin), select the User Management responsibility in the navigator and then click the Roles & Role Inheritance subtab.
2. Click the Create Role button.
3. Enter the required information to configure your role and optionally continue to configure it by accessing the following:

  • Permissions. Use this tab to assign permissions to your role.Delegated Administration Setup Using the Security Wizard Information in this section only applies to delegated administration roles in the context of the Oracle User Management application.
  • User Administration. Enables you to determine the set of users that can be managed by administrators to whom your role is assigned. The administrator can assign or revoke user accounts and roles for the users you specify here.
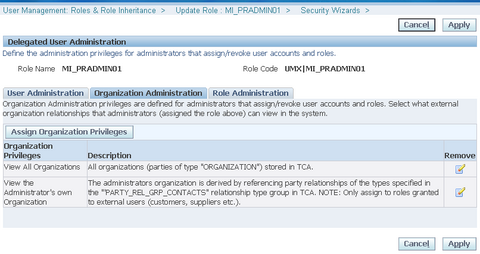
  • Organization Administration. Enables you to determine the external organizations that can be viewed in Oracle User Management by administrators to whom your role is assigned.
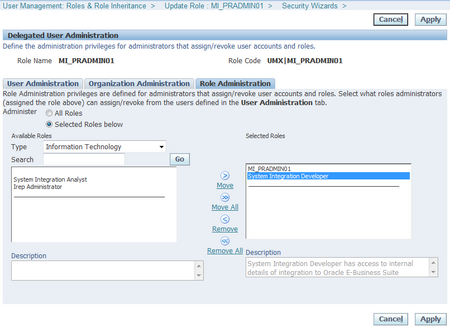
  • Role Administration. Enables you to determine which roles the administrator can assign to or revoke from the set of users specified in the User Administration section.

4. Click Save or Apply to save your changes.

Assigning Permissions to Roles
You can assign permissions to a role by creating a grant that specifies the navigation menu, permission sets, and/or the data security policies that are available at runtime to the role's assignees. Menus and permission sets in turn include individual functions and permissions.
1. Log on as a user that is assigned the Security Administrator role (typically as sysadmin), select the User Management responsibility in the navigator and then click the Roles & Role Inheritance subtab.

2. In the Role Inheritance Hierarchy, access the role to which you want to assign a permission and click the Update icon.

3. Click the Permissions subtab and the click Create Grant button.

4. Define the grant by entering the required information and clicking Next:
4.1. Enter the required information to identify the grant, such as Name and Effective From date.
4.2. Security Context. These optional parameters restrict the availability of the permissions being assigned. If you do not define the security context, then permissions are available to users in all contexts. Security contexts are also referred to as Activation Contexts.
4.2.1. Operating Unit. In many cases, an organization consists of several different operating units. You can limit your grant to only be active in the context of an individual operating unit.
4.2.2. Responsibility. Responsibilities determine the applications that can be accessed by users. You can optionally limit your grant to be available only in the context of an individual responsibility, or with all responsibilities.
4.2.3. Data Security. You must select a business object when you create Data Security policies. For more information, see the Oracle Application Object Library Security chapter.

5. If you have defined a specific object in the preceding step, then choose the object data context for the object, also referred to as the data scope. Specifying the object data context provides an additional level of access granularity for the object. Choose one of the following from the Data Context menu:

  • All Rows. This option provides access to all rows for the database object. For example, if the database object is a book, creating a data security policy for all rows of the object will provide access to all books catalogued in the database.
  • Instance. This option provides access to an instance of the object. A specific instance generally corresponds to a single row in the database, and is typically identified by the primary key value for the object. For example, a data security policy for the book object could contain a unique ISBN number, to return only one book from the database.
  • Instance Set. This option provides access to a related set of instances of the object.This set is specified as a predicate on the attributes of the object. The predicate is expressed as a SQL WHERE clause, and can optionally be implemented as a VPD policy. For example, a data security policy could include an instance set for all books published in the year 2005.

Creating USER and User Name Policy


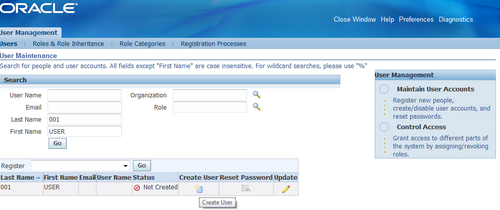
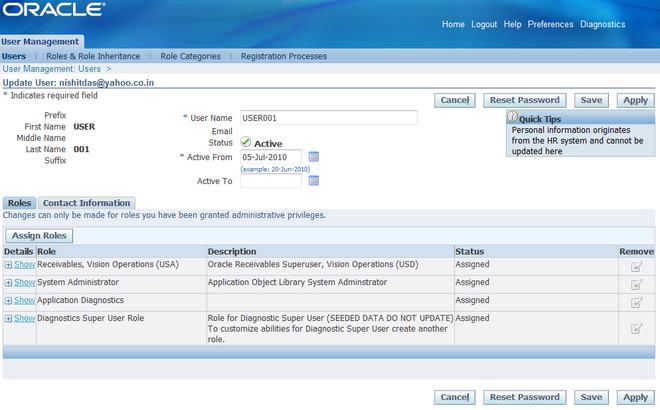
An user id should be created for each employee who needs access to the system. After an employee is created in HRMS, SYSADMIN logins to User Management and search for that employee by first and last name.

The sysadmin needs to enter the mail id and password (not mandatory, if not entered manually system generates a password). A mail is sent to the user with the log in credentials. Next the sysadmin can add the roles/responsibilities to the user as per the business requirements.

Configuring the User Name Policy

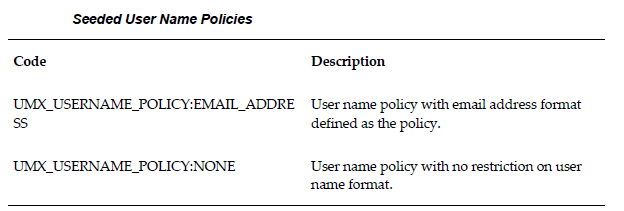
The Oracle User Management registration infrastructure supports a configurable user name policy. This policy is used to generate a suggested user name in the sample user creation flows shipped with the application, as well as for validating the chosen user name format.
Note: Oracle User Management is supplied with a default policy that identifies users by their email address.

Seeded User Name Policies
The following table lists the seeded user name policies that are shipped with Oracle Applications.
 

Administrators can configure either of these seeded policies. In addition to these, custom policies can also be implemented if desired.

Configuration of user name policy is a three-stage process.
Stage 1 - Suggested User Name Generation Subscription Setup
1. Log on as a user that is assigned the Workflow Administrator Web Applications responsibility (typically sysadmin).
2. Go to Workflow Administrator Web Applications > Business Events
3. From the Business Events page, search for the Business Event with the name racle.apps.fnd.umx.username.generate.
4. Click on the Subscription icon to go to the Subscriptions page.
5. For the subscription corresponding to the policy, change the status to "Enabled".

Stage 2 - Validation Event Subscription Setup
1. Log on as a user that is assigned the Workflow Administrator Web Applications responsibility (typically sysadmin).
2. Go to Workflow Administrator Web Applications > Business Events
3. From the Business Events page, search for the Business Event with the name
oracle.apps.fnd.user.name.validate.
4. Click on the Subscription icon to go to the Subscriptions page.
5. For the subscription corresponding to the policy, change the status to "Enabled".

Stage 3 - Profile Option Setup
1. Log on as a user that is assigned the Functional Administrator responsibility (typically sysadmin).
2. Go to Functional Administrator > Core Services > Profiles
3. Search with the Profile Name of UMX: User Name Policy in the Maintain Profile Options page.
4. Click on the Update icon to go to the Update Profile Option page.
5. Choose a value corresponding to the policy and click on the Apply button.

Additional Requirements
In all the three of the stages above, the values set must correspond to the same user name policy.
The Listener and JVMs must be restarted after the user name policy is changed.

Delegated Administration Privileges for Roles


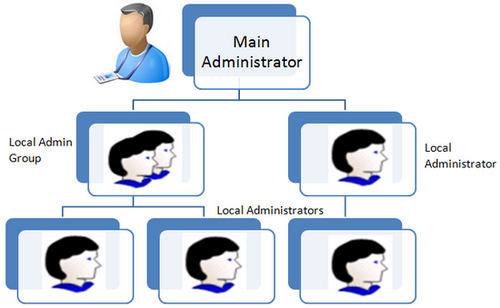
Delegated Administration Privileges determine the users, roles and organization information that delegated administrators (local administrators) can manage. Each privilege is granted separately, yet the three work in conjunction to provide the complete set of abilities for the delegated administrator.  

A local administrator must be granted User Administration Privileges to determine the users and people the local administrator can manage. Local administrators can be granted different privileges for different subsets of users. For example, a local administrator can be granted privileges only to query one set of users, and granted full privileges (including update and reset password) for another set. Local administrators cannot query users for which they do not have administration privileges.

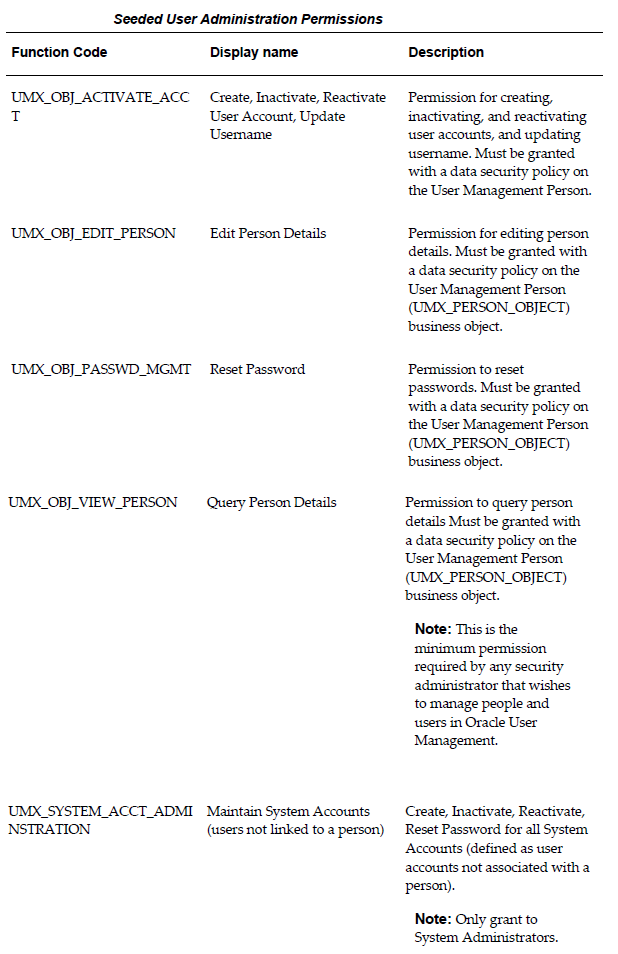
Oracle User Management ships with the following seeded permissions for defining user administration privileges for roles:

Steps
  1. Log on as a user that is assigned the Security Administrator role (typically as sysadmin), select the User Management responsibility in the navigator and then click the Roles & Role Inheritance subtab.
  2. In the role hierarchy, access the role to which you want to assign user administration privileges and click the Update icon.
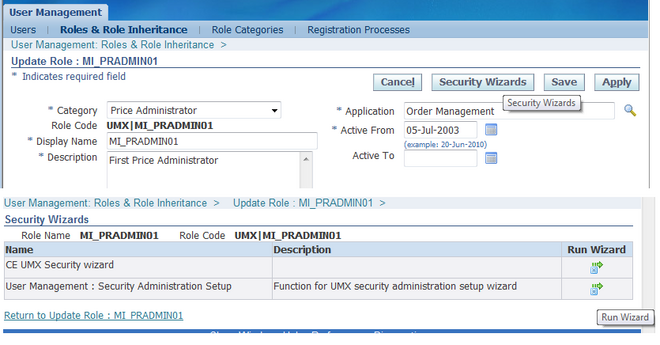
  3. Click on the Security Wizards button.
  4. Click on the Run Wizard icon for "User Management: Security Administration Setup".
  5. Click the User Administration subtab and then click the Add More Rows button.
  6. In the Users field, select the set of users that can be managed by Administrators to whom the role is assigned. The drop down list contains various data security policies that pertain to the User Management Person Object (UMX_PERSON_OBJECT). Oracle User Management ships with sample data security policies for users. Organizations can use these policies or create their own.
  7. In the Permissions field, select the permissions that you wish to associate with the delegated administration role. Permissions determine the actions an administrator can perform when managing the set of users defined in the previous step. The Permissions drop down list includes permission sets that contain permissions associated with the User Management Person object. Different combinations of the existing permissions can be grouped into new permission sets, enabling organizations to add permission sets based on their business needs and the level of granularity they prefer for administering users.
  8.  Click Save or Apply to save your changes.
Navigate back to the user tab to assign the new role to any existing user.
 
Defining Role Administration Privileges for Roles
Role Administration Privileges define the roles that local administrators can directly assign to and revoke from the set of users they manage.
 
Steps

1. Log on as a user that is assigned the Security Administrator role (typically as sysadmin), select the User Management responsibility in the navigator and then click the Roles & Role Inheritance subtab.
2. In the navigation menu access the role for which you want to define role administration and click the Update icon.
3. Click on the Security Wizards button.
4. Click on the "Run Wizard" icon for "User Management: Security Administration Setup".
5. Click the Role Administration link and use the Available Roles fields to search for the role(s) that you want to associate with this role and which administrators can manage once they are assigned this role.
6. Select the desired role(s), move them to the Selected Roles column and click Save or Apply.
 
Defining Organization Administration Privileges for Organizations

Organization Administration Privileges define the external organizations a local administrator can view in Oracle User Management. This privilege enables an administrator to search for people based on their organization, assuming the local administrator has also been granted access to view the people in that organization (User Administration Privileges). Depending on what administration account registration process has been granted, the administrator may have the ability to register new people for that organization.

Defining Data Security Policies


With Oracle Applications, organizations can use Data Security to manage permission assignments that control access to objects. Data Security policies can only be defined for applications that have been written to utilize the Data Security Framework. Access to the specific object must be formed with a specified Data Security Policy (also referred to as the Data Scope or Access Policy). The Data Security Policy restricts operations so that they only can be performed on a subset of instances of the corresponding database object.

Steps
1. Log on as a user with the Functional Developer responsibility, click the Functional Developer responsibility in the navigator, navigate to the Security tab and then click the Objects subtab.

2. Search for and access the object for which you want to create data security policies.
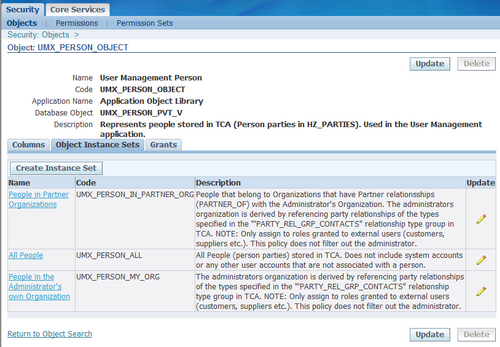
For example, to locate the User Management Person business object (UMX_PERSON_OBJECT), enter "UMX%" in the Code field, click the Go button, and then click User Management Person object (UMX_PERSON_OBJECT) in the
search results list. For any object for which you are creating a policy, ensure that the SQL statement returns the primary key value for that object. In this example, this is a list of person party IDs.

3. Click the Object Instance Sets subtab. Click the Create Instance Set button to create a new object instance set or click the Update icon to modify an existing one.

4. Enter the required information and then click the Apply button.

Defining Role Inheritance Hierarchies
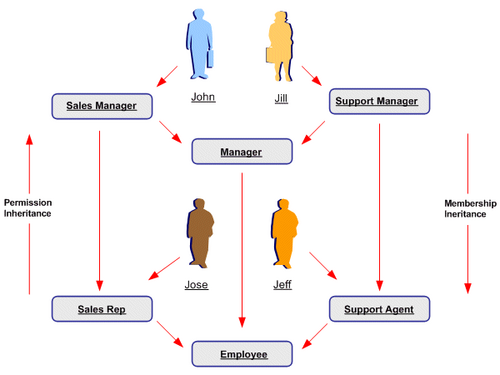

With role inheritance hierarchies, a role can contain sub roles. When a user is assigned a role, the user inherits the privileges defined for that role and for all of its sub roles. For example, the Sales Manager role can contain the Manager and Sales Rep roles, both of which in turn contain the Employee role. Any individual who is granted the Sales Manager role automatically inherits the Manager, Sales Rep and Employee roles.

With Role Inheritance Hierarchies, roles inherit the permissions assigned to their sub roles.

Steps
1. Log on as a user that is assigned the Security Administrator role (typically as sysadmin), select the User  Management responsibility in the navigator and then click the Roles & Role Inheritance subtab.

2. Locate the role for which you want to create a role inheritance hierarchy by using the Search fields or by expanding the appropriate nodes in the Role Inheritance Hierarchy menu. If you are building a role inheritance hierarchy that contains several roles, start with highest level role to which you want to add inherited subordinate roles.

3. Click the Add Node icon next to this role.

4. In the resulting menu, search for the role either by using the Search fields or by locating it in the Role Inheritance Hierarchy menu.

5. Select the role and then click the Select button or the Quick Select icon.

6. Repeat this process until you have added all of the required subordinate roles to their corresponding super roles. You can optionally verify the results by expanding the nodes for all super roles within your role inheritance hierarchy. You can also remove any subordinate roles by clicking the Remove Node icon.

Deployment Options
Organizations can use different deployment options for role inheritance hierarchies depending on their requirements.

Assigning Existing Responsibilities to Roles
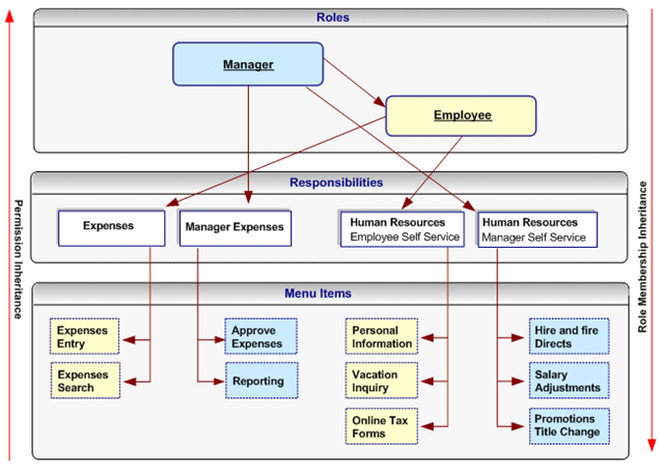
Using Role Inheritance Organizations that have already defined their responsibilities can utilize RBAC by creating roles and assigning their existing responsibilities to those roles. For example, an organization could create an Employee role and a Manager role, and add to these the Expenses and Human Resources responsibilities that it wishes to make available to employees and managers respectively. Then, instead of manually assigning or revoking each of these responsibilities to or from its employees, the organization can simply assign or revoke the Employee and Manager roles as required. Since the Manager role inherits the employee role, managers that are assigned the Manager role also inherit all the responsibilities and privileges associated with the Employee role.

In the following example, a Human Resource Manager inherits the Human Resources Manager Self Service responsibility through the Manager role as well as the Human Resources Employee Self Service responsibility, which the Manager role inherits from the Employee role.
 

Steps
1. Create roles representing the required job functions such as Manager and Employee.
2. Define a role inheritance hierarchy.
3. Ensure the responsibilities are inherited by their corresponding roles.
4. Assign the roles to users as required.

Fully Utilizing RBAC and Role Inheritance to Determine Access to an Application
In previous releases of Oracle Applications, access to individual functions within an application could only be defined through responsibilities, menu hierarchies, and menu exclusions. Responsibilities had the dual role of defining application navigation menus and granting permissions to the application. New responsibilities with one of the
following had to be defined for each set of users with different job functions that required access to a set of pages within an application:
• A completely new menu hierarchy for each responsibility, or
• A common menu covering the superset of all functions within the application, and menu exclusion rules defined for each responsibility.
The Human Resources application, for example, typically required a minimum of two responsibilities, one for employees and one for managers.

Separating Navigation Menus and Access Control
Oracle User Management provides new alternatives for defining access to an application with RBAC and Role Inheritance, allowing organizations to separate navigation menus from access control. Responsibilities can now be defined to represent an application itself and as a result, only one responsibility may be required for each
application. A menu can be tailored for each application with specific consideration to usability and end user navigation experience. Access to parts of the application (responsibility) and its corresponding menu hierarchy are instead controlled by different roles, each representing a specific job function or set of people.

Benefits
Using this mechanism for determining access control provides several benefits.
1.  Administration and changes can be accomplished with minimal effort:

  • A new page only has to be added to a single menu.
  • The permission to access a new page, only has to be granted once to the lowest level (subordinate role) in the role inheritance hierarchy.
  • An entirely new application (responsibility) can automatically be assigned to a set of people by simply defining it as the subordinate role of an existing role.
  • Permissions to access the various pages and functions within a new application should only be assigned at the lowest level in the role inheritance hierarchy.
  • The permissions are then automatically inherited by all superior roles in the hierarchy.
  •  Revoking access to a page, or an entire application, can be accomplished as
    easily as adding access.

2.  Improved end user experience. In the applications navigator, end users will see a list of applications to which they have access. Access to the various functions within each application is determined by the roles assigned to the end user.

Steps
1. Define a new responsibility that will be used to represent a specific application such as Expenses or Human Resources.

2. Design a complete menu that includes all the menu functions within an application as well as any required submenus, and attach this menu to the new responsibility. For example, both the Expenses and Human Resources responsibilities would include all employee and manager menus.

3. Following the "principle of least privilege", all the menu options within the application (each menu item corresponds to a function/permission) should be disabled by default. To accomplish this, remove the selection from the "grant" checkbox for each menu item.
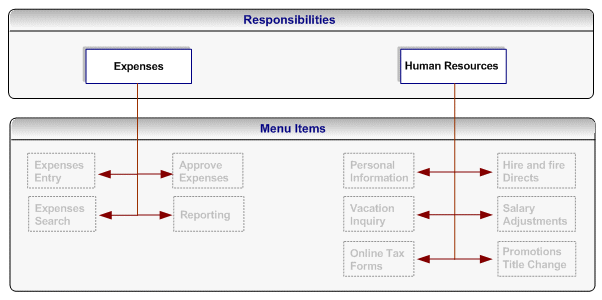
Note: A user cannot access any of the menu items (functions) within the application if you assign the responsibility to the user at this stage.

4. Create roles representing the people with various job functions that require access to the application, for example, a Manager role and an Employee role.

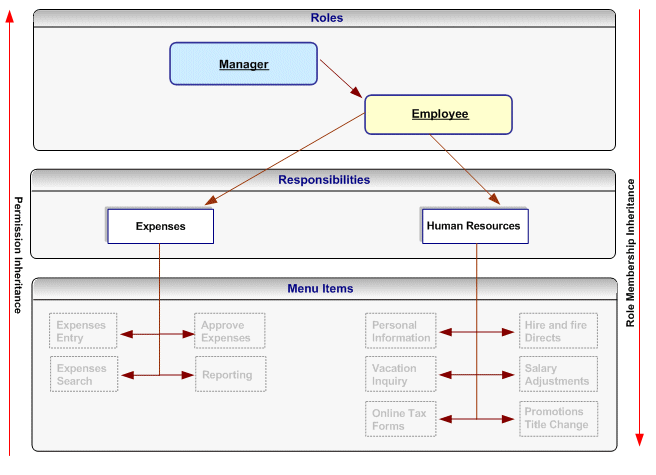
5. Define role inheritance relationships. For example, the Manager role should inherit the Employee role, and the Employee role should inherit the Expenses and Human Resources responsibilities.
The following figure illustrates a role inheritance relationship in which a role inherits the responsibilities that are inherited by its subordinate role:
6. Assign permissions to each role. Each permission maps to a menu item (function) within the application responsibility) that should be available to the users to whom the role is assigned. For example, an organization will grant the employee-related permissions from the Expenses and Human Resources responsibilities to the Employee role, and
will grant the manager-related permissions for these responsibilities to the Manager role. Consequently, the manager role will have access to all the menu items within these responsibilities, but the Employee role will only have access to the Employee-related functions.
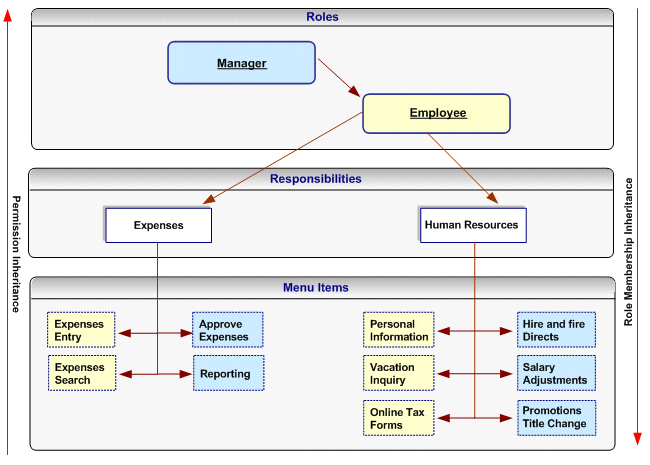

Permissions assigned to a subordinate role in the role inheritance hierarchy are automatically inherited by the superior roles. For example, if you grant the permission for accessing the Online Tax Forms page to the Employee role, anyone with the Manager role will automatically have access to this page through role inheritance. Because the Hire and Fire Directs page is only granted to the Manager role, it is not available to users that are only assigned the Employee role. Permissions are always assigned through permission sets, which represent named sets of functions (permissions). When determining what permissions (functions/menu items) should be granted to each role, you may have to create new
permission sets. Menus and permission sets are stored in the same tables  in the database; which means that they are interchangeable (both can be used) to assign permissions.

7. Optionally assign any additional permissions and data security policies to roles as required by each application.
 

Proxy Users


There are a number of business scenarios in which users of Oracle E-Business Suite need to grant delegates the ability to act on their behalf (act as proxy users for them) when performing specific E-Business Suite functions. Traditionally, delegators have done this by giving passwords for specific applications to other users. A delegate who
was given another user's passwords for certain applications could assume the identity and privileges of the delegator within those applications, and only those applications.

The integration of E-Business Suite with Oracle Application Server 10g Single Sign-On (SSO) makes this traditional strategy insecure. If a delegator grants a delegate access to his SSO password, the delegate will be able to access every SSO-enabled application to which the delegator has access, not just to specific applications. The new mechanism was designed to enable limited, auditable delegation of privilege from delegators to their delegates.

Important: Employing the Proxy User mechanism gives all-or-nothing delegation capability. However, start and end dates can be defined to limit the duration of proxy access.

Examples of Delegation
There are a number of common scenarios where a user may need to allow another user or users to interact with the E-Business Suite on their behalf:

  1. Executives allowing their assistants to access selected business applications on their behalf
  2. In a similar way to executives and their assistants, but for a more limited duration, managers may need to grant peers or subordinates limited authority to act on their behalf while they are out of the office
  3. Users may need to grant help-desk staff limited duration access to their E-Business Suite accounts, so that help desk staff can investigate problems and provide assistance
  4. The Proxy User mechanism allows such users to obtain limited, auditable access to accounts such as SYSADMIN that might otherwise have to be shared and therefore harder to audit
  5. Companies may be subject to audits that require granting a specific user (the auditor) access to employees' E-Business Suite accounts, normally on a read-only basis.
The ability for users to access the proxy feature is controlled by a Security Administrator role. Users with this role determine which set of users can create delegates who can act on their behalf.

Setting Up Proxy Users

1. Log in as System Administrator and navigate to User Management > Users.
2. Query the user (delegator) that you wish to have the ability to grant proxy privileges to other users: click on the Update icon of the results table to navigate to the User Details page.
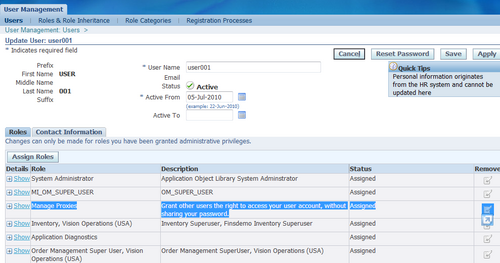
3. On the User Details page, click on the Assign Role button, and search for Manage Proxies role in the list of values.
Pick this role, supply the justification, and click the Apply button.
4. By assigning the Manage Proxies role to the delegator, you make the delegator eligible to grant proxy privileges to other users to act on the delegator's behalf.

Delegating Proxy User Privileges

1. As a user with the Manage Proxies role, log on to Oracle Applications and click on the global Preferences menu.
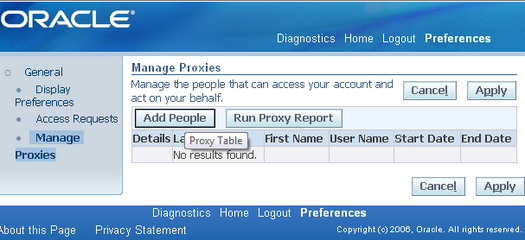
2. Under the Manage Proxies link, click on the Add People button.
3. Select a user from the list of values, updating the start and end dates if required.
4. Click on Apply to save the changes.
5. Once the changes are saved, a notification will be sent to the user who has been granted the proxy privileges.
Note: The permission that controls the list in the Add People LOV is UMX_OBJ_DESIGNATE_PROXY, and the object is
UMX_USER_OBJECT. The out-of-the-box instance set contains all the people. The list can be modified by creating a new instance set and a grant (and deleting the existing grant), to restrict the list of people.

Acting as a Proxy User
The proxy user mechanism is employed by users as follows:
1. If you are a user permitted to act on behalf of other users, you will see your name with the prefix Logged in as in the upper right-hand corner of the page. This reminds you who you are acting as.
2. To switch to another user (act as a delegate), choose the Switch User icon and link to access the Switch User page. These are only displayed for users who are permitted to use the Proxy User feature.
3. Click on the Switch User icon to switch to Proxy Mode, where you can act on behalf of the selected user.
4. The Switch User page shows an alphabetical list of people who have specified that you can act on their behalf, as a delegate.
5. After you have selected a delegator, the application will enter Proxy Mode. While in this mode, the icon and link will change from Switch User to Return to Self.
6. The user login information details reflect that you are now acting on behalf of the selected delegator.
7. While in Proxy Mode, you cannot switch directly to another proxy, but must first switch back to yourself.
8. To exit Proxy Mode, click on Return to Self.

Self Service Features


Implementors and administrators can verify the successful configuration of end user functions by performing the tasks described in this section.

Self-Service Registration
Oracle User Management enables users to register for access to applications without requiring assistance from administrators. To register for application access, users must provide information in the required fields and click the Submit button.
Oracle User Management ships with the following sample self-service registration processes:

  • Employee Self-Service Registration
  • Customer Self-Service Registration (external individuals)

Organizations can use these registration processes in their existing form, or can use them as references for developing their own registration processes.

Requesting Additional Application Access
Oracle User Management enables you to request additional access to the specific applications for which you are eligible. Application access is based on roles and to access an application you must be granted the appropriate role. Perform the following to view the roles you have been assigned and to request additional ones.

Steps
1. After logging into the system, click the Preferences link in the upper right corner, and click the Access Requests link in the sidebar menu. The Access Requests page displays the roles you have been assigned. Click the Request Access button to request one or more additional roles.

2. Most roles are organized according to role categories: roles that are not categorized appear under the Miscellaneous node. Select the role category that contains the role you want to request. If you do not see the required role, then either you are not eligible for the role or it has not been set up to for additional access requests.

3. Select the role or roles you require for additional access to the system, and click on the Add to List button. You can optionally remove roles from your list by clicking on the Remove Roles button.

4. When you have selected all your required roles, click on the Next button.

5. Enter a justification for your request and click on the Next button. You can remove any pending roles or check their status in the page that appears next.

Guidelines
Some roles may require you to provide additional information. In such cases, the system will prompt you for additional information before you can complete the process for requesting a role.
If the role being assigned would cause a separation of duties violation, the operation will flag this in the workflow attributes, and any approvers for the request will see the details.

Login Assistance
It is not uncommon for system administrators to have to reset a user's forgotten password, or even advise a user of the account's user (login) name. This is unproductive for both the user, who cannot do any work in the meantime, and for the administrator.
In addition, a user will occasionally request the password to be reset, when it is actually the user name that has been forgotten, or vice versa. This type of occurrence leads to even more time being lost.

A new feature reduces the time spent in such administrative activities by implementing a login help mechanism that is easily accessed from the E-Business Suite Login Page. A user simply clicks on the "Login Assistance" link located below the Login and Cancel buttons.
On the screen that appears, you can either:

  • Go to the Forgot Password section, enter the correct user name and then click on the "Forgot Password" button. You will then be emailed details of how to reset your password.
  • Go to the Forgot User Name section, enter the email address associated with the account, and click on the Forgot User Name button. The user name will then be emailed to the address specified.

For security, the relevant data is stored securely in workflow tables, and the URLs employed have both an expiration time and a single-use limitation.

The identify verification process required in previous Applications releases is no longer needed. Instead, a link to a secure page is sent to the email address of the user name defined in the system. From this secure page, the user can change password immediately.

Oracle Application Object Library Security


As System Administrator, you define Oracle Applications users, and assign one or more responsibilities to each user.
Defining Application Users
You allow a new user to sign-on to Oracle Applications by defining an application user. An application user has a username and a password. You define an initial password, then the first time the application user signs on, they must enter a new (secret) password.
When you define an application user, you assign to the user one or more responsibilities.

Responsibilities Define a User's Context
A responsibility provides a context in which a user operates. This context can include profile option values, navigation menus, available concurrent programs, and so on.
For example, a responsibility can allow access to:

  • A restricted list of windows that a user can navigate to; for example, a responsibility may allow certain Oracle Planning users to enter forecast items, but not enter master demand schedule items.
  • A restricted list of functions a user can perform. For example, two responsibilities may have access to the same window, but one responsibility's window may have additional function buttons that the other responsibility's window does not have.
  • Reports in a specific application; as system administrator, you can assign groups of reports to one or more responsibilities, so the responsibility a user choose determines the reports that can be submitted.
Each user has at least one or more responsibilities, and multiple users can share the same responsibility. A system administrator can assign users any of the standard responsibilities provided with Oracle Applications, or create new custom responsibilities if required.

HRMS Security
The Human Resources Management Systems (HRMS) products have an additional feature using Security Groups.

Defining a Responsibility


When you define a responsibility, you assign to it some or all of the components described below.

1. Menu (Required)
A menu is a hierarchical arrangement of application functions (forms). In the definition of a responsibility, the specified menu defines what is displayed in the navigator. The specified menu does not necessarily define the functions that can be accessed by the responsibility, which are granted.

2. Data Group (Required)
A data group defines the mapping between Oracle Applications products and ORACLE database IDs. A data group determines which Oracle database accounts a responsibility's forms, concurrent programs, and reports connect to.
Oracle Application Framework functionality does not support data groups.
For almost all cases, you should accept the default value in defining a responsibility.

3. Function and Menu Exclusions (Optional)
A responsibility may optionally have function and menu exclusion rules associated with it to restrict the application functionality enabled for that responsibility

4. Responsibilities and Request Security Groups
Note: The Request Security Groups feature is for backward compatibility only.
When a request group is assigned to a responsibility, it becomes a request security group.

From a standard submission form, such as the Submit Requests form, the choice of concurrent programs and request sets to run are those in the user's responsibility's request security group.  If you do not include the Submit Requests form on the menu for a responsibility, then you do not need to assign a request security group to the responsibility.

Responsibilities and Function Security
Oracle Applications architecture may aggregate several related business functions into a single form. Parts of an application's functionality may be identified as individual Oracle Applications functions, which can then be secured (i.e. included or excluded from a responsibility).

User Session Limits

Using the following profile options you can specify limits on user sessions.

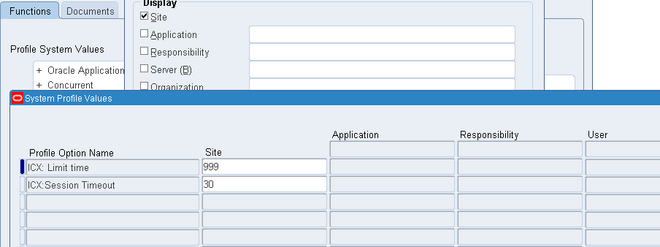
ICX:Session Timeout
Use this profile option to enforce an inactivity time-out. If a user performs no Oracle Applications operation for a time period longer than the time-out value (specified in minutes), the user's session is disabled. The user is provided an opportunity to re-authenticate and re-enable a timed-out session. If re-authentication is successful, the session is re-enabled and no work is lost. Otherwise, Oracle Applications exits without saving pending work.

If this profile option to 0 or NULL, then user sessions will never time out due to inactivity.

ICX: Limit time
Use this profile option to specify the absolute maximum length of time (in hours) of any user session, active or inactive.

Case Sensitivity in Oracle Applications User Passwords


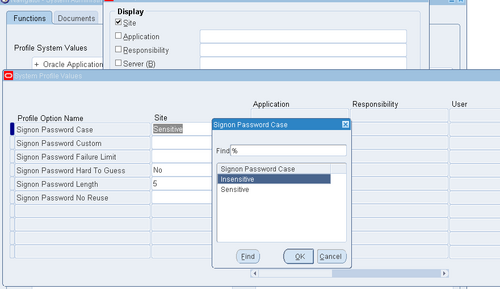
Case Sensitivity in Oracle Applications User Passwords In previous releases of Oracle Applications, user passwords were treated as case insensitive. Now, Oracle Applications user passwords can optionally be treated as case sensitive, depending on the mode you choose.

Case-sensitivity in passwords is controlled by the site-level profile option Signon Password Case. This profile has two possible settings:

Sensitive
- Passwords are stored and compared as they are, with the password case preserved. During comparison, if the entered password does not match the decrypted version, then an error message is displayed. With Release 12, this option is the default behavior. All newly created or changed passwords are treated as case sensitive.
Note: Users who have not changed their passwords since the installation of release 12 are not affected until they do change their passwords.

A password expiration utility is available if the System Administrator requires that all users convert to case sensitive passwords upon the next login. This utility expires all passwords in FND_USER, including that of SYSADMIN and default Vision accounts, and can be run as a SQL Script ($FND_TOP/sql/AFCPEXPIRE.sql) or as a Concurrent Program (FNDCPEXPIRE_SQLPLUS). 

Insensitive (or unset) - Passwords are treated as case insensitive. In Insensitive mode, passwords are stored and compared in uppercase, similar to that in earlier releases. The entered password and the decrypted password are converted to uppercase prior to comparison.
If you want to preserve case insensitivity in passwords, i.e. retain the behavior from previous releases, ensure that Signon Password Case value is either set to 'Insensitive', or not set at all.

There are no upgrade or data migration issues with this new feature. The profile option affects only how new passwords are stored. Existing passwords are tested using the policy in effect when they were created.

User and Data Auditing

There are two types of auditing in Oracle Applications: auditing users, and auditing database row changes.

Auditing User Activity
Auditing users is supported by:
• Sign-On:Audit Level profile option setting
• Audit Reports
Based on the audit level you choose, Sign-On audit records usernames, dates, and times of users accessing the system, as well as what responsibilities, forms, and terminals users are using.

Auditing Database Row Changes
Auditing database row changes is supported by:
• From the Help menu, About This Record
• AuditTrail:Activate profile option setting
• Audit forms

Object


Data Security uses the concept of an Object to define the data records that are secured.

Object
Data security permissions are managed on objects. Business entities such as Projects and Users are examples of objects. Only a securable business-level concept should be registered as an object. An object definition includes the business name of the object and identifies the main table and primary key columns used to access the object.

Object Instance
An object instance is a specific example of an object, such as Project Number 123 or User JDOE. An object instance generally corresponds to a row in the database. An instance is identified by a set of one or more primary key values as defined by the object. In addition, "All Rows" for an object indicates all data rows of the object.

Users and Groups
Users and groups are Oracle Workflow roles. See the Oracle Workflow documentation for more information on roles.
Privileges given to users and groups determine their access to secured objects.
The data security system allows you to assign privileges to groups of users instead of assigning privileges to each user individually.

Users
Users are individuals who have access to software applications at a particular enterprise. A user must have a unique name and should map one-to-one with an individual human or system. "Group" accounts are not correct uses of the user entity.

Groups
Users can belong to Groups. The grouping can come from position or organization relationships modeled in applications such as Oracle Human Resources. Alternatively, ad-hoc groups can be created explicitly for security purposes. A group is sometimes referred to as a role.

Creating Objects

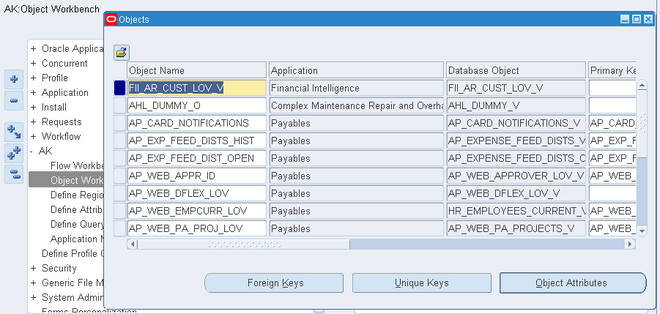
Use these pages to find, create, and edit data objects. You define objects to be secured in the Data Security system. Objects can be tables or views. An object must be queryable in SQL, and the combination of primary key columns specified must be a unique key.

In these pages, objects are described with the following

  • The Name is the name that appears in the Object Instance Set and Grants pages. This name should be user-friendly.
  • The Code is the internal name of the object.
  • The Application Name is the owning application.
  • The Database Object Name is the name of the underlying database object

System Administrator - Maintenance

A system administrator is involved in setting up an Oracle Applications installation, controlling access, and ensuring smooth ongoing operation. The tasks involved in these functions are described in the Oracle Applications System Administrator's Documentation Set, in these three volumes:

  • Security
  • Configuration
  • Maintenance
This Maintenance volume describes maintenance tasks for an Oracle Applications installation, as well as tasks you might perform on a frequent basis. Managing Concurrent Processing and Concurrent Programs.

Monitoring an Applications System Using Oracle Applications Manager
Oracle Applications Manager allows you to monitor many components of your applications system, such as database status, system activity, forms sessions and processes, and applications usage.

In addition, the OAM console can provide information on system alerts, metrics, and logs that can help you diagnose potential problems. For example, configuration issues,overdue routine maintenance tasks, and invalid data can cause serious problems requiring either an automated response or manual intervention.

Oracle Workflow Manager

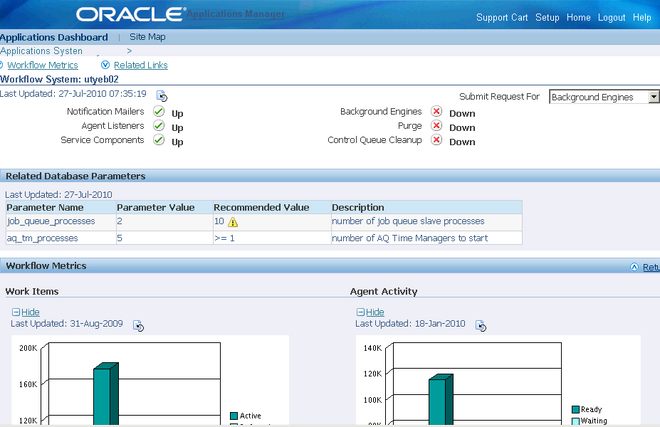
Oracle Workflow Manager is a component of Oracle Applications Manager that allows system administrators to manage Oracle Workflow for multiple Oracle Applications instances.

Using Oracle Workflow Manager, administrators can control Workflow system services, such as notification mailers, agent listeners, and other service components, background engines, purging obsolete Workflow data, and cleanup of the Workflow control queue.

Administrators can also monitor work item processing by viewing the distribution of all work items by status and drilling down to additional information. Additionally, they can monitor event message processing for local Business Event System agents by viewing the distribution of event messages by status as well as queue propagation
schedules. With this ability to monitor work items and event messages, a system administrator can identify possible bottlenecks easily.

Oracle Workflow Manager


Oracle Workflow Manager is a component of Oracle Applications Manager that allows system administrators to manage Oracle Workflow for multiple Oracle Applications instances from a single console.

Using Oracle Workflow Manager, administrators can control Workflow system services, such as notification mailers, agent listeners, and other service components, background engines, purging obsolete Workflow data, and cleanup of the Workflow control queue.

Administrators can also monitor work item processing by viewing the distribution of all work items by status and drilling down to additional information. Additionally, they can monitor event message processing for local Business Event System agents by viewing the distribution of event messages by status as well as queue propagation schedules. With this ability to monitor work items and event messages, a system administrator can identify possible bottlenecks easily.

Navigation: Applications Dashboard > (pull-down menu) Workflow Manager > (B) Go

Gathering Oracle Workflow Statistics
Some Oracle Workflow Manager graphs and lists may summarize large volumes of data, depending on the level of activity in your Oracle Applications instance. To enhance performance in displaying these statistics, Oracle Workflow Manager periodically runs concurrent programs to gather the statistics and displays the graphs
and lists based on the latest data from the concurrent programs.
1.  Workflow Agent Activity Statistics Concurrent Program (FNDWFAASTATCC) -
Gathers statistics for the Agent Activity graph in the Workflow System status page and for the agent activity list in the Agent Activity page.

2. Workflow Mailer Statistics Concurrent Program (FNDWFMLRSTATCC) -
Gathers statistics for the throughput graph in the Notification Mailer Throughput page.

3. Workflow Work Items Statistics Concurrent Program (FNDWFWITSTATCC) -
Gathers statistics for the Work Items graph in the Workflow System status page, for the Completed Work Items list in the Workflow Purge page, and for the work item lists in the Active Work Items, Deferred Work Items, Suspended Work Items, and Errored Work Items pages.

These concurrent programs are scheduled to run every 24 hours by default. They do not require any parameters. You can optionally cancel the default scheduled requests and run the programs with a different schedule if you want to gather statistics at a different frequency.
Each of these graphs and lists displays the date and time when its statistics were last updated, as well as a refresh icon that you can select to refresh the statistics immediately if necessary. However, note that if your Oracle Applications instance contains very large volumes of workflow data, you may encounter delays or page
timeouts when refreshing the data.

Note: Oracle Workflow Manager statistics that typically represent smaller volumes of data, such as work item details and work item activity details, are queried directly rather than through the concurrent programs.

Service Components


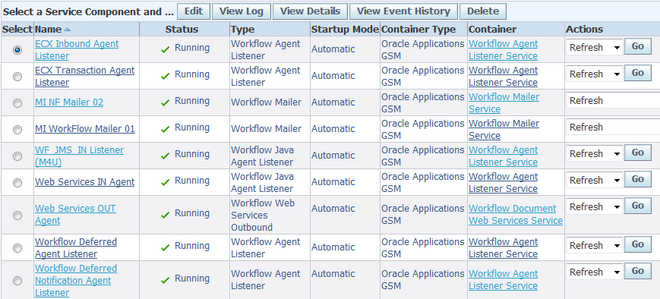
The Generic Service Component Framework helps to simplify and automate the management of background Java services. Service component containers and their service components are run through Generic Service Management (GSM), which you can control through Oracle Applications Manager (OAM).

A service component container is an instance of a service that manages the running of the individual service components that belong to it. The container monitors the status of its components and handles control events for itself and for its components. These actions are recorded in a log for the container.

A service component is an instance of a Java program which has been defined according to the Generic Service Component Framework standards so that it can be managed through this framework. Currently, Oracle Workflow provides four service component types: Workflow Mailer, Workflow Agent Listener, Workflow Java Agent Listener, and Workflow Web Services Outbound.

Oracle Workflow provides several seeded service components of these types, within seeded containers, to perform standard processing. You can optionally create additional service components to perform custom processing. If you create custom service components, you can either assign them to the seeded containers, or, based on the
volume to be handled by the seeded containers, you can also choose to create your own custom containers.

All service components have certain attributes required by the Generic Service Component Framework. General definition attributes for a component include the component name, startup mode, container type, inbound agent, outbound agent, and correlation ID. Detail attributes include the container that owns the component, the maximum idle time for an on-demand component, maximum error count, number of inbound and outbound processing threads, component log level, read timeout period, minimum sleep time, maximum sleep time, error sleep time, and whether to close connections when the read timeout period expires.

System Administrator - Configuration

A system administrator is involved in setting up an Oracle Applications installation, controlling access, and ensuring smooth ongoing operation. The tasks involved in these functions are described in the Oracle Applications System Administrator's Documentation Set, in these three volumes.

  1. Configuration
  2. Security
  3. Maintenance
This Oracle Applications System Administrator's Guide - Configuration volume describes the tasks involved in setting up and configuring Oracle Applications. These tasks may be done once upon installation, or may also be done as needed, such as setting up a printer or customizing online help files.

Oracle Applications Tablespace Model and the Tablespace Migration Utility
The new Oracle Applications Tablespace Model (OATM) has fewer, consolidated tablespaces (twelve, including three system tablespaces: temporary, system and undo segments). Locally managed tablespaces are also supported.
The Tablespace Migration Utility is a menu-based Perl program that enables you to estimate future space requirements for the tablespaces and to migrate the Applications  database to OATM.

Basic Configuration Tasks

Configuring the Login Page for Oracle Applications
Oracle Applications uses a configurable login page, which can be tailored to suit the needs of different organizations

Users log in to Oracle Applications using a client web browser. From the Oracle Applications Login page, users access the E-Business Suite Home Page, which provides a single point of access to HTML-based applications, forms-based applications, and Business Intelligence applications. Users access the Oracle Applications Login page from the following URL: http://<server:port>/OA_HTML/AppsLogin
For example, http://r121.oracleug.com:8000/OA_HTML/AppsLogin
From this URL, you will be redirected to the central login page, "AppsLocalLogin.jsp".

The following features are displayed in the default login page: Username field,  Password field, Login button, and the Language Picker (if more than one language is installed).
The following user interface features can be turned on or off through the Local Login Mask profile option:
 Hints for username/password
* Register URL - this link allows the user to perform self-service registration in User
Management
 * Forgot Password URL - allows the user to have a password reset
 Language Picker
 Corporate Policy message
* Oracle User Management must be installed for "Register URL" and "Forgot Password URL" to be enabled.

The ICX login page (http://server:port/OA_HTML/US/ICXINDEX.htm) redirects the user to the central login page, "AppsLocalLogin.jsp". If, in a previous release, you customized the ICX login page previously with a custom logo, you should make a copy of the new ICX login page and replace the existing image with your custom image in the copied file. The location for the company logo is $OA_MEDIA/FNDSSOCORP.gif.

Ensure that the image is appropriately size. Also, you should change the text of the message 'FND_ORACLE_LOGO' in Message Dictionary to the appropriate text. The following login URL is supported, but no new features are being added to it: http://server:port/OA_HTML/jtflogin.jsp

If the Oracle Applications instance is Single Sign-On enabled, the servlet directs the user to the Single Sign-On login page.

AdminAppServer Utility
Because Release 12 is deployed in a multi-tier configuration, the security model includes authentication of application servers to the database servers they access. When this layer of security is activated, the application server passes server IDs (similar to passwords) to the database server. If the database server recognizes the server ID, it grants access to the database. The server IDs are created using a Java script called AdminAppServer.

The application server security system is by default not activated; if it you must activate it after installation, if required. The application servers are not assigned server IDs and the database servers do not check for server IDs.

Tablespace Model and Migration Utility


The Oracle Applications Tablespace Model (OATM) uses twelve consolidated tablespaces^(including three system tablespaces: temporary, system and undo segments) and provides support for locally managed tablespaces. OATM was introduced in Release 11i.10. In prior 11i releases of the E-Business Suite, each product was allocated two tablespaces, one for data and one for indexes.

The Migration Utility is a menu-based PERL program and a series of sizing estimate reports that enables conversion of E-Business Suite applications schemas either in a single comprehensive migration or a phased, schema-by-schema migration. In general Oracle recommends performing a single comprehensive migration, however this requires a sufficient amount of down time and disk space. Oracle does not support partial migration of tablespaces. You must still migrate all schemas when performing a phased schema-by-schema migration.

With OATM, each database object is mapped to a tablespace based on its Input/Output characteristics, which include object size, life span, access methods and locking granularity. This model allows for easier maintenance, and reduced space usage for the E-Business Suite.

Migrating database objects to OATM provides the following benefits:

  1. Fewer and more consolidated tablespaces
  2. Locally Managed Tablespaces
  3. Accounts for the I/O characteristics of an object
  4. Reclaims space after migration
  5. Real Application Cluster (RAC) Support
The advantages of OATM's product tablespaces are best understood in terms of the tablespace model that preceded it. This model contained two tablespaces for each Oracle Applications product. One tablespace was allocated for tables and one for indexes. In this model, the standard naming convention for tablespaces contained the product's Oracle schema name with a suffix of either "D" for "Data" tablespaces or "X" for "Index" tablespaces. For example, the tablespaces APD and APX were the default tablespaces for Oracle Payables tables and indexes, respectively.

In contrast to the previous tablespace model, OATM contains nine default tablespaces for applications objects in addition to Undo, Temp and System database tablespaces. Indexes on transaction tables are held in a separate tablespace dedicated for transaction table indexes whereas all other indexes are held in the same tablespace as the parent/base table.
All Oracle Applications product schemas now have a default tablespace set to point to the TRANSACTION_TABLES tablespace type for data objects and the TRANSACTION_INDEXES tablespace type for index objects.

^A tablespace is a database storage unit that groups related logical structures together. The database data files are stored in tablespaces.

Sys Admin Setup Tasks


After you log on to Oracle System Administrator, complete the following steps to set up your Oracle Applications:

Create Accounts for Implementors to Complete Setting Up
Create individual Oracle Applications accounts for users who will be completing the implementation of your Oracle Applications. Assign these users the full access responsibilities for the products they will be implementing.

Create New Responsibilities (Optional)
A responsibility in Oracle Applications is a level of authority that determines how much of an application's functionality a user can use, what requests and concurrent programs the user can run, and which applications' data those requests and concurrent programs can access. Oracle Applications provides a set of predefined responsibilities that you can use. You can also define your own responsibilities if the ones provided do not meet your needs.

Set Up Oracle Applications Manager
Oracle Applications Manager (OAM) allows you to configure and maintain many components of the Oracle Applications system.

Define Your Concurrent Managers (Optional)
Concurrent Processing is a feature of Oracle Applications that lets you perform multiple tasks simultaneously. Oracle Applications Concurrent Processing lets you run long, data-dependent functions at the same time as your users perform online operations. Concurrent managers are components of concurrent processing that monitor and run your time-consuming tasks without tying up your computers.
Oracle Applications automatically installs one standard concurrent manager that can run every request. You may want to take advantage of the flexibility of concurrent managers to control throughput on your system.

You can define as many concurrent managers as you need. Keep in mind, however, that each concurrent manager consumes additional memory.
You can specialize each of your concurrent managers so that they run all requests, requests submitted by a particular user, requests submitted by a particular application, or other constraints, or any combination of these constraints.

If you are using Parallel Concurrent Processing in a cluster, massively parallel, or homogeneous networked environment, you should register your Nodes and then assign your concurrent managers to primary and secondary nodes. You can spread your concurrent managers, and therefore your concurrent processing, across all
available nodes to fully utilize hardware resources.

Use the Define Concurrent Manager form to define new concurrent managers

Define Request Sets (Optional)
A request set is a group of reports or programs which you submit with one request. To define and maintain request sets, use the Request Sets form.

Specify Preferences for Oracle Workflow Notifications (Required)
The SYSADMIN user is the default recipient for some types of notifications in Oracle Applications, such as error notifications. You need to specify how you want to receive these notifications by defining the notification preference and e-mail address for the SYSADMIN user.

By default, the SYSADMIN user has a notification preference to receive e-mail notifications. To enable Oracle Workflow to send e-mail to this user, navigate to the Users window and assign SYSADMIN an e-mail address that is fully qualified with a valid domain. However, if you want to access notifications only through the Oracle
Workflow Worklist Web page, then you should change the notification preference for SYSADMIN to "Do not send me mail" in the Preferences page. In this case you do not need to define an e-mail address.

Set Up AuditTrail (Optional)
If you want to keep track of the changes made to your data by application users, you should set up AuditTrail for the relevant tables.
Defining AuditTrail for your site involves defining Audit Groups, which are groups of tables and columns for which you intend to track changes. You then define Audit Installations to instruct AuditTrail which ORACLE IDs you want to audit. Finally, you run the Audit Trail Update Tables Report, which allows your AuditTrail definitions to take effect.

Set Up Your Printers
You must define any printer types used at your site that are not shipped with Oracle Applications, then register each printer with its name as determined by your operating system.
For every custom printer type or specialized print style you define, use the Printer Drivers form to assign a printer driver to use with each print style used by a printer type Specify Your Site-level and Application-level Profile Options
Use the System Profile Values form (Profile > System) to set site-level and other profile optons..

Optionally set your Site Name profile option to your site name. Many profile options are set by AutoConfig and their values can be reviewed in Oracle Applications Manager.

Define Internationalization Options (Optional)
Optionally define settings for internationalization features.
Modify Language Prompts (Optional) : If you want to modify the field name displayed in the Translations window, you should change the Description value for the language you want to modify in the Languages window.

Modify Territory LOV Values (Optional) : If you want to modify the territory value displayed in LOVs, you should change the Description value for the territory you want to modify in the Territories window.

Oracle Applications Manager


Oracle Applications Manager (OAM) allows administrators to manage Oracle E-Business Suite systems from an HTML console. Utilities available from OAM include Oracle Workflow Manager, Patch Wizard, and Concurrent Processing monitoring tools.

With Oracle Applications Manager, system administrators can view information on general system activity including the statuses of the database, concurrent managers and other services, concurrent requests, and Oracle Workflow processes. OAM provides a summary of configuration changes, infrastructure usage, performance, required
maintenance activities, potential security issues, status of business flows, and diagnostic test results. In addition, they can manage downtime and patching. System administrators can also start or stop services, and submit concurrent requests.

Using Oracle Workflow Manager, administrators can control Workflow system services, such background engines, the Notification Mailer, agent listeners, queue propagation, and purging obsolete Workflow data. OAM utilities are generally available from two main screens: the Applications Dashboard and Site Map

Oracle Applications Manager uses with Oracle Application Object Library's function security model. You can create custom responsibilities and menus to control access to specific OAM features. These features can thus be directly available from the E-Business Suite Home Page.